
【Swift】【初心者用】CollectionViewの横スクロール

はい、どうも!
フリーランスエンジニアの南だいすけです!
今日は昨日に引き続き、
CollectionViewについて話していきたいと思います。
今日はCollectionViewを使って、
横スクロールができる画面を作っていきたいと思います!
CollectionViewで横スクロール画面作成
今回は実装ではあるあるのこんな画面を対象に作っていきます。

見ての通り左右が空いているものですね。
これ、初見ではちょっと苦労します。。
はじめにネタバラシすると、
単純にヘッダーとフッターを置いてマージンを作っています!
では作っていきましょう!
まずはいつも通り、CollectionViewをおきます。
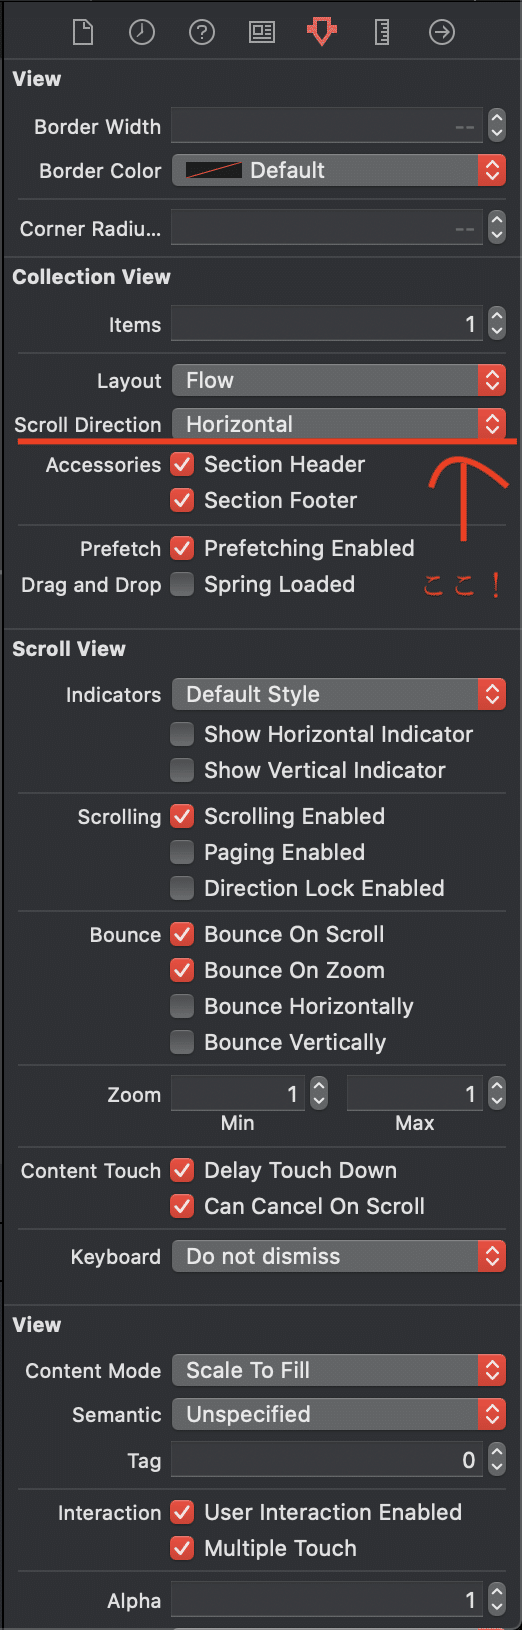
次に今回は横スクロールのため、Scroll DirectionをHorizontalにします。
またPaging Enabledは外します!!
次にCollection Reudable ViewをCellの両サイドにおきます。
これがヘッダーとフッターです。
・Section Header
・Section Footer
にチェックを入れ、各々Identifierをつけておきましょう。
一番はじめのCellの左のマージンと一番最後のCellの右側のマージンは、
ここのWidthで設定します!
また、viewForSupplementaryElementOfKindで設定するので、下記のようにし
// まずこちらはViewDidLoadなどに書いておく
       testLayout.headerReferenceSize = CGSize(width: 20, height: testCollectionView.frame.height)
       testLayout.footerReferenceSize = CGSize(width: 20, height: testCollectionView.frame.height)

// こっちはCollectionViewのextensionのところ
   func collectionView(_ collectionView: UICollectionView, viewForSupplementaryElementOfKind kind: String, at indexPath: IndexPath) -> UICollectionReusableView {
       if kind == "UICollectionElementKindSectionHeader" {
           let section = collectionView.dequeueReusableSupplementaryView(ofKind: UICollectionView.elementKindSectionHeader, withReuseIdentifier: "header", for: indexPath)
           return section
       } else {
           let section = collectionView.dequeueReusableSupplementaryView(ofKind: UICollectionView.elementKindSectionFooter, withReuseIdentifier: "footer", for: indexPath)
           return section
       }
   }
最後にスクロールバーを外したい場合は、
一緒に以下のチェックを外しまし。
・Show Horizontal Indicator
・ShowVertical Indicator
次に横スワイプ時にCellが真ん中になるようにカスタムClassを定義します。
// MARK: - PagingPerCellFlowLayout
/// 横スワイプ時にcellが真ん中に来るように
class PagingPerCellFlowLayout: UICollectionViewFlowLayout {

   var cellWidth: CGFloat = UIScreen.main.bounds.width - 60
   let windowWidth: CGFloat = UIScreen.main.bounds.width

   override func targetContentOffset(forProposedContentOffset proposedContentOffset: CGPoint, withScrollingVelocity velocity: CGPoint) -> CGPoint {
       if let collectionViewBounds = self.collectionView?.bounds {
           let halfWidthOfVC = collectionViewBounds.size.width * 0.5 // ここの数字を小さくするとより左寄りで止められます!
           let proposedContentOffsetCenterX = proposedContentOffset.x + halfWidthOfVC
           if let attributesForVisibleCells = self.layoutAttributesForElements(in: collectionViewBounds) {
               var candidateAttribute: UICollectionViewLayoutAttributes?
               for attributes in attributesForVisibleCells {
                   let candAttr: UICollectionViewLayoutAttributes? = candidateAttribute
                   if candAttr != nil {
                       let a = attributes.center.x - proposedContentOffsetCenterX
                       let b = candAttr!.center.x - proposedContentOffsetCenterX
                       if abs(a) < abs(b) {
                           candidateAttribute = attributes
                       }
                   } else {
                       candidateAttribute = attributes
                       continue
                   }
               }
               if candidateAttribute != nil {
                   return CGPoint(x: candidateAttribute!.center.x - halfWidthOfVC, y: proposedContentOffset.y)
               }
           }
       }
       return CGPoint.zero
   }
}
これで一通り出来たのでCollectionViewの設定をして終了です。
最後に全体のコードを乗せておきますで、参考にしてください!
class ViewController: UIViewController {

   var testTitle = ["あああ", "いいい", "ううう", "えええ", "おおお"]
   var testContent = ["かか", "きき", "くく", "けけ", "ここ"]

   @IBOutlet weak var testCollectionView: UICollectionView!

   override func viewDidLoad() {
       super.viewDidLoad()
       testCollectionView.delegate = self
       testCollectionView.dataSource = self
       testCollectionView.register(UINib(nibName: "TestCollectionViewCell", bundle: nil), forCellWithReuseIdentifier: "TestCollectionViewCell")
       setup()
   }

   private func setup() {
       let cellWidth = UIScreen.main.bounds.width - 60
       let testLayout = PagingPerCellFlowLayout()
       testLayout.headerReferenceSize = CGSize(width: 20, height: testCollectionView.frame.height)
       testLayout.footerReferenceSize = CGSize(width: 20, height: testCollectionView.frame.height)
       testLayout.scrollDirection = .horizontal
       testLayout.minimumLineSpacing = 16
       testLayout.itemSize = CGSize(width: cellWidth, height: testCollectionView.frame.height)
       testCollectionView.collectionViewLayout = testLayout
   }
}

extension ViewController: UICollectionViewDelegate, UICollectionViewDataSource {
   func collectionView(_ collectionView: UICollectionView, viewForSupplementaryElementOfKind kind: String, at indexPath: IndexPath) -> UICollectionReusableView {
       if kind == "UICollectionElementKindSectionHeader" {
           let section = collectionView.dequeueReusableSupplementaryView(ofKind: UICollectionView.elementKindSectionHeader, withReuseIdentifier: "header", for: indexPath)
           return section
       } else {
           let section = collectionView.dequeueReusableSupplementaryView(ofKind: UICollectionView.elementKindSectionFooter, withReuseIdentifier: "footer", for: indexPath)
           return section
       }
   }

   func collectionView(_ collectionView: UICollectionView, numberOfItemsInSection section: Int) -> Int {
           return testTitle.count
   }

   func collectionView(_ collectionView: UICollectionView, cellForItemAt indexPath: IndexPath) -> UICollectionViewCell {
           let cell = collectionView.dequeueReusableCell(withReuseIdentifier: "TestCollectionViewCell", for: indexPath)
           if let cell = cell as? TestCollectionViewCell {
               cell.testTitleLabel.text = testTitle[indexPath.row]
               cell.testContentLabel.text = testContent[indexPath.row]
           }
           return cell
}

/// カルーセルスワイプ時にcellが真ん中に来るように
class PagingPerCellFlowLayout: UICollectionViewFlowLayout {

   var cellWidth: CGFloat = UIScreen.main.bounds.width - 60
   let windowWidth: CGFloat = UIScreen.main.bounds.width

   override func targetContentOffset(forProposedContentOffset proposedContentOffset: CGPoint, withScrollingVelocity velocity: CGPoint) -> CGPoint {
       if let collectionViewBounds = self.collectionView?.bounds {
           let halfWidthOfVC = collectionViewBounds.size.width * 0.5
           let proposedContentOffsetCenterX = proposedContentOffset.x + halfWidthOfVC
           if let attributesForVisibleCells = self.layoutAttributesForElements(in: collectionViewBounds) {
               var candidateAttribute: UICollectionViewLayoutAttributes?
               for attributes in attributesForVisibleCells {
                   let candAttr: UICollectionViewLayoutAttributes? = candidateAttribute
                   if candAttr != nil {
                       let a = attributes.center.x - proposedContentOffsetCenterX
                       let b = candAttr!.center.x - proposedContentOffsetCenterX
                       if abs(a) < abs(b) {
                           candidateAttribute = attributes
                       }
                   } else {
                       candidateAttribute = attributes
                       continue
                   }
               }
               if candidateAttribute != nil {
                   return CGPoint(x: candidateAttribute!.center.x - halfWidthOfVC, y: proposedContentOffset.y)
               }
           }
       }
       return CGPoint.zero
   }
}
いかがでしたでしょうか?
ちょっと今回は初心者用としては難易度が高かったかもしれません。。
今回のテーマは調べてもあまり載っていないことが多かったので、記事にしてみました!
少しでも力になれたら幸いです!
さいごに
プログラミングって難しいですよね。。
僕も文系大学を出て、全くの未経験からスタートしたので
気持ちは痛いほどよくわかります。。!
少しずつ勉強していけば知識が蓄積され、
いつかはそれが線として繋がる日が絶対きます!!
一緒にがんばっていきましょう!
この記事で少しでも初心者の方が、
「お!そういうことか!」とか「ちょっとわかったぞ!!」
っとなっていただけたら幸いです。
最後まで見ていただきありがとうございました!
ではまた次の記事でお会いしましょう!
この記事が気に入ったらサポートをしてみませんか?