
microk8sでkubernetes環境を用意する

kubernetesに挫折した話
こんにちは。shoです。
私は半年から1年くらい前にDockerとkubernetesの学習をし始めました。
Dockerについては基礎基本を習得する事はそこまで難しいものでは
無かったかなと思います。試験環境も比較的容易に作ることが
出来ますしね。
私がDockerを学習した際に使用した教材は以下です。
かなりわかりやすく、初学者におススメ出来ます。
Dockerの面白さにハマり、そのままkubernetesについても基礎基本を
習得しようと、同じ講師の動画をみたのですがkubernetesの環境は
如何せん用意するのに骨がおれ、挫折してしまいました。
ちなみに講師はminikubeを使用していました。私のPCだとminikubeが上手く
動作してくれず、kindを使ってみたのですがこれも途中でうまく
いかないことが増え・・・そのままの状態でした。
このことを会社の社長に話してみたところ、
「ubuntuのmicrok8sを使ってみてはどうか」という話を伺い
実際に試してみたところ、これが結構良い感じにハマりました。
学習をようやく再開したので、そのログをnoteにも書いておこうと
思います。
今回はまずubuntu上にkubernetes環境を準備するところまでの
手順を記載致します。
土台となる環境
基本的にホストOSはなんでもいいと思いますし、
ハイパーバウザもなんでもいいと思います。
Windows10
VirtualBox
Ubuntu20.04 LTS
このnoteで出てくるkubernetesの技術
Master-Workerアークテクチャ
イメージとしては以下?
nodeとはサーバの事で良いと思われる。
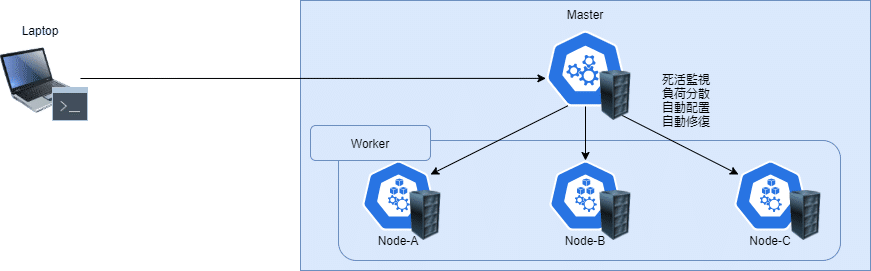
私が参考にしているUdemyの講義ではMasterもWorkerも
1つのサーバで行っている。つまり以下のようなイメージだと思います。

Pod
コンテナをグループ化した仮想ホストのようなもの。
Pod内のコンテナは仮想NICを共有している。とのこと。
普通のサーバだと以下のようイメージだけど

Podの場合は次のようなイメージ?
たぶんそこまで難しいことは言っていないはず。

kubernetes環境構築
まずUbuntu20.04 LTSのOSイメージを以下から引っ張ってきます。
ubuntu serverと記載されているところから引っ張ります。
上記で引っ張ってきたOSイメージを元に
仮想サーバを立てます。
仮想サーバにssh接続して、snap info microk8sを
実行して最新のstablを確認します。
2021/7/3現在だと1.21ですね。
ubuntu@master:~$ sudo su -
[sudo] password for ubuntu:
root@master:~# snap info microk8s
name:      microk8s
summary:   Lightweight Kubernetes for workstations and appliances
publisher: Canonical?
store-url: https://snapcraft.io/microk8s
contact:   https://github.com/ubuntu/microk8s
license:   Apache-2.0
description: |
 MicroK8s is the smallest, simplest, pure production Kubernetes for clusters, laptops, IoT and
 Edge, on Intel and ARM. One command installs a single-node K8s cluster with carefully
 selected add-ons on Linux, Windows and macOS.  MicroK8s requires no configuration, supports
 automatic updates and GPU acceleration. Use it for offline development, prototyping, testing,
 to build your CI/CD pipeline or your IoT apps.
snap-id: EaXqgt1lyCaxKaQCU349mlodBkDCXRcg
channels:
 1.21/stable:      v1.21.1         2021-06-16 (2262) 191MB classic
 1.21/candidate:   v1.21.1         2021-06-11 (2262) 191MB classic
 1.21/beta:        v1.21.1         2021-06-11 (2262) 191MB classic
 1.21/edge:        v1.21.2         2021-06-28 (2296) 191MB classic
 latest/stable:    v1.21.1         2021-05-18 (2210) 192MB classic
 latest/candidate: v1.21.2         2021-06-17 (2281) 191MB classic
 latest/beta:      v1.21.2         2021-06-17 (2281) 191MB classic
 latest/edge:      v1.21.2         2021-07-01 (2310) 193MB classic
 dqlite/stable:    ?
 dqlite/candidate: ?
 dqlite/beta:      ?
 dqlite/edge:      v1.16.2         2019-11-07 (1038) 189MB classic
 1.22/stable:      ?
 1.22/candidate:   ?
 1.22/beta:        v1.22.0-beta.0  2021-06-28 (2300) 197MB classic
 1.22/edge:        v1.22.0-alpha.3 2021-06-18 (2284) 196MB classic
 1.20/stable:      v1.20.7         2021-06-16 (2264) 221MB classic
 1.20/candidate:   v1.20.7         2021-06-11 (2264) 221MB classic
 1.20/beta:        v1.20.7         2021-06-11 (2264) 221MB classic
 1.20/edge:        v1.20.8         2021-06-28 (2291) 221MB classic
 1.19/stable:      v1.19.11        2021-06-16 (2263) 216MB classic
 1.19/candidate:   v1.19.11        2021-06-11 (2263) 216MB classic
 1.19/beta:        v1.19.11        2021-06-11 (2263) 216MB classic
 1.19/edge:        v1.19.12        2021-06-28 (2292) 216MB classic
 1.18/stable:      v1.18.18        2021-04-23 (2140) 198MB classic
 1.18/candidate:   v1.18.19        2021-05-13 (2208) 198MB classic
 1.18/beta:        v1.18.19        2021-05-13 (2208) 198MB classic
 1.18/edge:        v1.18.20        2021-06-16 (2271) 198MB classic
 1.17/stable:      v1.17.17        2021-01-15 (1916) 177MB classic
 1.17/candidate:   v1.17.17        2021-01-14 (1916) 177MB classic
 1.17/beta:        v1.17.17        2021-01-14 (1916) 177MB classic
 1.17/edge:        v1.17.17        2021-01-13 (1916) 177MB classic
 1.16/stable:      v1.16.15        2020-09-12 (1671) 179MB classic
 1.16/candidate:   v1.16.15        2020-09-04 (1671) 179MB classic
 1.16/beta:        v1.16.15        2020-09-04 (1671) 179MB classic
 1.16/edge:        v1.16.15        2020-09-02 (1671) 179MB classic
 1.15/stable:      v1.15.11        2020-03-27 (1301) 171MB classic
 1.15/candidate:   v1.15.11        2020-03-27 (1301) 171MB classic
 1.15/beta:        v1.15.11        2020-03-27 (1301) 171MB classic
 1.15/edge:        v1.15.11        2020-03-26 (1301) 171MB classic
 1.14/stable:      v1.14.10        2020-01-06 (1120) 217MB classic
 1.14/candidate:   ↑
 1.14/beta:        ↑
 1.14/edge:        v1.14.10        2020-03-26 (1303) 217MB classic
 1.13/stable:      v1.13.6         2019-06-06  (581) 237MB classic
 1.13/candidate:   ↑
 1.13/beta:        ↑
 1.13/edge:        ↑
 1.12/stable:      v1.12.9         2019-06-06  (612) 259MB classic
 1.12/candidate:   ↑
 1.12/beta:        ↑
 1.12/edge:        ↑
 1.11/stable:      v1.11.10        2019-05-10  (557) 258MB classic
 1.11/candidate:   ↑
 1.11/beta:        ↑
 1.11/edge:        ↑
 1.10/stable:      v1.10.13        2019-04-22  (546) 222MB classic
 1.10/candidate:   ↑
 1.10/beta:        ↑
 1.10/edge:        ↑
microk8sをubuntuにインストールします
これで完了。感動するくらい簡単!
※仮想サーバのスペックは少しっ高めに作った方が良いです。
root@master:~# snap install microk8s --classic --channel=1.21/stable
microk8s (1.21/stable) v1.21.1 from Canonical? installed
PodをDeployしてみる
試験用としてhelloworld PodをDeployする。
コマンド内のimageはDockerでいうところのimageと同義だと思われる。
root@master:~# microk8s kubectl run --image gcr.io/google-samples/hello-app:1.0 --restart N
ever helloworld
pod/helloworld created
root@master:~# microk8s kubectl get pod
NAME         READY   STATUS    RESTARTS   AGE
helloworld   1/1     Running   0          19s
kubectl logsでlogを確認することが出来る。
root@master:~# microk8s kubectl logs helloworld
2021/07/02 11:29:09 Server listening on port 8080
kubectl describe podでpodのメタデータを確認することが出来る。
root@master:~# microk8s kubectl describe pod helloworld
Name:         helloworld
Namespace:    default
Priority:     0
Node:         master/192.168.179.13
Start Time:   Fri, 02 Jul 2021 11:28:56 +0000
Labels:       run=helloworld
Annotations:  cni.projectcalico.org/podIP: 10.1.219.68/32
             cni.projectcalico.org/podIPs: 10.1.219.68/32
Status:       Running
IP:           10.1.219.68
IPs:
 IP:  10.1.219.68
Containers:
 helloworld:
   Container ID:   containerd://072a4085fe10d0a41345a7489c1e24e807a29287553ec06df752059e0a2d9838
   Image:          gcr.io/google-samples/hello-app:1.0
   Image ID:       gcr.io/google-samples/hello-app@sha256:95214fdf834ae96b1969e38c9768f5180366fdf430e5e31b39f7defb584698fb
   Port:           <none>
   Host Port:      <none>
   State:          Running
     Started:      Fri, 02 Jul 2021 11:29:09 +0000
   Ready:          True
   Restart Count:  0
   Environment:    <none>
   Mounts:
     /var/run/secrets/kubernetes.io/serviceaccount from kube-api-access-7zj9v (ro)
Conditions:
 Type              Status
 Initialized       True
 Ready             True
 ContainersReady   True
 PodScheduled      True
Volumes:
 kube-api-access-7zj9v:
   Type:                    Projected (a volume that contains injected data from multiple sources)
   TokenExpirationSeconds:  3607
   ConfigMapName:           kube-root-ca.crt
   ConfigMapOptional:       <nil>
   DownwardAPI:             true
QoS Class:                   BestEffort
Node-Selectors:              <none>
Tolerations:                 node.kubernetes.io/not-ready:NoExecute op=Exists for 300s
                            node.kubernetes.io/unreachable:NoExecute op=Exists for 300s
Events:
 Type     Reason             Age                  From               Message
 ----     ------             ----                 ----               -------
 Normal   Scheduled          6m22s                default-scheduler  Successfully assigned default/helloworld to master
 Normal   Pulling            6m22s                kubelet            Pulling image "gcr.io/google-samples/hello-app:1.0"
 Normal   Pulled             6m10s                kubelet            Successfully pulled image "gcr.io/google-samples/hello-app:1.0" in 11.433232983s
 Normal   Created            6m10s                kubelet            Created container helloworld
 Normal   Started            6m10s                kubelet            Started container helloworld
 Warning  MissingClusterDNS  56s (x8 over 6m22s)  kubelet            pod: "helloworld_default(bd141d97-e4f7-463e-b62d-7cbaddfd76b1)". kubelet does not have ClusterDNS IP configured and cannot create Pod using "ClusterFirst" policy. Falling back to "Default" policy.
ここまでの構築イメージは以下かな?

このpodにshellで入ってみる。
この辺りもDockerと操作感は同じかな?
root@master:~# microk8s kubectl exec -it helloworld sh
kubectl exec [POD] [COMMAND] is DEPRECATED and will be removed in a future version. Use kubectl exec [POD] -- [COMMAND] instead.
/ # ls
bin        hello-app  media      proc       sbin       tmp
dev        home       mnt        root       srv        usr
etc        lib        opt        run        sys        var
/ # whoami
root
/ # pwd
/
/ # exit
このPodに別のPodからアクセスしてみる。
curl PodをDeployする
以下のコマンドでcurl podを作成しながらそこのshellに入っている
root@master:~# microk8s kubectl run --restart Never --image=curlimages/curl:7.68.0 -it --rm curl sh
If you don't see a command prompt, try pressing enter.
/ $
この時、get podを実行するとcurlのpodが作成されていることが
確認出来る。
root@master:~# microk8s kubectl get pod
NAME         READY   STATUS    RESTARTS   AGE
helloworld   1/1     Running   0          45m
curl         1/1     Running   0          24s
curlを実行してみるとデータを取得出来ていることから
上手くアクセス出来ているようです。
/ $ curl helloworld
curl: (6) Could not resolve host: helloworld
/ $ curl helloworld pod
curl: (6) Could not resolve host: helloworld
curl: (6) Could not resolve host: pod
/ $ curl 10.1.219.68:8080
Hello, world!
Version: 1.0.0
Hostname: helloworld
ここまでの環境をイメージに落としこむと以下になると思います。

この記事が参加している募集
この記事が気に入ったらサポートをしてみませんか?