アムステルダム国立美術館所蔵のバッグの作り方を見つけた話 (2)

今日は、前回のnoteでお知らせした通り、1823年発行のオランダの月刊婦人誌Penélopé からpurse(小さなバッグ)の作り方の部分の英訳を紹介します。
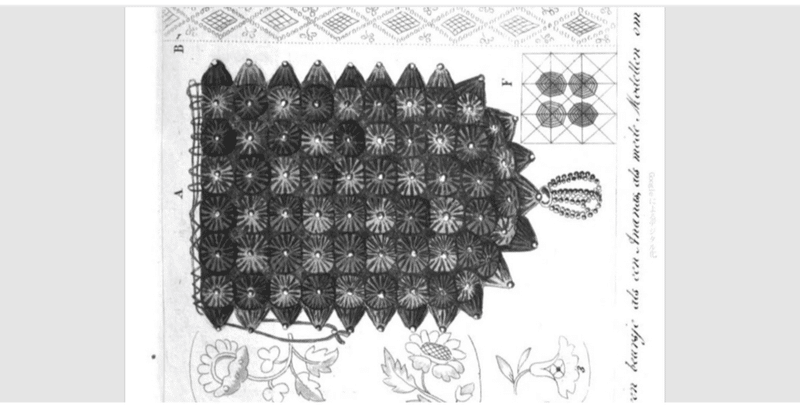
このpurseはアムステルダム国立美術館 (以下ライクス)所蔵、1825年頃制作というpurse と類似点がとても多く、発行年と制作年を考えあわせると、ライクスのpurseを作るにあたって参照された可能性が高いと考えられるもの。
「パイナップル型のバッグ」(なるほど!)という可愛い名前がついた、ちょっと不思議で面白い形のバッグです。
英文について
英訳してくださったのは、ライクスのコスチューム部門のキュレーターの方。経験したことのない技法は、ましてや昔の説明文は誰しも分かりにくいもの。「私には複雑過ぎてよくわからないところがあるので、意味が通じるといいのですが」とのこと。
私はといえば、当時対象となった読者と私との間に手芸の基礎教養に差がありすぎるためか(それは当然ある)、手芸の説明法がまだ洗練されていなかったためか(1840年代の刺繍書に男性の批評家が、作品はいいけど、文章がいまいちと評したとか)やはり、分からないと思うところが多いです。そこを詳しく!というところに限って説明が足りない。そんな私が更に和訳すると伝言ゲームのようになってしまいそう。ということで、まずは英文のままでシェアすることにしました。
英文はそのままですが、細かめに改行を入れ、まとまりごとに見出しをつけました。オランダ語の原文の改行には対応していません。
英文を読んでばかりいるより、手を動かしながら読んだほうが理解しやすいのかも知れません。
さて!
出典など
前回のnoteの繰り返しになりますがライクスのpurseはこちら。
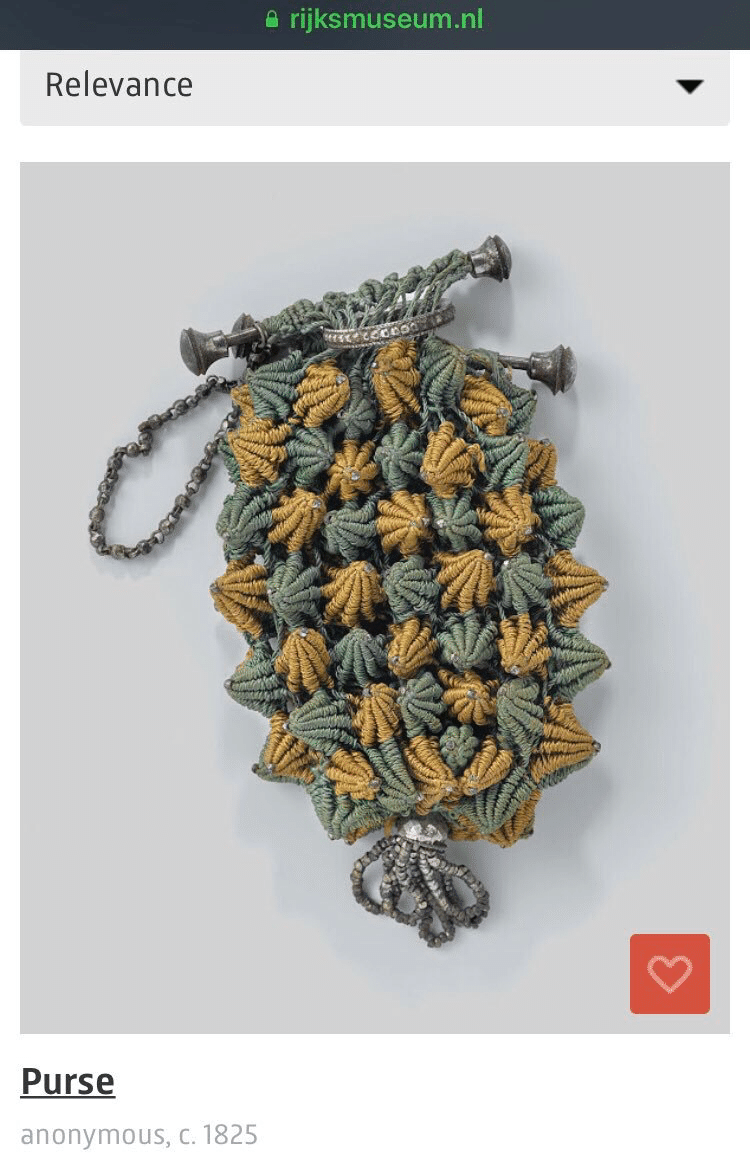
”Purse , anonymous, c. 1825 crocheting, l 9cm × w 5.4cm × h 2cm” (前回のnoteにこのあたりは書きましたが、crocheting ではないと思います)
https://www.rijksmuseum.nl/en/search/objects?q=purse&p=1&ps=12&st=Objects&ii=0#/BK-1974-29,0
purseの作り方が掲載されているPenélopéは こちらのリンクから。
"Penélopé, of maandwerk aan het vrouwelijk geslacht toegewijd" (1823)
Google Booksより
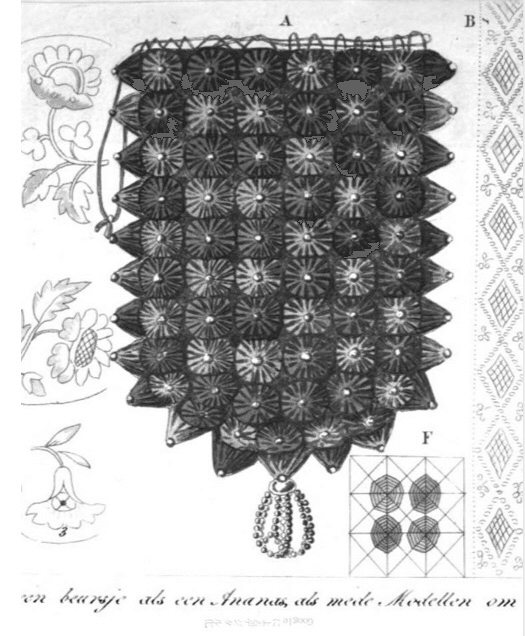
(下に転載した大きい図はp.7に、小さい図と今回の英訳の対象となった作り方説明はp8から)
A Purse in the Shape of a Pineapple**
1. 型、パターンの準備
(1) 木型→ボール紙の型紙を円筒形に→格子状に線を引いた白い紙のパターンを用意する
As this purse will have to be made on a cardboard cylinder, we will start with a description of how to make this, as we owe this to our readers who are still waiting for information on how to make cylinder-shaped or round boxes.
Just as with the square ones, one ought to have a shape or mould of smooth hard wood, which one should acquire from a wood turner and request for the mark in the center to remain.
(The height for the shape should be 1 palm (10 cm) 4 duim (4 cm), and the center line ought to be 7 duimen (7 cm.)
One should cut a piece of cardboard slightly larger than the shape, bend it around the cylinder, glue it together…. Tie a ribbon around it and leave to dry. (p. 7)
For making a purse, one takes a piece of white paper, similar height as the shape, but slightly wider allowing it to be glued together.
Draw 14 lines at equal distances from top to bottom (which works out as c. 1,5 duim (1,5 cm) apart); next draw 9 horizontal lines.
Now you have 126 intersections, being points where the lines cross or cut each other.
(2) 格子状に線をひいたパターンを円筒形のボール紙の型紙に糊付けし、線が交差したところに穴を開ける
Next glue this paper on the cardboard cylinder, the seam of the paper being on the opposite side from the one of the cardboard, glue around at the top and bottom, for safety and decoration, a coloured paper, and leave to dry, after which one punches each point with a sharp awl. The shape is ready now.
(p. 8) [Instructions for use with children, not translated]
2. 作り方
(1) 1段目 線にあわせて横方向に糸を留め付けていく
One can now start making the purse, for which one uses two differently coloured ‘knotting thread’: put a double silk thread around the top of the roll, over the first row of holes, attaching it as follows.
Holding the thread around the cylinder, use another thread and needle to prick through one of the holes from the inside out, prick back again through the same hole, but by covering the other thread, which is caught in between. This is repeated with the second and the next holes, until one has come full circle.
(2) 2段目からビーズを通した糸を横方向につけていく (最終段は1段目と同じくビーズはつけません)
Next, one threads 98 steel beads onto the darkest of the two coloured threads, attach it with one end to the top thread, bend this thread down in the left hand onto the first line and hold it over the first hole with your thumb, while one slings the thread with the right hand around the cylinder (parallel to the first attached thread), and pick this through the thread that is kept under the thumb, attaching it and continue until one reaches the bottom, where the thread is fixed just as at the top.
Before starting each round, make sure to thread 14 steel beads onto the thread, which are, when all threads are tightened, placed each in one hole: (p. 9) only on the thread of the top and the bottom there are no beads.
(3) 縦糸と斜め糸を渡す
Next, one crisscrosses again from top to bottom, always with the beads at the left hand side; one pricks in the bottom row to attach the thread, than moves one hole on and back up again. Finally one crosses again diagonally from the right- and left hand side, thus creating fig. A (p. 10) with each bead in the center of 8 threads.
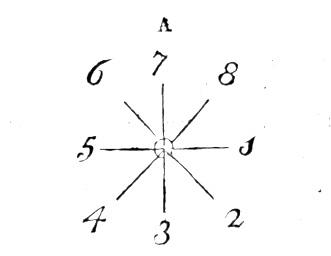
(4) 渡した糸に装飾糸をからめていく(ribbed spider's web stitch)
Next to start sewing, a thread of ½ an el (1,5 m) is threaded in a long, thin pointed needle, and with this under thread 1 (which is the thread with the beads) one pricks and pulls the thread almost completely through, and keeping the small end under the thumb of the left hand, one pricks from the inside out into thread 1; turning the cylinder slightly, and pricks under thread 2, and under thread 3 etc. (…) pulling all tightly, and while pulling (p.10)
the thread opposite a steel bead, hold it in such a manner, that while lifting thread 1, one points the thread towards 5 etc. The thread of the attachment is added for 3 to 4 rounds, and then cut.
3. 仕上げ
When the spinnetje [a stitch resembling a spider] has finished, prick from the circumference to the centre, between the sides, and cut the thread. This is slightly visible, but as the purse is made inside out, it doesn’t matter.
One has to take great care, while adjusting the tension, as well as while making the spinnetjes, to pull everything very tight, and particularly with the latter, allowing the steel bead to be covered, and lowered into the designated hole; whereby it becomes more visible on the outside. (…)
The top and bottom edge are festooned, after which one cuts the threads on the inside, takes the purse from the cylinder and turns it inside out…. (p.11)
おわり
チャレンジャー募集中!
親切なキュレーターの方との出会いのおかげで、思いがけず手にすることができた英訳ですが、作れるかどうかもわからない私が持っているだけでは宝の持ち腐れ。どなたか1人でも2人でも、興味を持った方が作ってみてくだされば、すごく嬉しい。そして、もしも完成できた方があれば、作り方のポイントなどシェアしてもらえたら、作ることができる人が増えるかもしれないし、楽しいことになる!と思っています。
一部だけでもできた!とか、もちろん完成したらぜひお知らせください。完成したpurseは、問い合わせに対応、英訳してくださった方にも見てもらいたいと思います。
ご意見などありましたら、他の方との情報共有の意味からも、このnoteのコメント欄のほか、下記にリンクしたSNSの関連投稿へのリプライ、コメントでお願いします。
また、今後、このpurseについてのツイッター(こちらを利用することの方が多いです)やInstagramのポストには #penelope1824purse のタグをつけます。作ってくださる方も、作成途中、完成したpurse、その他を投稿される時、よかったら使ってくださいね!
Twitter doily @nunomaniac
https://twitter.com/nunomaniac/status/1168354382334722048?s=21
Instagram @crochetbullion
https://www.instagram.com/p/B15I-bjFnvF/?igshid=x2pw4kfop9ja
では、どなたかが作り始められるのを楽しみにしています! (私は作り始められるの10月半ば以降になりますが、がんばる!)
この記事が気に入ったらサポートをしてみませんか?