
中級編4:ARDKでマルチプレイゲームをつくってみよう! #4

1. Introduction - はじめに
Hi! I’m Alexson Chu(@AlexsonChu)from the Designium.
This is the final in a series of six articles describing the Niantic Lightship ARDK and its production examples.
こんにちは!デザイニウムのAlexson Chu(@AlexsonChu)です。
この記事は、Niantic Lightship ARDKとその制作事例を解説する連載記事Niantic Lihtship ARDKをつかってみよう!(全六回)の最終回です。
【Niantic Lihtship ARDKをつかってみよう!】
第一回: 初級編1: ARDKってなに?
第二回: 初級編2: ARDKで簡単なアプリをつくってみよう!
第三回: 中級編1: ARDKでマルチプレイゲームをつくってみよう!#1
第四回: 中級編2: ARDKでマルチプレイゲームをつくってみよう!#2
第五回: 中級編3: ARDKでマルチプレイゲームをつくってみよう#3
第六回: 中級編4: ARDKでマルチプレイゲームをつくってみよう#4 ※本記事
Finally, we are at the final chapter of this series, let’s review what we have talked about:
中級編1 – we have learnt the basic concept and terms of multiplayer in the ARDK
中級編2 – we have learnt about Virtual Studio and tested the multiplayer app from ARDK example
中級編3 – we have created our basic AR game with game flow.
Note: If you are new to creating a multiplayer game, I would recommend you to read the first 3 articles
In this article, we will basically combine 中級2 + 3 to finish our game like below:
ついに、このシリーズ最後の記事になりました!これまでの内容を確認してみましょう。
中級編1 – ARDKでマルチプレイヤーの基本的な概念と用語を学びました
中級編2 – Virtual Studioについて学び、ARDK公式サンプルでマルチプレイヤーアプリを試しました
中級編3 – 基本的なARゲームを作成しました。
注:マルチプレイヤーゲームを初めて作成する場合は、初めに上記3つの記事を読むことをお勧めします
この記事では、基本的に中級2 + 3を組み合わせて、次のようなマルチプレイヤー機能が実装されたゲームを作成します
2. Explanation of networking - ネットワークに関する説明
Compare to the 中級編3
version, you can think of a multiplayer version is adding “network layer” and “linking page” with network and “communicate with others” at the same time.
中級編3と比べると、マルチプレイヤー版は「ネットワーク層」と「ページのリンク」をネットワークに追加し、「他者とのコミュニケーション」を同時に行っていると考えることができます。
Here are what we are required and missing from the single-player version:
· Connect to the game – Multiplayer connection using “Network Session Connection”
· Game State – Host send current game state to peers to “Start”, “Restart”, “End”, as well as non-host peer to receive this message
· Player status – Checking of peers network and scanning status
· Networked Bombing – Bomb player and send my updated score to all peers via “message broadcast”
· Peer’s position – Letting all peers know the player’s exact location.
· Score List – Receive score data from peers, and to define will I be the winner at game end.
シングルプレイヤーバージョンに必要なものと欠けているものは次のとおりです。
・Connect to the game – ネットワークを経由するマルチプレイヤー機能
・Game State – ホストは、現在のゲームの状態をピアに送信して「開始」、「再開」、「終了」、および非ホストピアにこのメッセージを受信する機能
・Player status – ピア同士のネットワークとスキャンステータスの確認機能
・Networked Bombing – 爆弾を使用するプレイヤーと「メッセージブロードキャスト」を介してすべてのピアに更新されたスコアを送信する機能
・Peer’s position – すべてのピアにプレイヤーの正確な位置を知らせる機能
・Score List – ピアからスコアデータを受け取り、ゲーム終了時に私が勝者になるかどうかを判断する機能
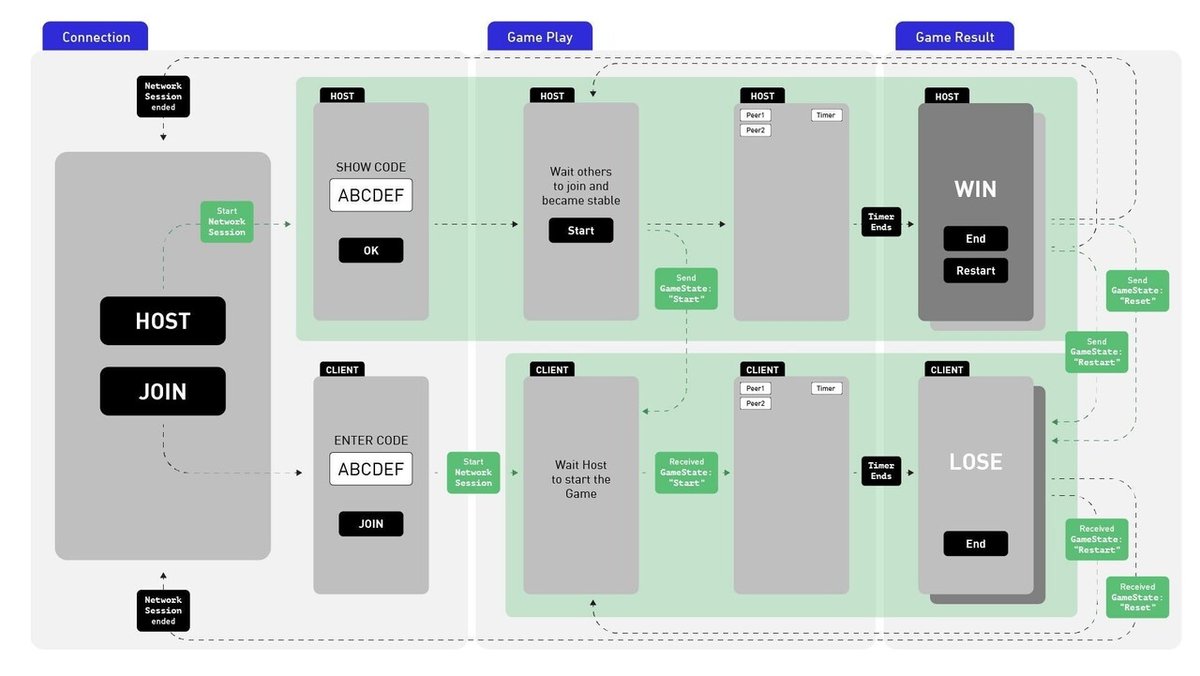
Our game state will be sent by the Host to all peers to go to the next step, you can see the new networked game flow like below (Green: Network function/action, Black: local function/action)
ゲームの状態は、ホストからすべてのピアに送信され、次の状態に進みます。次の画像をみると、ネットワーク化されたゲームフローを確認できます(緑:ネットワーク機能/アクション、黒:ローカル機能/アクション)
Peer and Bomb information will be broadcasting to everyone in the network:
ピアと爆弾の情報は、ネットワーク内のすべての人にブロードキャストされます。

We will breakdown these functions in following chapters:
1. Network Session
Connect to game, send and receive Player status & position
2. Networked Spawning
Create new networked spawning object and share to all peers
3. Peer Manager
Manage peer list, sending and receive position & rotation data
4. Message Broadcasting
Send and receive Score List & Game State to all peers
Note: Please do a check of 中級編1 for the basic concept of network communication if you do not understand the above.
これらの機能については、次の章で詳しく説明します。
1. Network Session
ネットワーク経由で、プレイヤーのステータスと位置を送受信します
2. Networked Spawning
ネットワークで共有されるオブジェクトを作成し、すべてのピアと共有します
3. Peer Manager
全てのピアを管理し、位置と回転のデータを送受信します
4. Message Broadcasting
スコアとゲームの状態を全てのピアと送受信します
注:中級編1に用語解説があります。
3. Network support for projects - プロジェクトのネットワーク対応
3-1. Basic Setup
As said, we are going to combine 初級編2+中級編2+中級編3, we will continue the project from 中級編3, please also import the package of this tutorial.
Package file: ardk_bombdemo_asset_2.unitypackage
3-1. Basic Setup
中級編3までの内容が反映されたUnityプロジェクトを準備してください。
※中級編3までのUnityプロジェクトを作成するには、初級編2と中級編2、中級編3の各記事を参照する必要があります。
Unityプロジェクトが準備できたら、本記事用のUnityパッケージをダウンロード&インポートしてください。
パッケージファイル:ardk_bombdemo_asset_2.unitypackage
First off we will go ahead copy elements from ARNetworking.scene:
1. But first, follow up from 中級編3, open “PlaneAnchors.scene” again, save as “GameMockup.scene” (~/Assets/BombDemo/Scene/GameMockup.scene)
2. Open “ARNetworking.scene” (~/Assets/ARDKExamples/ARNetworking/ARNetworking.scene)
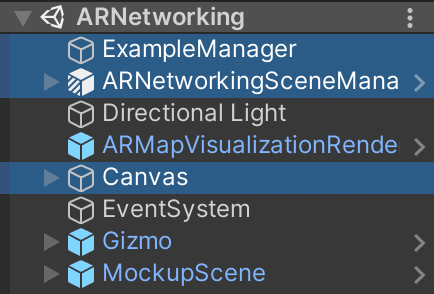
3. Copy the following GameObjects to “GameMockup.scene”
"ExampleManager", "ARNetworkingSceneManager", and "Canvas". Copy the objects to "GameMockup.scene".
note: Copy and paste the "Canvas" object.
the object will be named "Canvas (1)".
まず、シーンの整理を行います。
1. 中級編3の続きとして「PlaneAnchors.scene」シーンファイルを、「GameMockup.scene」(〜/ Assets / BombDemo / Scene / GameMockup.scene)として複製し、保存します。
2.「ARNetworking.scene」シーンを開きます(〜/ Assets / ARDKExamples / ARNetworking / ARNetworking.scene)
3. ”ExampleManager”、”ARNetworkingSceneManager”、”Canvas”オブジェクトを「GameMockup.scene」にコピーします。※コピぺすると”Canvas”
オブジェクトは、”Canvas (1)”と名前になるかと思います
4. Delete “ARSceneManager” GameObject
4.「GameMockup.scene」の「ARSceneManager」GameObjectを削除します
3-2. Network Session
To connect to the Network Session, first, we need the “Session Code” and then “Connect”, we check and map the original interface button to the new ARNetworkingScene’s function.
Network Sessionに接続するには、「Session ID」の生成処理と「Connect」処理が必要です。
「ARNetworking.scene」からコピーしたUI部品の設定を確認していきましょう。
Setup
1. First let’s change the “Canvas (1)” to “Network-Canvas” for more clear readability
2. We will also set the “Sort Order” in Canvas to 2, as we don’t want it to be blocked by our own UI.
3. For “Session Code”, check “Network-Canvas > ButtonGroup > SessionIDField > SessionIDGenerator > Button”, the generation function can be access via “SessionIDGenerator.AssignRandomText()”
4. For “Connect” check “Network-Canvas > ButtonGroup > Start”, the connect function can be access via “ARNetworkingManager.EnableFeatures()”
5. We will modify the object inside “UI-Canvas“, click on it and select “Prefab > Unpack Completely”
Setup
1. 読みやすくするために、コピペして作成された「Canvas(1)」を「Network-Canvas」に名前変更します
2. 「Network-Canvas」のCanvasコンポーネントの“Sort Order”を2に設定します。これは、独自のUIによってブロックされないようにするためです。
3. 「Session ID」生成処理は、「Network-Canvas> ButtonGroup> SessionIDField> SessionIDGenerator> Button」を確認してみましょう。生成処理は、「SessionIDGenerator.AssignRandomText()」で行われていることが確認できます。
4. 「Connect」処理は、「Network-Canvas > ButtonGroup > Start」を確認すると、「ARNetworkingManager.EnableFeatures()」で行っていることが確認できます
5. 「UI-Canvas」を右クリックして「Prefab> UnpackCompletely」を選択します。ゲームシーン上でオブジェクトを移動できるようにするためです。

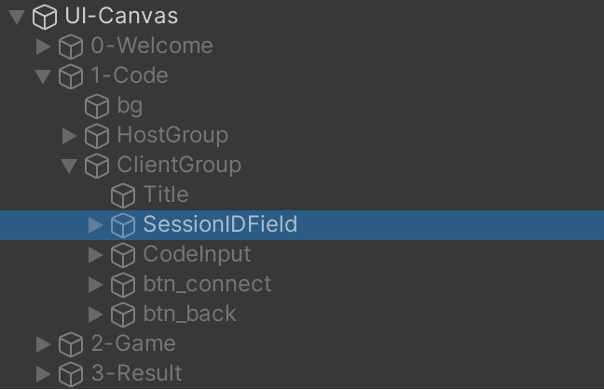
6. Drag “Network-Canvas > SessionIDField” to “UI-Canvas > 1-Code > ClientGroup” like so:
6. 「Network-Canvas> SessionIDField」を「UI-Canvas> 1-Code> ClientGroup」に次の画像のようにドラッグします。
7. Open "GameControl.cs" and open
In the namespace to use
”Using Niantic.ARDKExamples.Helpers;”
In a variable (property)
“
public SessionIDGenerator _SessionIDGenerator;
public SessionIDField _SessionIDField;
public ARNetworkingManager _ARNetworkingManager;
“
To add
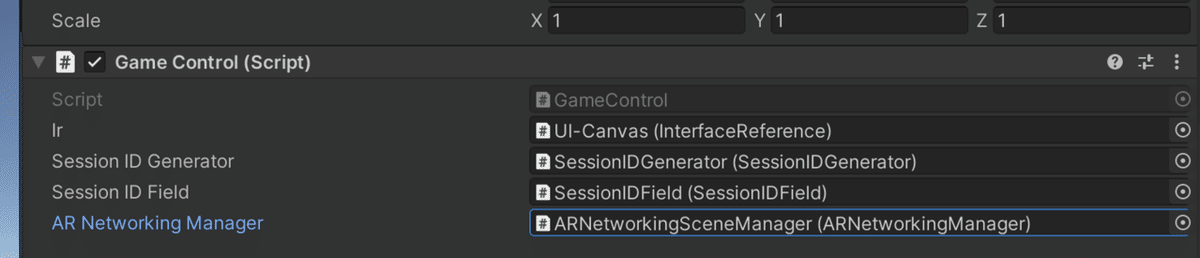
And in the Inspector of the GameControl object
-For _SessionIDGenerator, UI-Canvas-> 1-Code-> ClientGroup-> SessionIDGenerator
-In _SessionIDField, UI-Canvas-> 1-Code-> ClientGroup-> SessionIDField
-ARNetworkingSceneManager is included in _ARNetworkingManager
Please link each
7. 「GameControl.cs」を開き、
使用する名前空間に
”using Niantic.ARDKExamples.Helpers;”
変数(プロパティ)に
“
public SessionIDGenerator _SessionIDGenerator;
public SessionIDField _SessionIDField;
public ARNetworkingManager _ARNetworkingManager;
“
を追加します。そして、GameControlオブジェクトのInspectorで
・_SessionIDGeneratorには、UI-Canvas->1-Code->ClientGroup->SessionIDGenerator
・_SessionIDFieldには、UI-Canvas->1-Code->ClientGroup->SessionIDField
・_ARNetworkingManagerには、ARNetworkingSceneManager
をそれぞれ紐づけてください
ヒント:Visual Studioを使用している場合は、不足しているクラスを右クリックして[Quick Actions and Refactorings…]を選択すると、名前空間を見つけるのに役立ちます。


8. Replace script in “HostStart()”
8. 「HostStart()」処理内容を次のGistのように置き換えます
The Host will create the code, Connect, and then mirror the code to the Host text field.
ホストは「Session ID」を作成し、ネットワークへ接続してから、UIのTextFieldに「Session ID」をコピーします
9. Replace script in “ClientConnectToGame()”
9. 「ClientConnectToGame()」処理内容を次のGistのように置き換えます
10. Replace the script in GameReset()
10. 「GameReset()」処理内容を次のGistのように置き換えます
Test
1. Now we can use the Virtual Studio(LINK to 中級編2) to test the network
2. Select “Mock” in Virtual Studio.
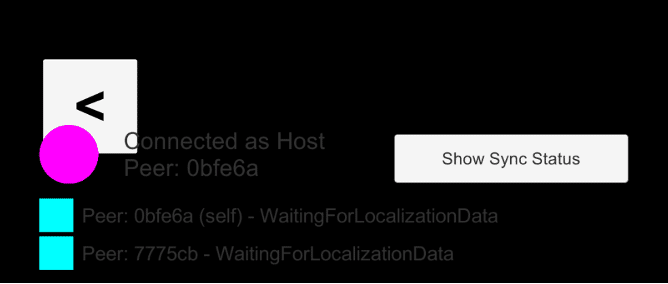
3. Enter Play Mode, select “Host”, it will show the status is “Connected as Host” and one peer connected
1. Virtual Studio(参照:中級編2)を使用してネットワークをテストできます
2. VirtualStudioで「Mock」を選択します
3. 再生モードに入り、「Host」を選択すると、ステータスが「Connected as Host」であり、1つのピアが接続されていることが表示されます

4. Now select “Connect and Run All” in Virtual Studio. It will show two peers connected.
4. 次に、VirtualStudioで[接続してすべて実行]を選択します。 接続されている2つのピアが表示されます。
5. And Press “Back” it will disconnect the ARNetworkSession
5. そして「戻る」を押すと、ARNetworkSessionが切断されます
I recommend you to test it by building it on your devices to make sure it is working.
If it is ok, that’s the connection part complete. Let’s move on to the spawning.
Note: You can check the “GameControl.cs_4” (~/Assets/BombDemo/Script/ GameControl.cs_4) if you encounter any issue.
デバイス上にビルドしてテストし、機能していることを確認することをお勧めします。
問題がなければ、ネットワーク接続部分は完了です。
注:問題が発生した場合は、「GameControl.cs_4」(〜/ Assets / BombDemo / Script / GameControl.cs_4)を参照してください。
3-3. Networked Spawning
We have already done the bomb spawning locally, we will now make it a networked version.
3-3. Networked Spawning
爆弾のスポーンはすでにローカルで行っていますが、ネットワークバージョンに変更します。
Setup Assets
1. Attach “NetworkedUnityObject.cs” to the “Bomb.prefab”, it will also adding “AuthBehaviour.cs” for you.
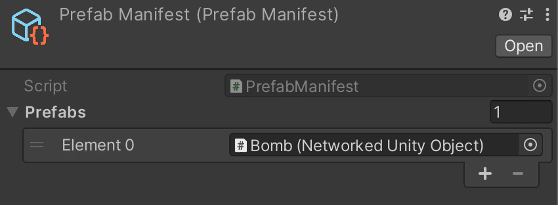
2. Create a “PrefabManifest” asset from “Create > Networking > Spawning > PrefabManifest”. And rename it to “Prefab Manifest”.
アセットの設定
1. 「NetworkedUnityObject.cs」を「Bomb.prefab」にアタッチしてください。「AuthBehaviour.cs」も自動追加されます。
2. 「Create > Networking > Spawning > PrefabManifest」から「PrefabManifest」アセットを作成します。 そして、名前を「Prefab Manifest」に変更します。

3. Now drag the “AuthBehaviour.cs” from Bomb.prefab to the Prefabs list in “Prefab Manifest”. It should be look this:
3. 「AuthBehaviour.cs」をBomb.prefabから「PrefabManifest」のPrefabsリストにドラッグします。
4. Add the “NetworkSceneSpawnManifest” to GameControl.cs, add the just created “Prefab Manifest.asset” to “Manifest”.
4. 「NetworkSceneSpawnManifest.cs」をシーン上のGameControlオブジェクトに追加し、作成したばかりの「PrefabManifest.asset」を「Manifest」に追加します

Spawn Script
Now we will replace the Instantiate() to NetworkedUnityObject.NetworkSpawn(), and manage it in List in GameControl.cs.
1. Open “GameControl.cs”
2. Create a “NetworkedUnityObject” List and “NetworkedUnityObject” prefab reference.
Spawn Script
次に、Instantiate()をNetworkedUnityObject.NetworkSpawn()に置き換え、GameControl.csのListで管理します。
1. 「GameControl.cs」を開きます
2. 「NetworkedUnityObject」リストと「NetworkedUnityObject」プレハブをもつ変数を作成します
使用する名前空間に、
“using Niantic.ARDK.Networking.HLAPI.Object.Unity;”
と以下のGistの内容をGameControl.csの変数一覧部分に追加してください
3. Drag the “Bomb.prefab” onto the reference
4. Create a Network Spawn and Destroy function inside GameControl.cs
3. 「Bomb.prefab」を参照にドラッグします
4. GameControl.cs内にネットワークスポーンおよび破棄関数を作成します
このGistの内容をGameControl.csに追加してください
5. Replace the old script from ARHit.cs from TouchBegan() to a new one
5. ARHit.csのTouchBegan()122行目あたりの
“
_placedObjects.Add(Instantiate(PlacementObjectPf, hitPosition, Quaternion.identity));
”
をコメントアウトし、
”
GameVal.gc.SpawnObjectForAllPeers(hitPosition, Quaternion.identity);
”
を追加してください
Destroy Script
By default, when the Bomb exploded locally, the GameObject will also Destroy from the network. For safety, we will use the ARDK NetworkDestroy() function instead.
1. In the “BombBehaviour.cs:Explode()”, we will remove Destroy() with DestroyNetworkedUnityObject()
2. Also we will remove the object from the list before the NetworkDestroy()
Destroy Script
通常のままでは、爆弾がローカルで爆発すると、爆弾オブジェクトは、Destroy()によってネットワーク上から削除されます。 安全に削除を実行するために、Destroy()の代わりにARDK NetworkDestroy()関数を使用するように変更します。
また、爆弾オブジェクトを削除する前に、ネットワーク経由のスポーンリストから削除します。
1. BombBehaviour.csに
“
using Niantic.ARDK.Networking.HLAPI.Object.Unity;
“
を追加する
2. BombBehaviour.csのExplode()の
”
//Destroy this object
Destroy(gameObject);
”
を削除し、そこにこのGistの内容を追加してください。
Note: You can check the “GameControl.cs_5” (~/Assets/BombDemo/Script/ GameControl.cs_5) for reference.
Check out the full Network Spawning Tutorial from lightship.dev here.
注:「GameControl.cs_5」(〜/ Assets / BombDemo / Script / GameControl.cs_5)を確認できます。
ネットワーク経由のスポーンの詳細は、公式ドキュメントをご覧ください
https://lightship.dev/docs/hlapi_network_spawning.html#autotoc_md223
3-4. Peer
Next, we have to take care of the Peer (Player) data, lucky for us, this part is already created and managed by “ARNetworkingExampleManager.cs” from “ExampleManager”. This script takes care of a few things inside.
· Add/Destroy joined peers to “_peerGameObjects” Dictionary.
· Sending and Receiving position & rotation data
3-4 Peer
次に、ピア(プレイヤー)データを処理する必要があります。ラッキーなことに、この部分はシーン上の「ExampleManager」オブジェクトの「ARNetworkingExampleManager.cs」によって既に作成および管理されています。 このスクリプトは、内部のいくつかのことを処理します。
・参加したピアを「_peerGameObjects」ディクショナリに追加/破棄します。
・位置、回転データの送受信
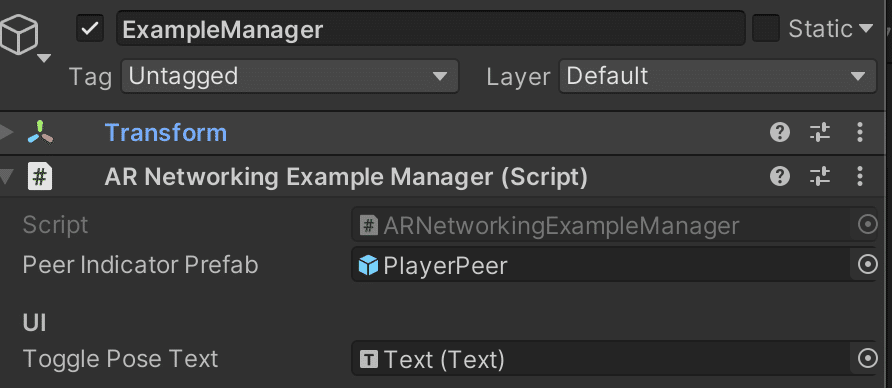
And remember we created the Mock Player before? We will replace it with the actual peer prefab.
1. Find “MockPlayer.prefab”
2. Change the name to “PlayerPeer” for better readability.
3. Drag it to “Peer Indicator Prefab” like so.
以前、モックプレイヤーを作成したことを覚えていますか?
実際のピアプレハブに置き換えます。
1. 「MockPlayer.prefab」を見つけます
2. 読みやすくするために、名前を「PlayerPeer」に変更します
3. シーン上の「ExampleManager」オブジェクトの「ARNetworkingExampleManager.cs」の「PeerIndicatorPrefab」に、PlayerPeer.prefabドラッグします
Also, we no longer need the “MockPlayer”, we will hide it in the scene from now on.
シーン上の「MockPlayer」は不要になりましたので、非アクティブにしておきましょう。
3-4. Message Broadcasting
We will also need to share Score and Game State to all peers. For that, we will create a manager class to manage it all. Let’s open the “MessagingManager.cs”(~/Assets/BombDemo/Script/ MessagingManager.cs), I will break it down here:
3-4 Message Broadcasting
スコアとゲームの状態をすべてのピアと共有する必要があります。 そのために、すべてを管理するマネージャークラスを作成します。 「MessagingManager.cs」(〜/ Assets / BombDemo / Script / MessagingManager.cs)を開いてみましょう。解説していきます。
Send
Besides sending “message”, we will also send it with “tag”, there are two tags here for our use case.
Send
「メッセージ」の送信に加えて、「タグ」を付けて送信します。ここでは、ユースケース用に2つのタグがあります。
For messages, we have to Serialize the data in order to do so. ARDK created Serializers for us to use, these functions were made in SerializeString(string), SerializeVector3(Quaternion) and SerializeQuaternionSerializer(string).
メッセージの場合、データをシリアル化する必要があります。 ARDK用のSerializerがあり、SerializeString(string)、SerializeVector3(Quaternion)、およびSerializeQuaternionSerializer(string)があります。
After Serialization, we’ll Broadcast the data to all peers, we will use BroadcastData() for that. We’ll use the BroadcastString(), BroadcastPosition() and BroadcastRotation() shortcut for better readability.
シリアル化後、すべてのピアにデータをブロードキャストします。そのためにBroadcastData()を使用します。呼び出しやすくするために、BroadcastString()、BroadcastPosition()、BroadcastRotation()のラッパー関数を使用します。
To use the function is as simple as below:
· Tag: the tag we create to send, we will also need to serialize it to uint in order to send it
· Message: The message we will send, the message will be serialized in the shortcut function
· Transport Type: How we would like to send the message, read details here
Note: We are using BroadcastData() to send data to all peers in the network, you can also use SendDataToPeer() if you want to send to only specific peers.
この関数を使用するのは、次のように簡単です。
・Tag:送信するために作成するタグ
送信するには、uintにシリアル化するが必要です
・Message:送信するメッセージ
・Transport Type:メッセージの送信方法
詳細は以下の公式ドキュメントをご覧ください。
https://lightship.dev/docs/namespace_niantic_1_1_a_r_d_k_1_1_networking_a55978eae94f616b31750a993b0ea5875.html
注:BroadcastData()を使用してネットワーク内のすべてのピアにデータを送信しています。特定のピアのみに送信する場合は、SendDataToPeer()を使用することもできます。
Receive
As the message serialized, we have to deserialize it when received. There are already DeserializeString(), DeserializeVector3() and DeserializeQuaternion() ready to use.
We’ve created an OnDidReceiveDataFromPeer() listener when the ARNetworking started. This function will filter the message for our needs.
Receive
メッセージがシリアル化されるて送られてくるため、受信時にメッセージを逆シリアル化する必要があります。 すでにDeserializeString()、DeserializeVector3()、DeserializeQuaternion()を実装してあります。
ARNetworkingの開始時に、OnDidReceiveDataFromPeer()リスナーを作成しました。 この関数は、必要に応じてメッセージをフィルタリングします。
The above shows how to get the Peer, Tag, and String message. And then we will just use a simple if/switch case to tell the local peer.
上記は、ピア、タグ、および文字列メッセージを取得する方法を示しています。 次に、単純なif / switchケースを使用して、ローカルピアに通知します。
For example, if we were sending this:
例えば、これを送信する場合:
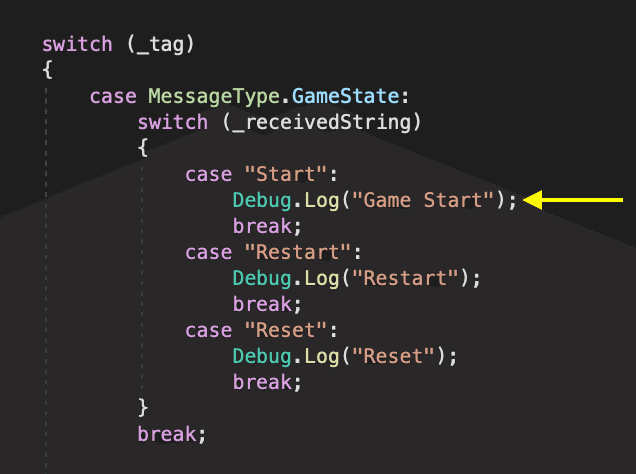
The message will fall into this case in MessagingManager.cs:
メッセージは、MessagingManager.csで次の場合に分類されます。
We will continue to modify the “MessagingManager.cs” and where to put this script in the next chapter.
Note: There are some limitations of this method, please read this article for more detail.
次の章では、「MessagingManager.cs」とこのスクリプトの配置場所を引き続き変更します。
注:この方法にはいくつかの制限があります。
詳細は、公式ドキュメントをご覧ください。
https://lightship.dev/docs/low_level_networking_gotchas.html
4. Game start and end - ゲーム開始と終了
So we have basically everything we need, now we will assemble it. First, let turn off some elements as don’t need it for our game
· “AR Helpers” > “ARCursorRenderer.cs”
· “AR Helpers” > “ARFeaturePointRenderer.cs”
基本的に必要なものはすべて揃っているので、今度はそれを組み立てます。 まず、私たちのゲームでは必要ない、いくつかの要素をオフにします。
・「AR Helpers」>「ARCursorRenderer.cs」
・「AR Helpers」>「ARFeaturePointRenderer.cs」
4-1. Game State
First, we'll make “MessagingManager.cs” accessible from “GameControl”.
1. Attach “MessagingManager.cs” to “GameControl” Gameobject
2. Add a “MessagingManager” reference to “GameControl.cs”.
3. Drag the “MessagingManager” to “GameControl.cs” reference
4-1 Game State
まず、「GameControl.cs」から「MessagingManager.cs」にアクセスできるようにします。
1. 「MessagingManager.cs」を、シーン上の「GameControl」ゲームオブジェクトにアタッチします
2. 「GameControl.cs」に「MessagingManager」参照となる
”public MessagingManager messagingManager;”追加してください
3. 「MessagingManager」を「GameControl.cs」リファレンスにドラッグします

Send from Host
We designed the game flow to be controlled by Host peer. So we will put the sending script to the Host's action.
1. Open “GameControl.cs”
2. Put “Start” script inside HostStartGame()
Send from Host
ホストピアによって制御されるようにゲームフローを設計しました。 したがって、送信スクリプトをホストのアクションに配置します。
1. 「GameControl.cs」を開きます
2. HostStartGame()内に、ネットワーク経由で”Start”を送る処理を追加します
3. Put “Restart” inside HostSendRestart()
3. HostSendRestart()内に、ネットワーク経由で”Restart”を送る処理を追加します
Receive by Client
Now we will modify the “MessagingManager.cs” for the client action.
1. Open “MessagingManager.cs”
2. In OnDidReceiveDataFromPeer(), make the “MessageType.GameState” case only execute if it’s not the Host.
3. Put ClientStartGame() inside "Start" case
4. Put GameRestart() inside “Restart” case
5. Out GameReset() inside “Reset” case
Receive by Client
次に、クライアントアクションの「MessagingManager.cs」を変更します。
1. 「MessagingManager.cs」を開きます
2. OnDidReceiveDataFromPeer()で、「MessageType.GameState」だった場合の処理が、ホストでない時のみ実行されるようにします。
3. ClientStartGame()を「Start」ケースの中に入れます
4. GameRestart()を「Restart」ケースの中に入れます
5. 「Reset」ケース内のGameReset()を出力します
You can check out the “MessagingManager.cs_1” (~/Assets/BombDemo/Script/ MessagingManager.cs_1) for the finished script.
完成したスクリプトについては、「MessagingManager.cs_1」(〜/ Assets / BombDemo / Script / MessagingManager.cs_1)で確認してください。
Game Reset
Don’t forgot as we added SessionID in the fields, we will clear it when game reset, we will set this in the GameControl.cs:Init()
Game Reset
フィールドにSessionIDを追加したことを忘れないでください。ゲームがリセットされたときにクリアします。これはGameControl.cs:Init()で設定します。
Now enter Play Mode, if we don’t have any error, test the script in Build to double-check.
次に、UnityをPlayモードにし、動作確認してください。エラーが発生しない場合は、ビルドして動作テストをして再確認します
4-2. Peer Score
Now we will send out the score to everyone and manage in GameControl.cs. We want to send this once the local score is updated. Once the score is received, we will update it to PlayerBehaviour.cs score.
4-2 Peer Score
次に、スコアを全員に送信し、GameControl.csで管理します。 ローカルスコアが更新されたら、これを送信します。 スコアを受け取ったら、PlayerBehaviour.csスコアに更新します
Send
We will send our score in GameControl.cs:AddScore().
1. Open “GameControl.cs”
2. Add the script like so:
Send
GameControl.cs:AddScore()でスコアを送信します。
1. 「GameControl.cs」を開きます
2. 次のようにスクリプトを追加します
Receive
When we receive the score from “MessagingManager.cs”, we will put it into our score list in “GameControl.cs”. We will insert the score by IPeer key.
1. Create a new public Dictionary<IPeer, int> in “GameControl.cs”
2. Open “MessageingManager.cs”, use the broadcast message like so:
Receive
「MessagingManager.cs」からスコアを受け取ったら、「GameControl.cs」のスコアリストに追加します。 IPeerキーでスコアを挿入します
1.「GameControl.cs」に
“
public Dictionary<IPeer, int> _peerScoreList = new Dictionary<IPeer, int>();
“
を追加します
2.「MessageingManager.cs」を開き、Gistの処理を追加します
Display
To display the score, we will make use of the “SyncStateTrackingList” for our use. First, we will make the Tracking List accessible, and then we will insert the score from “_peerScoreList” into it
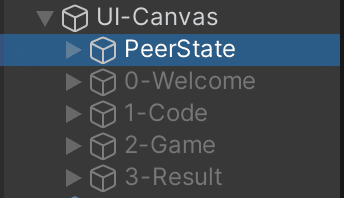
1. Firstly, drag the “Network-Canvas > SyncStateTrackingList” Game Object inside “UI-Canvas > 2-Game > PeerState”.
2. But as the connection will be started before the “2-Game” page, we will make it visible all the time. So we will move it to parent as below:
Deisplay
スコアを表示するために、「SyncStateTrackingList」を使用します。 まず、トラッキングリストにアクセスできるようにし、次に「_peerScoreList」のスコアを挿入します。
1. まず、「Network-Canvas> SyncStateTrackingList」ゲームオブジェクトを「UI-Canvas> 2-Game> PeerState」内に移動させます
2. 「2-Game」ページより前に接続が開始されるため、常時表示させたいので、画像のようにUI-Canvas直下に移動します
3. From “SyncStateTrackingList “, replace its “PeerTrackerPrefab” with our “SyncStateTrackedPeerScore.prefab” (~/Assets/BombDemo/Prefab/ SyncStateTrackedPeerScore.prefab)
4. From “SyncStateTrackingList.cs” (~/Assets/ARDKExamples/Common/Helpers/AR/SyncStateTrackingList.cs), make “_peerTrackerDict” public
5. Put “SyncStateTrackingList.cs” as reference in “GameControl.cs”
6. Create a “UpdateScoreUI()” in “GameControl.cs” like so:
3.「SyncStateTrackingList」から、その「PeerTrackerPrefab」を「SyncStateTrackedPeerScore.prefab」(〜/ Assets / BombDemo / Prefab / SyncStateTrackedPeerScore.prefab)に置き換えます
4.「SyncStateTrackingList.cs」(〜/ Assets / ARDKExamples / Common / Helpers / AR / SyncStateTrackingList.cs)から、「_ peerTrackerDict」をpublicに変更します
5.「GameControl.cs」に
“
public SyncStateTrackingList _SyncStateTrackingList;
”
を追加し、シーン上のSyncStateTrackingListオブジェクトを紐付けます。
6.次のように「GameControl.cs」に「UpdateScoreUI()」を作成します。
This function basically inserts local scores and scores from peers into the score UI.
7. Now, insert the function after the “Score” received in “MessagingManager.cs”
この関数は基本的に、ローカルスコアとピアからのスコアをスコアUIに挿入します。
7. ここで、「MessagingManager.cs」で受け取った「スコア」の後に表示更新関数(GameVal.gc.UpdateScoreUI();)を追加します
8. Also, if we got the score locally, we will never receive any score to put into the UI, so we will put it in AddScore() as well:
8. また、ローカルでスコアを取得した場合、UIに入れるスコアを受け取ることはないため、「GameControl.cs」のAddScore()にも表示更新関数を入れます。
9. One more thing, if you want to make the score of yourself more prominent, you can update the CreateTracker() in SyncStateTrackingList.cs.
9. もう1つ、自分のスコアをより目立たせたい場合は、SyncStateTrackingList.csのCreateTracker()に、スコアの大きさを変更する処理追加します
10. You may also need to change the space in “Vertical Layout Group” after you're done, otherwise the Tracked List will be overlapped. I’ll set to 50 in our case
10.SyncStateTrackingListオブジェクトの「Vertical Layout Group」のスペースを変更する必要がある場合もあります。そうしないと、追跡リストが重複します。 この場合は50に設定します

Note: Check the “MessagingManager.cs_2” and “GameControl.cs_6” if you encounter an issue.
Now test it in Play Mode, and then build it to two devices to test it.
注:問題が発生した場合は、「MessagingManager.cs_2」と「GameControl.cs_6」を確認してください。
次に、再生モードでテストしてから、2つのデバイスにビルドしてテストします。
4-3. Game Result
Finally, we will update the CheckIsWinner() in GameControl.cs using the new score list.
4-3 Game Result
最後に、新しいスコアリストを使用してGameControl.csのCheckIsWinner()を更新します
And don’t forget to clear the list and UI’s when we restart, we will clear it in the Init() function.
また、再起動時にリストとUIをクリアすることを忘れないでください。これは、GameControl.csのInit()関数でクリアします。
4-4. Other
Associate the ARNetworkingSceneManager-> ARSceneCamera object with the Camera in AR Helpers-> ARHit.cs
4-4 Other
ARNetworkingSceneManager->ARSceneCameraオブジェクトを、AR Helpers->ARHit.csのCameraに紐づけてください

4-5. Finish things up
Finally! We have finished our game! Let’s turn off “Network-Canvas” as we no longer need to check the status. And hide the mock up start button from “UI-Canvas > 2-Game > ClientGroup > btn_start”.
You can check the “GameControl.cs_7” for the final script.
4-5 Finish things up
ついに! ゲームが終了しました! ステータスを確認する必要がなくなったので、「Network-Canvas」をオフにしましょう。 そして、「UI-Canvas> 2-Game> ClientGroup> btn_start」を非表示にします。
最終的なスクリプトについては、「GameControl.cs_7」で確認できます。
5. Conclusion - おわりに
Ah, writing a tutorial blog is very different from developing a game yourself, in a normal development cycle, we can poke around the script and test it, if it doesn’t work we will move on. But as a teaching purpose, I have to make sure it is working yet as simple as possible, I hope you guys understand it easily.
Here are two games I’ve created based on ARDK Multiplayer. These basically use the same structure with more detailed function and style, I am sure you guys will be able to create your game too! Thank you for reading.
あぁ、チュートリアルブログを書くことは、自分でゲームを開発するのとは全く違いますね。通常の開発サイクルでは、スクリプトをざっと見てテストし、うまくいかなければ次に進めます。しかし、教える目的である以上、動作することを確認しつつも、できるだけシンプルにしなければなりませんでした。みなさんがこれらを簡単に理解できることを願っています。
さいごに、ARDKマルチプレイヤーをベースに作成したゲームを2つ紹介します。これらは基本的に同じ構造で、より細かい機能やスタイルが使われています。きっと皆さんもゲームを作ることができるでしょう!読んでいただき、ありがとうございました。
BombFight:
Have been developing my first #ARDK #AR #multiplayer game. It's kind of a running/bomb style death-match. It's chaotic, yet fun to play. It'd more more fun when there's more players.#designium #niantic #AugmentedReality #ardk pic.twitter.com/WyafailvsM
— Alexson Chu (@AlexsonChu) December 15, 2021
SnowFight:
My submission for the #LightshipWinterChallenge
— Alexson Chu (@AlexsonChu) January 3, 2022
So that I can play snowball fight even I am in Hong Kong! It'll be super fun if I have more mobiles to play along with friends.
It's kind of a workout playing this game.#ARDK #lightship #multiplayer #AR #designium #snow pic.twitter.com/9XlVOE0LvW
6. Editorial Note - 編集後記
こんにちは!デザイニウム広報のマリコです😊 最後の記事も大長編でしたね📝❗読みながら一緒にゲームを作ってくださった方、そして記事を最後まで読んでくださったみなさま、ありがとうございました✨そしてお疲れさまでした🎉お疲れの中、この編集後記まで読んでくださっている方には改めてお礼を言いたいです(笑)ありがとうございます☺
連載期間中は、『Niantic Lightship ARDK Meetup Vol.1』やAlexsonを含むデザイニウムの台湾・香港メンバーが中心となって開催した「Designium AR/VR online event vol.1』などのMeetupも開催し、ARDK三昧の日々でとても楽しかったです♪ 今後もARDKのイベントや記事は続けていきたいと思いますので、ぜひ感想やご意見などお気軽にお寄せください😊
The Designium.inc
Official website
Interactive website
Twitter (フォローお待ちしてます✨)
Facebook
/assets/images/4172042/original/4affdf14-95b5-43a3-bce0-bf456463ad5e?1638943848)
/assets/images/1935892/original/7ba5911c-ef4d-4b81-80f4-3ba16e0c7e61?1638946457)
この記事が気に入ったらサポートをしてみませんか?