
中級編3:ARDKでマルチプレイゲームをつくってみよう! #3

1. Introduction - はじめに
Hi! I’m Alexson Chu(@AlexsonChu)from the Designium.
This is the fifth in a series of six articles describing the Niantic Lightship ARDK and its production examples.
こんにちは!デザイニウムのAlexson Chu(@AlexsonChu)です。
この記事は、Niantic Lightship ARDKとその制作事例を解説する連載記事Niantic Lihtship ARDKをつかってみよう!(全六回)の第四回目です。
【Niantic Lihtship ARDKをつかってみよう!】
第一回: 初級編1: ARDKってなに?
第二回: 初級編2: ARDKで簡単なアプリをつくってみよう!
第三回: 中級編1: ARDKでマルチプレイゲームをつくってみよう!#1
第四回: 中級編2: ARDKでマルチプレイゲームをつくってみよう!#2
第五回: 中級編3: ARDKでマルチプレイゲームをつくってみよう#3 ※本記事
第六回: 中級編4: ARDKでマルチプレイゲームをつくってみよう#4(後日公開)
We had a taste of multiplayer by ARDK now, let’s create our game now!
We will separate the game development into two parts:
#3 – Create a basic game with ARPlane for single player (this article)
#4 – Convert the game into a networked multiplayer version
ARDKのマルチプレイヤー機能が動くことが確認できたので、実際にゲームの核部分を作っていきましょう!
ゲーム開発の核部分は、2つの記事に分けて説明します。
中級編3- ARPlaneでシングルプレイゲームの作成(※本記事)
中級編4- マルチプレイヤーバージョンに変換
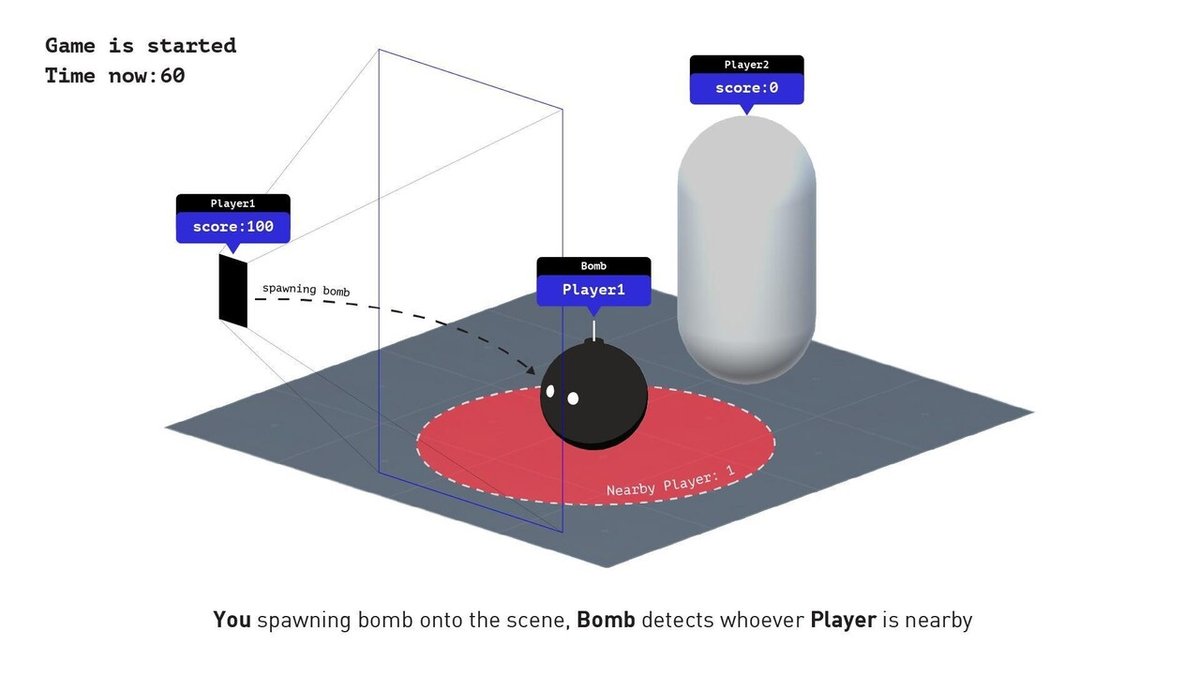
We have basically three elements in this game, You, Bomb and Players:
・You: Spawning bomb, collecting score
・Bomb: Explode in certain time, detect nearby player and counting score
・Players: Define detection area for bomb
The game will start by the host and counting down after the game starts. When the time is reached, the game will end and the game result will be shown, whoever has the most points wins. (We will follow up this logic in 2-2 PageUI part)
Note: To learn and develop your multiplayer game, it is always better to develop and test the functions separately as a single player, and assemble these functions into a multiplayer version later. It will save you a lot of time on debugging.
作成するゲームには、あなた・爆弾・プレイヤーという3つの要素があります。
・あなた:爆弾をスポーン(生成)させ、スコアを収集します
・爆弾:一定時間経つと爆発し、近くのプレイヤーを検出してスコアをカウントします
・プレイヤー:爆弾の検出エリアを定義します
ゲームはホストによって開始され、ゲーム開始後にカウントダウンされます。 一定時間経過すると、ゲームは終了し、ゲームの結果が表示され、最も多くのポイントを獲得した人が勝ちます。 (このロジックは2-2 UIでフォローアップします)
注:マルチプレイヤーゲームを学習および開発するには、シングルプレイヤーとして機能を個別に開発およびテストし、後でこれらの機能をマルチプレイヤーバージョンにアセンブルすることをお勧めします。 デバッグにかかる時間を大幅に節約できます。
2. Production - 制作

2-1. Prepare the project - プロジェクトの準備
If you wanna try out the finished project, you can import the following package and follow the instructions below:
1. Make sure you have setup your ARDK correctly, if not, please follow 中級2
2. Download the finished package
ardk_bombdemo_asset_1_finish.unitypackage
3. Change “ARPlaneManager.cs” as follow
4. From “~/Assets/ARDK/Extensions/ARPlaneManager.cs”, edit the ClearAllPlanes() from “private” to “public”.
5. In OnAnchorsRemoved(), comment the following.
6. Build with /Assets/BombDemo/Scene/GameMockup.unity as the target scene and check the operation.
Note: This completed project is a complete set of completed projects in this article, so only single-player operation is supported. You will be asked "HOST" or "JOIN" during operation, but select "HOST". Press the OK and Start buttons respectively to start the game. The time displayed in the upper right is the remaining game time.
Reference code: See below
本記事の完成したプロジェクトをすぐ試してみたい場合は、以下の手順に従ってプロジェクトを準備してください。
1.中級編2を参考に、ARDK公式サンプルが動くようにします
2.完成したパッケージardk_bombdemo_asset_1_finish.unitypackageをダウンロードし、インポートします
3.「ARPlaneManager.cs」を次のように変更します
「〜/ Assets / ARDK / Extensions / ARPlaneManager.cs」のClearAllPlanes()を「private」から「public」に変更します
4.「ARPlaneManager.cs」を次のように変更します
OnAnchorsRemoved()の処理のうち、
“
Destroy(_planeLookup[anchor.Identifier]);
_planeLookup.Remove(anchor.Identifier);
”
をコメントアウトします
5. /Assets/BombDemo/Scene/GameMockup.unityをターゲットシーンにしてビルドし動作確認してください
補足:この完成プロジェクトは、本記事の完成プロジェクト一式となるため、シングルプレイヤー動作のみ対応しています。動作中に”HOST”か”JOIN”か聞かれると思いますが、”HOST”を選択してください。OKボタンとStartボタンをそれぞれ押すと、ゲームが開始されます。右上に表示されている時間は、残りのゲーム時間となります。
参考コード:
If you follow the tutorial from [中級編#2], please import the package we’ve prepared to get started. Download here: https://github.com/TheDesignium/ARDK-BombDemo/releases/download/%E4%B8%AD%E7%B4%9A3/ardk_bombdemo_asset_1.unitypackage
We have prepared the asset we need for this game. Let’s review the assets:
1. Bomb asset – Bomb object, and effect
2. Player asset – Player object
3. UI Assets – Page objects
4. Script Assets – basic script we needed for this tutorial
もし、本記事読みながら実装を進めていく場合は、下記のようにプロジェクトを準備してください。
1. 中級編2を参考に、ARDK公式サンプルが動くようにします
2. ゲームに必要なアセットが含まれたパッケージをダウンロードし、インポートします。
https://github.com/TheDesignium/ARDK-BombDemo/releases/download/%E4%B8%AD%E7%B4%9A3/ardk_bombdemo_asset_1.unitypackage
このゲームに必要なアセットがパッケージに含まれています。 アセットを確認してみましょう:
1.Bomb asset – 爆弾オブジェクトと効果
2.Player asset – プレイヤーオブジェクト
3.UI Assets – ページオブジェクト
4.Script Assets – このチュートリアルに必要な基本的なスクリプト
2-2. Prepare the components - 構成要素の準備
In this section, we will prepare the necessary components and combine them together in the “Build” part.
Bomb Spawning
Let’s start with creating the bomb in AR.
We will build the interaction base on ARPlane, let’s open the ARPlane.scene.
(~/Assets/ARDKExamples/PlaneAnchors/PlaneAnchors.scene)
Note: Please make sure the “MockupScene.prefab” already added to the scene, if not, please refer to 【中級編2】3-3
To place the bomb in AR is as simple as replacing the prefab in “ARHitTester.cs” in “AR Helpers” GameObject. However, for our convenience, we will copy everything from the script from “ARHitTester.cs” and create a new script “ARHit.cs”. The “ARHit.cs” is prepared from the packages.
1. Drag and add “ARHit.cs” to “AR Helpers” GameObject
2. Remove the “ARHitTester.cs” from it
3. Drag the “ARSceneManager > ARSceneCamera” GameObject from Hierarchy to “ARHit.cs:Camera”
4. Drag the “Bomb.prefab” to “ARHit.cs:PlacementObjectPf”
5. Change the “HitTestType” to “ExistingPlaneUsingExtent”, you can check the difference here.
6. If you do not have the MockupScene.prefab ready, please drag it onto the scene (follow the last article to see how to set up the mock scene【中級編2】3-2)
7. Enter Play Mode, Check [Init] and [Run] to start the AR.
8. After the AR started, place the object, you should see the object replaced by Bomb
爆弾のスポーン(生成)
ARで爆弾オブジェクトを作成することから始めましょう。
ARPlaneにインタラクションベースを構築し、ARPlane.sceneを開きます。
(〜/ Assets / ARDKExamples / PlaneAnchors / PlaneAnchors.scene)
注:「MockupScene.prefab」がすでにシーンに追加されていることを確認してください。追加されていない場合は、【中級編2】3-3を参照し追加してください。
爆弾オブジェクトをARに配置するのは、「ARHelpers」GameObjectの「ARHitTester.cs」のプレハブを置き換えるのと同じくらい簡単です。
1.「ARHitTester.cs」のスクリプトを全てコピーして、新しいスクリプト「ARHit.cs」を作成し、クラス名をARHitに変更します
2.「ARHit.cs」を「ARHelpers」GameObjectのコンポーネントとして追加します
3.「ARHitTester.cs」を削除します
4.「ARSceneManager> ARSceneCamera」GameObjectを「ARHit.cs:Camera」に紐付けます
5.「Bomb.prefab」を「ARHit.cs:PlacementObjectPf」に紐付けます
6.「HitTestType」を「ExistingPlaneUsingExtent」に変更します。 設定内容の違いは、公式ドキュメントで確認できます
7. UnityをPlayモードにして、[Init]と[Run]ボタンをおして動作確認します。
8. ARが開始したら、オブジェクトを配置します。オブジェクトが爆弾に置き換えられていることが確認できます
Now we can place the bomb on the plane, but a bomb needed to explode right? So, we must control its behavior with a new script. We have prepared the script asset here:
1. Enter the Bomb.prefab
2. Drag the BombBehaviour.cs(~/Assets/BombDemo/BombBehaviour.cs) we provided onto the Bomb.prefab.
3. Drag the relative reference to the script like so:
これで爆弾を平面に置くことができるようになりましたが、爆弾は爆発する必要があると思いませんか? そこで、爆発処理のスクリプトを使用してその動作を制御します。
1. Bomb.prefabを編集するために開きます
2. BombBehaviour.cs(〜/ Assets / BombDemo / BombBehaviour.cs)をBomb.prefabにに追加コンポーネントします
3. 次の画像のように、BombBehaviourと紐づけ行います
・“Bomb Root”に、Bomb.prefabのBombWrap
・“Explosion Effect”に、〜/ Assets / BombDemo / Prefab / BombEffect.prefab
それぞれを紐づけます。

4. Enter Play Mode and test again. The bomb should be exploded in 1 second
Reference code: See below
4.UnityをPlayモードにし、もう一度テストします。 爆弾は1秒で爆発するはずです
参考コード:
Simple! Now let’s look at the “BombBehaviour.cs” file to see what it’s doing.
· (float) explodeTime: control how long does the bomb take to explode
· (GameObject) explosionEffect: The prefab of explosion effect
· (GameObject) bombRoot: Reference point for explosionEffect to instantiate with
· Start(): map explodeTime to countDownTotal. Make Bomb spawn facing camera with a slight turn for a natural feeling.
· Counting(): Countdown until time reached, then run Explode()
· Explode() function will Instantiate the explosion effect on the bombRoot location of the bomb and remove itself after that.
シンプルですね! 続いて「BombBehaviour.cs」の設定項目や処理内容を確認してみましょう。
・(float)explodeTime:爆弾が爆発するまでの時間(秒)
・(GameObject)explosionEffect:爆発効果のプレハブ
・(GameObject)bombRoot:インスタンス化するexplosionEffectの参照ポイント
・Start():explodeTimeをcountDownTotalにマップします。わかりやすいように 爆弾の正面をカメラに向けてスポーンさせます。
・Counting():時間に達するまでカウントダウンしてから、Explode()を実行します
・Explode(): 爆弾のbombRoot位置に対する爆発効果をインスタンス化と、BombBehaviourのGameOjbect自体を削除します。
Mock Player, Explosion Detection & Score
Next, we have to make the bomb’s explosion affecting other players in order to get a score. When the bomb explodes, we have to determine is the bomb nearby radius overlapping any player(s), if so, we will have a score.
Thus, we will create a mock player for that, also this will be replaced to the networked version player.
モックプレイヤー、爆発の検出とスコア
次に、スコアを取得するために、爆弾の爆発を他のプレイヤーに影響を与えるようにする必要があります。 爆弾が爆発したとき、爆弾とプレイヤーが一定距離以内の近さか確認する必要があります。一定距離内の場合は、スコアが計算されます。
したがって、そのためのモックプレイヤーを作成します。マルチプレイヤー機能が動作したらネットワーク越しのプレイヤーに置き換えられます。
Mock Player
Drag the MockPlayer.prefab(~/Assets/BombDemo/Prefab/Player.prefab) to thescene.
I’ll breakdown the elements here:
- “DetectionWrap > Capsule Collider” inside the prefab responsible for the effective detection area of the player, you can adjust the Radius to adjust that.
- “DetectionWrap > FixedTransform.cs” make the detection area level whatever the player’s rotation is
- “PlayerObj” represents the player’s outlook, you can change to anything if you want to.
- “PlayerBeHaviour.cs” controls the state of player, it’ll create a gizmo sphere to visualize if the bomb is detected. The Gizmo will only be showing in Editor.
モックプレイヤー
MockPlayer.prefab(〜/ Assets / BombDemo / Prefab / Player.prefab)をシーンに追加します。
- 「DetectionWrap> Capsule Collider」の半径を変更することで、プレイヤーの検出範囲を調整できます。
- 「DetectionWrap> FixedTransform.cs」は、プレイヤーの回転に関係なく、検出範囲を水平方向のみにします。
- 「PlayerObj」はプレイヤーの見た目です。必要に応じて何にでも変更できます。
- 「PlayerBehaviour.cs」はプレイヤーの状態を制御し、爆弾が検出されたかどうかを視覚化するための球状のギズモを作成します。 ギズモはUnityEditorにのみ表示されます。

Explosion Detection
Now as the player is ready, we will add a detection script to “BombBehaviour.cs”. You can replace the script inside the “BombBehaviour.cs_2” file to “BombBehaviour.cs” if you don’t want to type it yourself.
Reference code: See below
爆発の検出
下記ソースコードを参考に「BombBehaviour.cs」にソースコードを写してください。 検出スクリプトはすでに準備してあるので、「BombBehaviour.cs_2」ファイルの中身をコピーして「BombBehaviour.cs」に上書きしてもよいでしょう。
参考コード
- (float) detectionRadius: the effective detection area of the bomb, by default it is double the size of the bomb.
- OnDrawGizmo(): Draw a preview of the detection area
- CheckOverlapping(): Find the collided object within the Sphere, this sphere is visualized from the OnDrawGizmo(). We will loop it until we confirm it is a “Player” then we will send an update
- We will also comment on the Counting() from FixedUpdate() while we are testing.
- (float)detectionRadius:爆弾の有効な検出範囲。デフォルトでは、爆弾の2倍のサイズです。
- OnDrawGizmo():検出領域のプレビューを描画します
- CheckOverlapping():球内で衝突したオブジェクトを検索します。この球はOnDrawGizmo()から視覚化されます。 「プレイヤー」であることが確認されるまでループし、更新を送信します
- 動作確認中は、FixedUpdate()からのCounting()をコメントアウトするとよいでしょう。爆弾が爆発しないので検証しやすくなります。
For debug purposes, we’ve also added OnDrawGizmo() to Update() at this moment.
To test it:
1. Enter Play Mode
2. Place a bomb
3. Dragging the Player GameObject nearby the bomb
4. The player’s Gizmo sphere will be visible when overlapping the bomb, you can use this to fine tune the detection range.
デバッグのために、現時点ではOnDrawGizmo()をUpdate()に追加しています。
それをテストするには
1. UnityEditorをPlayモードにします
2. 爆弾を置きます
3. 爆弾の近くにMockPlayerオブジェクトをドラッグします
4. 爆弾を重ねると、プレイヤーの球上のギズモが表示されます。これを使用して、検出範囲を微調整できます。
Score
Now as we no longer need to test the detection, we can do the following update for score function:
1. Remove CheckOverlapping() from Update()
2. Add CheckOverlapping() to the Explode().
3. Uncomment Counting() from Update().
(Check BombBehaviour.cs_3 for reference)
Reference code: See below
スコア
プレイヤー検出をテストする必要がなくなったので、スコア関数に対して次の更新を行うことができます。
1. Update()からCheckOverlapping()を削除します
2. CheckOverlapping()をExplode()に追加します。
3. Update()からCounting()のコメントを外します。
(実装例としてBombBehaviour.cs_3を確認してください)
参考コード:
One more thing, we need to add a point if your bomb successfully bombed other players, therefore we’ll need another script GameControl.cs to control it and manage all other things. Let’s create an empty GameObject and add the GameControl.cs (~/Assets/BombDemo/Script/GameControl.cs) like so:
もう1つ、爆弾が他のプレイヤーを爆撃した場合はポイントを追加する必要があります。そのため、爆弾を制御して他のすべてのものを管理するために、別のスクリプトGameControl.csが必要になります。 空のGameObjectを作成し、GameControl.cs(〜/ Assets / BombDemo / Script / GameControl.cs)を次のように追加しましょう。

Let’s check the GameControl.cs:
· (class) GameVal: This static class allow us to access it everywhere, we declare this for easy access for this tutorial
· Init(): This function will handle all the variable reset when the game start and game restart later, all the new declared variables will be reset.
· AddScore(): When BombBehaviour.cs run Explode(), it will run this function to add score
Reference code: See below
GameControl.csを確認してみましょう!
・(class)GameVal:この静的クラスを使用すると、どこからでもアクセスできます。このチュートリアルに簡単にアクセスできるように、これを宣言します。
・init():この関数は、ゲームの開始時と後でゲームを再開するときにすべての変数のリセットを処理し、新しく宣言されたすべての変数がリセットされます。
・addScore():BombBehaviour.csがExplode()を実行すると、この関数を実行してスコアを追加します
参考コード:
Next, in the “BombBehaviour.cs” add the “GameVal.gc.AddScore()” to CheckOverlapping()
Reference code: See below
次に、「BombBehaviour.cs」で「GameVal.gc.AddScore()」をCheckOverlapping()に追加します
参考コード
Now enter Play Mode, place the bomb nearby the player, it should print the current score in the console.
次に、UnityEditorをPlayモードにし、爆弾をプレイヤーの近くに置きます。コンソール(ログ)に現在のスコアが出力されます。
2-3. Create a game flow - ゲームフローの作成
Page UI
Now let’s move on to the page UI, we have learn the connection flow from the ARNetworking.scene from article #2, we will recreate the basic interface to create the complete game flow.
Page UI
次に、UI編集をします。記事#2 [リンク]のARNetworking.sceneから接続フローを学習しました。基本的なインターフェイスを再作成して、完全なゲームフローを作成します。
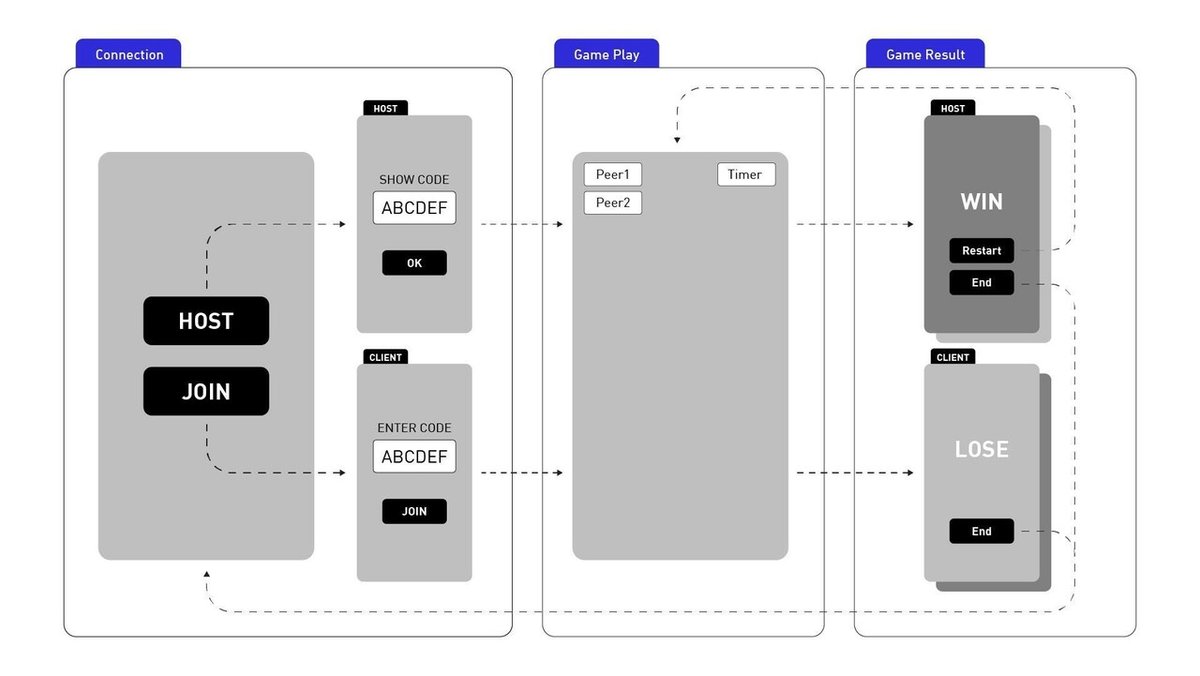
Let’s review the game flow, it’s a simple game flow with Connect, Game Play & Game Result.
– Connection – Welcome: Pick whatever you are Host or Join a Game to start. It will go to the next page. When “Host” is clicked, a random code will be generated and ARSession & ARNetworkSession will be initialized.
– Connection – Code(Host): The generated code will be generated and displayed here.
– Connection – Code(Client): Player will be required to type in the code from the Host to start the game.
– Game Play: The AR screen and gameplay screen, it will display the state of peer and score of each player, and current game time.
– Game Result: The game will end after game time and display either WIN or LOSE screen, while HOST will have a "Restart" button to restart both players to “Game Play”. And both “End” buttons will end ARSession and ARNetworkSession.
ゲームフローを確認しましょう。 Connect, Game Play & Game Resultを使用したシンプルなフローになります。
Connection – Welcome:ホストプレイヤーになるか、ホスト外のプレイヤーとして参加するか選択します。 「HOST」をクリックすると、ランダムなコードが生成され、ARSessionとARNetworkSessionが初期化されます。
Connection – Code(Host):生成されたコードが、ここに表示されます。
Connection – Code(Client):ホスト以外のプレイヤーは、ホストから共有されたコードを入力します
Game Play:AR画面とゲームプレイ画面。各プレイヤーの状態とスコア、および現在のゲーム時間が表示されます。
Game Result:一定時間経過したらゲームを終了し、勝ちまたは負けの画面が表示されます。ホストには、両方のプレーヤーを「ゲームプレイ」に再開するための「Restart」ボタンがあります。 そして、両方の「End」ボタンは、ARSessionとARNetworkSessionを終了します。
Let’s move on to Unity. Drag the UI-Canvas.prefab(~/Assets/BombDemo/Prefab/UI-Canvas.prefab) to the scene. We will pack all things together in the next section.
– InterfaceReference.cs: Object reference script link to objects inside
– 0-Welcome: Same as “Connection – Welcome” page
– 1-Code: Same as “Connection – Code” page
– 2-Game: Same as “Game Play” page
– 3-Result: Same as “Game Result” page
Unityに戻りましょう。 UI-Canvas.prefab(〜/ Assets / BombDemo / Prefab / UI-Canvas.prefab)をシーンに追加します。
UI-Canvas.prefabについて
– InterfaceReference.cs:各UIオブジェクトへのリンク保持クラス
– 0-Welcome:「Connection – Welcome」ページのUIオブジェクト
– 1-Code:「Connection – Code」ページのUIオブジェクト
– 2-Game:「Game Play」ページのUIオブジェクト
– 3-Result:「Game Result」ページのUIオブジェクト
Linking functions to Game Flow
We’ve got everything we need, now we have to setup the page logic structure. Let’s update the “GameControl.cs”
1. Replace the new “GameControl.cs” in “~/Assets/BombDemo/Script/GameControl.cs_2”.
The updated script contains basically the logic flow from Page UI.
2. Drag the “InterfaceReference.cs” from UI-Canvas into “GameControl.cs > ir”
3. Create the GameTimer.cs by duplicate the “GameTimer.cs_1” (~/Assets/BombDemo/Script/GameTimer.cs_1) and change the file to “GameTimer.cs”
4. Add GameTimer.cs onto “(GameObject) GameControl” (You can change the CountDownTotal for the game duration)
5. Turn off the ARPlane control canvas
必要なものはすべて揃いました。次は、UIとゲームロジックを紐づける必要があります。 「GameControl.cs」を更新しましょう
1. 「〜/ Assets / BombDemo / Script /GameControl.cs_2」の中身をコピーして新しい「GameControl.cs」に上書きします。
更新されたスクリプトには、UIとゲームロジックの連携処理が含まれています。
2. 「InterfaceReference.cs」をUI-Canvasから「GameControl.cs:Ir」に紐づけます
3. 「GameTimer.cs_1」(〜/ Assets / BombDemo / Script / GameTimer.cs_1)を複製してGameTimer.csを作成し、ファイル名を「GameTimer.cs」に変更します。
4. GameTimer.csを「(GameObject)GameControl」のGameObjectに追加コンポーネントします。ゲーム時間(CountDownTotal)をこのスクリプトで変更できます。
5. ARPlaneシーンに元々あったCanvasオブジェクトを非アクティブにします

6. Inside the UI-Canvas, we will link functions to the Buttons.
6. UI-Canvasの各UIオブジェクトと、GameControlの関数を紐づけます
UI-Canvas > 0-Welcome > ButtonGroup > btn_host: GameControl.HostStart
UI-Canvas > 0-Welcome > ButtonGroup > btn_join: GameControl.ClientStart
UI-Canvas > 1-Code > HostGroup > btn_ok: GameControl.HostEnterGame
UI-Canvas > 1-Code > HostGroup > btn_back: GameControl.GameReset
UI-Canvas > 1-Code > ClientGroup > btn_connect: GameControl.ClientConnectToGame
UI-Canvas > 1-Code > ClientGroup > btn_start: GameControl.HostStartGame
UI-Canvas > 2-Game > HostGroup > btn_start: GameControl.HostStartGame
UI-Canvas > 2-Game > ClientGroup > btn_start: GameControl.ClientStartGame
UI-Canvas > 3-Result > HostGroup > btn_restart: GameControl.GameRestart
UI-Canvas > 3-Result > HostGroup > btn_end: GameControl. GameReset
UI-Canvas > 3-Result > ClientGroup > btn_end: GameControl. GameReset
Enter the play mode, you should be able to test the complete flow from start to finish. However we are not yet linked the AR function to our script, let’s do it now.
UnityEditorをPlayモードにすると、最初から最後まで完全なゲームフローをテストできるはずです。ただし、AR関数はまだスクリプトには紐付けされてないです。

Enabling ARSession
Now let’s add back ARSession to our game flow. Check the button inside “Canvas > SessionFlowButtons > Init” & “Canvas > SessionFlowButtons > Run” inside. You can see what function is triggered in the button, we will reference it and trigger it thru our script. We will add Initialize() and EnableFeatures() to GameControl.cs.
1. First add the class “ARSessionManager” object inside GameControl.cs. (you will also need to add “using Niantic.ARDK.Extensions” in order to access this class)
2. Add Initialize() and EnableFeatures() to HostStart() and ClientConnectToGame()
Reference code: See below
ARSessionの有効化
それでは、ARSessionをゲームフローに追加してみましょう。 「Canvas> SessionFlowButtons> Init」および「Canvas> SessionFlowButtons> Run」内のボタンを確認します。 ボタンでトリガーされる関数を確認できます。これを参照し、スクリプトを介してトリガーします。 GameControl.csにARSessionManagerのInitialize()とEnableFeatures()を追加します。
1.まず、GameControl.cs内に「ARSessionManager」変数を追加します。 (このクラスにアクセスするには、「using Niantic.ARDK.Extensions」も追加する必要があります)
2. Initialize()およびEnableFeatures()を、GameControlのHostStart()およびClientConnectToGame()に追加します
参考コード:
3. Add DisableFeatures() to GameReset()
Reference code: See below
3. DisableFeatures()を、GameControlのGameReset()に追加します
参考コード:
4. Don’t forget to add the “ARSessionManager” reference from “ARSceneManager” GameObject to “GameControl.cs”
5. Now enter play mode, the ARSession will be enabled with the game flow.
4.「ARSceneManager」GameObjectのARSessionManagerを、「GameControl:ARSessionManager」に紐づけます
5.UnityEidtorがPlayモードになると、ARSessionがゲームフローで有効になります。
Interact only when game started
However, you will notice the Bomb was spawned when a button was clicked, we don’t want that, we want the bomb to spawn only when the game actually started. I’ve already inserted (bool) gameEnabled on GameStart(). So we will change our ARHit.cs again, add the if a case like so:
Reference code: See below
爆弾を置けるタイミングの変更
試しにUnityEditorをPlayモードに、ボタンをクリックすると爆弾がスポーンされたことに気付くでしょう。これは望ましくありません。ゲームが実際に開始されたときにのみ爆弾がスポーンされるべきです。GameControlのGameStart()に(bool)gameEnabledを追加します。さらに、ARHit.csを再度変更し、次のようにif分を追加します。
参考コード
Find Game Winner
As we said in section 1, whoever has the most points wins, so we will check if I am a winner or not. However, we are not yet creating a multiplayer version, so we will create a mockup player’s score list for mockup purposes.
1. Add new “List<int> _scoreList”. Set the length to 1 in inspector, it will represent the other player.
2. In GameControl.cs, create a new function CheckIsWinner(), it will return true if your score is higher than others. You can find this script in GameControl.cs_3 (“~/Assets/BombDemo/Script/GameControl.cs_3”)
Reference code: See below
勝者判定
本記事の最初で述べたように、ポイントが最も多い人が勝つため、私が勝者であるかどうかを確認します。 ただし、まだマルチプレイヤーバージョンを作成していないため、モックアップ用にモックプレイヤーのスコアリストを作成します。
1.GameControlに「List <int> _scoreList」を追加します。
2. GameControlにCheckIsWinner()を作成します。スコアが他の関数よりも高い場合、trueを返します。 ここのロジックはGameControl.cs_3(“〜/ Assets / BombDemo / Script / GameControl.cs_3”)に記載してあるのでコピーしてください
参考コード
3. Insert this to the “GameResult() > DisplayResult(CheckIsWinner())” like so
Reference code: Seebelow
3.次の画像を参考に、GameResult()にDisplayResult(CheckIsWinner())を追加してください
参考コード
4. Enter play mode, don’t do anything, wait for the game to end, it should be returning LOSE as you don’t have a bigger score than you.
5. Enter play mode again, bomb the mock player, you will WIN as mock player doesn’t have any score.
4. UnityEditorをPlayモードにし、何もせず、ゲームが終了するのを待ちます。あなたよりも大きなスコアがないため、ゲームはLOSEを返すはずです。
5. もう一度Playモードにし、モックプレイヤーを爆撃します。モックプレイヤーにはスコアがないため、勝ちます。
Game Restart
One last thing, when the game restarted, even if the ARSession ended. The created planes are still in Unity Scene, we need to manually remove it. The ARPlaneManager.cs:ClearAllPlanes() is the function to help us to remove it.
1. From ARPlaneManager.cs (~/Assets/ARDK/Extensions/ARSessionManager.cs) , edit the ClearAllPlanes() from “private” to “public”, this function is basically remove all plane gameobjects in the scene and clear its Dictionary.
2. As the function in ClearAllPlanes() already removes and clears the Dictionary. We don’t need the duplicated function in OnAnchorsRemoved(), we will go ahead and comment on it.
Reference code: See below
ゲームの再起動
ARSessionが終了した場合でも、 作成されたPlaneオブジェクトはまだUnityシーン上にあるため、手動で削除する必要があります。 ARPlaneManager.cs:ClearAllPlanes()は、それを削除するのに役立つ関数です。
1. ARPlaneManager.cs(〜/ Assets / ARDK / Extensions / ARSessionManager.cs)から、ClearAllPlanes()を「private」から「public」に編集します。この関数は基本的に、シーン内のすべてのPlaneオブジェクトを削除し、Plane一覧変数を空にします
2. 次の画像のようにOnAnchorsRemoved()でPlane一覧変数の一部を空にしている箇所をコメントアウトします。ClearAllPlanes()でPlane一覧変数を空にしていて、必要ない処理なためです
参考コード:
3. Add “ARPlaneManager” reference to GameControl.cs
4. Add ClearAllPlanes() inside GameReset(), it will clear all the planes when we End the game.
Reference code: See below
3.GameControlのARPlaneManagerに、ARHelpersのARPlaneManagerを紐づけます。
4. GameControlのGameReset()内にClearAllPlanes()を追加します。これにより、ゲームを終了するときにすべてのPlaneがクリアされます。
参考コード
Note: You can check the “~/Assets/BombDemo/Script/GameControl.cs_3” for the edited script.
注:編集したスクリプトは「〜/ Assets / BombDemo / Script /GameControl.cs_3」で確認できます。
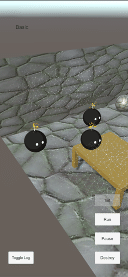
Build on a device to Test
Now as a final check, we need to build the project onto a mobile phone to check if any issue occurred.
Cool! That’s the basic game we need for the actual multiplayer version!
テストするデバイスでビルドする
最後のチェックとして、プロジェクトを実機端末にビルドして、問題が発生したかどうかをチェックする必要があります。
Cool! これで、実際のマルチプレイヤーバージョンに必要な基本的なゲーム作成は終わりです。

3. Conclusion - おわりに
That’s it! I hope this game is simple enough for you! There is a lot you can do when you figure out how to utilize the ARSession. In the next article, we will put all the things together!
以上です! このゲームがあなたにとってシンプルだったことを願っています! ARSessionの利用方法を理解すると、できることがたくさんあります。 次の記事では、そのすべてをまとめていきます!
4. Editorial Note - 編集後記
こんにちは!デザイニウム広報のマリコです😊 先日『Niantic Lightship ARDK Meetup Vol.1』をオンライン開催しましたが、今月は記事を書いてくれたAlexsonやMao、Williamなどデザイニウムの香港・台湾出身のメンバーが中心となって『Designium AR/VR online event vol1』という日本x香港x台灣のMeetupも開催されます✨海外で活躍するクリエイター達とARやVRの情報交換をしていけるのは嬉しいですね😉 中国語はわからないので、言葉がわからない状態でどれだけ楽しめるかが楽しみです❗😆
The Designium.inc
Official website
Interactive website
Twitter (フォローお待ちしてます✨)
Facebook
/assets/images/4172042/original/4affdf14-95b5-43a3-bce0-bf456463ad5e?1638943848)
/assets/images/1935892/original/7ba5911c-ef4d-4b81-80f4-3ba16e0c7e61?1638946457)