
中級編2:ARDKでマルチプレイゲームをつくってみよう! #2

1. Introduction - はじめに
Hi! I’m Alexson Chu(@AlexsonChu) from the Designium.
This is the fourth in a series of six articles describing the Niantic Lightship ARDK and its production examples.
こんにちは!デザイニウムのAlexson Chu(@AlexsonChu)です。
この記事は、Niantic Lightship ARDKとその制作事例を解説する連載記事Niantic Lihtship ARDKをつかってみよう!(全六回)の第四回目です。
【Niantic Lihtship ARDKをつかってみよう!】
第一回: 初級編1: ARDKってなに?
第二回: 初級編2: ARDKで簡単なアプリをつくってみよう!
第三回: 中級編1: ARDKでマルチプレイゲームをつくってみよう! #1
第四回: 中級編2: ARDKでマルチプレイゲームをつくってみよう#2※本記事
第五回: 中級編3: ARDKでマルチプレイゲームをつくってみよう#3(後日公開)
第六回: 中級編4: ARDKでマルチプレイゲームをつくってみよう#4(後日公開)
Now that you have a basic concept of a multiplayer game from the previous article, let’s try the multiplayer function.
In this section, you will learn how to use the multi-function scene of the ARDK official sample and its Virtual Studio to speed up your development process.
Note: As we are developing multiplayer games, you will need 2 mobile devices that are connected to the internet for testing the experience in real-life.
For this time I am using the following devices & development environment:
前回の記事でマルチプレイヤーゲームの基本的な概念がわかったので、マルチプレイ機能をためしていきましょう!
この記事では、ARDK公式サンプルとVirtualStudioを使用して開発プロセスをスピードアップする方法を学習します。
注:マルチプレイヤーゲームを開発するため、実機テストにはインターネットに接続された2台のスマホが必要になります。
この記事では、以下のスマホと開発環境を使用しています。
Mobile devices(スマートフォン):
iPhone 12 Pro, iOS 15.2
iPhone 13 Pro, iOS 15.2
Development environment(開発環境):
Macbook Pro (16-inch, 2019), macOS 12.0.1
Unity 2020.3.25.f1 LTS, Xcode 13.2
You might check the mobile system requirement here:
https://lightship.dev/docs/system_reqs.html
公式ドキュメントでスマホスペックの詳細要件を確認できます。
https://lightship.dev/docs/system_reqs.html
2. How to use the official ARDK samples - ARDK公式サンプルの使い方
Firstly, you should already know how to set up an ARDK, if not, you can follow this article(3-1 to 3-5) to set up your ARDK.
If you have already created a Unity project in Beginner's Edition 2, you can use that project and go to 2-1.
If you are reading this article and have not downloaded ARDK yet, please refer to 3-1 to 3-5 of "Beginner 2" to set up your ARDK.
ARDK公式サンプルを使うためには、ARDKプロジェクトの準備が必要です。
すでに初級編2を読んでUnityプロジェクトを作ってある場合は、そのプロジェクトがつかえるので、そのまま2-1へ進んでください。
もし、この記事から読んでいてARDKをまだダウンロードしていない方は
初級編2の3-1から3-5を参考にARDKの初期設定をしてください。
2-1. Importing official ARDK samples - ARDK 公式サンプルのインポート
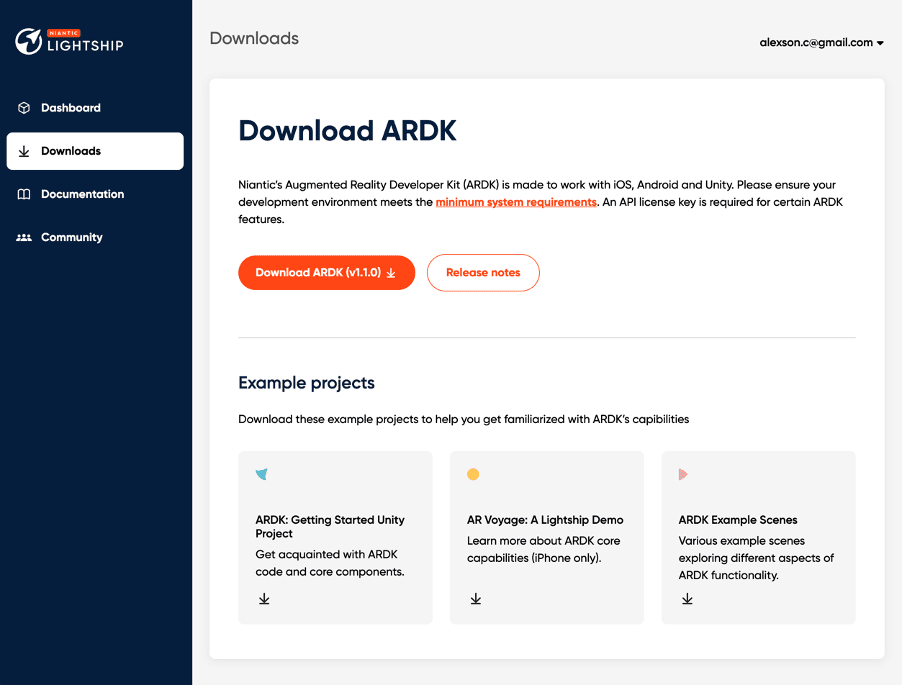
After your ARDK setup is completed, you should download and install this package: https://lightship.dev/account/downloads/artifacts/ardk-examples-1.1.0.unitypackage
The most updated version can be found here.
https://lightship.dev/account/downloads
ARDKのセットアップが完了したら、ARDK公式サンプルをダウンロードしてインポートしてください。
ARDK公式サンプルver1.1.0
https://lightship.dev/account/downloads/artifacts/ardk-examples-1.1.0.unitypackage
記事を読んだ時点でver1.1.0より上のARDKがダウンロードできる場合は、こちらから最新のものをお使いください。
https://lightship.dev/account/downloads
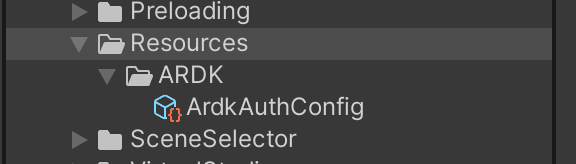
After that, remember to add a token to your project
https://lightship.dev/docs/authentication.html
※ If you are using a project that you have created in the Beginner's Edition, you do not need to make any additional settings because you have already set the license key.
その後、プロジェクトにライセンスキーを追加する事を忘れないでください
https://lightship.dev/docs/authentication.html
※初級編で作ったプロジェクトを流用している場合は、すでにライセンスキー設定済みなので、追加設定は必要ありません。
2-2. Build from ARDK Example - ARDK公式サンプルのビルド
We will start off with “ARNetworking” example
1. Open “ARNetworking” scene
Open the “ARNetworking” in ~/Assets/ARDKExamples/ARNetworking/ARNetworking.scene
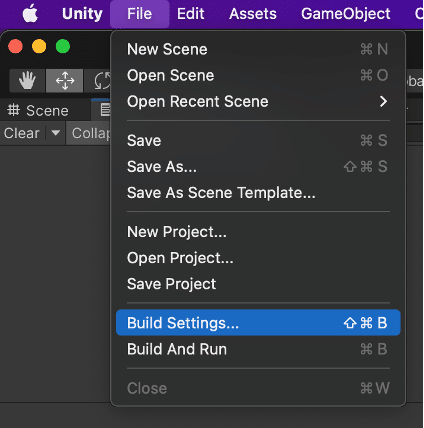
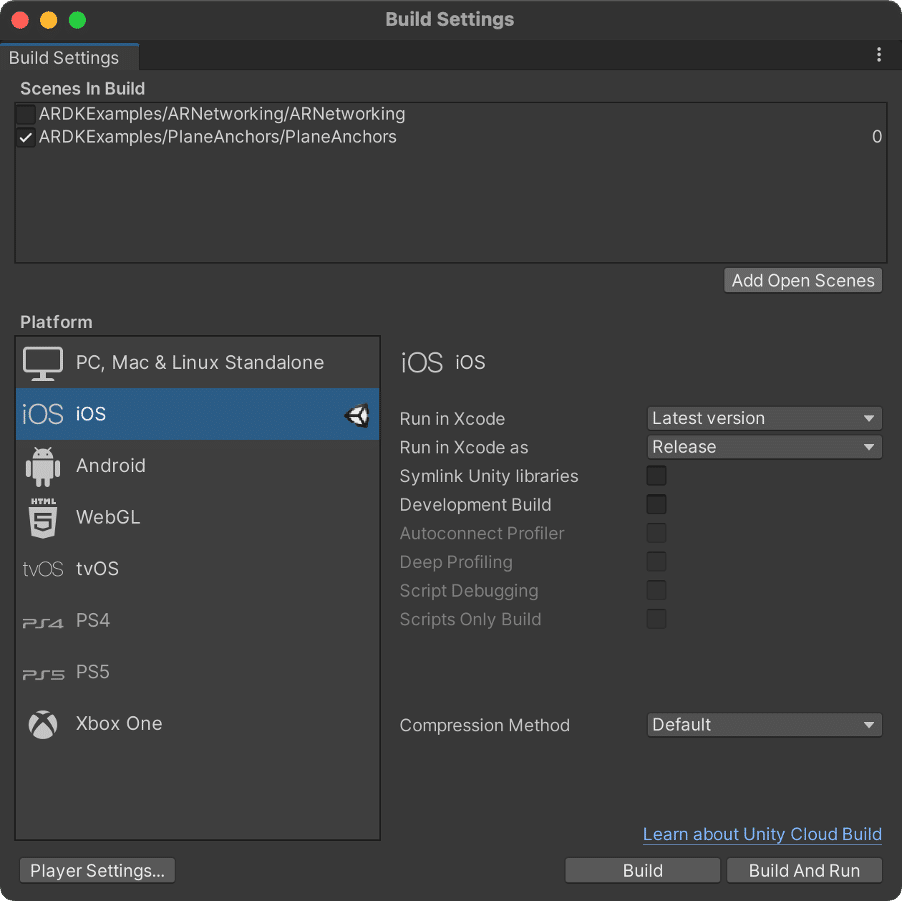
2. Add the scene to project
Open “/File/Build Setting” and Press “Add Open Scene” to add “ARNetworking” scene to the List.
まずは「ARNetworking」の例からはじめます。
1.「ARNetworking」シーンを開きます
/ Assets / ARDKExamples / ARNetworking /ARNetworking.scene を開きます。
2.シーンをビルド対象のシーンリストに追加します
“/File/Build Setting”を開き、”Add Open Scene”を押して"ARNetworking"シーンをリストに追加します。
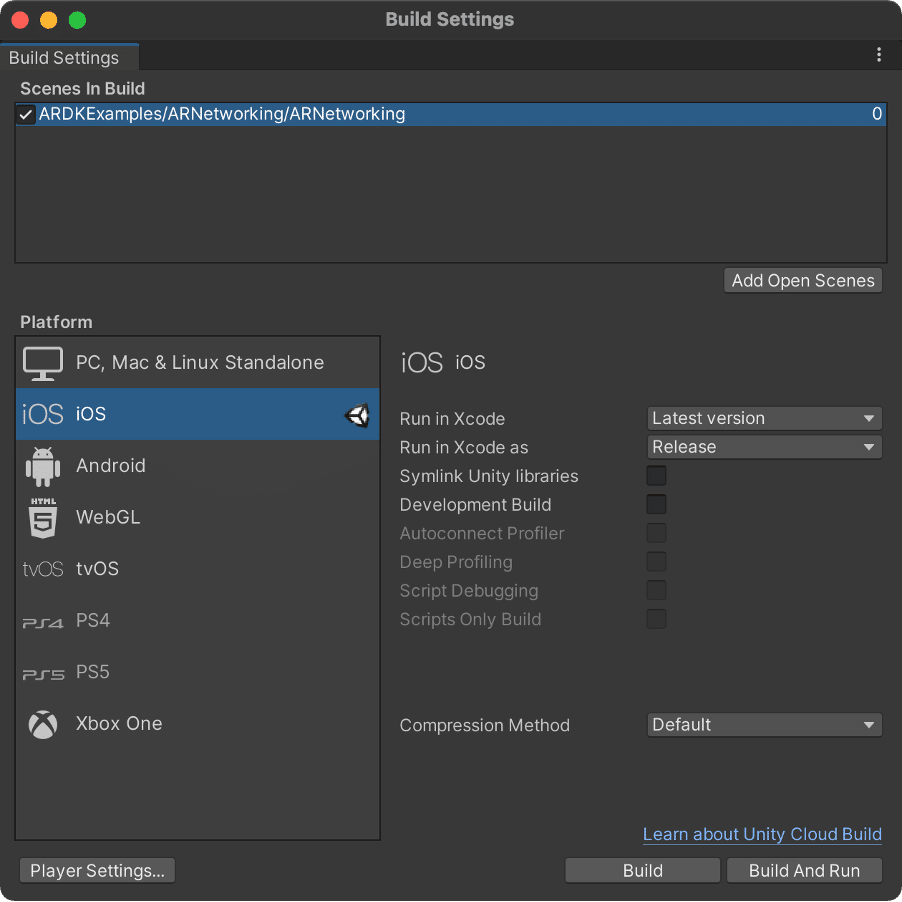
Note: Settings for iOS
If you are building an iOS version, remember to add Usage Description before build.
・Camera Usage Description
・Microphone Usage Description
・Location Usage Description
Please add "ForAR" or similar to each one as appropriate.
注: iOS向けのセッティング
iOS向けにビルドするため、”Usage Description”を設定します。
・Camera Usage Description
・Microphone Usage Description
・Location Usage Description
それぞれに”ForAR”など適宜いれてください。

3. Build & Test
Build and Run your project on your mobile device.
Note: Please ensure your Build System is using “New Build System (Default)”, otherwise the project will not build.
After building successfully, the app will launch the following screen, we will connect from the Host device first.
3.ビルドとテスト
実機端末で動作させて、動作確認します。
Unityプロジェクトをビルドして、xcodeプロジェクトを出力し、そのプロジェクトをビルドしてください。
もしビルド時にエラーがでたら、初級編2の”3-9:ビルド”を参考にしてください。
ビルドが完了したら、2台のスマホ端末でそれぞれアプリを起動してください。1台目はホスト兼ピア、2台目はピアの役割となります。
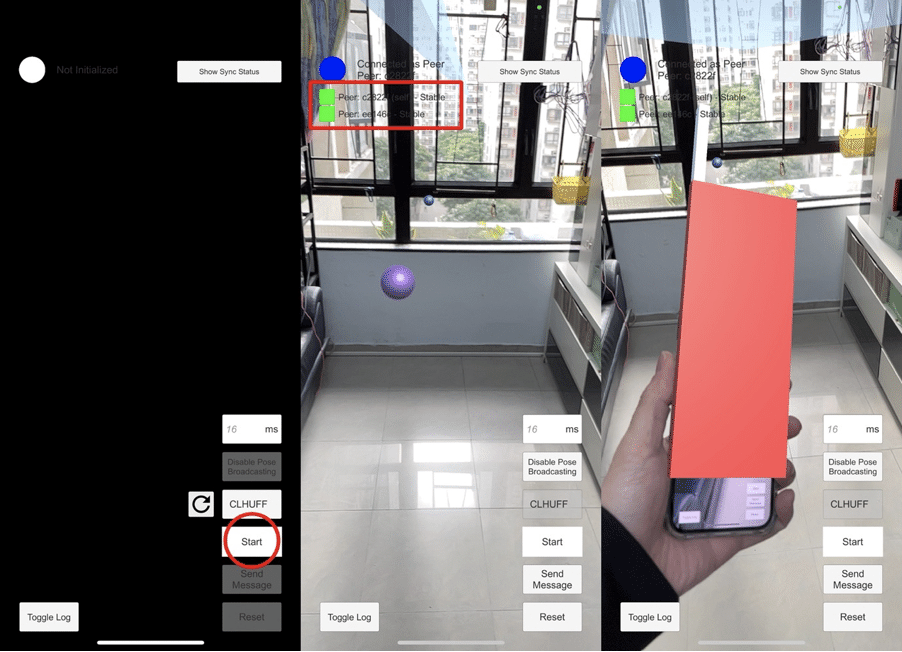
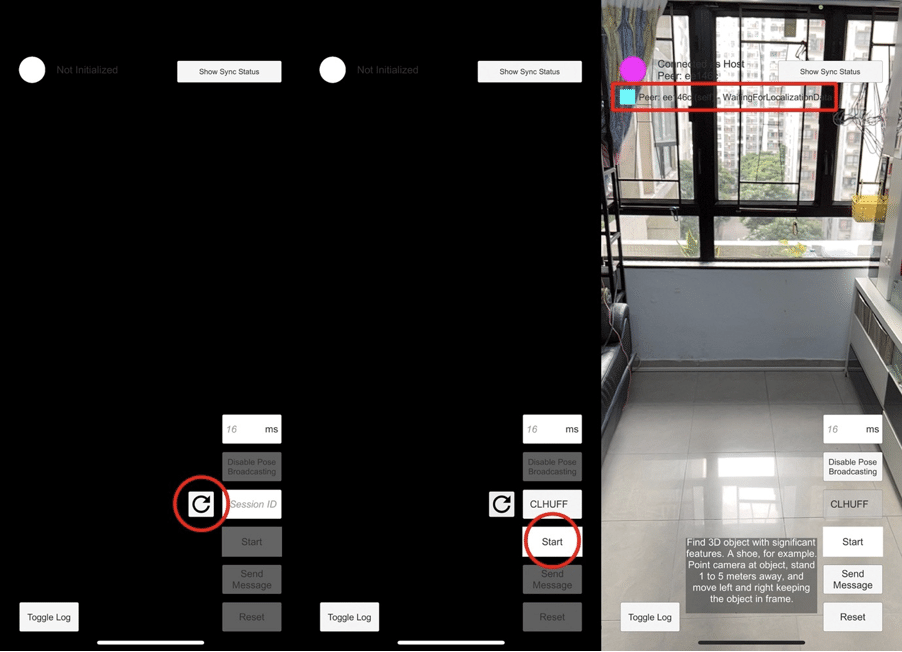
On Host Device:
1. Click “Refresh” Button to generate SessionID
2. Click “Start” to start the Network Session
3. When connected, it will show this device connected as a Host. And a new peer added to the list.
4. After the map is scanned, the peer will turn into the stable.
ホスト兼ピア端末の場合:
1.「更新」ボタンをタップしてセッションIDを生成します
2.「Start」をクリックして、ネットワークセッションを開始します
3.この端末がホストとして接続されていることが表示されます。 そして、新しいピアがリストに追加されます。
4.端末で周りを見渡してください。ピアの状態がStableに変更されます。

On Guest Device:
1. Type in the same SessionID from Host Device, and click “Start”
2. When connected, it will show this device connected as Peer and added to the peer list
3. Scan the area. Till both Peer’s status turn into “Stable”. All peers pose in-sync.
4. Now look at Host Device, you will see the “red box” mapped onto its exact position
ピア端末の場合:
1. ホスト端末と同じセッションIDを入力し、「Start」をタップします。
(画像だと、”CLHUFF”がセッションID)
2. この端末がピアとして接続され、ピア一覧に追加され表示されます
3. 端末で周りを見渡してください。ARDKが空間を把握できると、両端末のステータスが「Stable」になり、位置回転が同期されます。
4. ピア端末でホスト兼ピア端末を見ると、ホスト端末の位置に「赤いボックス」がマッピングされているのがわかります。
Cool! Now you have prepared your multiplayer stage already! Easy right?
Cool! これで、マルチプレイヤーの準備が整いました。 簡単でしたよね?
2-3. Description of the official ARDK sample - ARDK 公式サンプルの解説
In the following chapter, we will take a look at the scene we will be going to use and the key components inside it.
この章では、使用するシーンとその中の主要コンポーネントを見ていきます。
ARNetworkingシーン – Example of Multiplayer
Location: Assets/ARDKExamples/ARNetworking/ARNetworking.scene
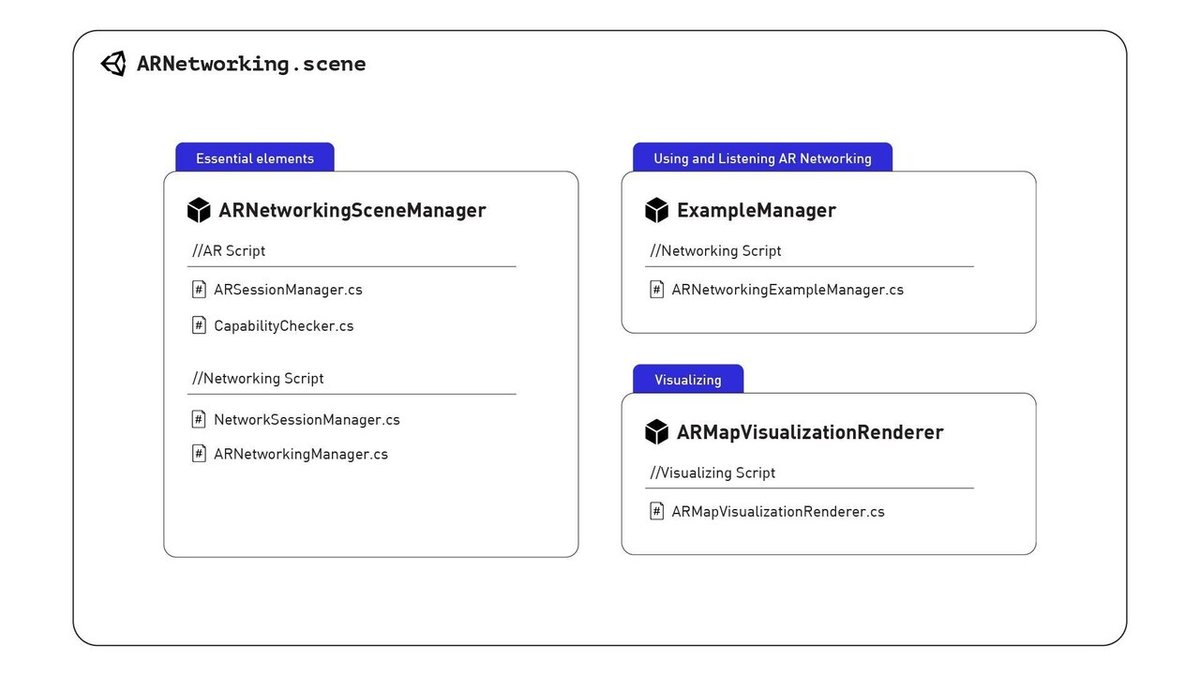
From “ARNetworkingSceneManager” GameObject
ARSessionManager.cs
Default class required managing ARDK AR session
CapabilityChecker.cs
Default class checks whether the device is AR-capable.
NetworkSessionManager.cs
Network class managing MultipeerNetworking session. This collects the SessionID to join the session. (Please note: A MultipeerNetworking instance cannot leave a session and be re-used to join a session, meaning SessionID cannot be reused)
ARNetworkingManager.cs
Integrates with the ARSessionManager and NetworkSessionManager to make sure all components are set up correctly, this controls the Enable/Disable of ARSesssion and NetworkSession
----------------------------------------------------
From “ExampleManager” GameObject
ARNetworkingExampleManager.cs
Example class to use the ARNetworking to listen to Peer Add/Remove/Post/Message and other peer-related methods. In this script, you can read Peer’s information via IARNetworking in this script.
----------------------------------------------------
From “ARMapVisualizationRenderer” GameObject
ARMapVisualizationRenderer.cs
Visualizing each “map” scanned by the Host can be disabled when the function is not useful for your scene.
「ARNetworkingSceneManager」GameObjectのコンポーネント
ARSessionManager.cs
ARDKのARセッションの管理用の必須クラスです
CapabilityChecker.cs
スマホ端末がAR対応かどうかをチェックに使用するクラスです
NetworkSessionManager.cs
MultipeerNetworkingセッションを管理するクラスです。これにより、セッションIDが収集されてセッションに参加します。 (注意:MultipeerNetworkingインスタンスは、セッションを終了してセッションに参加するために再利用することはできません。つまり、セッションIDを再利用することはできません)
ARNetworkingManager.cs
ARSessionManagerおよびNetworkSessionManagerといっしょに、すべてのコンポーネントが正しく設定されていることを確認します。これにより、ARセッションおよびNetworkセッションの有効化/無効化が制御されます。
----------------------------------------------------
「ExampleManager」GameObjectのコンポーネント
ARNetworkingExampleManager.cs
ARNetworkingを使用してピアの追加/削除/投稿/メッセージおよびその他のピア関連のメソッドをリッスンする実装のサンプルクラスです。このクラスでは、このスクリプトのIARNetworkingを介してピアの情報を読み取ることができます。
----------------------------------------------------
「ARMapVisualizationRenderer」GameObjectのコンポーネント
ARMapVisualizationRenderer.cs
ホストによってスキャンされた空間情報の視覚化を行います。オフにすることもできます。
PlaneAnchorsシーン – Example of basic plane AR
Location: Assets/ARDKExamples/ARNetworking/PlaneAnchors.scene
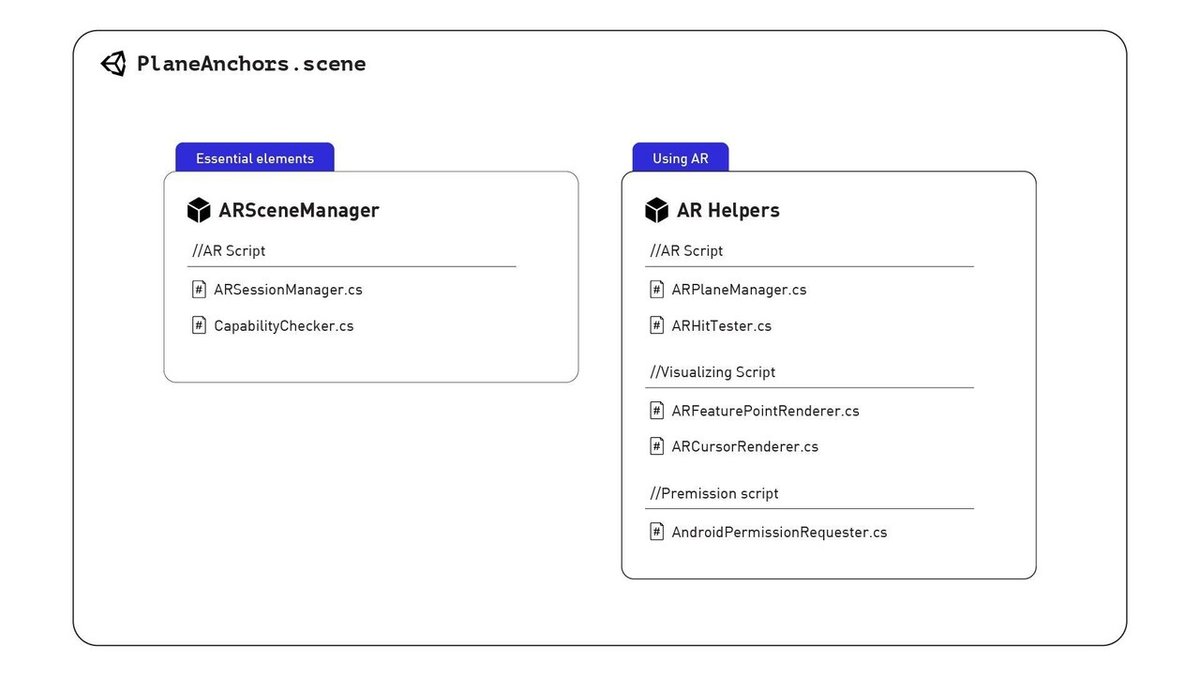
From “ARSceneManager” GameObject
ARSessionManager.cs
Default class required managingARDK AR session
CapabilityChecker.cs
Default class checks whether the device is AR-capable.
From “AR Helpers” GameObject
ARPlaneManager.cs
Manage the plane detection and rendering plane for interaction
ARFeaturePointRenderer.cs: Detect and Rendering detected Feature Points, you can modify the “FeaturePointsObjectPf” to adjust the style.
ARFeaturePointRenderer.cs
Detecting and Rendering detected Feature Points, you can modify the “FeaturePointsObjectPf” prefab to adjust the style.
ARHitTester.cs
Example class to use “Touch on Plane”, and instantiate GameObject onto it.
ARCursorRenderer.cs
Example class to use “Point to Plane” from the screen centre.
AndroidPermissionRequester.cs
Quick solution for requesting permissions from an Android device. We will remove it as we develop on iOS.
「ARSceneManager」GameObjectのコンポーネント
ARSessionManager.cs
ARDKのARセッションの管理用の必須クラスです
CapabilityChecker.cs
スマホ端末がAR対応かどうかをチェックに使用するクラスです
「ARHelpers」GameObjectのコンポーネント
ARPlaneManager.cs
平面検出とレンダリング平面を管理します
ARFeaturePointRenderer.cs
検出された特徴点を検出してレンダリングします。「FeaturePointsObjectPf」を変更して見映えを調整できます
ARHitTester.cs
「TouchonPlane」を使用し、GameObjectをインスタンス化するクラスです
ARCursorRenderer.cs
画面中央から「PointtoPlane」を使用するクラスです
AndroidPermissionRequester.cs
Androidデバイスにおいて、権限要求を簡易的に実現するクラスです。
iOS向け開発するなら削除してください
You can also build this example scene to test this scene.
1. Press “Add Open Scenes” and untick the “ARNetworking” scene
2. Press "Build And Run" to test on your phone.
このサンプルシーンを構築してテストすることも可能です。
1.「Add Open Scenes」を押し、「ARNetworking」シーンのチェックを外します
2. 「Build And Run」を押して、実機端末でテストします
3. "Virtual Studio" for faster debugging - デバッグ高速化「Virtual Studio」
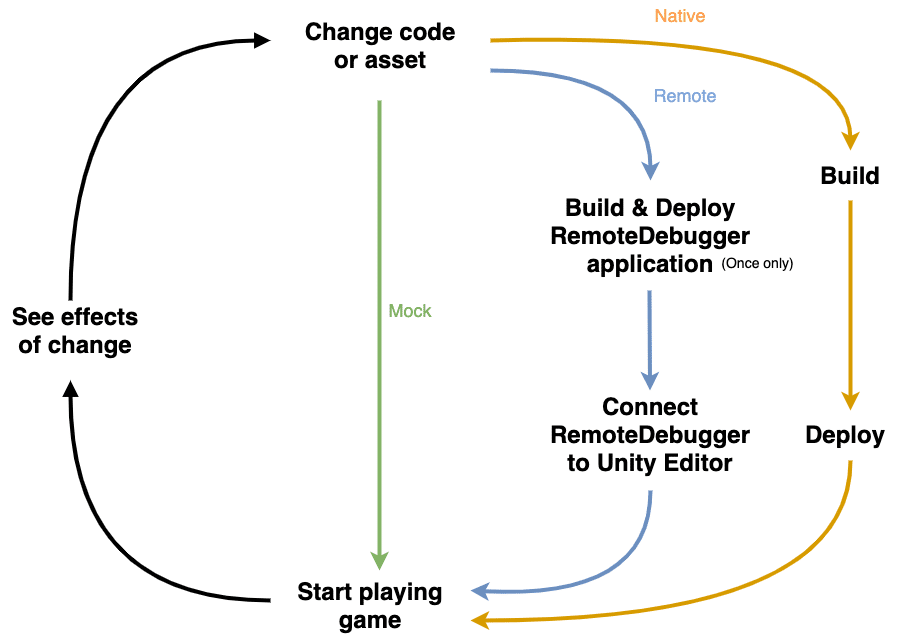
One more thing! In normal circumstances, to test an AR App, we must build the app to the device in other to test it, but not ARDK! There are a pre-build “Virtual Studio” tool provided in the ARDK for us to test basic connection and interaction right inside the Unity Editor!
One more thing! 通常の開発では、ARアプリをテストするために、実機端末でアプリで実行する必要がありますが、ARDKでは必要ではありません。 Unity Editor内で基本的なネットワーク越しの同期をテストするために、ARDKには「VirtualStudio」ツールが用意されています。
Source: https://lightship.dev/docs/virtual_studio.html
3-1. What is "Virtual Studio"? - 「Virtual Studio」とは?
Virtual Studio is a tool to either use “Mock” or “Remote” to test your program.
Remote Mode: Useful when you want to do code iteration without re-deploying to a device. Or accessing Depth Point Cloud in Unity Editor.
Mock Mode: Mock AR environments inside Unity Editor, you can Mock Multiplayer, Plane Detection, Occlusion, Localization and more.
For this tutorial, we will make use of Mock Mode to develop our game.
Virtual Studioは、「モック」または「リモート」モードを使用してプログラムをテストするためのツールです。
リモートモード:デバイスに再デプロイせずにコードの反復を実行する場合に便利です。 または、UnityEditorで深度、ポイントクラウドにアクセスします。
モックモード:Unity Editor内のAR環境をモックし、マルチプレイヤー、平面検出、オクルージョン、ローカリゼーションなどをUnityEditorで試すことができます。
このチュートリアルでは、モックモードを使用してゲームを開発していきます。
3-2. Preparing for "Virtual Studio" - 「Virtual Studio」の準備
We only need three things to set up a mocking AR environment. Basically, there are 3 elements to simulate a real-world environment.
Mockup scene
A prefab scene object to simulate Plane Detection, Occlusion, ARHit...etc. It is a lot faster than building onto a device to test the simple interaction.
Mock players
Created for testing and debugging network connection. Useful when you have to test your gameflow with the network connection.
Mock status
You can also control the status of localization from the Virtual Studio window. It will also be helpful to testing and debugging your gameflow.
You can setup the Virtual Studio by following the 3 parts below
モックAR環境をセットアップするために必要なものは3つだけです。 それらが現実環境をシミュレートするためのものとなります。
モックアップシーン
平面検出、オクルージョン、ARHitなどをシミュレートするプレハブシーンオブジェクト。 単純な相互作用をテストするためにスマホ端末を準備するよりもはるかに簡単です。
モックプレイヤー
ネットワーク接続のテストとデバッグ用に作成されます。 ネットワーク接続を使用してゲームフローをテストする必要がある場合に便利です。
モックステータス
VirtualStudioウィンドウからローカリゼーションのステータスを制御することもできます。 また、ゲームフローのテストとデバッグにも役立ちます。
以下の3つの部分に従って、VirtualStudioをセットアップできます。
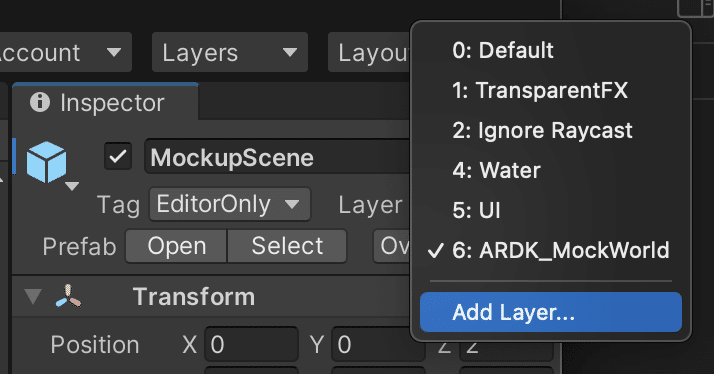
Setup the mock-up scene:
1. Find and Add “MockupScene.prefab” to your hierarchy. (~/Assets/ARDKExamples/VirtualStudio/Assets/Prefabs/MockupScene.prefab)
2. Set the object layer to “ARDK_MockWorld”, I recommend you to set this to the prefab directly.
3. “ARDK_MockWorld” layer is not created by default, you will need to create it by “Add Layer….”
モックアップシーンの準備
1.「MockupScene.prefab」をシーンに追加 (/ Assets / ARDKExamples / VirtualStudio / Assets / Prefabs / MockupScene.prefab)
2.「ARDK_MockWorld」レイヤー を追加します。
「Add Layer…」で作成する必要があります。
3.シーン上のMockupSceneのレイヤーを「ARDK_MockWorld」に設定します。これはプレハブに直接設定することをお勧めします。
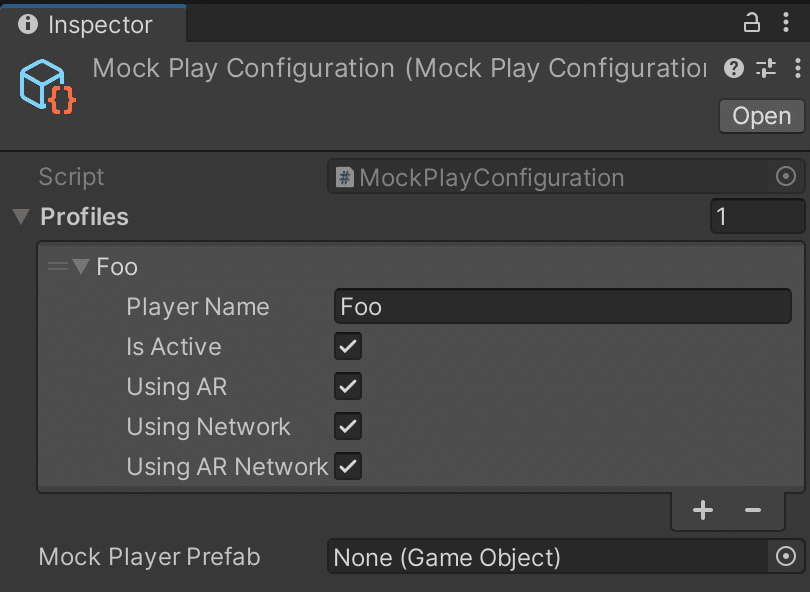
Setup the mock players:
1. Create a new MockPlayConfiguration (/ Assets / ARDKExamples / VirtualStudio / MockPlayConfiguration.asset) via the right-click menu (Create->ARDK-> MockPlayConfiguration).
2. Add mock players by adding “Profiles” from the list, you can set whatever Player Name you want.
3. Click true on “Is Active”, “Using AR”, “Using Network” & Using AR Network”
モックプレイヤーのセットアップ
1. MockPlayConfiguration(/ Assets / ARDKExamples / VirtualStudio / MockPlayConfiguration.asset)を右クリックメニュー(Create->ARDK->MockPlayConfiguration)で新規作成してください
2.リストから「Profiles」を追加してモックプレーヤーを追加します。任意のプレイヤー名を設定できます
3.「Is Active」「Using AR」「Using Network」「Using AR Network」をクリックします
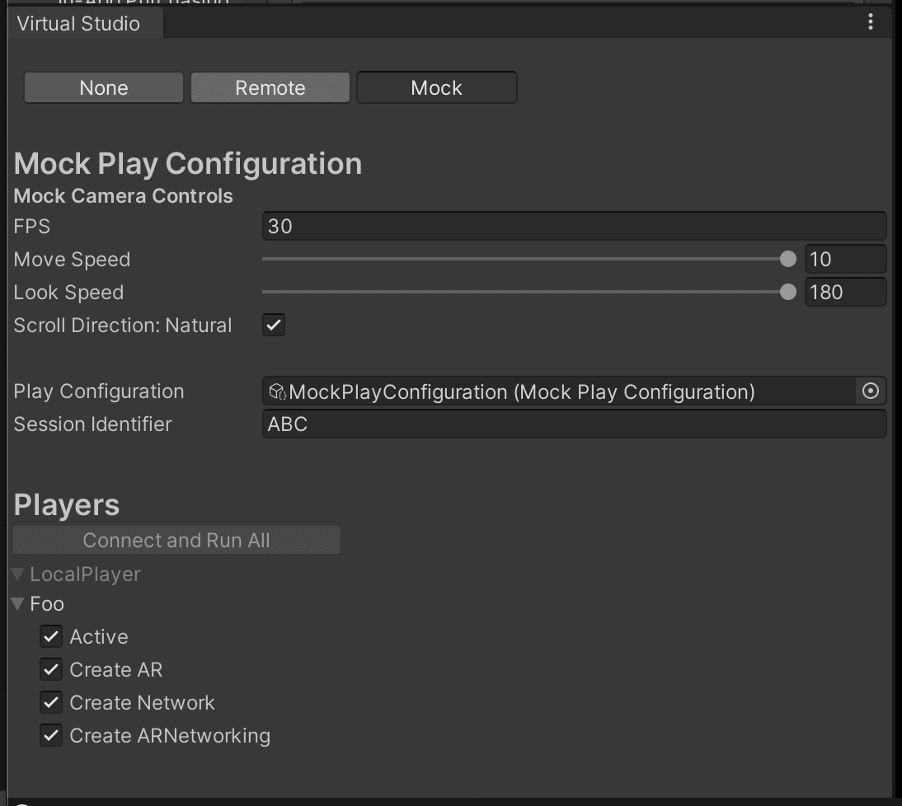
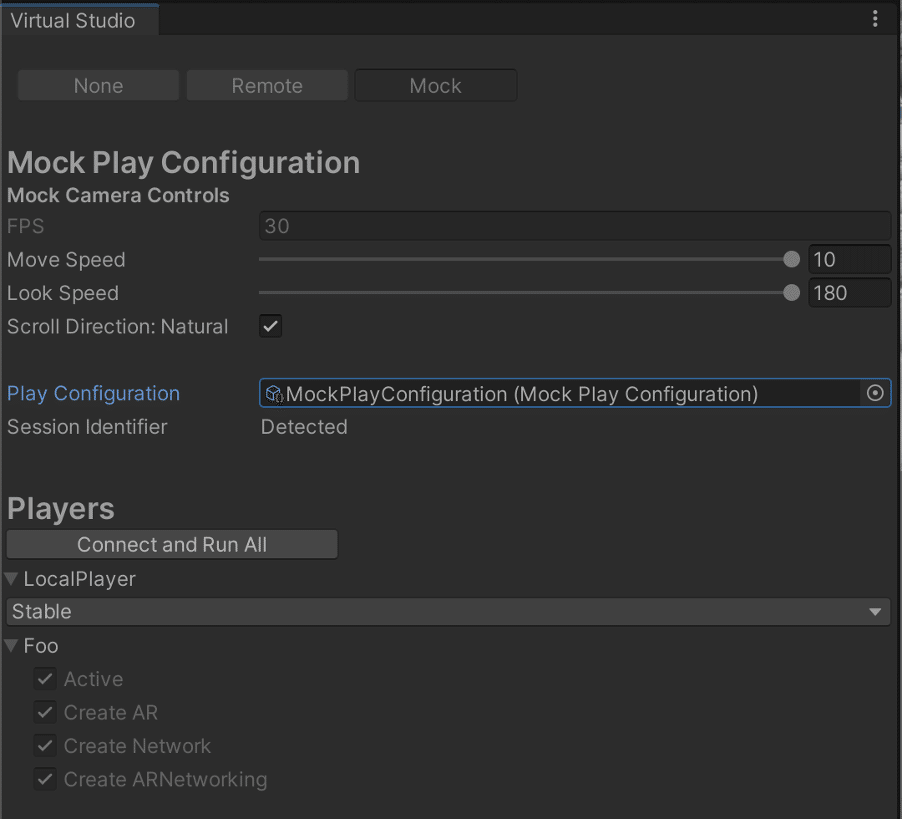
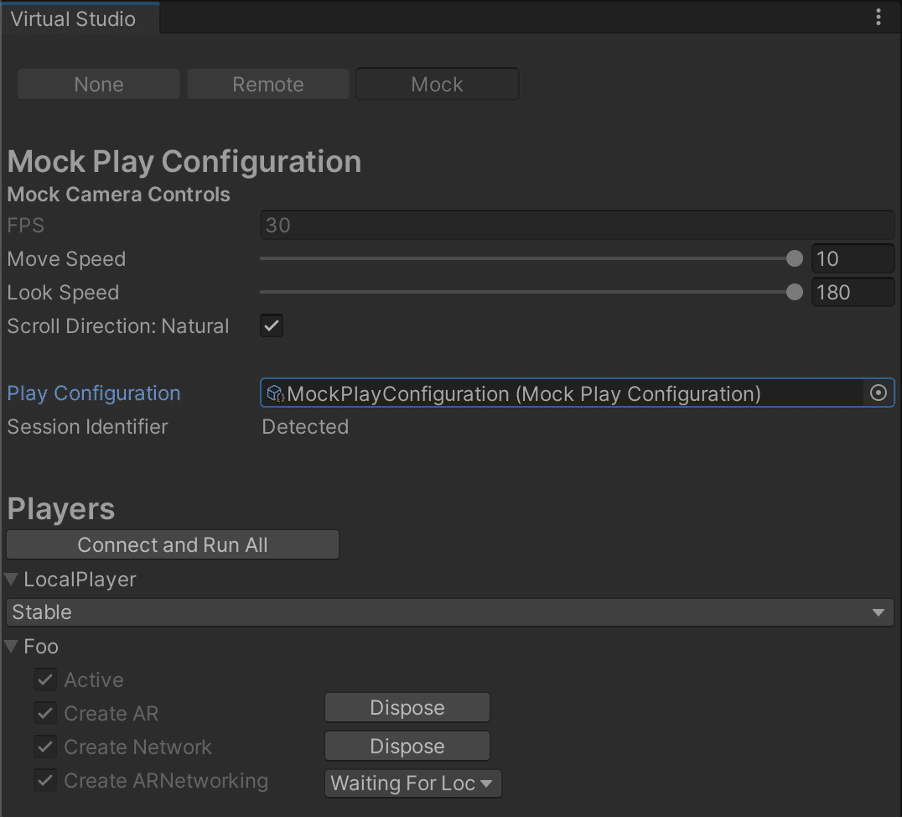
Setup Virtual Studio window:
1. Open “Virtual Studio” window from “ARDK > Virtual Studio”
2. Click on “Mock” button
3. Add “MockPlayConfiguration” to the “Play Configuration” field
Virtual Studio Windowのセットアップ
1.「ARDK>Virtual Studio」から「Virtual Studio」ウィンドウを開きます
2.「Mock」ボタンをクリックします
3.「PlayConfiguration」フィールドに先ほど編集した「MockPlayConfiguration」を追加します
3-3. How to use "Virtual Studio" - 「Virtual Studio」の使い方
When the setup is complete, to use the Virtual Studio is as simple as clicking on the Play Mode.
As an example, let’s open the PlaneAnchors.scene again
1. Setup the scene like before (3-2 > Setup the mock-up scene)
2. Enter “Play Mode”
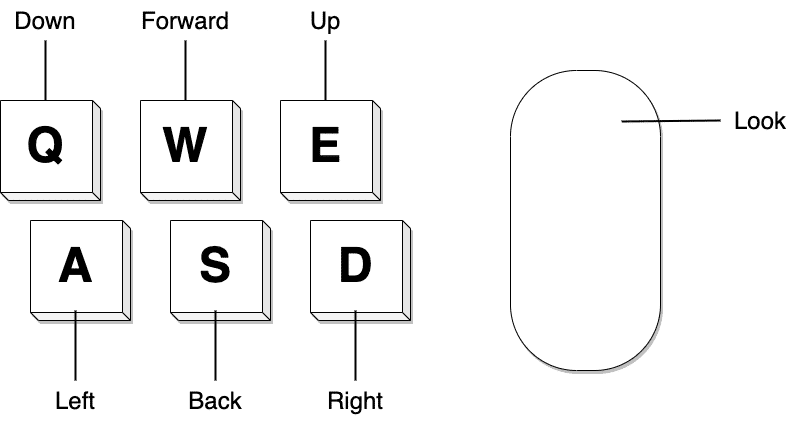
3. To Move, use the keyboard keys “WASD” & “QE”.
To Look, Right click + Mouse Move
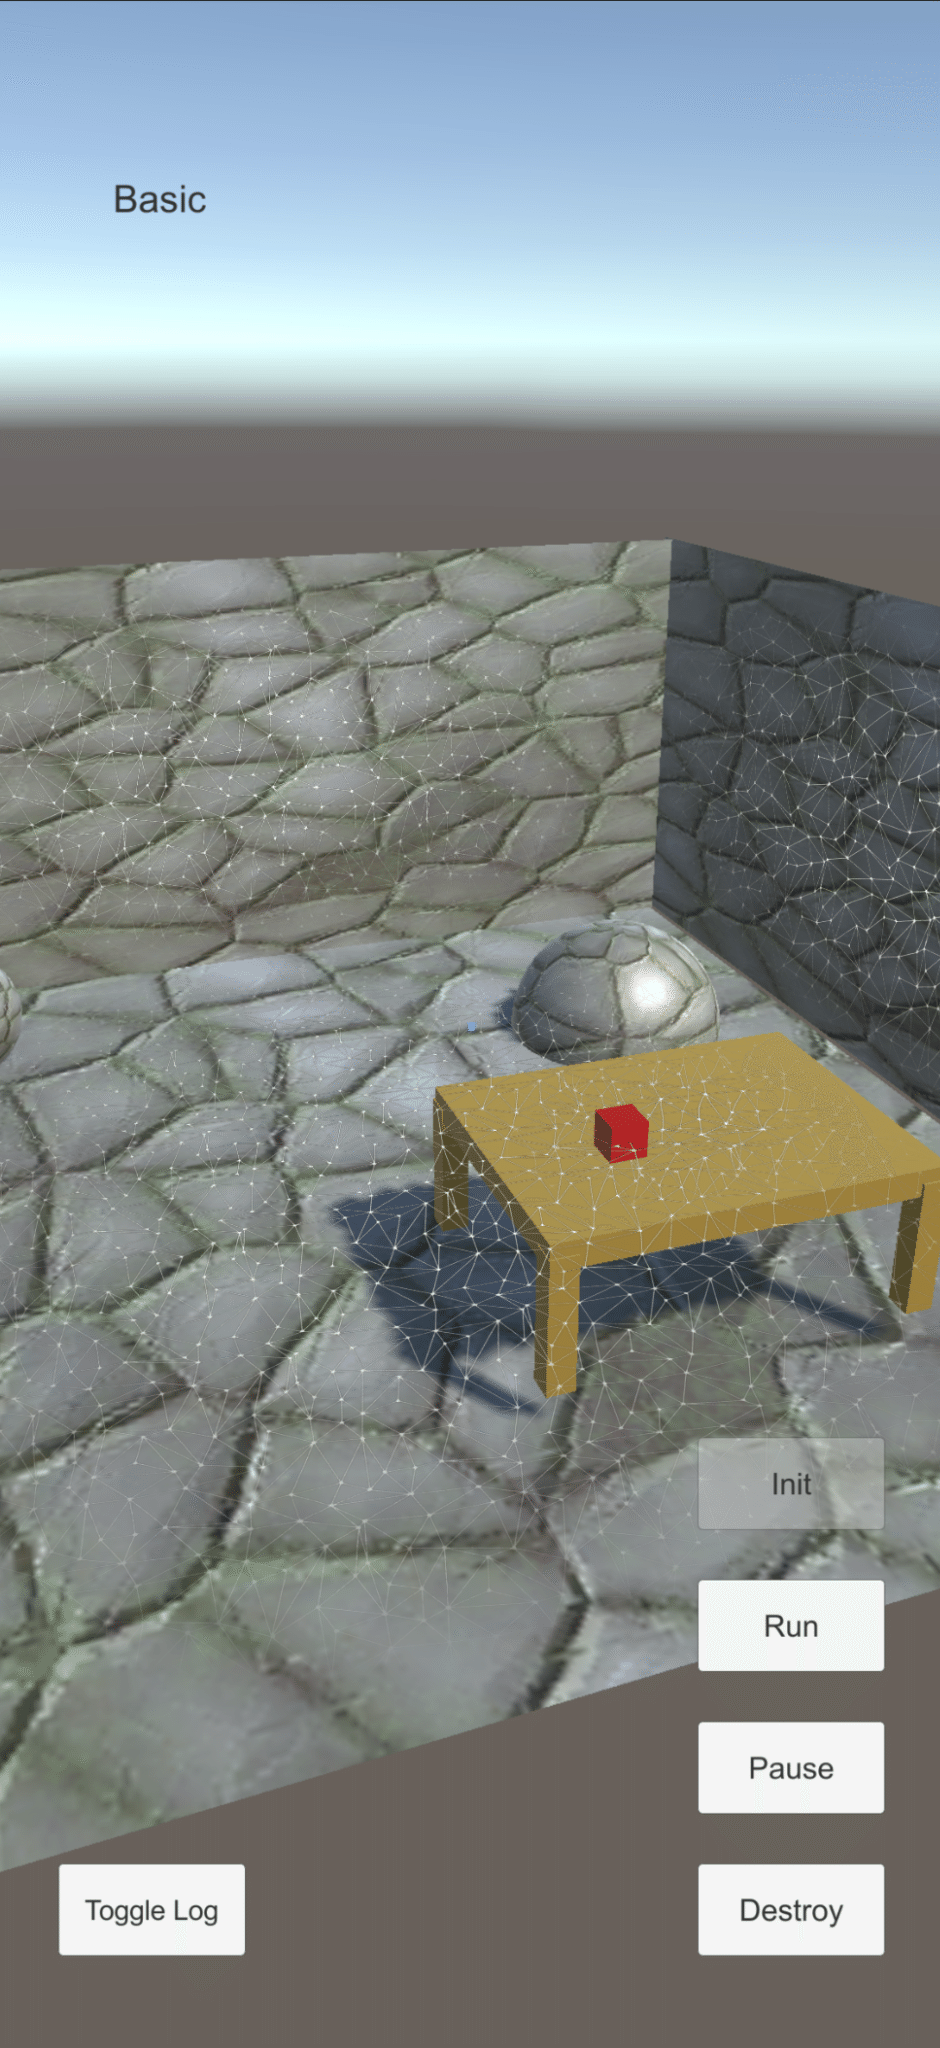
4. You should see the scene screen as below, you can also click and place cube to test the ARHit function.
セットアップが完了したら、UnityEditorの再生モードをクリックするだけでVirtual Studioを使用できます。
例として、PlaneAnchors.sceneをもう一度開いてみましょう
1. 前と同じようにシーンを設定しまる (3-2>モックアップシーンの設定)
2: UnityEditorの”再生モード”に入ります
3: 移動: キーボードの「WASD」と「QE」
視点変更: 右クリック+マウス移動
4: 以下のようなシーン画面が表示されます。キューブをクリックして配置し、ARHit機能をテストすることもできます。
ソース:https://lightship.dev/docs/vs_mock_mode.html#autotoc_md415
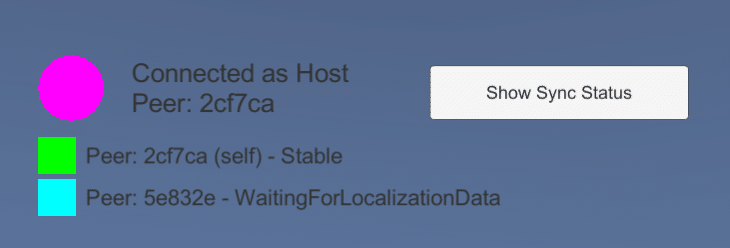
Now we can test the multiplayer function in Virtual Studio. Let’s open the ARNetworking.scene again
1. Enter Unity Play Mode
2. Click on “Refresh” to generate SessionID and click “Start” to start the network session
これで、VirtualStudioでマルチプレイヤー機能をテストできます。ARNetworking.sceneをもう一度開いてみましょう。
1. UnityEditorの再生モードに入ります
2. 「更新」をクリックしてセッションIDを生成し、「Start」をクリックしてネットワークセッションを開始します
3. Look at the “Virtual Studio” again, is “Session Identifier” should be changed to “Detected”
3:「VirtualStudio」ウィンドウをもう一度開き、「SessionIdentifier」が「Detected」に変更されていることが確認してください。
4. Click on “Connect and Run All”, the mock peer will be connected to the session just created.
4:「Connect and Run All」をクリックすると、モックプレイヤーが作成したばかりのセッションに接続されます。
5. Then there will be a new peer added to the scene. That’s our mock player.
5. シーンに新しいピアが追加されます。それがモックプレイヤーです。
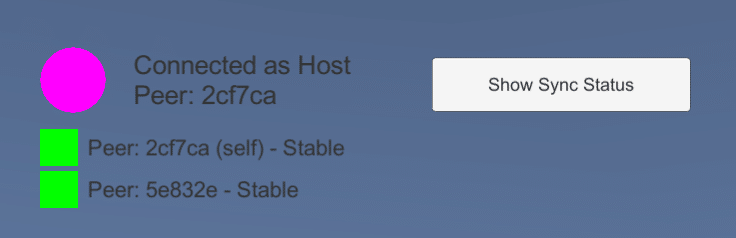
6. Also, you can change the Detection status from the “Create ARNetworking” dropdown list.
6. 「Create ARNetworking」ドロップダウンリストからモックプレイヤーのステータスを変更できます。
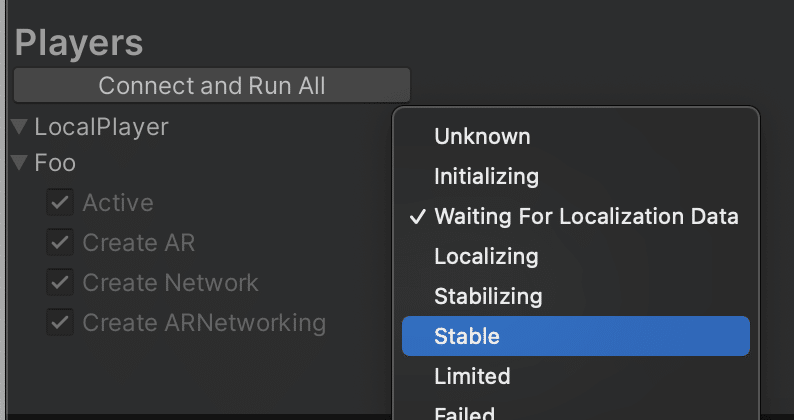
7. By changing it, the status of the peer will also change.
7. これを変更すると、ピアのステータス表示も変更されます。
Note: The mock players in Virtual Studio are a convenient way to test multiplayer connection functions. But it has its limitations. For now, it can only simulate the host's connection and host’s action. To test the multiplayer experience completely, testing on the actual mobile devices is recommended. Even so, it is always better to test your game in Play Mode before deploying to your devices to speed-up your development time.
See more:
https://lightship.dev/docs/vs_remote_mode.html
https://lightship.dev/docs/vs_mock_mode.html
注:Virtual Studioのモックプレイヤーは、マルチプレイヤー接続機能をテストするための便利な方法です。 しかし、それには限界があります。 今のところ、ホストの接続とホストのアクションのみをシミュレートできます。 マルチプレイヤーエクスペリエンスを完全にテストするには、実際のスマホ端末でテストすることをお勧めします。 それでも、開発時間を短縮するために、スマホ端末にデプロイする前に、プレイモードでゲームをテストすることをお勧めします。
詳細は公式ドキュメントをご覧ください
https://lightship.dev/docs/vs_remote_mode.html
https://lightship.dev/docs/vs_mock_mode.html
That’s basically every element we need to create our game. We will try to combine the examples and write our script in the next article.
これで今回つくるゲームを作成するために必要なすべての要素の説明は終わりです。 次の記事では、サンプルを組み合わせてスクリプトを記述していきます。
4. Editorial Note - 編集後記
こんにちは!デザイニウム広報のマリコです😊 先日『Niantic Lightship ARDK Meetup Vol.1』をオンラインで開催しました🎉 初めて司会をつとめさせて頂きとても緊張したのですが、登壇者のお話はもちろんTwitterで参加者の方の声がたくさん聞けて楽しかったです✨(参加してくださったみなさまありがとうございました🙏)また、連載記事を楽しみにしているという声も聞て嬉しかったです😊ぜひ記事の感想やMeetup Vol.2開催への要望などお聞かせください❗ Twitterハッシュタグ #ARDKUG でお待ちしています😉 今回参加されなかった方も次回、参加頂けたら嬉しいです✨
The Designium.inc
Official website
Interactive website
Twitter (フォローお待ちしてます✨)
Facebook
/assets/images/4172042/original/4affdf14-95b5-43a3-bce0-bf456463ad5e?1638943848)
/assets/images/1935892/original/7ba5911c-ef4d-4b81-80f4-3ba16e0c7e61?1638946457)