
Pythonフレームワーク:Pytorch 基礎操作編

概要
PytorchはPython用の機械学習フレームワークです。本記事ではまず初めに(機械学習操作ではなく)Pytorchの基礎操作を記載します。留意事項は下記の通りです。
【留意事項】
●Numpyとほぼ同じAPIのためNumpyと比較しながら紹介します。
->特定メソッドにおけるデータ数の次元数は要注意※例:1->(1, )
●本記事では本格的な機械学習モデルの作成方法は記載しません。
●記事内の出力では体裁を考慮して一部のprint文は省略しました。
【環境構築】
Pytorchの環境構築は下記記事に記載しております。NVIDIA製のGPUがなくCUDAの設定が不要であればインストールはすぐに完了します。
1.Pytorchの基本操作1
1-1.テンソル:torch.tensor()
Pytorchで作成する配列はテンソルと呼ばれます。テンソルの作成はtorch.tensor()の引数にリスト形式で入力します。リストを多次元にするとベクトル・行列・テンソルの作成が可能です。
[In]
import torch

tensor1 = torch.tensor(1)
tensor2 = torch.tensor([1, 2, 3])
tensor3 = torch.tensor([1, 2, 3], dtype=torch.float32) #floatに変換
tensor4 = torch.tensor([[1, 2], [3, 4], [5, 6]])
[Out]
tensor(1)
tensor([1, 2, 3])
tensor([1., 2., 3.])
tensor([[1, 2],
[3, 4],
[5, 6]])1-2.テンソル:torch.tensor(requires_grad=True)
本記事では詳細は説明しませんが、バックプロパゲーションをできるようにテンソルに勾配データを保持させるには"requires_grad"を設定します。勾配を持つテンソルには"requires_grad=True"が確認できます。
[IN]
tensor1 = torch.tensor([1.0, 2.0, 3.0])
tensor2 = torch.tensor([1.0, 2.0, 3.0], requires_grad=True) #勾配を計算するかどうか

print(tensor1)
print(tensor1.requires_grad)
print(tensor2)
print(tensor2.requires_grad)

[OUT]
tensor([1., 2., 3.])
False
tensor([1., 2., 3.], requires_grad=True)
True
なおテンソルがint型だとエラーが出ます。
[IN]
tensor2 = torch.tensor([1, 2, 3], requires_grad=True) #勾配を計算するかどうか
[OUT]
RuntimeError: Only Tensors of floating point and complex dtype can require gradients なお連続値を作成する場合は①Numpy型のデータを入れてテンソルで引数を指定、②torchで連数作成後に別途"requires_grad=True"を設定する方法があります。
直感的には①・②は同じ結果に思いますが微妙にずれることがありますのでご注意ください。
[IN ※同じパターン]
import numpy as np
import torch

#Numpyから作る場合
x1 = torch.tensor(np.arange(-2, 2.1, 0.25),
                  dtype = torch.float32, #設定しないとtorch.float64になる
                  requires_grad=True)

#Pytorchの関数から作る場合
x2 = torch.arange(-2, 2.1, 0.25)
x2.requires_grad = True

print(x1==x2)

[OUT]
tensor([True, True, True, True, True, True, True, True, True, True, True, True,
        True, True, True, True, True])
[IN]
#Numpyから作る場合
x1 = torch.tensor(np.arange(-1, 1.1, 0.1),
dtype = torch.float32, #設定しないとtorch.float64になる
requires_grad=True)
#Pytorchの関数から作る場合
x2 = torch.arange(-1, 1.1, 0.1)
x2.requires_grad = True
print(x1==x2) #0と1で値がずれている
print(x1, x2)
print(x1[10: 12], x2[10: 12])
[OUT]
tensor([ True, True, True, True, True, True, True, True, True, True,
False, False, True, True, True, True, True, True, True, True,
True])
tensor([-1.0000e+00, -9.0000e-01, -8.0000e-01, -7.0000e-01, -6.0000e-01,
-5.0000e-01, -4.0000e-01, -3.0000e-01, -2.0000e-01, -1.0000e-01,
-2.2204e-16, 1.0000e-01, 2.0000e-01, 3.0000e-01, 4.0000e-01,
5.0000e-01, 6.0000e-01, 7.0000e-01, 8.0000e-01, 9.0000e-01,
1.0000e+00], requires_grad=True)
tensor([-1.0000e+00, -9.0000e-01, -8.0000e-01, -7.0000e-01, -6.0000e-01,
-5.0000e-01, -4.0000e-01, -3.0000e-01, -2.0000e-01, -1.0000e-01,
-2.9802e-09, 1.0000e-01, 2.0000e-01, 3.0000e-01, 4.0000e-01,
5.0000e-01, 6.0000e-01, 7.0000e-01, 8.0000e-01, 9.0000e-01,
1.0000e+00], requires_grad=True)
tensor([-2.2204e-16, 1.0000e-01], grad_fn=<SliceBackward>)
tensor([-2.9802e-09, 1.0000e-01], grad_fn=<SliceBackward>)1-3.テンソル情報の取得:shape, dtype, ndim, size
テンソル情報の取得は下記の通りです。
●shape:テンソルの形状
●size():テンソルの形状->shapeとほぼ同じ(※numpyのsizeとは異なる)
●dtype:テンソル内のデータ型
●ndim:テンソルの次元数
●numel():テンソル全体のパラメータ数 (※numpyのarray.sizeと同じ)
[In]
print(f'データ形状(shape):{tensor1.shape, tensor2.shape, tensor3.shape, tensor4.shape}')
print(f'データ形状(size):{tensor1.size(), tensor2.size(), tensor3.size(), tensor4.size()}')
print(f'データの型:{tensor1.dtype, tensor2.dtype, tensor3.dtype, tensor4.dtype}')
print(f'次元数:{tensor1.ndim, tensor2.ndim, tensor3.ndim, tensor3.ndim}')
print(f'要素数(パラメータ数):{tensor1.numel(), tensor2.numel(), tensor3.numel(), tensor4.numel()}')
[Out]
データ形状(shape):(torch.Size([]), torch.Size([3]), torch.Size([3]), torch.Size([3, 2]))
データ形状(size):(torch.Size([]), torch.Size([3]), torch.Size([3]), torch.Size([3, 2]))
データの型:(torch.int64, torch.int64, torch.float32, torch.int64)
次元数:(0, 1, 1, 1)
要素数(パラメータ数):(1, 3, 3, 6)1-4.データ型変換/取得:tensor.data/tensor.item()
データ型変更はtensor.データ型()です(numpyのastypeメソッドは無し)。
【データ型に関する留意点】
●テンソル内のデータを取得する時はtensor.dataとします。
●Numpy型で取得する場合はtensor.numpy()です。
[In]
tensor =torch.tensor([1, 2, 3])
tensor_f = tensor.float() #floatに変換
tensor_numpy = tensor.numpy() #numpyに変換

print(tensor.data, tensor.dtype, type(tensor))
print(tensor_f.data, tensor_f.dtype, type(tensor_f))
print(tensor_numpy, tensor_numpy.dtype, type(tensor_numpy))

[Out]
tensor([1, 2, 3]) torch.int64 <class 'torch.Tensor'>
tensor([1., 2., 3.]) torch.float32 <class 'torch.Tensor'>
[1 2 3] int64 <class 'numpy.ndarray'>
データが1要素のテンソルであればitem()メソッドで数値型(int, float)として取得できます。
[IN]
tensor =torch.tensor([1, 2, 3])
tensor_sum = tensor.sum()

print(tensor_sum, type(tensor_sum))
print(tensor_sum.item(), type(tensor_sum.item()))

[OUT]
tensor(6) <class 'torch.Tensor'>
6 <class 'int'>
2.Pytorchの基本操作2:データ抽出/ソート
2-1.データ抽出1:スライス
データの抽出・スライスをします。リスト操作とほぼ同じです
[In]
import torch

tensor = torch.tensor([[ 0,  1,  2,  3,  4,  5],
       [ 6,  7,  8,  9, 10, 11],
       [12, 13, 14, 15, 16, 17],
       [18, 19, 20, 21, 22, 23]])

tensor
tensor[0] # 1行目を抽出
tensor[:2] # 2行目までを抽出
tensor[:, 3:] # 3列目以降を抽出
tensor[0, 1] # 1行2列目を抽出
tensor[1][1] # 1行1列目を抽出※上と同じ
tensor[0:2, 3:5] # 1-2行、3-4列目を抽出[Out]下記はイメージ図
tensor([[ 0, 1, 2, 3, 4, 5],
[ 6, 7, 8, 9, 10, 11],
[12, 13, 14, 15, 16, 17],
[18, 19, 20, 21, 22, 23]])
tensor([0, 1, 2, 3, 4, 5])
tensor([[ 0, 1, 2, 3, 4, 5],
[ 6, 7, 8, 9, 10, 11]])
tensor([[ 3, 4, 5],
[ 9, 10, 11],
[15, 16, 17],
[21, 22, 23]])
tensor(1)
tensor(7)
tensor([[ 3, 4],
[ 9, 10]])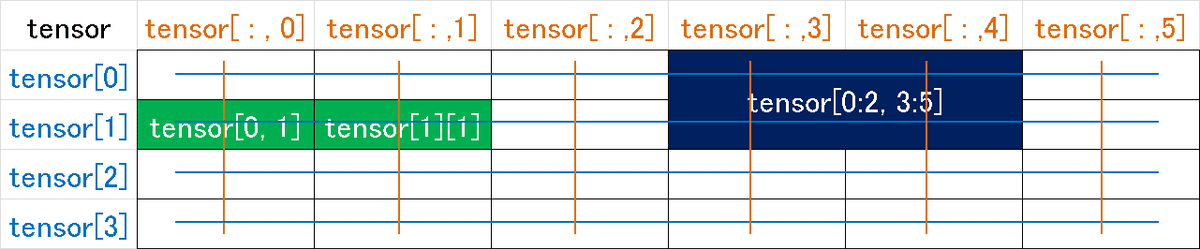

2-2.データ抽出2:整数配列
Tensorを部分抽出する場合は下記のような整数配列を使用します。
[In]
tensor[[1,2,3], [1,3,2]]
# torch.tensor([tensor[1,1], tensor[2,3], tensor[3,2]]) #同上

[Out]
tensor([ 7, 15, 20])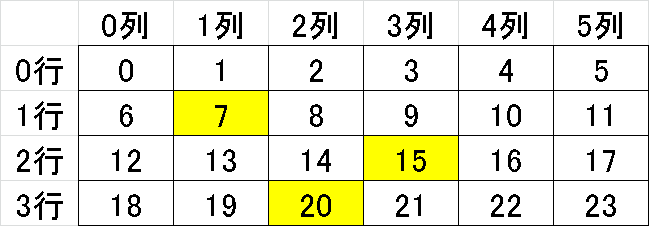
2-3.数値のソート:torch.sort()
数値をソートする場合はtorch.sort()を使用します。戻り値は値とindex番号を含むためNumpyと処理方法が異なります。
[In]昇順ソート
a_1dim = torch.tensor([69, 87, 3, 12, 45])
a_sort = torch.sort(a_1dim) #配列を昇順にソート

print(a_sort) #ソートされた配列
print(a_sort[0]) #a_sort.valuesと同じ
print(a_sort[1]) #a_sort.indicesと同じ

[Out]
torch.return_types.sort(
values=tensor([ 3, 12, 45, 69, 87]),
indices=tensor([2, 3, 4, 0, 1]))

tensor([ 3, 12, 45, 69, 87])

tensor([2, 3, 4, 0, 1])
[In]降順ソート
a_1dim = torch.tensor([69, 87, 3, 12, 45])
a_sortinv = torch.sort(a_1dim) #配列を降順にソート
list_inv = list(a_sortinv[0])[::-1] #テンソルを直接降順できないため一度リスト化してソート
torch.tensor(list_inv) #リスト形式をテンソルに戻す
[Out]
tensor([87, 69, 45, 12, 3])多次元配列の場合は1次元より複雑になります。
[In]多次元配列
a_2dim = torch.tensor([[ 60,   0,  70,  30,  50,  10],
                  [100,  80,  20,  40,  90, 110]])

a_sort = torch.sort(a_2dim) #配列を昇順にソート
a_sort[0]
[Out]
tensor([[ 0, 10, 30, 50, 60, 70],
[ 20, 40, 80, 90, 100, 110]])2-4.ソートのindex番号取得: torch.argsort()
ソート順のindex番号を返すのがtorch.argsort()です(torch.sort()[1
]と同じ)。また戻り値のindex番号を使用して値を抽出することもできます。
[In]1次元配列
a_1dim = torch.tensor([69, 87, 3, 12, 45])

a_sort = torch.argsort(a_1dim) #配列を昇順にソート
a_sortinv = torch.tensor(list(torch.argsort(a_1dim))[::-1]) #配列を降順にソート
a_sval = a_1dim[a_sort]
a_svalinv = a_1dim[a_sortinv]

display(a_sort, a_sortinv, a_sval, a_svalinv)
[Out]
tensor([2, 3, 4, 0, 1])
tensor([1, 0, 4, 3, 2])
tensor([ 3, 12, 45, 69, 87])
tensor([87, 69, 45, 12, 3])多次元配列の場合は値抽出は各行で処理が必要です。torch.sort()はNumpyのようにaxis引数がなかったですがargsort()ではaxis指定が可能です。
[In]
a_2dim = np.array([[ 60,   0,  70,  30,  50,  10],
                  [100,  80,  20,  40,  90, 110]])

a_argsort_h = np.argsort(a_2dim) #axis=1、横方向にソート順のインデックスを返す
a_argsort_v = np.argsort(a_2dim, axis=0) #縦方向にソート順のインデックスを返す

a_vals = a_2dim.ravel()[np.argsort(a_2dim.ravel())].reshape(a_2dim.shape)
[Out]
tensor([[1, 5, 3, 4, 0, 2],
[2, 3, 1, 4, 0, 5]])
tensor([[0, 0, 1, 0, 0, 0],
[1, 1, 0, 1, 1, 1]])
tensor([[ 0, 10, 20, 30, 40, 50],
[ 60, 70, 80, 90, 100, 110]])3.連続値配列・標準行列
3-1.連続値の作成:torch.arange(), torch.linspace()
連続値の配列は下記で作成できます。
●torch.arange():整数での連数を作成
●torch.linspace(開始値、終値、データ数)(デフォデータ数100※Numpyは50)
[In]
tensor1 = torch.arange(10) #開始値:0, 終了値x-1, ステップ:1
tensor2 = torch.arange(3, 10) #開始値:3, 終了値x-1, ステップ:1
tensor3 = torch.arange(0, 10, 2) #開始値:0, 終了値x-1, ステップ:2

[Out]
tensor([0, 1, 2, 3, 4, 5, 6, 7, 8, 9]),
tensor([3, 4, 5, 6, 7, 8, 9]),
tensor([0, 2, 4, 6, 8])
[In]
tensor_lin1 = torch.linspace(0, 1) #0~1を99個に分割(データ数は100)
tensor_lin2 = torch.linspace(0, 1, 11) #0~1を10個に分割(データ数は11)
tensor_lin1
tensor_lin2
print('ary_lin1形状:', ary_lin1.shape, 'ary_lin2形状:', ary_lin2.shape)
[Out]
tensor([0.0000, 0.0101, 0.0202, 0.0303, 0.0404, 0.0505, 0.0606, 0.0707, 0.0808,
0.0909, 0.1010, 0.1111, 0.1212, 0.1313, 0.1414, 0.1515, 0.1616, 0.1717,
0.1818, 0.1919, 0.2020, 0.2121, 0.2222, 0.2323, 0.2424, 0.2525, 0.2626,
0.2727, 0.2828, 0.2929, 0.3030, 0.3131, 0.3232, 0.3333, 0.3434, 0.3535,
0.3636, 0.3737, 0.3838, 0.3939, 0.4040, 0.4141, 0.4242, 0.4343, 0.4444,
0.4545, 0.4646, 0.4747, 0.4848, 0.4949, 0.5051, 0.5152, 0.5253, 0.5354,
0.5455, 0.5556, 0.5657, 0.5758, 0.5859, 0.5960, 0.6061, 0.6162, 0.6263,
0.6364, 0.6465, 0.6566, 0.6667, 0.6768, 0.6869, 0.6970, 0.7071, 0.7172,
0.7273, 0.7374, 0.7475, 0.7576, 0.7677, 0.7778, 0.7879, 0.7980, 0.8081,
0.8182, 0.8283, 0.8384, 0.8485, 0.8586, 0.8687, 0.8788, 0.8889, 0.8990,
0.9091, 0.9192, 0.9293, 0.9394, 0.9495, 0.9596, 0.9697, 0.9798, 0.9899,
1.0000])
tensor([0.0000, 0.1000, 0.2000, 0.3000, 0.4000, 0.5000, 0.6000, 0.7000, 0.8000,
0.9000, 1.0000])
tensor_lin1形状: torch.Size([100]) tensor_lin2形状: torch.Size([11])3-2.標準行列:zeros, ones, full, eye
特定の形・数値の配列を作成する場合は下記のメソッドがあります。
●torch.zeros(ゼロ行列):すべての値が0の行列を作成
●torch.ones(1行列):すべての値が1の行列を作成
●torch.full(行列指定):指定した形状・値の行列を作成
->次元数は1次元でも必ず配列で渡す必要がある(Numpyとは異なる)
->torchでnanを作るのはめんどいのでNumpyから利用
●torch.eye(単位行列):対角成分のみ 1でそれ以外は 0である正方行列
[In] #ゼロ行列
t_zero1 = torch.zeros(3) #形状(3,)の0行列(ベクトル)
t_zero2 = torch.zeros([2, 2]) #torch.zeros([行数a×列数b])でa×bのゼロ行列

_torch = torch.tensor([[1, 2, 3], [4, 5, 6]]) #参考配列:形状(2,3)
t_zero3 = torch.zeros_like(_torch) #_torchと同形状のゼロ行列

[Out]
tensor([0., 0., 0.])

tensor([[0., 0.],
        [0., 0.]])

tensor([[0, 0, 0],
[0, 0, 0]])[In] #1行列
t_one1 = torch.ones(3) #形状(3,)の1行列
t_one2 = torch.ones([2, 2]) #torch.ones([行数a×列数b])でa×bの1行列となる。
_torch = torch.tensor([[1, 2, 3], [4, 5, 6]]) #参考配列:形状(2,3)
t_one3 = torch.ones_like(_torch) #_torchと同形状の1行列
[Out]
tensor([1., 1., 1.])
tensor([[1., 1.],
[1., 1.]])
tensor([[1, 1, 1],
[1, 1, 1]])[In] #行列を指定
import torch
import numpy as np
t_full1 = torch.full((3, ),1) #1次元配列:値が1の(3,)行列
t_full2 = torch.full([2,3],1) #多次元配列:値が1の多次元配列
t_full3 = torch.full([2,3], np.nan) #空行列も作成可能
[Out]
tensor([1, 1, 1])
tensor([[1, 1, 1],
[1, 1, 1]])
tensor([[nan, nan, nan],
[nan, nan, nan]])[In]
t_eye1 = torch.eye(2) #torch.eye(次元数n)でn×nの単位行列となる。
t_eye2 = torch.eye(3, 6) #出力参照
[Out]
tensor([[1., 0.],
[0., 1.]])
tensor([[1., 0., 0., 0., 0., 0.],
[0., 1., 0., 0., 0., 0.],
[0., 0., 1., 0., 0., 0.]])4.形状操作
4-1.テンソル形状の変換:reshape(), view()
形状変換はNumpyと同様にreshape()がありますがview()も使用可能です。
[In]
tensor = torch.tensor([0, 1, 2, 3, 4, 5, 6, 7, 8, 9]) # tensor([0, 1, 2, 3, 4, 5, 6, 7, 8, 9])

tensor_re1 = tensor.reshape(2, 5) #(行数, 列数)へ変換
tensor_re2= tensor.reshape(2, -1) #-1を選択すると、片方の数値を指定して残り(-1)の方は自動で計算する。

tensor_v1 = tensor.view(2, 5) #(行数, 列数)へ変換
tensor_v2 = tensor.view(2, -1)
[Out] ※すべて同じ出力
tensor([[0, 1, 2, 3, 4],
[5, 6, 7, 8, 9]])4-2.テンソルの1次元化:tensor.ravel()
テンソルを1次元化するにはtensor.ravel()を使用します。
[In]
tensor_re1.ravel() #1次元配列に変換

[Out]
tensor([0, 1, 2, 3, 4, 5, 6, 7, 8, 9])
4-3.テンソルの転置:torch.transpose()/tensor.T
テンソルの転置(次元数を入れ替える)はtensor.Tを使用します。テンソルにおいて次元を指定する場合はtransposeメソッド()を使用します。
【Numpyのtransposeとの違い】
●テンソル転置時はtorch.t(tensor)と記載(※torch.transposeはエラー)
●torch.transpose(tensor, 次元)の記法はNumpyと異なる(3次元で引数は2つ)
[In]
array = np.array([[ 0,  1,  2],
                   [ 6,  7,  8]]) #配列形状: (2, 6)

array.T
torch.t(tensor) #tensor.Tと同じ

[Out] 出力は同じ
tensor([[0, 6],
        [1, 7],
[2, 8]])[In]
tensor_3dim = torch.tensor([[[0, 1, 2],
[3, 4, 5]],
[[6, 7, 8],
[9, 10, 11]]]) #形状(2, 2, 3)の3次元配列
tensor_3dim.T #tensor_3dim.transpose(2,1,0)と同じ 形状(3, 2, 2)
torch.transpose(tensor_3dim, 0,2) #形状(2, 3, 2)の3次元
[Out]
tensor([[[ 0, 6],
[ 3, 9]],
[[ 1, 7],
[ 4, 10]],
[[ 2, 8],
[ 5, 11]]])
tensor([[[ 0, 6],
[ 3, 9]],
[[ 1, 7],
[ 4, 10]],
[[ 2, 8],
[ 5, 11]]])4-4.次元の追加:tensor.unsqueeze()
新しい次元を追加する場合はNumpyはnp.newaxisですが、pytorchdeではtensor.unsqueeze()を使用します。
[In]
tensor = torch.tensor([[ 0,  1,  2,  3,  4,  5],
                   [ 6,  7,  8,  9, 10, 11]]) #配列形状: (2, 6)

tensor1 = tensor.unsqueeze(0) #Tensor形状:torch.Size([1, 2, 6])
tensor2 = tensor.unsqueeze(1) #Tensor形状:torch.Size([2, 1, 6])
tensor3 = tensor.unsqueeze(2) #Tensor形状:torch.Size([2, 6, 1])

print('配列形状:', tensor.shape, tensor1.shape, tensor2.shape, tensor3.shape)

[Out]
配列形状: torch.Size([2, 6]) torch.Size([1, 2, 6]) torch.Size([2, 1, 6]) torch.Size([2, 6, 1])
【参考】unsqueeze_とunsqueezeの違い:inplace
一部のメソッドで_の有り無しがあります。_があると元の変数が置換(inplace機能)されます
[In]
tensor = torch.tensor([1])
print(id(tensor))
tensor.unsqueeze(0) #元の変数には影響なし
print(id(tensor), tensor)
tensor.unsqueeze_(0) #元の変数が置換される
print(id(tensor), tensor)

[Out]
2153232063936
2153232063936 tensor([1])
2153232063936 tensor([[1]])
5.条件抽出
5-1.シンプルな条件抽出
シンプルな手法としてテンソルに比較演算子を加えるとBool型配列を取得できます。それを元のテンソルに入れると指定値を抽出できます。
[In]
tensor = torch.tensor([[ 0,  1,  2,  3,  4,  5],
                   [ 6,  7,  8,  9, 10, 11]])

a_bool = tensor > 7 #7超の数値はTrue, 以下はFalse
a_up7 = tensor[tensor > 7] #7超の数値のみ抽出

[Out]
tensor([[False, False, False, False, False, False],
        [False, False,  True,  True,  True,  True]])

tensor([ 8,  9, 10, 11])
5-2.条件抽出+置換:torch.where()
指定した条件のTrue/Falseに対して値を置換する場合はtorch.where(条件, Trueの値, Falseの値)を使用します。
[In]
tensor = torch.tensor([[ 0,  1,  2,  3,  4,  5],
                   [ 6,  7,  8,  9, 10, 11]])

torch.where(tensor > 7, 0, 1) #torch.where(条件、置き換える値、条件を満たさない要素の値)

[Out]
tensor([[1, 1, 1, 1, 1, 1],
        [1, 1, 0, 0, 0, 0]])
5-3.下限/上限(min/max)を設定:torch.clip()
下限・上限設定はtorch.clip(テンソル、下限値、上限値)を使用します。
[In]
tensor = torch.tensor([[ 0,  1,  2,  3,  4,  5],
                   [ 6,  7,  8,  9, 10, 11]])

torch.clip(tensor,2,7) #torch.clip(data, min, max)としてmin以下の数値はすべてmin, max以上の数値はすべてmaxにする。

[Out]
tensor([[2, 2, 2, 3, 4, 5],
        [6, 7, 7, 7, 7, 7]])
6.統計量取得(sum, mean, std, argmax)
統計情報および指定値のインデックス番号を取得します。
合計:sum, 平均:mean, 分散:var, 標準偏差:std, 最大:max, 最小:min
最大値index:argmax, 最小値index:argmin
【Numpyとの違いに関する留意点】
●Numpyと異なり整数(Int)型だとエラーが出るためfloatに指定しました。
●Numpy:標本分散(母集団)、Pytorch:不偏分散(標本集団)のためstd, varの値は異なります。
[In]'1次元'
a = torch.tensor([1,2,3,5,7,9,10,11], dtype=torch.float) #dtypeはfloat(Intだとエラー)

print('sum:', torch.sum(a), 'avg:', torch.mean(a),'var:', torch.var(a), 'std:', torch.std(a) ) #合計・平均・分散・標準偏差
print('max:', torch.max(a), 'min:', torch.min(a)) #最大値, 最小値
print('argmax:', torch.argmax(a),'argmin:', torch.argmin(a)) #最大値のindex番号, 最小値のindex番号

[Out]
sum: tensor(48.) avg: tensor(6.) var: tensor(14.5714) std: tensor(3.8173)
max: tensor(11.) min: tensor(1.)
argmax: tensor(7) argmin: tensor(0)[In]'2次元'
a_2D = torch.tensor([[ 1, 2, 3, 5],
[ 7, 9, 10, 11]], dtype=torch.float)
print('sum:', torch.sum(a_2D), 'avg:', torch.mean(a_2D),'var:', torch.var(a_2D), 'std:', torch.std(a_2D) ) #合計・平均・分散・標準偏差
print('max:', torch.max(a_2D), 'min:', torch.min(a_2D)) #最大値, 最小値
print('argmax:', torch.argmax(a_2D),'argmin:', torch.argmin(a_2D)) #最大値のindex番号, 最小値のindex番号
print(torch.argmax(a_2D, axis=0), torch.argmax(a_2D, axis=1)) #最大値のindex番号を軸方向で取得->axis=0で列方向、axis=1で行方向
[Out]
sum: tensor(48.) avg: tensor(6.) var: tensor(14.5714) std: tensor(3.8173)
max: tensor(11.) min: tensor(1.)
argmax: tensor(7) argmin: tensor(0)
tensor([1, 1, 1, 1]) tensor([3, 3])7.ランダム操作
7-1.データのシャッフル
PytorchだけだとしんどかったのでNumpyを使用しました。他の方法としては作成した整数の乱数をindex代わりにしてテンソル取得があります。
[In]
import torch
import numpy as np

tensor = torch.tensor([0, 1, 2, 3, 4, 5, 6, 7, 8, 9])
np.random.shuffle(tensor.numpy()) #配列をランダムに並び替える
tensor

[Out]
tensor([1, 0, 4, 8, 3, 7, 6, 2, 9, 5])
7-2.乱数値作成:次元数確認
乱数を作成する場合torch.randメソッド(各次元の乱数の数)で記載します。
[In]
import torch
torch.manual_seed(0) #乱数値を固定

t_rand1 = torch.rand(10) #0~1の間でランダムに生成 形状:torch.Size([10])
t_rand2 = torch.rand(2,5) #0~1の間でランダムに生成 形状:torch.Size([2, 5])
t_rand3 = torch.rand(1,2,5) #0~1の間でランダムに生成 形状:torch.Size([1, 2, 5])

t_rand1, t_rand2, t_rand3[Out]
tensor([0.4963, 0.7682, 0.0885, 0.1320, 0.3074, 0.6341, 0.4901, 0.8964, 0.4556,
0.6323])
tensor([[0.3489, 0.4017, 0.0223, 0.1689, 0.2939],
[0.5185, 0.6977, 0.8000, 0.1610, 0.2823]])
tensor([[[0.6816, 0.9152, 0.3971, 0.8742, 0.4194],
[0.5529, 0.9527, 0.0362, 0.1852, 0.3734]]])7-3.様々な乱数値の作成
条件に応じた乱数値を作成します。
●torch.rand(データ数(データ形状)):0~1の間でランダムに生成
●torch.randn(データ数(データ形状)):標準正規分布(平均0, 分散1)
●torch.randint(最小値, 最大値, データ数):整数値のランダム
->データ数は次元の記法に注意(Numpyと異なる)
●torch.randperm(順列数):順列(0から入力値を1刻み)のランダム
[In]
import torch
torch.manual_seed(0) #乱数値を固定

t_rand = torch.rand(10)
t_randn = torch.randn(10) #標準正規分布(平均0, 分散1)の乱数
t_int = torch.randint(1, 100, (10, )) #(最小値, 最大値, データ数)で整数値をランダムで作成
t_randperm = torch.randperm(10) #与えた整数値の順列に対してランダムな整数を作成[Out]
tensor([0.4963, 0.7682, 0.0885, 0.1320, 0.3074, 0.6341, 0.4901, 0.8964, 0.4556,
0.6323])
tensor([ 0.1604, -0.6065, -0.7831, 1.0622, -0.2613, 1.0667, 0.4159, 0.8396,
-0.8265, -0.7949])
tensor([56, 82, 9, 70, 65, 34, 92, 9, 90, 26])
tensor([8, 4, 2, 0, 5, 7, 9, 3, 1, 6])なお乱数ではないですが初期化されていない値を持つテンソルはtorch.empty(次元数)で作成できます。
[In]
torch.empty(10)

[Out]※初期化されていないためランダムな値が入る。
tensor([0.4963, 0.7682, 0.0885, 0.1320, 0.3074, 0.6341, 0.4901, 0.8964, 0.4556,
        0.6323])
8.配列の結合
配列を結合する場合は torch.vstackとtorch.hstackがあります。Numpyのconcatenateメソッドの代わりはtorch.cat()があります。
8-1.列方向の結合:torch.cat(dim=0)/vstack()
列方向への結合はtorch.cat([tensorのリスト], dim=0)またはvstackメソッドを使用します。
[In]
import torch

tensor1 = torch.tensor([[1, 2, 3],
                    [4, 5, 6]]) #torch.Size([2, 3])

tensor2 = torch.tensor([[10, 11, 12],
                    [13, 14, 15]]) #torch.Size([2, 3])

#vertical(垂直)方向に結合
tensor_v = torch.vstack([tensor1, tensor2])
tensor_v1 = torch.cat([tensor1, tensor2], dim=0) #dim=0はvertical(垂直)方向に結合

print(tensor_v1.shape)
print(tensor_v1) #tensor_vも同じ

[OUT]
torch.Size([4, 3])

tensor([[ 1,  2,  3],
        [ 4,  5,  6],
        [10, 11, 12],
        [13, 14, 15]])
8-2.行方向の結合:torch.cat(dim=1)/hstack()
行方向への結合はtorch.cat([tensorのリスト], dim=1)またはhstackメソッドを使用します。
[IN]
#Horizontal(水平)方向に結合
tensor_h = torch.hstack([tensor1, tensor2])
tensor_h1 = torch.cat([tensor1, tensor2], dim=1) #dim=1はhorizontal(水平)方向に結合

print(tensor_h1.shape) #tensor_vも同じ
print(tensor_h1)

[Out]
torch.Size([2, 6])

tensor([[ 1,  2,  3, 10, 11, 12],
        [ 4,  5,  6, 13, 14, 15]])
9.配列の計算・線形代数の処理
9-1.四則演算・その他基礎演算
各種演算・留意事項は下記の通りです。
●和差商積:numpy配列同士に+, -, *, / で計算可能
●累乗:array**nまたはnp.power(array, 乗数)
●平方根(ルート):np.sqrt(array)
●指数関数・対数関数:np.exp(array)、np.log1p(array)
9-2.アダマール積・内積
アダマール積および内積は下記の通りです。注意点として内積は@記法はいけますがdotメソッドでは次元数関係でエラーが出ました。
[In]
tensor1 = torch.tensor([[1, 2, 3],
       [4, 5, 6],
       [7, 8, 9]])

tensor2 = torch.tensor([[10, 11, 12],
       [13, 14, 15],
       [16, 17, 18]])

tensor1*tensor2 #アダマール積
tensor1@tensor2 #torch.dot(tensor1, tensor2)は「RuntimeError: 1D tensors expected, but got 2D and 2D tensors」

[Out]
tensor([[ 10,  22,  36],
        [ 52,  70,  90],
        [112, 136, 162]])

tensor([[ 84,  90,  96],
        [201, 216, 231],
        [318, 342, 366]])
9-3.線形代数の計算:torch.linalg
線形代数(Linear Algebra)で使用する計算はtorch.linalgで使用できます。整数(Int)型ではエラーが出るため小数点にします。
[In]
A = torch.tensor([[1, 7, 3],
       [5, 2, 8],
       [0, 4, 6]], dtype=torch.float)

A_inv = torch.linalg.inv(A) #逆行列の計算
A@A_inv #AとAの逆行列の積 ※確認用

[Out]行列と逆行列の内積で単位行列が生成
tensor([[ 1.0000e+00,  0.0000e+00, -5.9605e-08],
        [ 0.0000e+00,  1.0000e+00, -1.1921e-07],
        [-5.9605e-08,  1.4901e-08,  1.0000e+00]])
10.CUDA
GPUを使用するためにCUDAを使用します。GPUが使用できればモデルの学習などを高速で計算可能です。
CUDAを使用するためには①PCにNVIDIAのGPUがある、②事前に環境構築が必要です。
10-1.CUDAの環境確認
CUDA, GPUの仕様やGPUの設置の確認は下記で実施できます。
[In]
import torch
torch.cuda.manual_seed(0) #GPUのシード値を設定

print(torch.__version__) #PytorchのVersion
print(torch.cuda.get_device_name(0)) #PCのGPU名を表示
print(torch.cuda.is_available()) #GPUが使えるかどうか

[Out]
1.9.0+cu111
NVIDIA GeForce RTX 2060 SUPER
True
10-2.GPUへの割り当て
GPUで使用する場合はdevice、変数にGPUを割り当てる必要があります。Deviceへの割り当てや確認は下記の通りです。
[In]
device = torch.device('cuda:0' if torch.cuda.is_available() else 'cpu') #GPUが使える場合はDeviceをGPUに設定
tensor = torch.tensor(1)

print(device)
print(tensor.device) #Device上のテンソル(変数)の位置(CPU or GPU)を表示
print(tensor.is_cuda) #テンソル(変数)がGPU上にあるかどうか確認

[Out]
cuda:0
cpu
False
11.Pytorch応用(記事紹介)
具体的にPytorchを使用したライブラリや実装例は下記の通りです。
【補足】ブロードキャスト機能
ざっくりいうと配列形状の自動補完機能です。ルールとして「2つの配列の各次元が同じ大きさになっているか、どちらかが1であること」です。
参考資料
This tutorial will introduce compute and data-efficient transformers and provide a step-by-step to create your own Vision Transformers. Through this guide, you'll be able to train state of the art results for classification in both computer vision & NLP. https://t.co/d3bc7ijeBJ
— PyTorch (@PyTorch) June 28, 2021
PYTORCH PERFORMANCE TUNING GUIDE Szymon Migacz, 04/12/2021
あとがき
取り合えず基礎中の基礎(Numpyとの比較ベース)は書き出して機械学習関係は別記事にしますが、使いやすさを考慮しながらめっちゃ更新するかもしれないです・・・
あとPytorch Lightningという「PyTorchのコーディングを簡単にできるフレーワーク」がありますがAPIの変更が多く、かつコードが動かなくなる致命的な変更が2022年8月現在でも生じているため、このAPI変更が落ち着いたころに記事まとめたいです。
この記事が気に入ったらサポートをしてみませんか?