Automatic Sudoku (Number Place) Solver with Digit Recognition and Integer Linear Programming

Photo by Maria Teneva on Unsplash
※本稿はテックブログからの転載です。
Sudoku is a logic-based number placement puzzle that consists of 81 cells which are divided into 9 columns, rows and blocks. The goal of this game is to fill out each cells with numbers 1–9 so that there are no repeating numbers in each row, column and blocks.
In this post, I aim to introduce a digit recognition and integer linear programming based automatic sudoku solver that uses the following: Keras (based on the MNIST database [1]) and OpenCV for digit recognition and PuLP for integer linear programming. Also, I plan on detailing out the integer linear programming part and only lightly touch upon the digit recognition and extraction part (image processing)
[1] The MNIST database is a large database of handwritten digits that is commonly used for training various image processing systems. The database is also widely used for training and testing in the field of machine learning.
The rest of this post is organized as follows:
1.Digit Extraction with OpenCV & Digit Recognition with Keras
2.Formulas and Python3 code with PuLP used for a Sudoku Puzzle Solver
3.Digit placement on the image of a Sudoku puzzle
4.Testing of the developed solver with a sample Sudoku puzzle
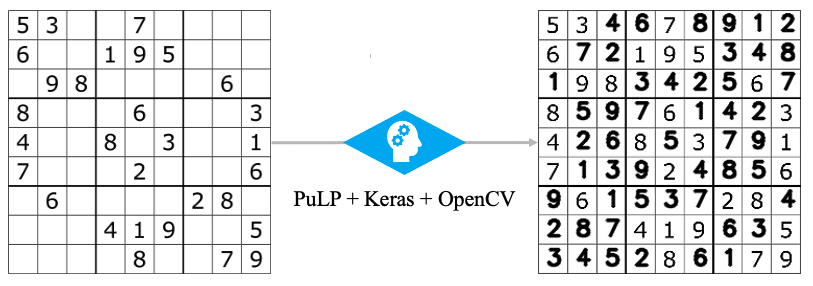
Fig1. Concept Image of Automatic Sudoku Solver
1. Digit Extraction with OpenCV & Digit Recognition with Keras
In this section, I explain the overview of image processing for digit recognition. Below, I have laid out a simple description of the sample code.
・Image processing: Gaussian blur, Thresholding, Resizing for prediction with MNIST based digit recognition model
・Digit Extraction: Based on Contours, crop and warp image
・Digit Recognition: MNIST based digit recognition model (As I used an existing trained model, I won’t provide a sample code for digit recognition modeling.)
import cv2
import pulp
import numpy as np
import tensorflow as tf
import matplotlib.pyplot as plt
from PIL import Image
from itertools import product
from tensorflow.keras.models import load_model
from keras.preprocessing import image

MNIST_MODEL_PATH = 'model/mnist_model.h5' # trained model path
SUDOKU_PUZZLE_IMAGE_PATH = 'image/sample_sudoku_puzzle.png' # sample sudoku puzzle image path
Part1. Setup
automatic_sudoku_solver_part_1.py hosted with ❤ by GitHub
def _image_processing_for_extracting_digits(_SUDOKU_PUZZLE_IMAGE_PATH):

   # read image as gray scale
   _image = cv2.imread(_SUDOKU_PUZZLE_IMAGE_PATH)
   _gray_scale_image = cv2.cvtColor(_image, cv2.COLOR_BGR2GRAY)

   # applying gaussian blurring to reduce background noise
   _gaussian_blurred_gray_scale_image = cv2.GaussianBlur(_gray_scale_image,(1,1),cv2.BORDER_DEFAULT)

   # applying inverse binary threshold
   _ret, _inverse_binary_threshold_image = cv2.threshold(_gray_scale_image, 180, 255,cv2.THRESH_BINARY_INV)

   # applying probabilistic hough transform on binary image
   _minLineLength = 100
   _maxLineGap = 60
   _lines = cv2.HoughLinesP(_inverse_binary_threshold_image, 1, np.pi/180, 100, minLineLength=_minLineLength, maxLineGap=_maxLineGap)

   for _line in _lines:
       x1,y1,x2,y2 = _line[0]
       cv2.line(_image, (x1,y1), (x2,y2), (0,255,0), 2, cv2.LINE_AA)
   cv2.imwrite('image/sample_sudoku_puzzle_hough.jpg',_image)

   # finding contours
   _image_hough = cv2.imread('image/sample_sudoku_puzzle_hough.jpg',0)
   _contours, _hierarchy = cv2.findContours(_image_hough, cv2.RETR_TREE, cv2.CHAIN_APPROX_NONE)
   _cnt = _contours[0]
   _max_area = cv2.contourArea(_cnt)
   for _contour in _contours:
       if cv2.contourArea(_contour) > _max_area:
           _cnt = _contour
           _max_area = cv2.contourArea(_contour)

   # replaceing the contour by approximate encompassing polygon
   _epsilon = 0.01*cv2.arcLength(_cnt, True)
   _poly_approx = cv2.approxPolyDP(_cnt, _epsilon, True)
   _processed_image = _points_transforming(_inverse_binary_threshold_image, _poly_approx)

   return _processed_image


def _points_cordinating(_points):

   _cordinated_points = np.zeros((4, 2), dtype = "float32")
   _cordinated_points[0] = _points[0]
   _cordinated_points[2] = _points[2]
   _cordinated_points[3] = _points[3]
   _cordinated_points[1] = _points[1]
   return _cordinated_points

def _points_transforming(_image, _points):

   # obtain cordinated points
   _cordinated_points = _points_cordinating(_points)

   # tl: top left
   # tr: top right
   # br: bottom right
   # bl: bottom left
   (tl, tr, br, bl) = _cordinated_points
   # calculate max height
   _width_1 = np.sqrt(((br[0]-bl[0])**2) + ((br[1]-bl[1])**2))
   _width_2 = np.sqrt(((tr[0]-tl[0])**2) + ((tr[1]-tl[1])**2))
   _max_width = max(int(_width_1), int(_width_2))
   # calculate max height
   _height_1 = np.sqrt(((tr[0]-br[0])**2) + ((tr[1]-br[1])**2))
   _height_2 = np.sqrt(((tl[0]-bl[0])**2) + ((tl[1]-bl[1])**2))
   _max_height = max(int(_height_1), int(_height_2))
   # the set of destination points
   _destination_points = np.array([[0, 0], [0, _max_height - 1], [_max_width - 1, _max_height - 1], [_max_width - 1, 0]], dtype = 'float32')
   # compute the perspective transform matrix and then apply it
   _matrix = cv2.getPerspectiveTransform(_cordinated_points, _destination_points)
   _warped_image = cv2.warpPerspective(_image, _matrix, (_max_width, _max_height))
   # return the warped image
   return _warped_image

def _calculating_cell_positions(_image):

   # resize input image for digit recognition (NN model trained with MNIST)
   _image = cv2.resize(_image,(252,252))

   # computing position of each cell and storing in an array of arrays
   _cell_positions = []
   _cell_width = _image.shape[1]//9
   _cell_height = _image.shape[0]//9

   # set start points
   x1,x2,y1,y2 = 0,0,0,0

   # append each cell position
   for i in range(9):
       y2 = y1 + _cell_height
       x1 = 0
       for j in range(9):
           x2 = x1 + _cell_width
           _current_cell = [x1, x2, y1, y2]
           _cell_positions.append(_current_cell)
           x1 = x2
       y1 = y2

   return _cell_positions

def _digit_prediction_with_NN_model(_cell, _image):

   # resize image find contours
   _image = cv2.resize(_image, (252,252))
   _image = _image[_cell[2]+2:_cell[3]-3, _cell[0]+2:_cell[1]-3]
   _contours, _hierarchy = cv2.findContours(_image.copy(), cv2.RETR_TREE, cv2.CHAIN_APPROX_SIMPLE)

   # calculate positions of each image
   _positions = []

   if len(_contours) != 0:
       for _contour in _contours:
           x, y, w, h = cv2.boundingRect(_contour)
           if (w < 15 and x > 2) and (h < 25 and y > 2):
               _positions.append((x, y, x+w, y+h))
               break

   # prediction
   if _positions != []:
       _croped_image = cv2.resize(_image, (28,28))
       _croped_image = _croped_image.reshape(1,28,28,1)
       _croped_image = tf.cast(_croped_image, tf.float32)
       _result = _predict_digit(_croped_image)
   else:
       _result = 0

   return _result

def _extract_digits(_image):

   # set list
   _digits = []
   _cells = _calculating_cell_positions(_image)

   for _cell in range(len(_cells)):
       _prediction_result = _digit_prediction_with_NN_model(_cells[_cell], _image)
       _digits.append(_prediction_result)

   _results = [_digits[i:i+9] for i in range(0, len(_digits), 9)]

   return _results

def _predict_digit(_image):

   _mnist_model = load_model(MNIST_MODEL_PATH)
   _prediction_result = _mnist_model.predict_classes(_image)

   return _prediction_result[0]
Part2. Function for Digit Extraction and Recognition
automatic_sudoku_solver_part_2.py hosted with ❤ by GitHub
2. Formulas and Python3 code with PuLP used for a Sudoku Puzzle Solver
Unlike typical integer linear programming problems, there is no objective function in sudoku puzzles. In this case, we just find a feasible answer which satisfies some given constraints.
The constraints to solving a Sudoku puzzle is that each row, column, and blocks is filled with an integer between 1–9 and that no duplicates exists within each row, column and block. Fig2 shows constraints of sudoku puzzles and we use parameter x with i for columns, j for rows and k for values. In other words, x _(i, j, k) assumes the value of 1, if element (i, j) of the sudoku matrix contains k, and 0 otherwise.
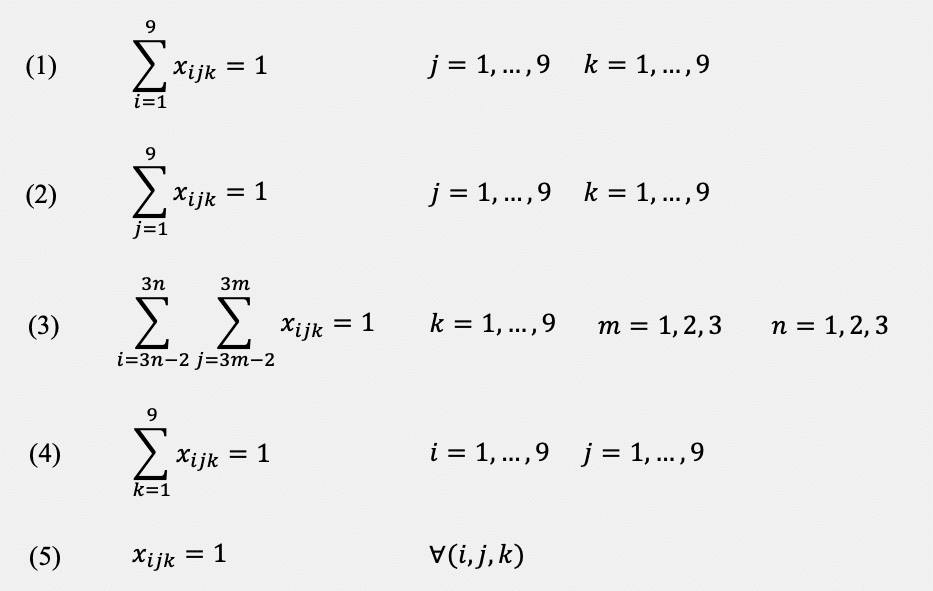
Fig2. Formula of Sudoku Puzzle
(1) the constraint on columns
(2) the constraint on rows
(3) the constraint on 3 x 3 block
(4) assures that all the cells of the Sudoku puzzle is filled
(5) means that where the corresponding sudoku matrix are assumed to equal one.
Based on the above formulas , I wrote a sudoku solving function with PuLP.
def _sudoku_solver_with_pulp(_board):

   problem = pulp.LpProblem()
   line = list(range(9))
   x = [[[pulp.LpVariable(f'x{i}{j}{k}', cat='Binary') for k in line] for j in line] for i in line]
   # constraints
   for i, j in product(line, line):
       if _board[i][j] > 0:
           problem += x[i][j][_board[i][j]-1] == 1
   for j, k in product(line, line):
       problem += pulp.lpSum(x[i][j][k] for i in line) == 1
   for k, i in product(line, line):
       problem += pulp.lpSum(x[i][j][k] for j in line) == 1
   for i, j in product(line, line):
       problem += pulp.lpSum(x[i][j][k] for k in line) == 1
   _3x3_square = [[ii, ii+1, ii+2] for ii in [0, 3, 6]]
   for a, b in product(_3x3_square, _3x3_square):
       for k in line:
           problem += pulp.lpSum(x[i][j][k] for i in a for j in b) == 1

   # calculate
   problem.solve()
   # make result board
   _result = _board.copy()
   for i, j, k in product(line, line, line):
       if x[i][j][k].value() == 1:
           _result[i][j] = k + 1

   return _result
Part3. Function for Solving Sudoku Puzzles
automatic_sudoku_solver_part_3.py hosted with ❤ by GitHub
4. Digit placement on the image of a Sudoku puzzle
As in section 1, description for details of writing calculated results is omitted.
def _finding_empty_cell(_cell, _image):

   # prepare
   _positions = []
   _image = cv2.resize(_image,(252,252))
   _image = _image[_cell[2]+2:_cell[3]-3,_cell[0]+2:_cell[1]-3]
   _contours, _hierarchy = cv2.findContours(_image.copy(), cv2.RETR_TREE, cv2.CHAIN_APPROX_SIMPLE)

   # calculate posisions
   if len(_contours) != 0:
       for _contour in _contours:
           x, y, w, h = cv2.boundingRect(_contour)
           if (w < 15 and x > 2) and (h < 25 and y > 2):
               _positions.append((x, y, x+w, y+h))
               break

   if _positions == []:
       return _positions
   else:
       return 0

def _place_digit_on_empty_cell(_image):

   # read image for placing
   _image_for_placing = cv2.imread(SUDOKU_PUZZLE_IMAGE_PATH)
   _image_for_placing = cv2.cvtColor(_image_for_placing, cv2.COLOR_BGR2GRAY)
   _image_for_placing = cv2.resize(_image_for_placing,(252,252))

   # resize image
   _image = cv2.resize(_image,(252,252))
   _cells = _calculating_cell_positions(_image)

   n = 9
   _reshaped_cell = [_cells[i:i+n] for i in range(0, len(_cells), n)]
   _sudoku_digits = _extract_digits(_image)
   _answer_digits = _sudoku_solver_with_pulp(_sudoku_digits)

   for i in range(len(_reshaped_cell)):
       for j in range(len(_reshaped_cell[i])):
           _posisions = _finding_empty_cell(_reshaped_cell[i][j], _image)
           _digit_text = _answer_digits[i][j]

           if _posisions == []:
               cv2.putText(_image_for_placing, str(_digit_text), ((_reshaped_cell[i][j][0]+8), (_reshaped_cell[i][j][2]+19)), cv2.FONT_HERSHEY_SIMPLEX, 0.7, (0, 0, 0), 2, cv2.LINE_AA)
           else:
               continue

   cv2.imwrite('image/sample_sudoku_puzzle_answer.jpg', _image_for_placing)
   plt.imshow(_image_for_placing, cmap='gray')

   return _image_for_placing
Part4. Function for Placing Digits on Image
automatic_sudoku_solver_part_4.py hosted with ❤ by GitHub
5. Testing of the developed solver with a sample Sudoku puzzle
In this section, I will test the solver, which was built using functions outlined in Section1~4, on a sample sudoku puzzle. Fig3 shows the sample Sudoku puzzle that I used for testing. Fig4, Fig5, Fig6 shows the code on Jupyter Notebook that I used for recognizing digits from the image of a sudoku puzzle, solving the sudoku puzzle and writing in the calculated results on the original image of the puzzle respectively.
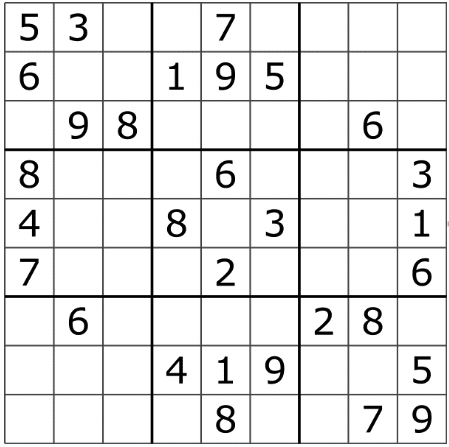
Fig3. A Sample Sudoku Puzzle
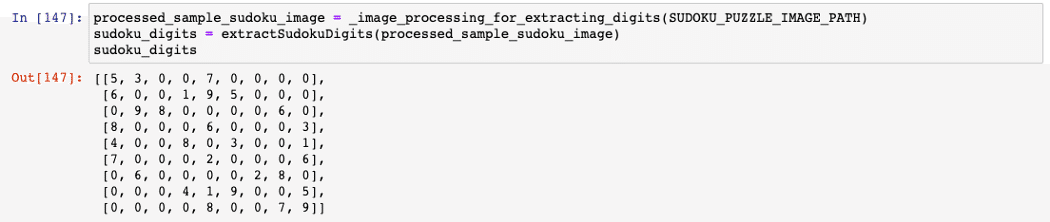
Fig4. Test of Digit Recognition
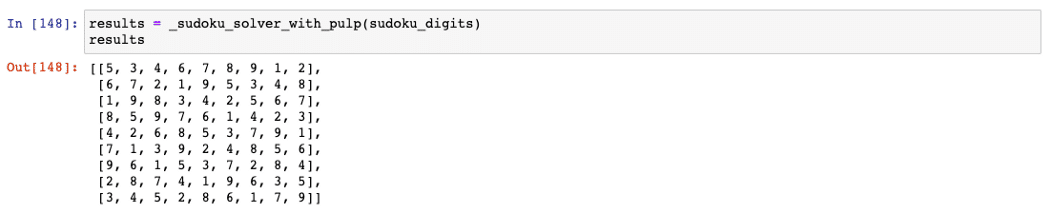
Fig5. Test of Sudoku Solver with extracted digits from a sample sudoku puzzle
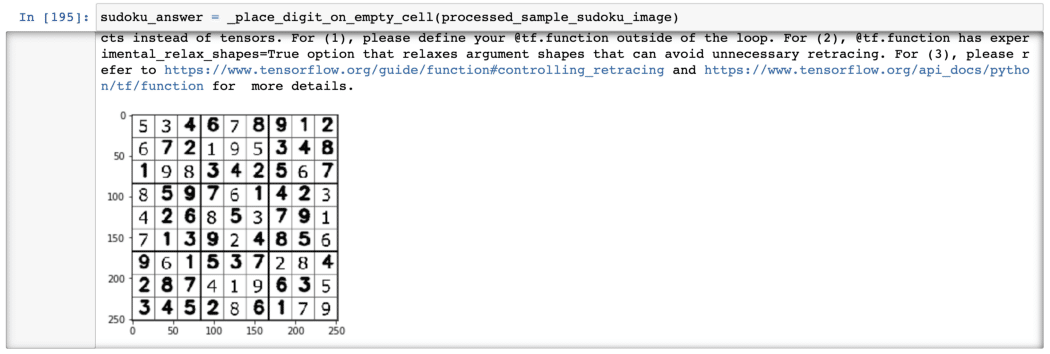
Fig6. Test of Digit Placement
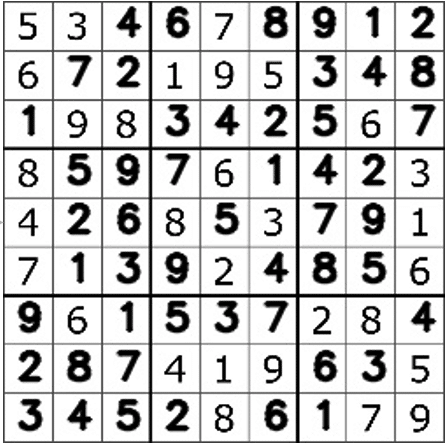
Fig7. Output Results
Closing Remarks
In this post, I introduced an automatic Sudoku solver using digit recognition and integer linear programming, However, this is one of many methods for building a sudoku solver and I only chose it from the purpose of mathematical optimization. Hence, I recommend you also implementing other methods for building a sudoku solver!
この記事が気に入ったらサポートをしてみませんか?