
【テスト駆動開発】Springboot & React - 第5回 : Reduxの状態管理

1. はじめに
こんにちは、今日はReduxを通じて、ユーザーのログイン状態管理してみます。ReduxはJavaScriptアプリケーションの状態を効果的に管理するための状態管理ライブラリの一つです。アプリケーションの状態を一元化し、状態の変化を予測可能にします。
今日の目標画面実装です!

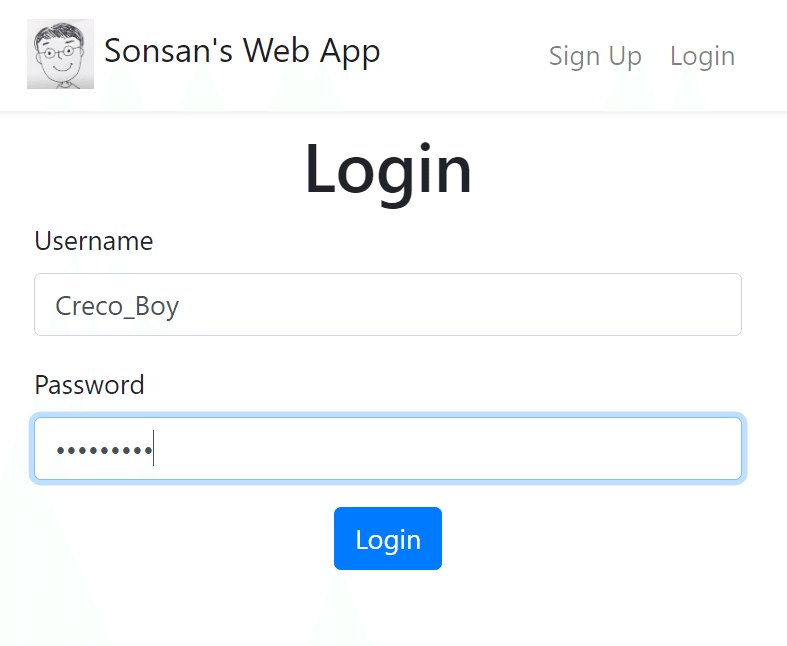

ここで、重要なのは、パージをリロードしても、認証状態が維持されることです。その状態を管理するライブラリが「Redux」です。
2.Reduxの基本概念
状態 (State)
Reduxはアプリケーションの状態を一つのJavaScriptオブジェクトで管理します。このオブジェクトはアプリケーションの全ての状態情報を含み、コンポーネント間で共有されます。
アクション(Action)
アプリケーションの状態を変更するリクエストやイベントを表すオブジェクトです。アクションは主にtype属性を持ち、必要に応じてpayloadを含めることができます。
リデューサ(Reducer)
アクションを処理して新しい状態を返す関数です。リデューサは以前の状態とアクションを受けて状態変更ロジックを実行し、新しい状態を返します。
ストア(Store)
Reduxの状態を保存して管理するオブジェクトです。アプリケーションの全ての状態情報はストアに保存されます。ストアはビューと状態の間の仲介の役割をします。
ディスパッチ (Dispatch)
アクションをストアに送って状態変更を要請するメソッドです。ディスパッチを通じてアクションを処理し、ステータスを更新します。
サブスクリプション(Subscribe)
ストアで状態が変更される時、特定の関数(リスナー)を呼び出すメソッドです。コンポーネントはサブスクリプションを通じて状態の変化を検知して画面を更新することができます。
コネクト(Connect)
ReactコンポーネントをReduxストアに接続するための高階コンポーネントです。これにより、コンポーネントはストアの状態を購読し、必要に応じてリデューサーをトリガーして再描画できます。
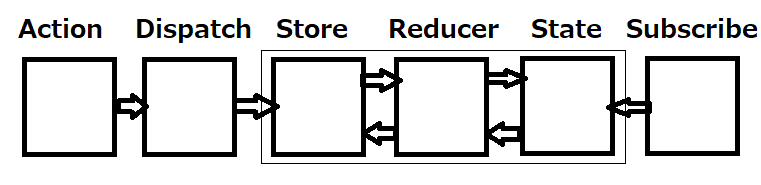
ストアはリデューサを呼び出して状態を更新します。
サブスクリプションはストアで状態変化を検知して、Reactコンポーネントのようなビューを更新する役割をします。
3.実装過程
3.1. Reduxのインストールと初期設定
npm install --save redux react-redux
npm install --save-dev redux-logger
frontend/src/index.js
import React from 'react';
import ReactDOM from 'react-dom';
import './index.css';
import { HashRouter } from 'react-router-dom';
import * as serviceWorker from './serviceWorker';
import App from './containers/App';
import { Provider } from 'react-redux';
import { createStore } from 'redux';
import authReducer from './redux/authReducer';

const store = createStore(authReducer);

ReactDOM.render(
  <Provider store={store}>
    <HashRouter>
      <App />
    </HashRouter>
  </Provider>,
  document.getElementById('root')
);
createStore(authReducer)
createStore関数はReduxストアを作成します。
authReducerはリデューサー関数で、ストアが状態を管理するときに使用される状態の変更ロジックを定義します。
<Provider store={store}>
ProviderコンポーネントはReact Reduxライブラリから提供されるコンポーネントで、ReduxストアをReactアプリケーションに提供します。
storeプロパティを使用してReduxストアを提供し、子コンポーネントから状態にアクセスできるようにします。
frontend/src/redux/authReducer.js
const initialState = {
  id: 0,
  username: '',
  displayName: '',
  image: '',
  password: '',
  isLoggedIn: false
};

export default function authReducer(state = initialState, action) {
  return state;
}初期状態のオブジェクトを持ち、authReducerと呼ばれるリデューサー関数をエクスポートしています。このリデューサーは、アクションが発生した場合には状態を変更せずに現在の状態をそのまま返します。
3.2. Reduxとナビゲーションバーの連結
frontend/src/components/TopBar.spec.js
import { Provider } from 'react-redux';
import { createStore } from 'redux';
import authReducer from '../redux/authReducer';

const loggedInState = {
  id: 1,
  username: 'user1',
  displayName: 'display1',
  image: 'profile1.png',
  password: 'P4ssword',
  isLoggedIn: true
};

const defaultState = {
  id: 0,
  username: '',
  displayName: '',
  image: '',
  password: '',
  isLoggedIn: false
};

const setup = (state = defaultState) => {
  const store = createStore(authReducer, state);
  return render(
    <Provider store={store}>
      <MemoryRouter>
        <TopBar />
      </MemoryRouter>
    </Provider>
  );
};
…
describe('TopBar', () => {
  describe('Layout', () => {
…
    it('has link to logout when user logged in', () => {
      const { queryByText } = setup(loggedInState);
      const logoutLink = queryByText('Logout');
      expect(logoutLink).toBeInTheDocument();
    });
    it('has link to user profile when user logged in', () => {
      const { queryByText } = setup(loggedInState);
      const profileLink = queryByText('My Profile');
      expect(profileLink.getAttribute('href')).toBe('/user1');
    });
  });
});
setup 関数は、指定された状態を持つストアを作成し、TopBar コンポーネントをレンダリングするために使用されます。
テストスイートで TopBar コンポーネントの異なるレイアウトやリンクに関するテストが行われており、loggedInState を使用してユーザーがログインしている場合の振る舞いを検証しています。たとえば、"Logout" リンクが表示されることや、ユーザーのプロファイルへのリンクが正しいURLを持つことを確認しています。
frontend/src/components/TopBar.js
import React from 'react';
import logo from '../assets/hoaxify-logo.png';
import { Link } from 'react-router-dom';
import { connect } from 'react-redux';

class TopBar extends React.Component {
  render() {
    let links = (
      <ul className="nav navbar-nav ml-auto">
        <li className="nav-item">
          <Link to="/signup" className="nav-link">
            Sign Up
          </Link>
        </li>
        <li className="nav-item">
          <Link to="/login" className="nav-link">
            Login
          </Link>
        </li>
      </ul>
    );
    if (this.props.user.isLoggedIn) {
      links = (
        <ul className="nav navbar-nav ml-auto">
          <li className="nav-item nav-link">Logout</li>
          <li className="nav-item">
            <Link to={`/${this.props.user.username}`} className="nav-link">
              My Profile
            </Link>
          </li>
        </ul>
      );
    }
    return (
      <div className="bg-white shadow-sm mb-2">
        <div className="container">
          <nav className="navbar navbar-light navbar-expand">
            <Link to="/" className="navbar-brand">
              <img src={logo} width="60" alt="Hoaxify" /> Hoaxify
            </Link>
            {links}
…
          </nav>
        </div>
      </div>
    );
  }
}

const mapStateToProps = (state) => {
  return {
    user: state
  };
};

export default connect(mapStateToProps)(TopBar);
このコードは、Reactコンポーネント TopBar で、認証関連のユーザー情報を表示するためにReduxとReact Routerを統合しています。
TopBar コンポーネントは、ヘッダー領域を表示し、ユーザーがログインしている場合とログインしていない場合で異なるリンクを表示します。
connect 関数を使用して、Reduxストアからユーザー情報を TopBar コンポーネントにマッピングしています。このコンポーネントは user プロパティとしてユーザー情報にアクセスできます。
ロゴやサインアップ、ログイン、ログアウト、ユーザープロファイルへのリンクが表示され、ユーザーのログイン状態に応じて異なるリンクが表示されます。
frontend/src/containers/App.spec.js
import { Provider } from 'react-redux';
import { createStore } from 'redux';
import authReducer from '../redux/authReducer';

const setup = (path) => {
  const store = createStore(authReducer);
  return render(
    <Provider store={store}>
      <MemoryRouter initialEntries={[path]}>
        <App />
      </MemoryRouter>
    </Provider>
  );
};
このコードは、Redux ストアをセットアップし、React アプリケーション内でテストするためのユーティリティ関数 setup を定義しています。
Provider コンポーネントは、Redux ストアを提供するために使用されています。これにより、Redux ストアのデータが React アプリケーション内で利用できるようになります。
frontend/src/index.js
import { Provider } from 'react-redux';
import { createStore } from 'redux';
import authReducer from './redux/authReducer';
const loggedInState = {
  id: 1,
  username: 'user1',
  displayName: 'display1',
  image: 'profile1.png',
  password: 'P4ssword',
  isLoggedIn: true
};
const store = createStore(authReducer, loggedInState);

ReactDOM.render(
  <Provider store={store}>
Reduxストアを設定し、ログインした状態でのReactアプリケーションの初期化を行います。
3.3. ディスパッチアクション(Dispatching action)
「Dispatching action」は行為を状態管理ライブラリやフレームワークに送ることです。これにより、アプリケーションの状態を変更し、画面ビューや構成要素が変更されます。
frontend/src/components/TopBar.spec.js
  describe('Interactions', () => {
    it('displays the login and signup links when user clicks logout', () => {
      const { queryByText } = setup(loggedInState);
      const logoutLink = queryByText('Logout');
      fireEvent.click(logoutLink);
      const loginLink = queryByText('Login');
      expect(loginLink).toBeInTheDocument();
    });
  });
このテストケースでは、ユーザーがログアウトリンクをクリックしたときの振る舞いをテストしています。
setup(loggedInState) を使用して、ログイン状態でのアプリケーションをセットアップし、ログアウトリンクを取得します。
fireEvent.click(logoutLink) は、ログアウトリンクをクリックするシミュレーションを行います。
最後に、ログアウト後に "Login" リンクが表示されることをテストしています。
frontend/src/components/TopBar.js
class TopBar extends React.Component {
  onClickLogout = () => {
    const action = {
      type: 'logout-success'
    };
    this.props.dispatch(action);
  };

  render() {
    let links = (
      <ul className="nav navbar-nav ml-auto">
…
    if (this.props.user.isLoggedIn) {
      links = (
        <ul className="nav navbar-nav ml-auto">
          <li
            className="nav-item nav-link"
            onClick={this.onClickLogout}
            style={{
              cursor: 'pointer'
            }}
          >
            Logout
          </li>
TopBar 内でログアウト操作を処理するためのコードを示しています。
onClickLogout メソッドは、ログアウト操作時に呼び出されるコールバック関数です。このメソッドは、Reduxアクションをディスパッチしてログアウトを処理します。
action オブジェクトは、type プロパティを持つReduxアクションを定義します。この場合、type は 'logout-success' です。
this.props.dispatch(action) は、Reduxの dispatch メソッドを使用してアクションをストアに送信します。これにより、Reduxストア内の状態が更新され、ユーザーがログアウトされます。
ログアウトリンクは、onClickLogout メソッドをクリックすることでログアウト操作をトリガーします。また、cursor: 'pointer' を設定してカーソルがポインティングハンドに変わるようにスタイルを指定しています。
frontend/src/redux/authReducer.js
export default function authReducer(state = initialState, action) {
  if (action.type === 'logout-success') {
    return { ...initialState };
  }
  return state;
}
Reducerは状態(state)を変更する関数です。アクション(Action)を処理し、新しい状態を返還します。
Reduxのリデューサー(Reducer)関数で、ユーザーのログアウトアクションを処理します。
authReducer 関数は、現在の状態(state)とアクション(action)を受け取ります。
アクションの type プロパティが 'logout-success' である場合、ログアウトアクションを示します。このアクションが発生すると、現在の状態を初期状態(initialState)としてリセットします。新しい状態オブジェクトは { ...initialState } を使用して複製されます。
ログアウトアクション以外の場合、状態を変更せずに現在の状態をそのまま返します。
ここで、「…」というのは?たとえば、以下のコードがあります。
const newState = { ...initialState };newStateはinitialStateと同じプロパティを持つ新しいオブジェクトになります。これを「浅いコピー」とも言います。 つまり、newStateとinitialStateは異なるオブジェクトですが、プロパティの値は同じです。
frontend/src/index.js
import { createStore, applyMiddleware } from 'redux';
import authReducer from './redux/authReducer';
import logger from 'redux-logger';

const loggedInState = {
  id: 1,
  username: 'user1',
  displayName: 'display1',
  image: 'profile1.png',
  password: 'P4ssword',
  isLoggedIn: true
};
const store = createStore(authReducer, loggedInState, applyMiddleware(logger))

ReactDOM.render(
  <Provider store={store}>
    <HashRouter>
      <App />
    </HashRouter>
  </Provider>,
  document.getElementById('root')
);applyMiddlewareは、createStore関数に渡され、ミドルウェアをストアに適用します。ミドルウェアはアクションがディスパッチされるたびに実行され、アクションや状態に対してカスタムの操作を実行することができます。
applyMiddlewareは、Reduxアプリケーションでミドルウェアを使用するための関数です。ミドルウェアは、アクションがディスパッチされてからリデューサーが状態を変更する前に、アクションに対するカスタムのロジックや変換を適用するために使用されます。
ミドルウェアは、Reduxの機能を拡張し、アクションを監視、変更、またはロギングするのに役立ちます。
ロギング: redux-loggerのようなミドルウェアを使用して、アクションと状態の変更をコンソールにログ出力することができます。
非同期処理: redux-thunkやredux-sagaなどのミドルウェアを使用して、非同期操作(APIリクエストなど)を実行し、その結果を元にアクションをディスパッチすることができます。
ルーティング: react-router-reduxなどのミドルウェアを使用して、アプリケーションのルーティングをReduxストアと同期させることができます。
3.4. ReduxへのLoginPage連結
frontend/src/containers/App.spec.js
  it('displays My Profile on TopBar after login success', async () => {
    const { queryByPlaceholderText, container, queryByText } = setup('/login');
    const changeEvent = (content) => {
      return {
        target: {
          value: content
        }
      };
    };
    const usernameInput = queryByPlaceholderText('Your username');
    fireEvent.change(usernameInput, changeEvent('user1'));
    const passwordInput = queryByPlaceholderText('Your password');
    fireEvent.change(passwordInput, changeEvent('P4ssword'));
    const button = container.querySelector('button');
    axios.post = jest.fn().mockResolvedValue({
      data: {
        id: 1,
        username: 'user1',
        displayName: 'display1',
        image: 'profile1.png'
      }
    });
    fireEvent.click(button);

    const myProfileLink = await waitForElement(() => queryByText('My Profile'));
    expect(myProfileLink).toBeInTheDocument();
  });
このテストは、ログイン成功後にTopBar(トップバー)に"My Profile"(マイプロフィール)リンクが表示されることを検証しています。
/login ページに移動した状態をセットアップします。setup('/login')は、テスト環境を設定し、特定のURLにアプリケーションを移動します。
changeEvent 関数は、テキスト入力の内容を変更するためのイベントを模倣します。
queryByPlaceholderText メソッドを使用して、ユーザー名とパスワードのテキスト入力フィールドを取得し、それらの入力フィールドにユーザー名とパスワードを入力します。
"button" 要素を取得し、ボタンをクリックします。このクリック操作は、axios.postメソッドのモックを使用して、ログインリクエストが成功することを模倣しています。
waitForElement メソッドを使用して、"My Profile" リンクが表示されるのを待ちます。このメソッドは非同期の要素の表示を待つために使用されます。
frontend/src/pages/LoginPage.js
  onClickLogin = () => {
    const body = {
      username: this.state.username,
      password: this.state.password
    };
    this.setState({ pendingApiCall: true });
    this.props.actions
      .postLogin(body)
      .then((response) => {
        const action = {
          type: 'login-success',
          payload: {
            ...response.data,
            password: this.state.password
          }
        };
        this.props.dispatch(action);
...

LoginPage.defaultProps = {
  actions: {
    postLogin: () => new Promise((resolve, reject) => resolve({}))
  },
  dispatch: () => {}
};

export default connect()(LoginPage);
onClickLogin メソッド
ユーザー名とパスワードを含むログイン情報を body オブジェクトに格納します。
this.setState({ pendingApiCall: true }) を使用して、APIリクエストが実行中であることを示す pendingApiCall ステートを設定します。
this.props.actions.postLogin(body) を呼び出して、ユーザーのログインを試みます。postLogin メソッドは、ログインリクエストを非同期に実行し、その結果を Promise で返します。
ログインが成功すると、レスポンスデータを含むアクションを作成し、Reduxストアにディスパッチします。
LoginPage.defaultProps:
LoginPage コンポーネントのデフォルトプロパティを設定します。これには、actions プロパティと dispatch プロパティが含まれています。
frontend/src/redux/authReducer.js
export default function authReducer(state = initialState, action) {
  if (action.type === 'logout-success') {
    return { ...initialState };
  } else if (action.type === 'login-success') {
    return {
      ...action.payload,
      isLoggedIn: true
    };
  }
  return state;
}
3.5. ReduxへのUserSignupPage連結
frontend/src/containers/App.spec.js
const changeEvent = (content) => {
  return {
    target: {
      value: content
    }
  };
};
...
    const myProfileLink = await waitForElement(() => queryByText('My Profile'));
    expect(myProfileLink).toBeInTheDocument();
  });
  it('displays My Profile on TopBar after signup success', async () => {
    const { queryByPlaceholderText, container, queryByText } = setup('/signup');
    const displayNameInput = queryByPlaceholderText('Your display name');
    const usernameInput = queryByPlaceholderText('Your username');
    const passwordInput = queryByPlaceholderText('Your password');
    const passwordRepeat = queryByPlaceholderText('Repeat your password');

    fireEvent.change(displayNameInput, changeEvent('display1'));
    fireEvent.change(usernameInput, changeEvent('user1'));
    fireEvent.change(passwordInput, changeEvent('P4ssword'));
    fireEvent.change(passwordRepeat, changeEvent('P4ssword'));

    const button = container.querySelector('button');
    axios.post = jest
      .fn()
      .mockResolvedValueOnce({
        data: {
          message: 'User saved'
        }
      })
      .mockResolvedValueOnce({
        data: {
          id: 1,
          username: 'user1',
          displayName: 'display1',
          image: 'profile1.png'
        }
      });

    fireEvent.click(button);
'displays My Profile on TopBar after signup success' テストケースでは、サインアップ成功後にトップバーに"My Profile"リンクが表示されることを確認します。
frontend/src/pages/UserSignupPage.js
  onClickSignup = () => {
    const user = {
      username: this.state.username,
      displayName: this.state.displayName,
      password: this.state.password
    };
    this.setState({ pendingApiCall: true });
    this.props.actions
      .postSignup(user)
      .then((response) => {
        const body = {
          username: this.state.username,
          password: this.state.password
        };
        this.setState({ pendingApiCall: true });
        this.props.actions
          .postLogin(body)
          .then((response) => {
            const action = {
              type: 'login-success',
              payload: {
                ...response.data,
                password: this.state.password
              }
            };
            this.props.dispatch(action);
            this.setState({ pendingApiCall: false }, () => {
              this.props.history.push('/');
            });
          })
          .catch((error) => {
            if (error.response) {
              this.setState({
                apiError: error.response.data.message,
                pendingApiCall: false
              });
            }
          });
        // this.setState({ pendingApiCall: false }, () =>
        //   this.props.history.push('/')
        // );
      })
...
export default connect()(UserSignupPage);
3.6. Redux ミドルウェア: Thunk
「Thunk」はReduxのような状態管理ライブラリと一緒に使用される概念で、非同期タスクを処理するためのミドルウェアまたは関数を指します。Redux Thunkを使用すると、アプリケーションで非同期タスクをより効果的に管理することができます。
npm install --save redux-thunk
frontend/src/containers/App.spec.js
import React from 'react';
import { render, fireEvent, waitForElement } from '@testing-library/react';
import { MemoryRouter } from 'react-router-dom';
import App from './App';
import { Provider } from 'react-redux';
import axios from 'axios';
import configureStore from '../redux/configureStore';

const setup = (path) => {
  const store = configureStore(false);
  return render(
    <Provider store={store}>
      <MemoryRouter initialEntries={[path]}>
...
configureStore 関数を使用して、Reduxストアをセットアップします。このストアは Provider コンポーネントに渡され、アプリケーション内のコンポーネントで使用されます。
frontend/src/index.js
import configureStore from './redux/configureStore';

const store = configureStore();
frontend/src/pages/LoginPage.js
import * as authActions from '../redux/authActions';
...
const mapDispatchToProps = (dispatch) => {
  return {
    actions: {
      postLogin: (body) => dispatch(authActions.loginHandler(body))
    }
  };
};

export default connect(
  null,
  mapDispatchToProps
)(LoginPage);
frontend/src/redux/configureStore.js
import { createStore, applyMiddleware } from 'redux';
import authReducer from './authReducer';
import logger from 'redux-logger';
import thunk from 'redux-thunk';

const configureStore = (addLogger = true) => {
  const middleware = addLogger
    ? applyMiddleware(thunk, logger)
    : applyMiddleware(thunk);
  return createStore(authReducer, middleware);
};

export default configureStore;
このコードの主な目的は、Reduxストアの設定をカスタマイズできるようにすることです。addLogger パラメーターを変更することで、ロギングミドルウェアを含むかどうかを切り替えることができます。これにより、開発とデバッグの段階でロギングを有効または無効にすることが可能です。
logger は、Reduxアプリケーション内のアクションと状態の変更をコンソールにログ出力するためのReduxミドルウェアです。
thunk は、非同期アクションを処理するためのReduxミドルウェアです。非同期操作を実行し、その結果に基づいてアクションをディスパッチできます。
configureStore 関数は、引数 addLogger を受け取ります。この引数はデフォルトで true に設定されており、true の場合、logger ミドルウェアが適用されます。
middleware 変数は、addLogger の値に応じて適切なミドルウェアを作成します。addLogger が true の場合、thunk と logger ミドルウェアを適用します。それ以外の場合は、単に thunk ミドルウェアを適用します。
createStore 関数を使用して、authReducer リデューサーとミドルウェアを適用したReduxストアを作成します。
最終的に、作成されたストアを return して、他の部分のコードからこのストアを使用できるようにします。
3.7. signup・ loginの合体
frontend/src/containers/App.js
function App() {
  return (
    <div>
      <TopBar />
      <div className="container">
        <Switch>
          <Route exact path="/" component={HomePage} />
          <Route path="/login" component={LoginPage} />
          <Route path="/signup" component={UserSignupPage} />
          <Route path="/:username" component={UserPage} />
        </Switch>
      </div>
frontend/src/pages/UserSignupPage.js
import * as authActions from '../redux/authActions';
…
  onClickSignup = () => {
    const user = {
      username: this.state.username,
      displayName: this.state.displayName,
      password: this.state.password
    };
    this.setState({ pendingApiCall: true });
    this.props.actions
      .postSignup(user)
      .then((response) => {
        this.setState({ pendingApiCall: false }, () =>
          this.props.history.push('/')
        );
…
const mapDispatchToProps = (dispatch) => {
  return {
    actions: {
      postSignup: (user) => dispatch(authActions.signupHandler(user))
    }
  };
};

export default connect(
  null,
  mapDispatchToProps
)(UserSignupPage);
frontend/src/redux/authActions.js
export const signupHandler = (user) => {
  return function(dispatch) {
    return apiCalls.signup(user).then((response) => {
      return dispatch(loginHandler(user));
    });
  };
};
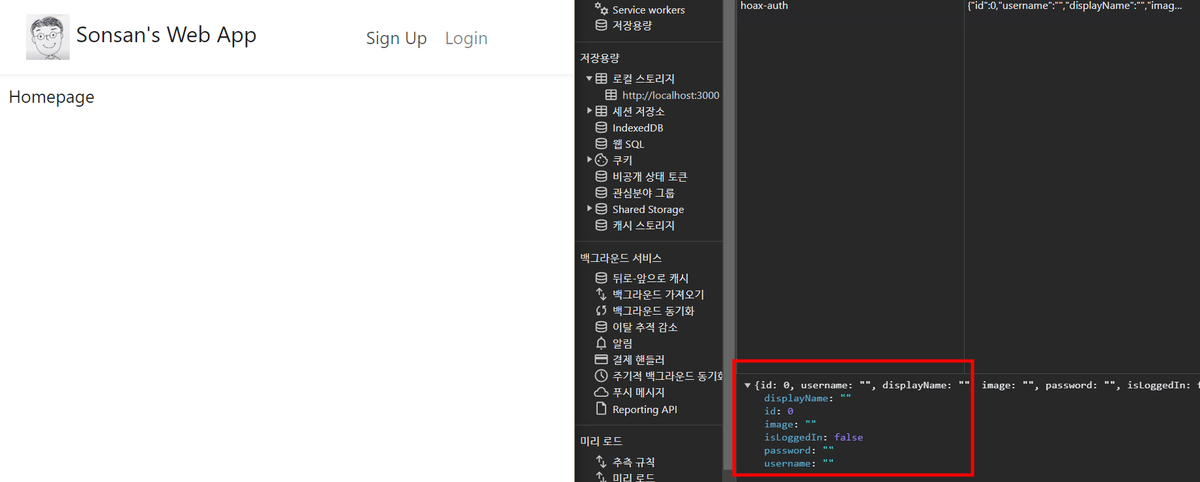
3.8. ローカルストレージに状態保存
今まで実装過程でまだ残っている問題は、リロードをするとログイン状態情報が消えるという点です。ログイン情報を保存するため、ローカルストレージに状態情報を保存します。
frontend/src/containers/App.spec.js
beforeEach(() => {
  localStorage.clear();
});
...
 it('saves logged in user data to localStorage after login success', async () => {
    const { queryByPlaceholderText, container, queryByText } = setup('/login');
    const usernameInput = queryByPlaceholderText('Your username');
    fireEvent.change(usernameInput, changeEvent('user1'));
    const passwordInput = queryByPlaceholderText('Your password');
    fireEvent.change(passwordInput, changeEvent('P4ssword'));
    const button = container.querySelector('button');
    axios.post = jest.fn().mockResolvedValue({
      data: {
        id: 1,
        username: 'user1',
        displayName: 'display1',
        image: 'profile1.png'
      }
    });
    fireEvent.click(button);

    await waitForElement(() => queryByText('My Profile'));
    const dataInStorage = JSON.parse(localStorage.getItem('hoax-auth'));
    expect(dataInStorage).toEqual({
      id: 1,
      username: 'user1',
      displayName: 'display1',
      image: 'profile1.png',
      password: 'P4ssword',
      isLoggedIn: true
    });
  });

  it('displays loggeed in topBar when storage has logged in user data', () => {
    localStorage.setItem(
      'hoax-auth',
      JSON.stringify({
        id: 1,
        username: 'user1',
        displayName: 'display1',
        image: 'profile1.png',
        password: 'P4ssword',
        isLoggedIn: true
      })
    );
    const { queryByText } = setup('/');
    const myProfileLink = queryByText('My Profile');
    expect(myProfileLink).toBeInTheDocument();
  });
ーザーの認証情報の管理と、localStorageを使用してその情報をブラウザに保存するためのテストです。
'saves logged in user data to localStorage after login success' テストケース
setup('/login') は /login ページの状態をセットアップし、ユーザー名とパスワードの入力を模倣します。
ユーザーがログインボタンをクリックすると、axios.post メソッドがモック化され、成功したログインリクエストのレスポンスが返されます。
localStorage から認証情報が保存されたかどうかを確認し、それが期待通りの内容であるかを検証します。
'displays loggeed in topBar when storage has logged in user data' テストケース
localStorage にログイン済みのユーザーデータが保存されている状況をシミュレートします。
/ ページをセットアップし、トップバーに"My Profile"リンクが表示されているかどうかを検証します。
これらのテストケースは、ユーザーの認証情報を正しく保存し、ブラウザの localStorage から読み取って表示されているかを確認するためのものです。
frontend/src/redux/configureStore.js
const configureStore = (addLogger = true) => {
  let localStorageData = localStorage.getItem('hoax-auth');

  let persistedState = {
    id: 0,
    username: '',
    displayName: '',
    image: '',
    password: '',
    isLoggedIn: false
  };
  if (localStorageData) {
    try {
      persistedState = JSON.parse(localStorageData);
    } catch (error) {}
  }
...
  const store = createStore(authReducer, persistedState, middleware);

  store.subscribe(() => {
    localStorage.setItem('hoax-auth', JSON.stringify(store.getState()));
  });

  return store;
};
認証関連のデータをローカルストレージから永続化するためのロジックを含んでいます。
キー「hoax-auth」でローカルストレージからデータを取得し、JSONとして解析を試みます。
store.subscribe()を使用してストアの変更に対して購読します。ストア内の状態が変更されたとき、新しい状態でローカルストレージのデータを更新し、認証データを永続化します。

3.9. Axios 許可の設定
frontend/src/containers/App.spec.js
beforeEach(() => {
  localStorage.clear();
  delete axios.defaults.headers.common['Authorization'];
});
...
 it('sets axios authorization with base64 encoded user credentials after login success', async () => {
    const { queryByPlaceholderText, container, queryByText } = setup('/login');
    const usernameInput = queryByPlaceholderText('Your username');
    fireEvent.change(usernameInput, changeEvent('user1'));
    const passwordInput = queryByPlaceholderText('Your password');
    fireEvent.change(passwordInput, changeEvent('P4ssword'));
    const button = container.querySelector('button');
    axios.post = jest.fn().mockResolvedValue({
      data: {
        id: 1,
        username: 'user1',
        displayName: 'display1',
        image: 'profile1.png'
      }
    });
    fireEvent.click(button);

    await waitForElement(() => queryByText('My Profile'));
    const axiosAuthorization = axios.defaults.headers.common['Authorization'];

    const encoded = btoa('user1:P4ssword');
    const expectedAuthorization = `Basic ${encoded}`;
    expect(axiosAuthorization).toBe(expectedAuthorization);
  });
  it('sets axios authorization with base64 encoded user credentials when storage has logged in user data', () => {
    localStorage.setItem(
      'hoax-auth',
      JSON.stringify({
        id: 1,
        username: 'user1',
        displayName: 'display1',
        image: 'profile1.png',
        password: 'P4ssword',
        isLoggedIn: true
      })
    );
    setup('/');
    const axiosAuthorization = axios.defaults.headers.common['Authorization'];
    const encoded = btoa('user1:P4ssword');
    const expectedAuthorization = `Basic ${encoded}`;
    expect(axiosAuthorization).toBe(expectedAuthorization);
  });
  it('removes axios authorization header when user logout', async () => {
    localStorage.setItem(
      'hoax-auth',
      JSON.stringify({
        id: 1,
        username: 'user1',
        displayName: 'display1',
        image: 'profile1.png',
        password: 'P4ssword',
        isLoggedIn: true
      })
    );
    const { queryByText } = setup('/');
    fireEvent.click(queryByText('Logout'));

    const axiosAuthorization = axios.defaults.headers.common['Authorization'];
    expect(axiosAuthorization).toBeFalsy();
  });
テストケース: 'sets axios authorization with base64 encoded user credentials after login success':
ユーザーのログインが成功した後、Axiosの認証ヘッダーがユーザーの認証情報をBase64でエンコードして設定されることを検証しています。
テストケース: 'sets axios authorization with base64 encoded user credentials when storage has logged in user data':
ローカルストレージにログイン済みのユーザーデータが存在する場合、Axiosの認証ヘッダーがそのユーザーの認証情報をBase64でエンコードして設定されることを検証しています。
テストケース: 'removes axios authorization header when user logout':
ユーザーがログアウトした場合、Axiosの認証ヘッダーが削除されることを検証しています。
Base64(ベース64)は、データをバイナリ形式からテキスト形式にエンコード(変換)するための一般的なエンコーディング方式の一つです。Base64エンコーディングは、バイナリデータ(例: 画像、音声、バイナリファイル)をテキストデータとして表現するのに使用されます。
frontend/src/api/apiCalls.js
export const setAuthorizationHeader = ({ username, password, isLoggedIn }) => {
  if (isLoggedIn) {
    axios.defaults.headers.common['Authorization'] = `Basic ${btoa(
      username + ':' + password
    )}`;
  } else {
    delete axios.defaults.headers.common['Authorization'];
  }
};
delete axios.defaults.headers.common['Authorization'];
isLoggedIn が false の場合、関数は axios.defaults.headers.common['Authorization'] を削除します。これは、ユーザーがログアウトした場合など、認証情報をヘッダーから削除するための処理です。
import * as apiCalls from '../api/apiCalls';
...

const configureStore = (addLogger = true) => {
  let localStorageData = localStorage.getItem('hoax-auth');
  let persistedState = {
    id: 0,
    username: '',
    displayName: '',
    image: '',
    password: '',
    isLoggedIn: false
  };
  if (localStorageData) {
    try {
      persistedState = JSON.parse(localStorageData);
      apiCalls.setAuthorizationHeader(persistedState);
    } catch (error) {}
  }
apiCalls.setAuthorizationHeader(persistedState);
apiCalls.setAuthorizationHeader(persistedState) を使用して、persistedState 内の認証情報を基に、認証ヘッダーを設定しようとしています。この手法は、ユーザーが以前にログインしていた場合、その認証情報をセットし、新しいリクエストを送信する際に認証ヘッダーを持つことができるようになります。
4. 最後に
今までReduxを通じて、ユーザーのログイン状態管理について勉強しました!それと、Thunkを通じて、非同期処理も実装しました。Reduxの主な目的は、アプリケーション内での状態の一貫性と予測可能性を高めることです。ReactとReduxを組み合わせて使用することで、ReactコンポーネントがReduxストア内のデータにアクセスし、変更を反映できるため、非常に強力なツールとなります。
エンジニアファーストの会社 株式会社CRE-CO
ソンさん
【参考】
[Udemy] Spring Boot and React with Test Driven Development
この記事が気に入ったらサポートをしてみませんか?