PythonでGmail APIを使ってメール本文取得を試す

Gmailで受信したメールのデータを一括で取得したい機会がありました。
そんなときに活躍するのが、GoogleのGmail API。
Pythonから対象のメールボックスにアクセスして、メールの送受信が行える機能です。Python以外の言語にも対応しています。
一応Gmailの方でメールを一括エクスポートできるので、エクスポートしてからメール本文を解析しても良かったのですが、そうすると出力ファイルはmbox形式となりこれはこれで触ったことがなかったので、今回はGmail APIを試すことにしました。
前々から興味があったのも理由の一つです。
導入方法
自分の場合、ひとまず動いているのを確認+メール本文取得が目的だったので、こちらのマニュアルを参考に環境構築。
サンプルを動かすまでが簡潔に記されており、良いガイドでした。
Step1では使用したいGmailアカウンドのGmail APIを有効にします。
上記URLの[Enable the Gmail API]ボタンをクリックすると、次の画面が出現します。
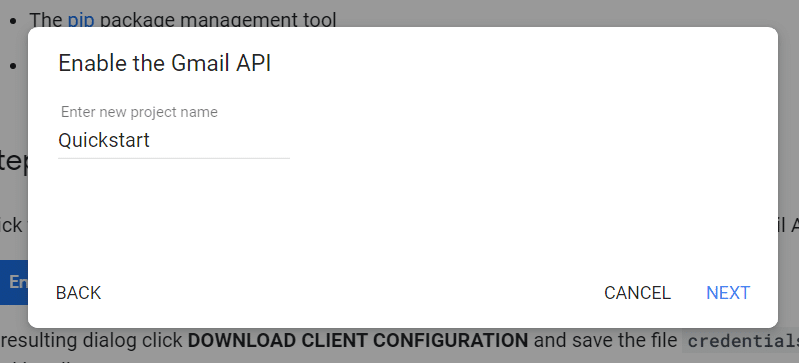
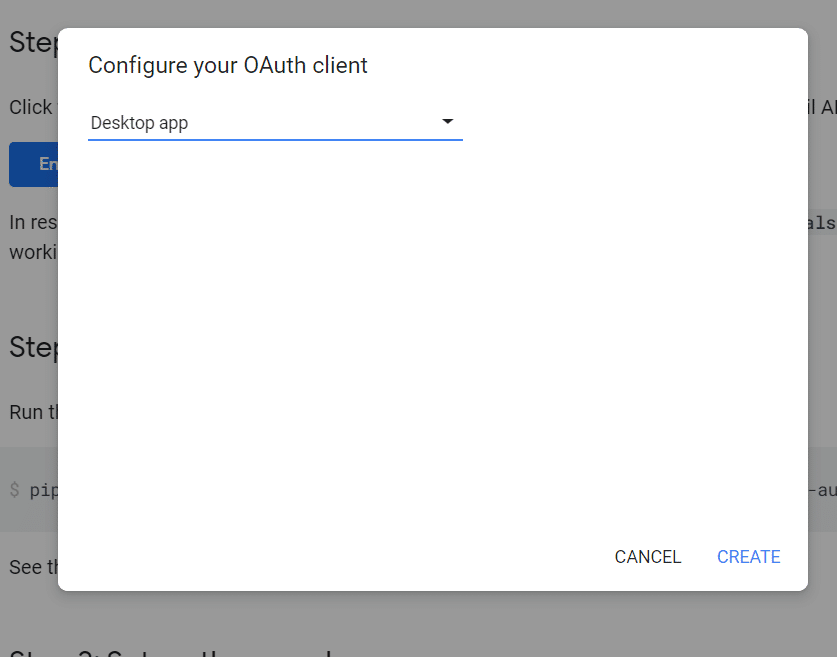
今回は名前も「Quickstart」のまま[NEXT]で次に進みます。続いてOAuthの設定画面が出現するのですが、これも初期状態の[Desktop app]のまま[CREATE]をクリック。
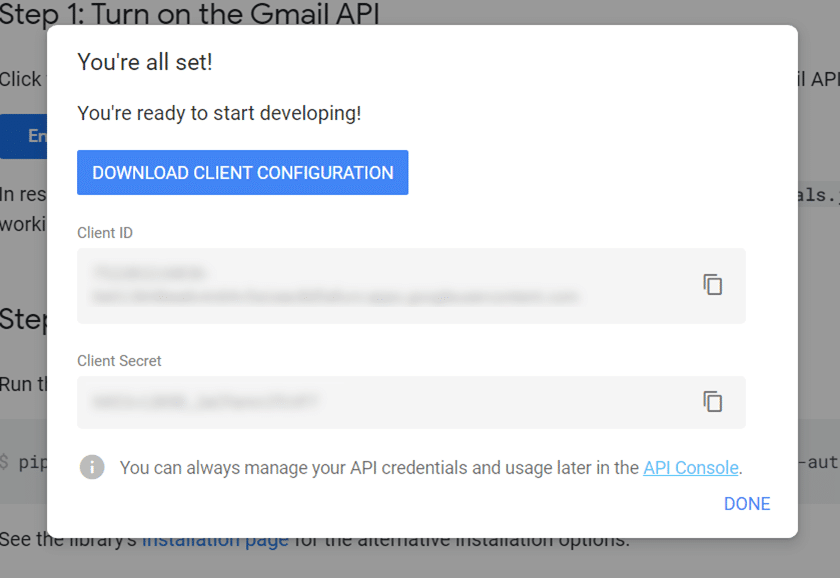
最後に[DOWNLOAD CLIENT CONFIGURATION]をクリックして完了です。クリックすると、credentials.jsonというファイルが出力されます。これをPythonのワーキングディレクトリに保存しろと書いてあるので、該当ディレクトリに保存。
自分はAnaconda上で試したかったので、"C:\Users\[ユーザ名]\credentials.json"に保存しました(Anacondaユーザは特に設定しなければここですよね)。
か、簡単……。
Step2では環境にライブラリをインストールします。
Anaconda Prompt上で、次のコードを実行。
pip install --upgrade google-api-python-client google-auth-httplib2 google-auth-oauthlibStep3, Step4ではサンプルを動かします。
とりあえず書いてあるコードをそのままワーキングディレクトリに保存("C:\Users\[ユーザ名]\quickstart.py")して、実行場所を"C:\Users\[ユーザ名]"とした上で、Anaconda Promptで実行しました。
python quickstart.py初回起動時はブラウザの方で許可するか尋ねられるので、Acceptをクリックします。
実行するとGmail上で設定されているラベルが表示されることになります。
Labels:
CHAT
SENT
INBOX
IMPORTANT
TRASH
DRAFT
SPAM
CATEGORY_FORUMS
CATEGORY_UPDATES
CATEGORY_PERSONAL
CATEGORY_PROMOTIONS
CATEGORY_SOCIAL
STARRED
UNREAD
東方英単語クイズ
原神読み方クイズ
普段遣いの関数
サンプルを普段遣いできる関数にしました。普段これを使っています。
from __future__ import print_function
import os.path
from googleapiclient.discovery import build
from google_auth_oauthlib.flow import InstalledAppFlow
from google.auth.transport.requests import Request
from google.oauth2.credentials import Credentials

# If modifying these scopes, delete the file token.json.
SCOPES = ['https://www.googleapis.com/auth/gmail.readonly']

import base64, email #デコード用
import dateutil.parser

#token.jsonを設定
tokenPath = "C:\\Users\\[ユーザ名]\\token.json"

#credentials.jsonを設定
credentialsPath = "C:\\Users\\[ユーザ名]\\credentials.json"


#メール本文のデコード
def decode(encoded):
   decoded = base64.urlsafe_b64decode(encoded).decode()
   return decoded


#初期化(from quickstart.py)
def gmail_init():
   creds = None
   # The file token.json stores the user's access and refresh tokens, and is
   # created automatically when the authorization flow completes for the first
   # time.
   if os.path.exists(tokenPath):
       creds = Credentials.from_authorized_user_file(tokenPath, SCOPES)
   # If there are no (valid) credentials available, let the user log in.
   if not creds or not creds.valid:
       if creds and creds.expired and creds.refresh_token:
           creds.refresh(Request())
       else:
           flow = InstalledAppFlow.from_client_secrets_file(
               credentialsPath, SCOPES)
           creds = flow.run_local_server(port=0)
       # Save the credentials for the next run
       with open(tokenPath, 'w') as token:
           token.write(creds.to_json())

   service = build('gmail', 'v1', credentials=creds)
   return service


#ここからやりたい処理を書く
service = gmail_init()

#quickstart.pyと同じ処理にしてみた
results = service.users().labels().list(userId='me').execute()
labels = results.get('labels', [])

if not labels:
   print('No labels found.')
else:
   print('Labels:')
   for label in labels:
       print(label['name'])
gmail_init関数で得られるserviceがあれば何でもできそうなので、これを使って本文の取得をしていきます。
ここでは特定ラベルのメール本文を一括取得する処理をしていきます。
#メール本文の内容を配列で取得する関数
def gmail_get_messages_body(service, labelIdsValue):
   mailBody = []

   # メッセージの一覧を取得
   messages = service.users().messages()
   msg_list = messages.list(userId='me', labelIds=labelIdsValue).execute()
   # msg_list = messages.list(userId='me', labelIds=labelIdsValue ,maxResults=456).execute() #最大値指定

   # 取得したメッセージの一覧を配列に格納
   for msg in msg_list['messages']:

       #メールの受信日時を取得
       date = gmail_get_messages_body_date(messages,msg)

       topid = msg['id']
       msg = messages.get(userId='me', id=topid).execute()

       if(msg["payload"]["body"]["size"]!=0):
           mailBody.append(date+"<br>"+decode(msg["payload"]["body"]["data"]))
       else:
           #メールによっては"parts"属性の中に本文がある場合もある
           mailBody.append(date+"<br>"+decode(msg["payload"]["parts"][0]["body"]["data"]))

   return mailBody


#gmail_get_messages_body関数内で受信日時を取得する関数
def gmail_get_messages_body_date(messages,msg):
   msg_id = msg['id']
   m = messages.get(userId='me', id=msg_id, format='raw').execute()
   raw = base64.urlsafe_b64decode(m['raw'])

   # Emailを解析する
   eml = email.message_from_bytes(raw)

   date = dateutil.parser.parse(eml.get('Date')).strftime("%Y-%m-%d_%H-%M-%S")
   return date
gmail_get_messages_body関数は、引数としてgmail_init関数で得たserviceとラベルのIDを必要とします。
本関数内でmsg_listの取得時、maxResults要素の指定がないと上限100個のメールしか取り扱えないようなので、注意してください。
ラベルのIDは次の関数で予め取得しておくのが良いです。
#ラベルのIDやnameを表示する関数
def gmail_display_label(service):
   results = service.users().labels().list(userId='me').execute()
   labels = results.get('labels', [])

   if not labels:
       print('No labels found.')
   else:
       print('Labels:')
       for label in labels:
           print(label)
gmail_display_labelを実行すると、ラベルの一覧が表示されるので、対象のラベルIDをメモしておきます。
例えば
{'id': 'Label_5411878336952604509', 'name': '東方英単語クイズ', 'type': 'user'}
{'id': 'Label_6958940344976197524', 'name': '原神読み方クイズ', 'type': 'user'}
のような感じです。
これで次のようにgmail_get_messages_body関数を実行すると、
bodyArray = gmail_get_messages_body(service, "Label_6958940344976197524")メール本文が詰まった配列が得られます。
取得した配列は
import re

bodyList=re.split('<br>|\r\n', bodyArray[0])
などで改行ごとに新しく配列に移すなどしてあげると、解析がスムーズにいくかもしれません。
何に使うのか
それはもちろんメールベースで取得したデータの解析です。
データ取得開始から間が空いてしまいましたが。
解析結果を使って作成してた記事はこちら
→原神難読ランキング (「原神読み方クイズ」より集計)
この記事が参加している募集
この記事が気に入ったらサポートをしてみませんか?