
[Shopify]複数モーダルを表示する方法(Javascript)

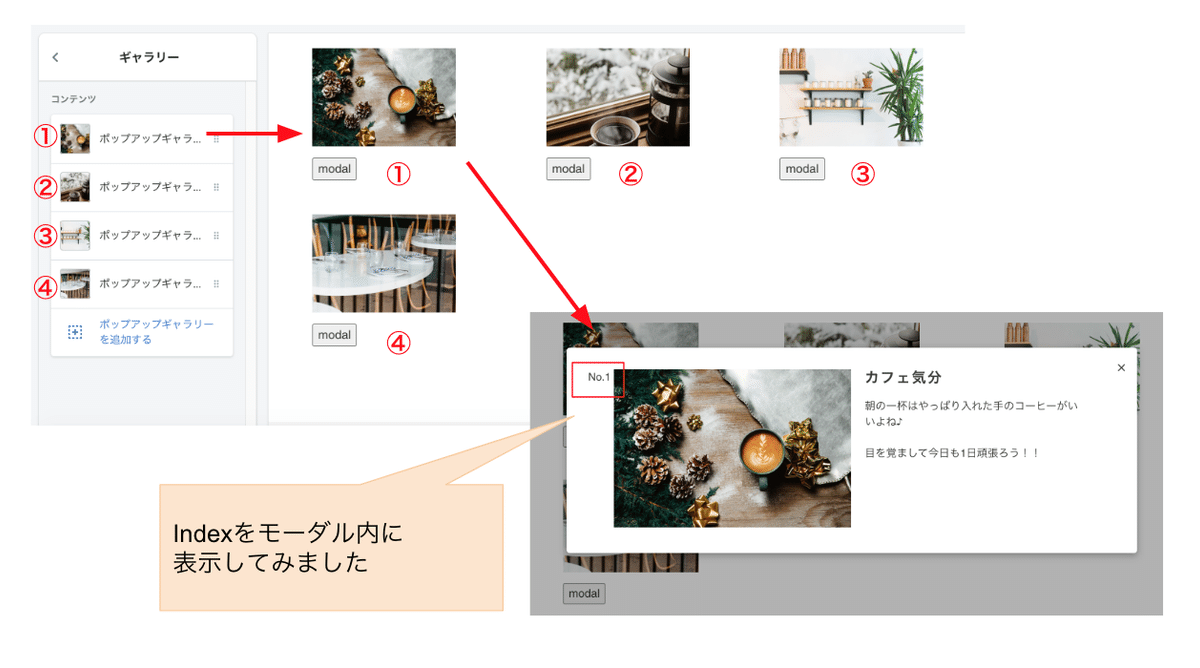
Sectionブロックでエディタから画像を追加しギャラリーを作成したあと、その画像に紐づく詳細情報をモーダルで表示させる方法についてご紹介♪
1ページにモーダル表示ボタンを複数設置させることができます!!
今日のGoal

ギャラリー画像とモーダル表示時の画像は同じ画像です。
ボタンを押したらモーダルを表示
下準備
❶ダッシュボード>コード編集>Template>新しいTemplate追加
❷「目的:page」 「名前:gallary(任意)」
今回はgallary.liquidを作成。
❸Section>新しいSection追加>ファイル名:gallary-popupにしました
❹❷のgallary.liquidに{% section 'gallary-popup' %}を挿入
(デフォルトで入ってるコードは全削除)
ポイント
今回、活躍してくれるのはこちらのコード
{{ forloop.index }}エディタから画像を追加する際のIndexを取得してくれるコードです♪
イメージ的にはこんな感じ
ボタンタグのdata-idにこの{{ forloop.index }}を設置
<button class="js-btn-modal" data-id="{{ forloop.index }}">modal</button>モーダルのコンテンツ部分になるところにも{{ forloop.index }}を設置
data-id="modal{{ forloop.index }}"
▼modalの後ろにインデックスが入ります
data-id="modal1"
data-id="modal2"
data-id="modal3"
・
・
・
<div class="gallarymodal js-modal" data-id="modal{{ forloop.index }}">
  No.{{ forloop.index }} //今回はインデックスを表示させてみたので表示される箇所にも挿入
  ・
  ・
  ここにモーダル内の画像やテキストなどのコンテンツ部分のコードを書く
</div>
HTML
ここのHTMLはこちらです。
<div class="overlay" id="overlay"></div>

 {% for block in section.blocks %}
 <div class="gallaryPop">
   <div class="gallary-content">
     <img src="{{ block.settings.gallaryImage | img_url: 'master'  }}">
   </div>
   <div  class="gallary-btn">
      <button class="js-btn-modal" data-id="{{ forloop.index }}">modal</button>
   </div>
 </div>
 <div class="gallarymodal js-modal" data-id="modal{{ forloop.index }}">
     <button class="modal-close-btn js-close-btn">×</button>
     No.{{ forloop.index }}
    <div class="pop_content pop_content_left"><img src="{{ block.settings.gallaryImage | img_url: 'master'  }}"></div>
    <div class="pop_content pop_content_right">
      <h2>{{ block.settings.gallaryTitle }}</h2>
      <p>{{ block.settings.gallaryTxt }}</p>
   </div>
   </div>

 {% endfor %}
モーダル 表示、非表示のJavascript
<script>
window.addEventListener('DOMContentLoaded', (event) => {
 $('.js-btn-modal').on('click', function(){
   $('#overlay').fadeIn();
   var id = $(this).data('id');
   $('.js-modal[data-id="modal' + id + '"]').fadeIn();
 });

 $('.js-close-btn').on('click', function(){
   $('#overlay').fadeOut();
   $('.js-modal').fadeOut();
 });
 $('#overlay').on('click', function(){
   $('#overlay').fadeOut();
   $('.js-modal').fadeOut();
 });
});
</script>
同じSectionファイル内にScriptタグを挿入。{% schema %}の直前ぐらいに入れてます。
window.addEventListener('DOMContentLoaded', (event) => { を入れてなかったので最初全然動かなかった><
CSS
今回のCSSはこちら
<style>
.gallarymodal {
 z-index: 1;
 display: none;
 position: absolute;
 top: 10%;
 left: 0;
 right: 0;
 max-width: 800px;
 margin: 0 auto;
 padding: 30px;
 background: #fff;
 border-radius: 4px;
 box-shadow: 0 3px 10px rgba(0,0,0,0.3);
}
.modal-close-btn {
 position: absolute;
 right: 10px;
 top: 10px;
 font-size: 20px;
 background: transparent;
 border: none;
}

.overlay {
 display: none;
 position: fixed;
 top: 0;
 left: 0;
 right: 0;
 bottom: 0;
 width: 100%;
 height: 100%;
 background-color: rgba(0,0,0,0.3);
}

 .gallaryPop {
   width: 33%;
   display: inline-block;
   vertical-align: top;
   margin-bottom: 2em;
}

.gallary-content {
   width: 190px;
   height: 130px;
   margin: 0 auto;
}

.gallary-content img {
   width: 100%;
   height: 100%;
   object-fit: cover;
}

.gallary-btn {
 width: 190px;
 margin: 1em auto;
}

.pop_content {
   width: 45%;
   display: inline-block;
   vertical-align: top;
}

.pop_content_right{
 padding: 0 1em;
}
</style>
フルコードはこちら
上記の部分を1ページにまとめたフルコード。そのままコピペで使えます。ベーステンプレートはDebutです。他のテンプレだと上手く動作するか分からないので少し変えながら使用していただかないとかもです><
(サポートや返金はしておりません。)
ここから先は
¥ 100
この記事が気に入ったらサポートをしてみませんか?