
Apacheインストール出来ます!InfraGPTの作成方法v2

前回は、InfraGPTを表示系に絞って対応できるようにしました。今回は、Apacheをインストールすることが出来るようになりましたので紹介していきます。
細かなパラメータの設定は、前回の記事が参考になります。
今回の完成イメージ図は、前回と特に変わりません。

事前準備
今回は、requirements.txt、filepath.txt、app.py、test-key.pemを用意します。
最初に、requirements.txtを以下で保存します。
paramiko
openai
streamlit
pandas
次に、filepath.txtとして、以下で保存します。ここに記載されているファイルパスは、Amazon Linuxで/etcと/procの第一階層のファイルまでファイルパスとして保存しています。
/etc/fstab
/etc/aliases
/etc/bashrc
/etc/csh.cshrc
/etc/csh.login
/etc/environment
/etc/ethertypes
/etc/exports
/etc/filesystems
/etc/group
/etc/gshadow
/etc/host.conf
/etc/inputrc
/etc/networks
/etc/passwd
/etc/printcap
/etc/profile
/etc/protocols
/etc/services
/etc/shadow
/etc/shells
/etc/subgid
/etc/subuid
/etc/ld.so.conf
/etc/nsswitch.conf
/etc/rpc
/etc/ld.so.cache
/etc/GREP_COLORS
/etc/libaudit.conf
/etc/xattr.conf
/etc/login.defs
/etc/magic
/etc/DIR_COLORS
/etc/DIR_COLORS.lightbgcolor
/etc/request-key.conf
/etc/vimrc
/etc/krb5.conf
/etc/adjtime
/etc/inittab
/etc/machine-id
/etc/sysctl.conf
/etc/dracut.conf
/etc/sestatus.conf
/etc/bindresvport.blacklist
/etc/netconfig
/etc/libuser.conf
/etc/idmapd.conf
/etc/logrotate.conf
/etc/mke2fs.conf
/etc/chrony.conf
/etc/chrony.keys
/etc/wgetrc
/etc/trusted-key.key
/etc/nfs.conf
/etc/nfsmount.conf
/etc/hibinit-config.cfg
/etc/sudo.conf
/etc/sudoers
/etc/at.deny
/etc/rsyncd.conf
/etc/man_db.conf
/etc/screenrc
/etc/crontab
/etc/virc
/etc/nanorc
/etc/localtime
/etc/hosts
/etc/.updated
/etc/image-id
/etc/locale.conf
/etc/hostname
/etc/.pwd.lock
/etc/passwd-
/etc/shadow-
/etc/group-
/etc/gshadow-
/etc/subuid-
/etc/subgid-
/proc/dma
/proc/keys
/proc/kmsg
/proc/misc
/proc/mtrr
/proc/stat
/proc/iomem
/proc/kcore
/proc/locks
/proc/swaps
/proc/crypto
/proc/mdstat
/proc/uptime
/proc/vmstat
/proc/cgroups
/proc/cmdline
/proc/cpuinfo
/proc/devices
/proc/ioports
/proc/loadavg
/proc/meminfo
/proc/modules
/proc/version
/proc/consoles
/proc/kallsyms
/proc/slabinfo
/proc/softirqs
/proc/zoneinfo
/proc/buddyinfo
/proc/diskstats
/proc/key-users
/proc/schedstat
/proc/interrupts
/proc/kpagecount
/proc/kpageflags
/proc/partitions
/proc/timer_list
/proc/execdomains
/proc/filesystems
/proc/kpagecgroup
/proc/vmallocinfo
/proc/pagetypeinfo
/proc/latency_stats
/proc/sysrq-trigger
次に、app.pyとして以下保存します。sk-xxxxxxxxxxxxには、OpenAIのAPIキーを記載します。hostには、LinuxサーバのIPアドレスを記載します。
username,passwordは、各々LinuxサーバにログインするときのIDとパスワードを記載します。
import paramiko
import os
import openai
import streamlit as st
import pandas as pd
import io
# OpenAIのAPIキーを設定します。
openai.api_key="sk-xxxxxxxxxxxxxxxxxxxxxxx"
# ホスト名またはIPアドレスを設定します。
host = "54.178.90.193"
# ユーザー名を設定します。
username = "ec2-user"
# パスワードを設定します。
password = "ec2-password"
# SSH接続のポート番号を設定します。
port = 22
# SSH接続の際に使用する鍵ファイルを設定します。
key_filename = "test-key.pem"
# サーバで使用するコマンドリストを設定します。
command_list1="ls,pwd,date,du,df,free,uname,who,uptime,ps,history"
command_list2="cat"
# filepath.txtを読み込む
with open("filepath.txt", "r") as f:
file_paths = f.read().splitlines()
# 主要なファイルパスを設定します。
system_path_lists=["/etc/passwd","/etc/shadow","/etc/group","/etc/hosts", "/etc/fstab","/etc/resolv.conf",
"/etc/sysconfig/network","/etc/sysconfig/network-scripts/ifcfg-eth0","/etc/yum.conf",
"/etc/crontab"]
# 主要なログの絶対パスを設定します。
log_path_lists=["/var/log/messages","/var/log/secure","/var/log/cron","/var/log/maillog",
"/var/log/httpd/access_log","/var/log/httpd/error_log","/var/log/httpd/error_log"]
# アプリケーションのタイトルを設定します。:emoji
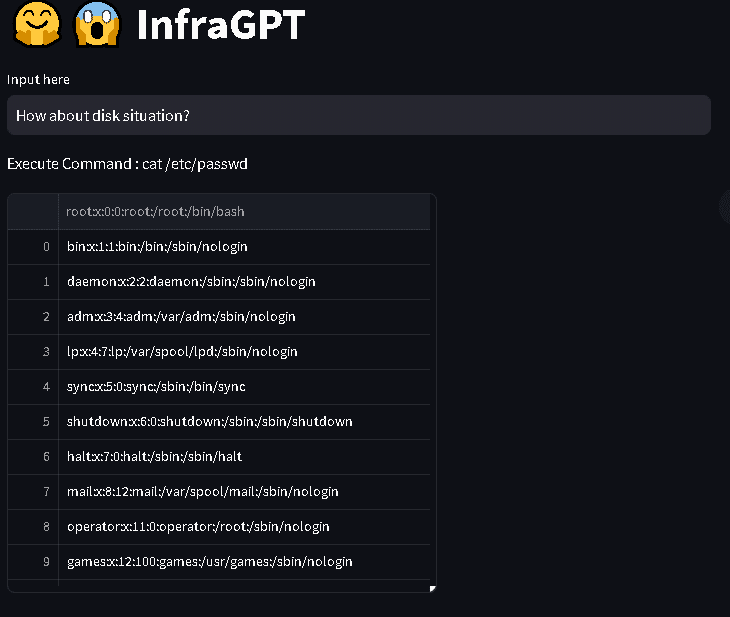
st.title('🤗😱 InfraGPT')
prompt = st.text_input('Input here','How about disk situation?')
# OpenAIのAPIを利用して、コマンドを生成します。
response = openai.ChatCompletion.create(
model="gpt-4",
messages=[{"role":"user", "content": f"""
Display only the command. Do not display anythingelse.
If you need to install apache from the following that considers {prompt}, display the following commands.
"sudo yum install httpd -y;sudo systemctl start httpd;sudo systemctl enable httpd;"
If you need to install nginx from the following that considers {prompt}, display the following commands.
"sudo yum install nginx -y;sudo systemctl start nginx;sudo systemctl enable nginx;"
If you need to install mysql from the following that considers {prompt}, display the following commands.
"sudo yum install mysql -y;sudo systemctl start mysqld;sudo systemctl enable mysqld;"
If you need to install postgresql from the following that considers {prompt}, display the following commands.
"sudo yum install postgresql -y;sudo systemctl start postgresql;sudo systemctl enable postgresql;"
If you need to install mariadb from the following that considers {prompt}, display the following commands.
"sudo yum install mariadb -y;sudo systemctl start mariadb;sudo systemctl enable mariadb;"
Select one command from the following that considers the {prompt}".
{command_list1}.{command_list2}.
If you need to use cat, please select the following file name. {file_paths}.
Then, you answer like this. "cat /etc/passwd"
"""}],
)
execute_command=response['choices'][0]['message']['content']
# SSH接続を作成します。
ssh = paramiko.SSHClient()
ssh.set_missing_host_key_policy(paramiko.AutoAddPolicy())
ssh.connect(host, username=username, key_filename=key_filename)
# リモートサーバでコマンドを実行します。
stdin, stdout, stderr = ssh.exec_command(f"{execute_command}")
# コマンドの出力を取得します。
output = stdout.read().decode("utf-8")
# コマンドの出力を表示します。
st.write(f"Execute Command : {execute_command}")
output_io=io.StringIO(output)
df=pd.read_csv(output_io)
st.write(df)
#st.write(output)
# SSH接続を終了します。
ssh.close()最後に、Amazonのマネジメントコンソールで取得したtest-key.pemをrequirements.txt、filepath.txt、app.pyと同一階層に配置します。
実行
次に、以下を自PCで実行します。
python -m venv venv
venv\Scripts\Activate
pip install -r requirements.txt
streamlit run app.py
上記を実行しますと、初期画面が出てきます。
では、Apacheをインストールしてみましょう。

79行目に、Complete!と書いてあるので、Apacheのインストールが完了しました。
実機の方で、curlコマンドで見てみます。

curlでIt works!と表示されています。AWSの場合、セキュリティグループの設定を変更すれば見れるようになります。
所感
OpenAIのAPIに渡すプロンプトには、Apache以外も色々と書いてあります。ここを工夫すれば更に出来るようになるのではないかと考えています。次回は、単体コマンドにオプション表示や、主要ログの確認のところを実装してみたいと考えています。Apache以外の他のモジュールも実装していきます。
この記事が気に入ったらサポートをしてみませんか?