
Pythonでマイクラを作る ③ブロックのモデルを作成する
Pythonでマイクラを作る 第3回です。今回はPanda3Dの世界にマイクラのブロックを導入します。かなり面倒な作業が含まれますが、マイクラブロックが使えるようになると、Pythonプログラミングによる建築ができるようになります(次回掲載予定)。頑張っていきましょう!
マイクラのterrain.png
マイクラブロックを作成するには、モデルに貼り付ける画像が必要です。3Dモデルに貼り付ける画像のことをテクスチャー(texture)と言います。マイクラの初期のバージョンでは、テクスチャーはサイズ16x16 の画像であり、テクスチャーをまとめた画像を terrain.pngと呼んでいました。Google検索で「minecraft terrain.png」で検索すると、たくさんのterrain.pngを見つけることができます。
本プロジェクトでは、多くのブロックテクスチャーをカバーしており、フリーで公開されている「Blockcss - Minecraft Terrain Png 1.0 0」を使用させていただきます。上記リンクからダウンロードしてください。
ダウンロードした画像は プロジェクトルートに imagesディレクトリを作成して、その中に保存してください。テクスチャーを保存するための texturesディレクトリも作成しておきましょう。
# ディレクトリ構造
Documents/
  ├ pynecrafter/
  │  ├ images/
  │  │  ├ 48-488312_blockcss-minecraft-terrain-png-1-0-0.png
  │  │
  │  ├ textures/
  │  │  ├
  │  │
  │  ├ 01_01_showbase.py
  │  ├ 01_02_showbase.py
  │  ├ 01_03_showbase.py
  │  ├ xxx.py
  │
terrain.pngを分割する
terrain.png はサイズ384x576 で、縦36枚、横24枚のテクスチャーをまとめたものです。cv2ライブラリーを使えば一瞬で画像を分割、保存できます。cv2ライブラリーをインストールするには、次のコマンドを実行してください。
pip3 install opencv-python↩️(pip install opencv-python↩️)
プロジェクトルートに trim_image.py というファイルを作成してください。下記のコードを入力します。
"""trim_image.py"""
import cv2

size = 16

# 画像読み込み
img = cv2.imread("images/48-488312_blockcss-minecraft-terrain-png-1-0-0.png", -1)

# img[top : bottom, left : right]
for i in range(36):
    for j in range(24):
        print(i, j)
        trim_img = img[i * size: (i + 1) * size, j * size: (j + 1) * size]
cv2.imwrite(f"textures/{i}-{j}.png", trim_img)trim_image.py の説明をします。
cv2.imread() により処理したい画像を読み込ます。img[top : bottom, left : right] のコードで選択した範囲の画像を切り取ることができます。cv2.imwrite() により切り取った画像を指定した名前で保存します。
注意点は、imreadメソッドの第2引数の -1 をつけ忘れると、透明(Alpha)情報が取得できないので背景が黒の画像に変更されてしまうことです。透明情報を持つ PNG画像を扱うときは、第2引数の -1 を忘れないようにしましょう。
trim_image.pyを実行するろ、texturesディレクトリの中に 0-0.png 〜 35x23.png の864枚の画像を保存されているはずです。これでテクスチャーの準備は終了しました。次はテクスチャーを貼り付けたキューブを作成する方法を検討します。まずは標準モデルである eggモデルを理解する必要があります。
eggモデル
"""03_01_box_model.py"""
from direct.showbase.ShowBase import ShowBase
from panda3d.core import *


class App(ShowBase):
    # コンストラクタ
    def __init__(self):
        # ShowBaseを継承する
        ShowBase.__init__(self)

        # ウインドウの設定
        self.properties = WindowProperties()
        self.properties.setTitle('Box model')
        self.properties.setSize(1200, 800)
        self.win.requestProperties(self.properties)
        self.setBackgroundColor(0, 0, 0)

        # マウス操作を禁止
        self.disableMouse()
        # カメラの設定
        self.camera.setPos(40, -50, 50)
        self.camera.lookAt(0, 0, 0)

        # 座標軸
        self.axis = self.loader.loadModel('models/zup-axis')
        self.axis.setPos(0, 0, 0)
        self.axis.setScale(1.5)
        self.axis.reparentTo(self.render)

        # ブロックを置く
        self.cube1 = self.loader.loadModel('models/box')
        self.cube1.setPos(0, 0, 0)
        self.cube1.setScale(5)
        self.cube1.reparentTo(self.render)


app = App()
app.run()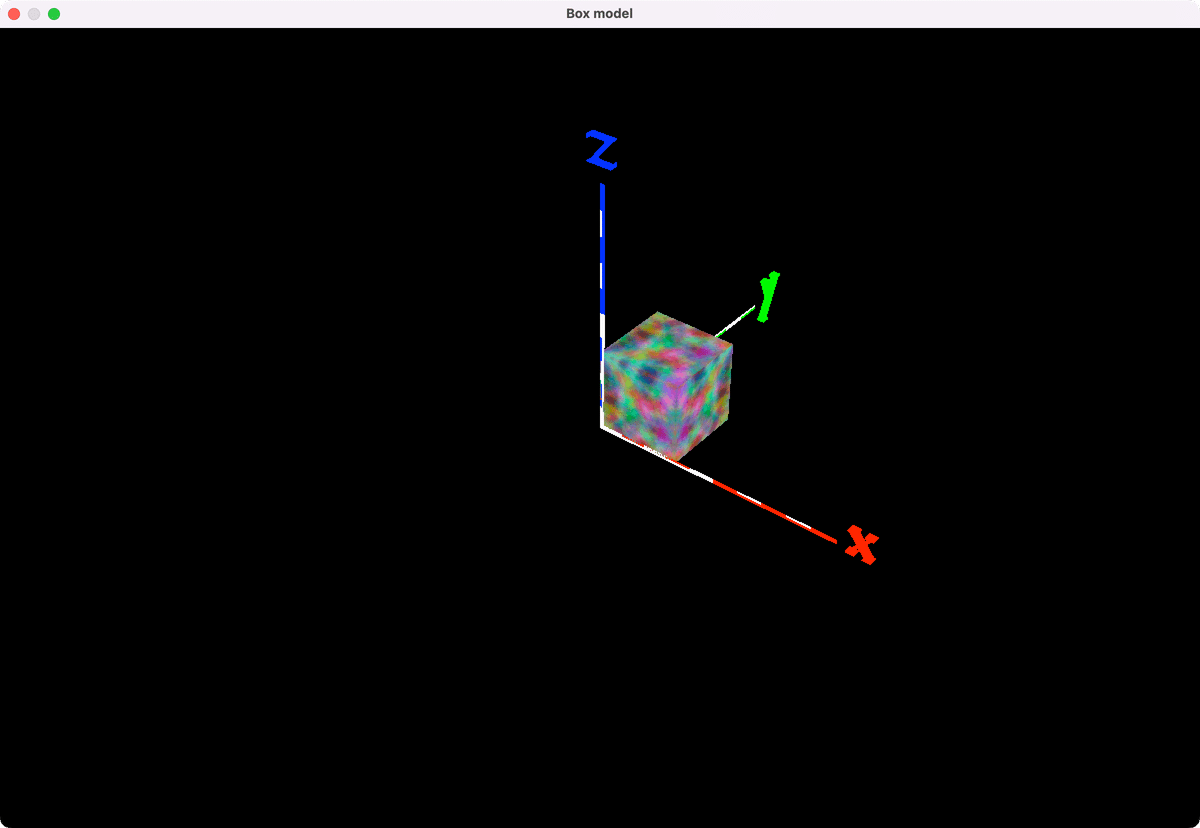
Panda3Dのデフォルトのモデル box.egg を表示するプログラムを実行してください。このモデルを改造して、マイクラブロックを作っていきます。Panda3Dでは、拡張子 .egg のモデルを使用します。box.egg の中身を覗くと、次のような構造になっています。
<CoordinateSystem> { Z-Up }

<Texture> noise {
  "maps/noise.rgb"
}

<VertexPool> box {
  <Vertex> 1 {
    0 1 1
    <UV> { 1 1 }
  }
  <Vertex> 2 {
    1 1 1
    <UV> { 0 1 }
  }
  <Vertex> 3 {
    0 0 1
    <UV> { 0 1 }
  }
  <Vertex> 4 {
    1 0 1
    <UV> { 1 1 }
  }
  <Vertex> 5 {
    0 1 0
    <UV> { 1 0 }
  }
  <Vertex> 6 {
    1 1 0
    <UV> { 0 0 }
  }
  <Vertex> 7 {
    0 0 0
    <UV> { 0 0 }
  }
  <Vertex> 8 {
    1 0 0
    <UV> { 1 0 }
  }
  <Vertex> 9 {
    0 1 1
    <UV> { 0 0 }
  }
  <Vertex> 10 {
    1 1 1
    <UV> { 1 0 }
  }
  <Vertex> 11 {
    0 1 0
    <UV> { 0 1 }
  }
  <Vertex> 12 {
    1 1 0
    <UV> { 1 1 }
  }
}
<Group> box {
  <Polygon> {
    <TRef> { noise }
    <Normal> { 0 -1 0 }
    <VertexRef> { 3 7 8 4 <Ref> { box } }
  }
  <Polygon> {
    <TRef> { noise }
    <Normal> { 0 1 0 }
    <VertexRef> { 2 6 5 1 <Ref> { box } }
  }
  <Polygon> {
    <TRef> { noise }
    <Normal> { -1 0 0 }
    <VertexRef> { 1 5 7 3 <Ref> { box } }
  }
  <Polygon> {
    <TRef> { noise }
    <Normal> { 1 0 0 }
    <VertexRef> { 4 8 6 2 <Ref> { box } }
  }
  <Polygon> {
    <TRef> { noise }
    <Normal> { 0 0 1 }
    <VertexRef> { 9 3 4 10 <Ref> { box } }
  }
  <Polygon> {
    <TRef> { noise }
    <Normal> { 0 0 -1 }
    <VertexRef> { 7 11 12 8 <Ref> { box } }
  }
}egg ファイルの構造を説明すると、<Texture>セクションでテクスチャー画像を読み込みます。<VertexPool>セクションで頂点(vertex)の座標を指定します。そして、<Polygon>セクションで頂点をまとめた面(polygon)を作成し、テクスチャーを貼り付けます。最後、<Group>セクションでポリゴンを合体して3Dモデルを作成します。
テクスチャーの貼り付け方には独特のクセがあり、そのことを次の節で説明します。そのクセとはテクスチャー画像が反転して貼り付けられてしまうという問題のことです。具体的に見ていきましょう。
テクスチャーの貼り付け方を理解する
numbers.zip をダウンロードして、解凍します。6枚の画像が保存されているので、imagesディレクトリにコピペしてください。
プロジェクトルートに modelsディレクトリを作り、その中に numbers.egg ファイルを作成します。
# ディレクトリ構造
Documents/
  ├ pynecrafter/
  │  ├ images/
  │  │  ├ 48-488312_blockcss-minecraft-terrain-png-1-0-0.png
  │  │  ├ one.png
  │  │  ├ two.png
  │  │  ├ three.png
  │  │  ├ four.png
  │  │  ├ five.png
  │  │  ├ six.png
  │  │
  │  ├ textures/
  │  │  ├ 0-1.png
  │  │  ├ 0-2.png
  │  │
  │  ├ models/
  │  │  ├ numbers.egg
  │  │
  │  ├ 01_01_showbase.py
  │  ├ 01_02_showbase.py
  │  ├ 01_03_showbase.py
  │  ├ xxx.py
  │
numbers.egg に以下のコードをコピペしてください。
<CoordinateSystem> { Z-Up }

<Texture> one {
  "../images/one.png"
}
<Texture> two {
  "../images/two.png"
}
<Texture> three {
  "../images/three.png"
}
<Texture> four {
  "../images/four.png"
}
<Texture> five {
  "../images/five.png"
}
<Texture> six {
  "../images/six.png"
}

<VertexPool> box {
  <Vertex> 1 {
    0 1 1
    <UV> { 1 1 }
  }
  <Vertex> 2 {
    1 1 1
    <UV> { 0 1 }
  }
  <Vertex> 3 {
    0 0 1
    <UV> { 0 1 }
  }
  <Vertex> 4 {
    1 0 1
    <UV> { 1 1 }
  }
  <Vertex> 5 {
    0 1 0
    <UV> { 1 0 }
  }
  <Vertex> 6 {
    1 1 0
    <UV> { 0 0 }
  }
  <Vertex> 7 {
    0 0 0
    <UV> { 0 0 }
  }
  <Vertex> 8 {
    1 0 0
    <UV> { 1 0 }
  }
  <Vertex> 9 {
    0 1 1
    <UV> { 0 0 }
  }
  <Vertex> 10 {
    1 1 1
    <UV> { 1 0 }
  }
  <Vertex> 11 {
    0 1 0
    <UV> { 0 1 }
  }
  <Vertex> 12 {
    1 1 0
    <UV> { 1 1 }
  }
}
<Group> box {
  <Polygon> {
    <TRef> { one }
    <Normal> { 0 1 0 }
    <VertexRef> { 3 7 8 4 <Ref> { box } }
  }
  <Polygon> {
    <TRef> { two }
    <Normal> { 0 1 0 }
    <VertexRef> { 2 6 5 1 <Ref> { box } }
  }
  <Polygon> {
    <TRef> { three }
    <Normal> { -1 0 0 }
    <VertexRef> { 1 5 7 3 <Ref> { box } }
  }
  <Polygon> {
    <TRef> { four }
    <Normal> { 1 0 0 }
    <VertexRef> { 4 8 6 2 <Ref> { box } }
  }
  <Polygon> {
    <TRef> { five }
    <Normal> { 0 0 1 }
    <VertexRef> { 9 3 4 10 <Ref> { box } }
  }
  <Polygon> {
    <TRef> { six }
    <Normal> { 0 0 -1 }
    <VertexRef> { 7 11 12 8 <Ref> { box } }
  }
}box.egg を改造して、6面全て別のテクスチャーを貼り付ける numbers.egg を作成しました。box.egg との違いは、読み込むテクスチャーの数が6個になっており、<Group>セクションで、各面に別の画像が読み込まれるようにしたところです。
どのようにテクスチャーが貼り付けられるか確認するため、次のコード(03_02_numbers_model.py)を作成し実行してください。03_01_box_model.py を1行修正するだけです。
"""03_02_numbers_model.py"""
from direct.showbase.ShowBase import ShowBase
from panda3d.core import *


class App(ShowBase):
    # コンストラクタ
    def __init__(self):
        # ShowBaseを継承する
        ShowBase.__init__(self)

        # ウインドウの設定
        self.properties = WindowProperties()
        self.properties.setTitle('Box model')
        self.properties.setSize(1200, 800)
        self.win.requestProperties(self.properties)
        self.setBackgroundColor(0, 0, 0)

        # マウス操作を禁止
        self.disableMouse()
        # カメラの設定
        self.camera.setPos(40, -50, 50)
        self.camera.lookAt(0, 0, 0)

        # 座標軸
        self.axis = self.loader.loadModel('models/zup-axis')
        self.axis.setPos(0, 0, 0)
        self.axis.setScale(1.5)
        self.axis.reparentTo(self.render)

        # ブロックを置く
        self.cube1 = self.loader.loadModel('models/numbers')  # ここを修正
        self.cube1.setPos(0, 0, 0)
        self.cube1.setScale(5)
        self.cube1.reparentTo(self.render)


app = App()
app.run()
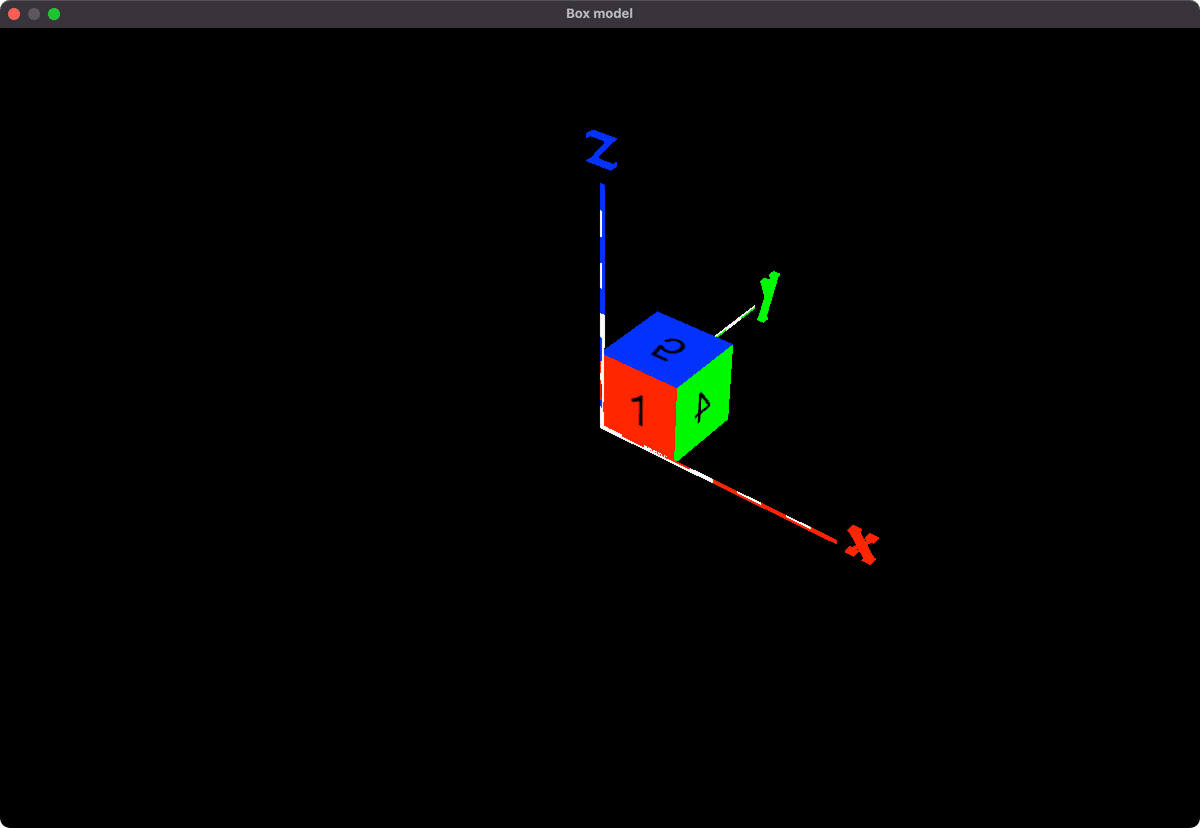
数字の書いたテクスチャーを貼り付けることができました。しかし何か変です。4や5が逆さまになっています。裏になって見えませんが、3と6も反対になっています。これはどうしてでしょうか?
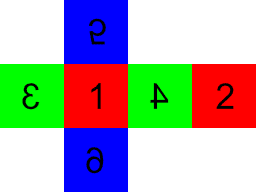
numbersモデルを展開してみました。1と2以外は数字が反転しています。これは画像を貼り付ける方向が逆になっているためです。例として、4の面を考察します。
略

<VertexPool> box {
  略
  <Vertex> 2 {
    1 1 1
    <UV> { 0 1 }
  }略
  <Vertex> 4 {
    1 0 1
    <UV> { 1 1 }
  }
  略
  <Vertex> 6 {
    1 1 0
    <UV> { 0 0 }
  }
  略
  <Vertex> 8 {
    1 0 0
    <UV> { 1 0 }
  }
  略
}
<Group> box {
  略
  <Polygon> {
    <TRef> { four }
    <Normal> { 1 0 0 }
    <VertexRef> { 4 8 6 2 <Ref> { box } }
  }
  略
}numbers.egg を一部抜粋しました。4の面は頂点4 8 6 2よりできています。次の説明図の4の面をよく観察してください。
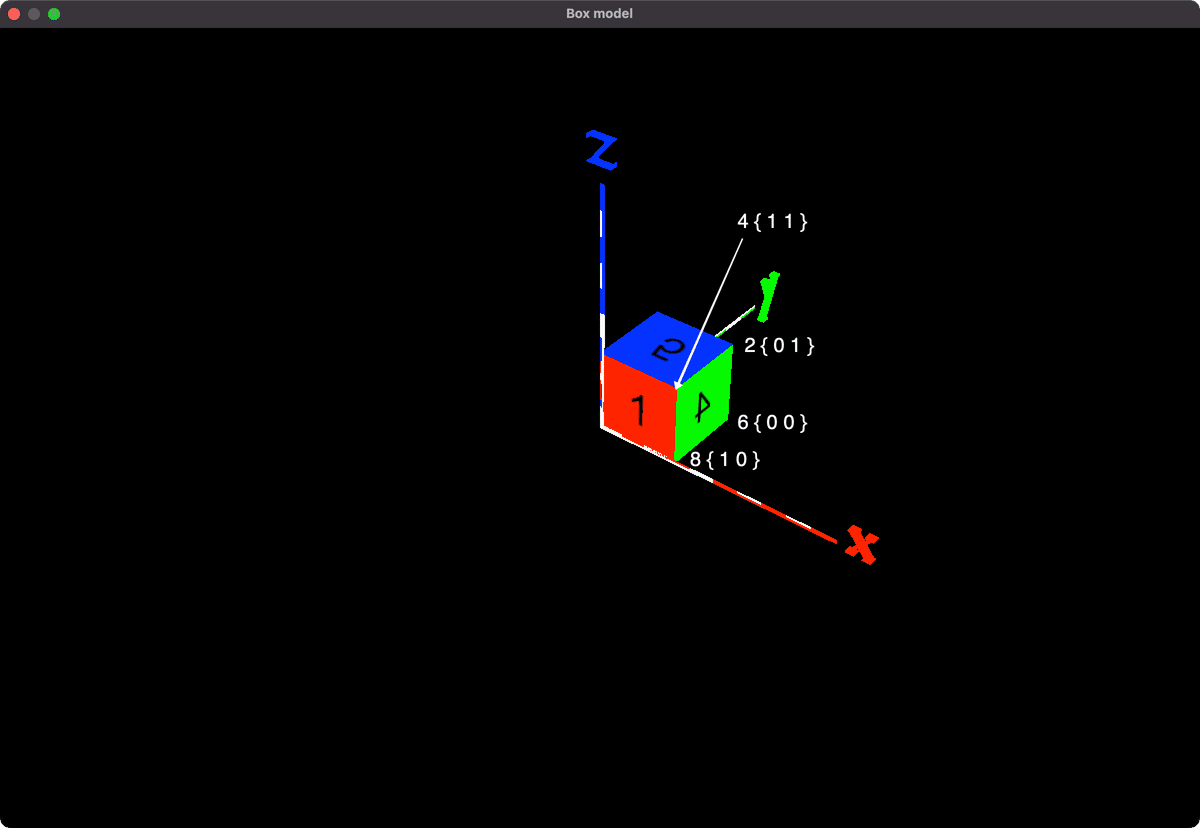
画像の貼り付けは、<UV>要素により方向が決定されます。頂点4 は<UV> { 1 1 } が指定されており、テクスチャーの右上が張り付きます。頂点6 は<UV> { 0 0 } が指定されており、テクスチャーの左下が張り付きます。したがって画像が反対に(内側から)貼り付けられてしまうというわけです。
画像が反転してしまう理由は分かりましたが、ではなぜ、わざわざ反転させているのでしょうか? これはファイルのサイズを減らして読み込みを少しでも早くしようとする工夫の一つです。
全ての面を正しい方向に貼り付けるには本来、4 x 6 = 24の頂点を指定しなくてはなりませんが、box.egg は半分の12頂点にしか指定していません。半分の頂点で読み込みを早くできる反面、テクスチャーが反転す弊害が出てしまうことになります。
box.egg の作成者は、「ブロックに貼り付けるテクスチャーは左右対称であることが多いので問題ない」と考えているのだと思います。通常は画像の反転は問題ないのですが、うまく貼り付けられないときは、この画像の反転のことを思い出し対策してください。最初から3 4 5 6面の画像は逆さまに作っておくことをお勧めします。
次はいよいよブロックのモデルを生成するプログラムを完成させます。まずは全ての面が同じテクスチャーである石(stone)ブロックを作成します。
ブロック作成(全ての面が同じ)
"""03_03_egg_model_maker_1.py"""

coordinate = """\
<CoordinateSystem> { Z-Up }

"""
vertex_pool = """\
<VertexPool> box {
  <Vertex> 1 {
    0 1 1
    <UV> { 1 1 }
  }
  <Vertex> 2 {
    1 1 1
    <UV> { 0 1 }
  }
  <Vertex> 3 {
    0 0 1
    <UV> { 0 1 }
  }
  <Vertex> 4 {
    1 0 1
    <UV> { 1 1 }
  }
  <Vertex> 5 {
    0 1 0
    <UV> { 1 0 }
  }
  <Vertex> 6 {
    1 1 0
    <UV> { 0 0 }
  }
  <Vertex> 7 {
    0 0 0
    <UV> { 0 0 }
  }
  <Vertex> 8 {
    1 0 0
    <UV> { 1 0 }
  }
  <Vertex> 9 {
    0 1 1
    <UV> { 0 0 }
  }
  <Vertex> 10 {
    1 1 1
    <UV> { 1 0 }
  }
  <Vertex> 11 {
    0 1 0
    <UV> { 0 1 }
  }
  <Vertex> 12 {
    1 1 0
    <UV> { 1 1 }
  }
}

"""
group = """\
<Group> box {
  <Polygon> {
    <TRef> { one }
    <Normal> { 0 1 0 }
    <VertexRef> { 3 7 8 4 <Ref> { box } }
  }
  <Polygon> {
    <TRef> { one }
    <Normal> { 0 1 0 }
    <VertexRef> { 2 6 5 1 <Ref> { box } }
  }
  <Polygon> {
    <TRef> { one }
    <Normal> { -1 0 0 }
    <VertexRef> { 1 5 7 3 <Ref> { box } }
  }
  <Polygon> {
    <TRef> { one }
    <Normal> { 1 0 0 }
    <VertexRef> { 4 8 6 2 <Ref> { box } }
  }
  <Polygon> {
    <TRef> { one }
    <Normal> { 0 0 1 }
    <VertexRef> { 9 3 4 10 <Ref> { box } }
  }
  <Polygon> {
    <TRef> { one }
    <Normal> { 0 0 -1 }
    <VertexRef> { 7 11 12 8 <Ref> { box } }
  }
}

"""


class EggModel:
    def __init__(self, model_name, texture1):
        self.model_name = model_name
        self.texture1 = texture1

    def make(self):
        model = coordinate
        model += f'<Texture> one {{\n  "../textures/{self.texture1}.png"\n}}\n\n'
        model += vertex_pool + group

        print(model)

        # クライアントから送られてきたデータをファイルに書き出す
        with open(f"models/{self.model_name}.egg", "w") as f:
            f.write(model)


if __name__ == "__main__":
    blocks_1 = {
        'stone': ['0-1'],
        'dirt': ['0-2'],
        'bricks': ['0-7'],
        'cobblestone': ['1-0'],
        'bedrock': ['1-1'],
        'sand': ['1-2'],
        'iron_block': ['1-6'],
        'gold_block': ['1-7'],
        'diamond_block': ['1-8'],
        'emerald_block': ['1-9'],
        'gold_ore': ['2-0'],
        'iron_ore': ['2-1'],
        'coal_ore': ['2-2'],
        'mossy_cobblestone': ['2-4'],
        'obsidian': ['2-5'],
        'sponge': ['3-0'],
        'glass': ['3-1'],
        'diamond_ore': ['3-2'],
        'redstone_ore': ['3-3'],
        'oak_leaves': ['3-4'],
        'oak_plants': ['0-4'],
        'stone_bricks': ['3-6'],
        'lava': ['3-21'],
        'water': ['3-22'],
        'white_wool': ['4-0'],
        'mob_spawner': ['4-1'],
        'snow': ['4-2'],
        'ice': ['4-3'],
        'black_wool': ['7-1'],
        'gray_wool': ['7-2'],
        'red_wool': ['8-1'],
        'pink_wool': ['8-2'],
        'lapis_block': ['9-0'],
        'green_wool': ['9-1'],
        'lime_wool': ['9-2'],
        'lapis_ore': ['10-0'],
        'brown_wool': ['10-1'],
        'yellow_wool': ['10-2'],
        'blue_wool': ['11-1'],
        'cyan_wool': ['11-2'],
        'purple_wool': ['12-1'],
        'magenta_wool': ['12-2'],
        'spruce_planks': ['12-6'],
        'jungle_planks': ['12-7'],
        'light_blue_wool': ['13-1'],
        'orange_wool': ['13-2'],
        'birch_planks': ['13-6'],
        'light_gray_wool': ['14-1'],
    }

    for key, value in blocks_1.items():
        egg_model = EggModel(key, value[0])
        egg_model.make()
eggファイルの構造が理解できたので、マイクラブロックを作成できるようになりました。一つずつ手動で作成することもできますが、ブロックの種類は多いので自動化したくなります。そこでブロックID とテクスチャ名を指定すると自動でモデルを生成するプログラムを作成しました。
ブロックID は、本家マイクラと同じ名前を使わせていただきます。古いバージョンでは、ブロックID は数字で指定していましたが、平坦化という大きなアップデートがあり、文字で指定するようになりました。
たとえば石ブロックのブロックID は、以前は「1」でしたが、最新版では「stone」となります。
03_03_egg_model_maker_1.py は、全ての面が同じブロックを作成できます。全ての面が同じブロックの代表は石ブロック(stone)です。
03_03_egg_model_maker_1.py の説明をします。
少し分かりづらいかもしれませんが、ブロックID.egg を名前とするテキストファイルを作っているだけです。
変数blocks_1 は辞書であり、キー(key)と値(value)を持っています。キーはブロックIDであり、値はテクスチャー名をリストで指定しています。
変数model にテキストをまとめて、with構文の中でテキストファイルとして指定の場所に保存します。
03_03_egg_model_maker_1.py を実行すると、48種類のブロックモデルがmodelsディレクトリに自動で生成されます。正しく生成できているか確認してみましょう。
"""03_04_egg_model_viewer.py"""
from direct.showbase.ShowBase import ShowBase
from panda3d.core import *


class App(ShowBase):
    # コンストラクタ
    def __init__(self):
        # ShowBaseを継承する
        ShowBase.__init__(self)

        # textured cube
        blocks = {
            # blocks_1
            'stone': ['0-1'],
            'dirt': ['0-2'],
            'bricks': ['0-7'],
            'cobblestone': ['1-0'],
            'bedrock': ['1-1'],
            'sand': ['1-2'],
            'iron_block': ['1-6'],
            'gold_block': ['1-7'],
            'diamond_block': ['1-8'],
            'emerald_block': ['1-9'],
            'gold_ore': ['2-0'],
            'iron_ore': ['2-1'],
            'coal_ore': ['2-2'],
            'mossy_cobblestone': ['2-4'],
            'obsidian': ['2-5'],
            'sponge': ['3-0'],
            'glass': ['3-1'],
            'diamond_ore': ['3-2'],
            'redstone_ore': ['3-3'],
            'oak_leaves': ['3-4'],
            'oak_plants': ['0-4'],
            'stone_bricks': ['3-6'],
            'lava': ['3-21'],
            'water': ['3-22'],
            'white_wool': ['4-0'],
            'mob_spawner': ['4-1'],
            'snow': ['4-2'],
            'ice': ['4-3'],
            'black_wool': ['7-1'],
            'gray_wool': ['7-2'],
            'red_wool': ['8-1'],
            'pink_wool': ['8-2'],
            'lapis_block': ['9-0'],
            'green_wool': ['9-1'],
            'lime_wool': ['9-2'],
            'lapis_ore': ['10-0'],
            'brown_wool': ['10-1'],
            'yellow_wool': ['10-2'],
            'blue_wool': ['11-1'],
            'cyan_wool': ['11-2'],
            'purple_wool': ['12-1'],
            'magenta_wool': ['12-2'],
            'spruce_planks': ['12-6'],
            'jungle_planks': ['12-7'],
            'light_blue_wool': ['13-1'],
            'orange_wool': ['13-2'],
            'birch_planks': ['13-6'],
            'light_gray_wool': ['14-1'],
        }

        for i, name in enumerate(blocks):
            self.cube = self.loader.loadModel(f'models/{name}')
            self.cube.setPos(i % 10 - 5, 30, int(i / 10) * 2)
            self.cube.reparentTo(self.render)


app = App()
app.run()
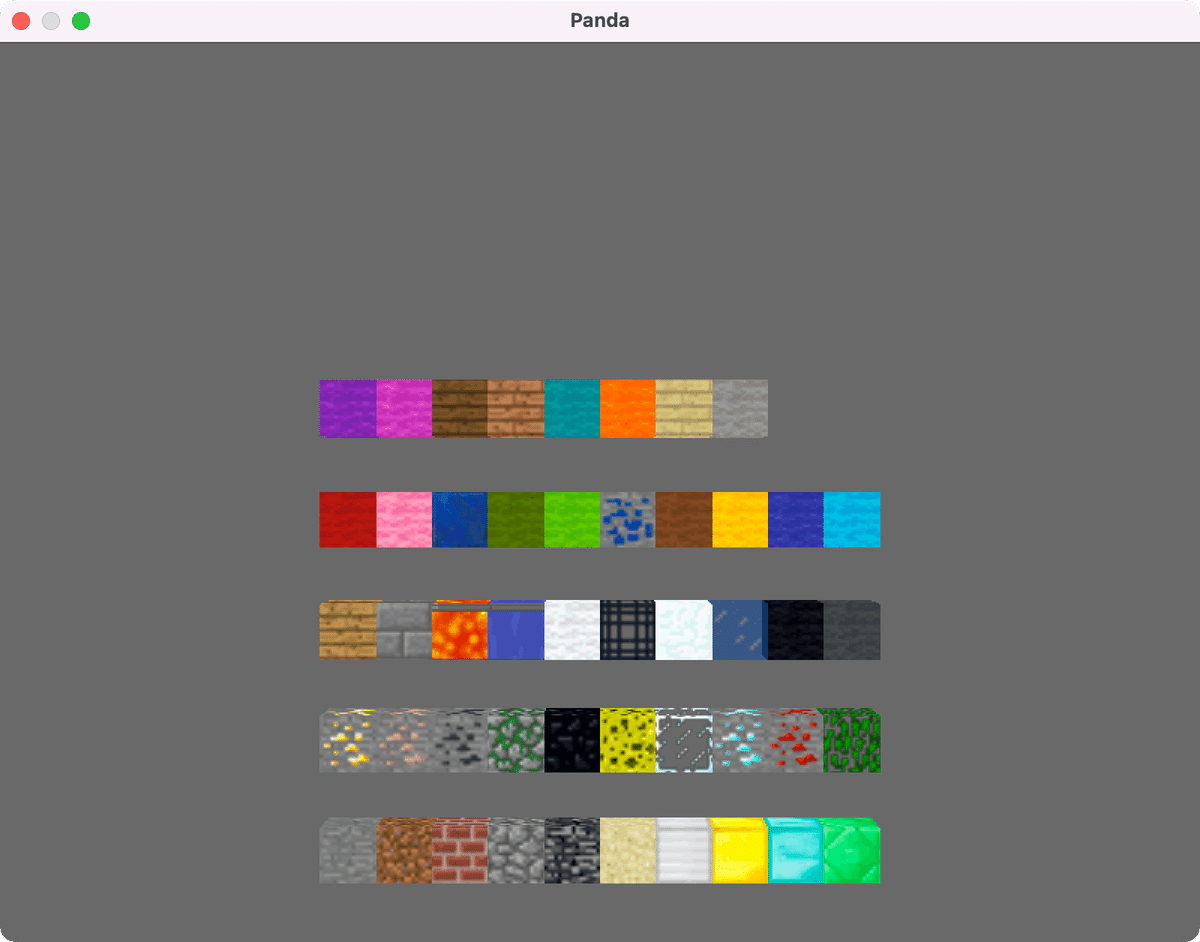
03_04_egg_model_viewer.py は作成したモデルを表示するプログラムです。ブロックを観察しやすいように 10個を一列として上方向に並んで表示するようにしています。
実行すると、ブロックが正しく作成できていることを確認できました。これで48個もブロックが使えるようになりましたが、いくつかの使いたいブロックが含まれていません。次の節でオークの原木(oak_log)を作ります。
ブロック作成(上下の面が同じ)
"""03_05_egg_model_maker_1_5.py"""

coordinate = """\
<CoordinateSystem> { Z-Up }

"""
vertex_pool = """\
<VertexPool> box {
  <Vertex> 1 {
    0 1 1
    <UV> { 1 1 }
  }
  <Vertex> 2 {
    1 1 1
    <UV> { 0 1 }
  }
  <Vertex> 3 {
    0 0 1
    <UV> { 0 1 }
  }
  <Vertex> 4 {
    1 0 1
    <UV> { 1 1 }
  }
  <Vertex> 5 {
    0 1 0
    <UV> { 1 0 }
  }
  <Vertex> 6 {
    1 1 0
    <UV> { 0 0 }
  }
  <Vertex> 7 {
    0 0 0
    <UV> { 0 0 }
  }
  <Vertex> 8 {
    1 0 0
    <UV> { 1 0 }
  }
  <Vertex> 9 {
    0 1 1
    <UV> { 0 0 }
  }
  <Vertex> 10 {
    1 1 1
    <UV> { 1 0 }
  }
  <Vertex> 11 {
    0 1 0
    <UV> { 0 1 }
  }
  <Vertex> 12 {
    1 1 0
    <UV> { 1 1 }
  }
}

"""
group = """\
<Group> box {
  <Polygon> {
    <TRef> { one }
    <Normal> { 0 1 0 }
    <VertexRef> { 3 7 8 4 <Ref> { box } }
  }
  <Polygon> {
    <TRef> { one }
    <Normal> { 0 1 0 }
    <VertexRef> { 2 6 5 1 <Ref> { box } }
  }
  <Polygon> {
    <TRef> { one }
    <Normal> { -1 0 0 }
    <VertexRef> { 1 5 7 3 <Ref> { box } }
  }
  <Polygon> {
    <TRef> { one }
    <Normal> { 1 0 0 }
    <VertexRef> { 4 8 6 2 <Ref> { box } }
  }
  <Polygon> {
    <TRef> { five }
    <Normal> { 0 0 1 }
    <VertexRef> { 9 3 4 10 <Ref> { box } }
  }
  <Polygon> {
    <TRef> { five }
    <Normal> { 0 0 -1 }
    <VertexRef> { 7 11 12 8 <Ref> { box } }
  }
}

"""


class EggModel:
    def __init__(self, model_name, texture1, texture5):
        self.model_name = model_name
        self.texture1 = texture1
        self.texture5 = texture5

    def make(self):
        model = coordinate
        model += f'<Texture> one {{\n  "../textures/{self.texture1}.png"\n}}\n\n'
        model += f'<Texture> five {{\n  "../textures/{self.texture5}.png"\n}}\n\n'
        model += vertex_pool + group

        print(model)

        # クライアントから送られてきたデータをファイルに書き出す
        with open(f"models/{self.model_name}.egg", "w") as f:
            f.write(model)


if __name__ == "__main__":
    blocks_1_5 = {
        'oak_log': ['1-4', '1-5'],
        'bookshelf': ['2-3', '0-4'],
        'crafting_table': ['3-11', '2-11'],
        'cactus': ['4-6', '4-5'],
        'jukebox': ['4-10', '4-11'],
        'spruce_log': ['7-4', '1-5'],
        'binch_log': ['7-5', '1-5'],
        'jungle_log': ['9-9', '1-5'],
    }

    for key, value in blocks_1_5.items():
        egg_model = EggModel(key, value[0], value[1])
egg_model.make()03_05_egg_model_maker_1_5.py は、たとえばオークの原木(oak_log)のような上下の面が同じ、側面が全て同じブロックを作成できます。変数blocks_1_5 は辞書であり、値はテクスチャーのリストです。1面の画像名と5面の画像名を保存しています。
実行すると、8種類のブロックモデルがmodelsディレクトリに追加で保存されます。正しく生成できたか確認してみます。
"""03_04_egg_model_viewer.py"""

blocks の中に追記
            # blocks_1_5
            'oak_log': ['1-4', '1-5'],
            'bookshelf': ['2-3', '0-4'],
            'crafting_table': ['3-11', '2-11'],
            'cactus': ['4-5', '4-6'],
            'jukebox': ['4-10', '4-11'],
            'spruce_log': ['7-4', '1-5'],
            'binch_log': ['7-5', '1-5'],
            'jungle_log': ['9-9', '1-5'],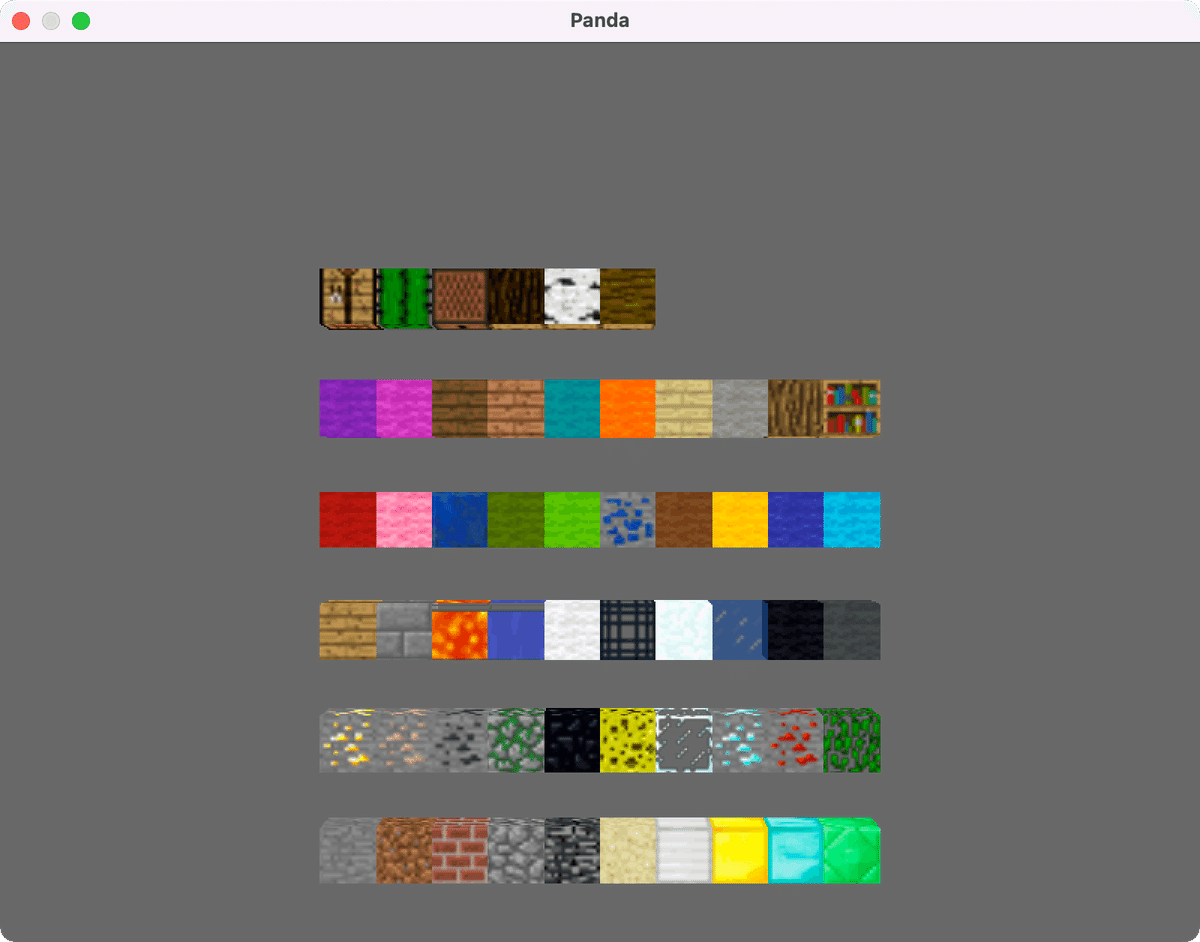
03_04_egg_model_viewer.py のblocksの内容を追記して、実行してください。8種類のブロックを正しく追加できました。これで56個のブロックが使えます。次は草ブロック(grass_block)を追加します。マイクラといえば、この有名なブロックは外せませんね。
ブロック作成(上下の面が違う)
"""03_06_egg_model_maker_1_5_6.py"""

coordinate = """\
<CoordinateSystem> { Z-Up }

"""
vertex_pool = """\
<VertexPool> box {
  <Vertex> 1 {
    0 1 1
    <UV> { 1 1 }
  }
  <Vertex> 2 {
    1 1 1
    <UV> { 0 1 }
  }
  <Vertex> 3 {
    0 0 1
    <UV> { 0 1 }
  }
  <Vertex> 4 {
    1 0 1
    <UV> { 1 1 }
  }
  <Vertex> 5 {
    0 1 0
    <UV> { 1 0 }
  }
  <Vertex> 6 {
    1 1 0
    <UV> { 0 0 }
  }
  <Vertex> 7 {
    0 0 0
    <UV> { 0 0 }
  }
  <Vertex> 8 {
    1 0 0
    <UV> { 1 0 }
  }
  <Vertex> 9 {
    0 1 1
    <UV> { 0 0 }
  }
  <Vertex> 10 {
    1 1 1
    <UV> { 1 0 }
  }
  <Vertex> 11 {
    0 1 0
    <UV> { 0 1 }
  }
  <Vertex> 12 {
    1 1 0
    <UV> { 1 1 }
  }
}

"""
group = """\
<Group> box {
  <Polygon> {
    <TRef> { one }
    <Normal> { 0 1 0 }
    <VertexRef> { 3 7 8 4 <Ref> { box } }
  }
  <Polygon> {
    <TRef> { one }
    <Normal> { 0 1 0 }
    <VertexRef> { 2 6 5 1 <Ref> { box } }
  }
  <Polygon> {
    <TRef> { one }
    <Normal> { -1 0 0 }
    <VertexRef> { 1 5 7 3 <Ref> { box } }
  }
  <Polygon> {
    <TRef> { one }
    <Normal> { 1 0 0 }
    <VertexRef> { 4 8 6 2 <Ref> { box } }
  }
  <Polygon> {
    <TRef> { five }
    <Normal> { 0 0 1 }
    <VertexRef> { 9 3 4 10 <Ref> { box } }
  }
  <Polygon> {
    <TRef> { six }
    <Normal> { 0 0 -1 }
    <VertexRef> { 7 11 12 8 <Ref> { box } }
  }
}

"""


class EggModel:
    def __init__(self, model_name, texture1, texture5, texture6):
        self.model_name = model_name
        self.texture1 = texture1
        self.texture5 = texture5
        self.texture6 = texture6

    def make(self):
        model = coordinate
        model += f'<Texture> one {{\n  "../textures/{self.texture1}.png"\n}}\n\n'
        model += f'<Texture> five {{\n  "../textures/{self.texture5}.png"\n}}\n\n'
        model += f'<Texture> six {{\n  "../textures/{self.texture6}.png"\n}}\n\n'
        model += vertex_pool + group

        print(model)

        # クライアントから送られてきたデータをファイルに書き出す
        with open(f"models/{self.model_name}.egg", "w") as f:
            f.write(model)


if __name__ == "__main__":
    blocks_1_5_6 = {
        'grass_block': ['0-3', '0-0', '0-2'],
        'tnt': ['0-8', '0-9', '0-10'],
        'sticky_piston': ['6-12', '6-10', '6-13'],
        'piston': ['6-12', '6-11', '6-13'],
    }

    for key, value in blocks_1_5_6.items():
        egg_model = EggModel(key, value[0], value[1], value[2])
        egg_model.make()
03_06_egg_model_maker_1_5_6.py は、たとえば草ブロック(grass_block)のような上下の面が異なり、側面が全て同じのブロックを作成できます。変数blocks_1_5_6 は辞書であり、値はテクスチャーのリストです。1面、5面、6面の画像名を保存しています。
実行すると、4種類のブロックモデルがmodelsディレクトリに保存されます。
"""03_04_egg_model_viewer.py"""

blocks の中に追記
            # blocks_1_5_6
            'grass_block': ['0-3', '0-0', '0-2'],
            'tnt': ['0-8', '0-9', '0-10'],
            'sticky_piston': ['6-12', '6-10', '6-13'],
            'piston': ['6-12', '6-11', '6-13'],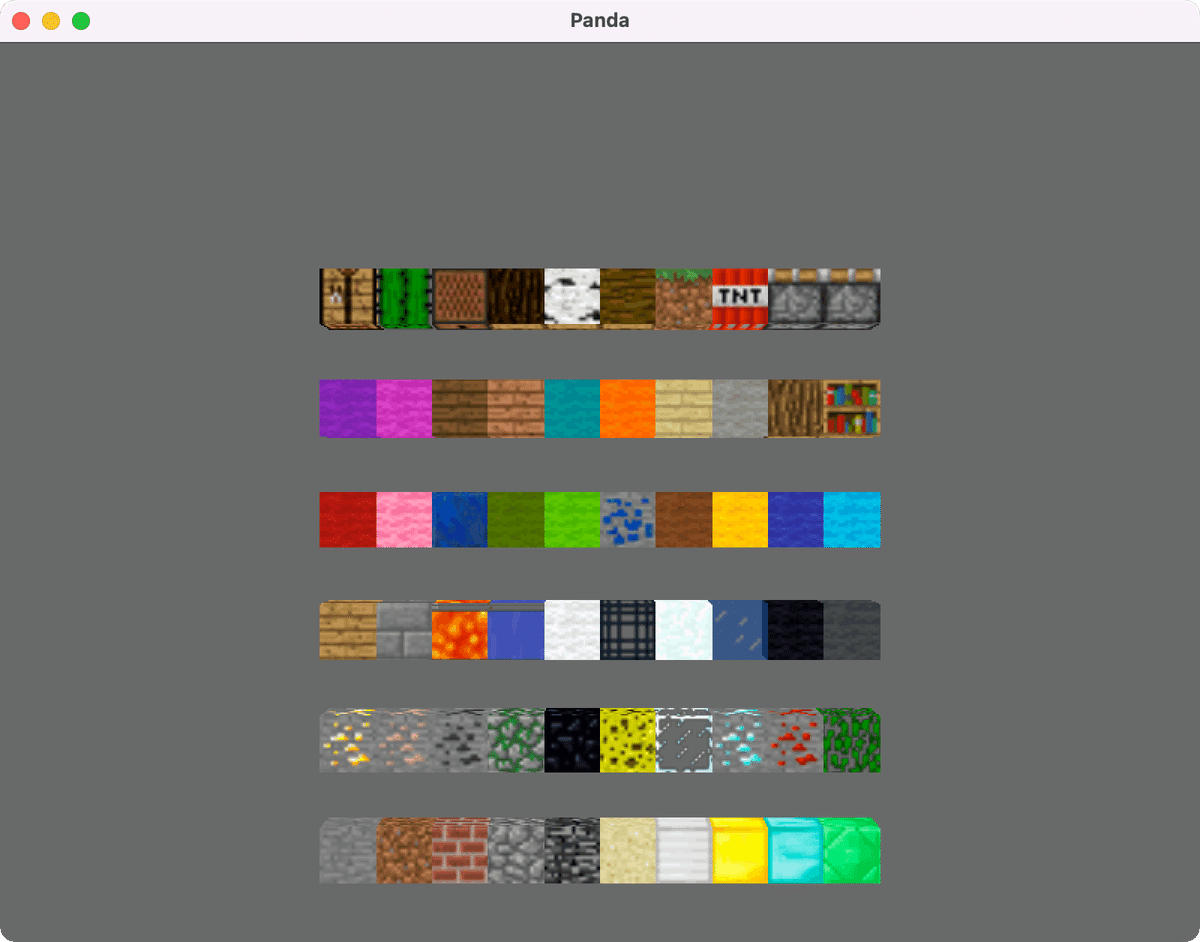
03_04_egg_model_viewer.py のblocksの内容を追記して、実行してください。4種類のブロックを正しく追加できました。これで60種類のブロックが使えるようになりました。最後、使用頻度は少ないかもしれませんが、チェスト(chest)ブロックを生成します。
ブロック作成(上下の面が同じ、前後の面が違う)
"""03_06_egg_model_maker_1_5_6.py"""

coordinate = """\
<CoordinateSystem> { Z-Up }

"""
vertex_pool = """\
<VertexPool> box {
  <Vertex> 1 {
    0 1 1
    <UV> { 1 1 }
  }
  <Vertex> 2 {
    1 1 1
    <UV> { 0 1 }
  }
  <Vertex> 3 {
    0 0 1
    <UV> { 0 1 }
  }
  <Vertex> 4 {
    1 0 1
    <UV> { 1 1 }
  }
  <Vertex> 5 {
    0 1 0
    <UV> { 1 0 }
  }
  <Vertex> 6 {
    1 1 0
    <UV> { 0 0 }
  }
  <Vertex> 7 {
    0 0 0
    <UV> { 0 0 }
  }
  <Vertex> 8 {
    1 0 0
    <UV> { 1 0 }
  }
  <Vertex> 9 {
    0 1 1
    <UV> { 0 0 }
  }
  <Vertex> 10 {
    1 1 1
    <UV> { 1 0 }
  }
  <Vertex> 11 {
    0 1 0
    <UV> { 0 1 }
  }
  <Vertex> 12 {
    1 1 0
    <UV> { 1 1 }
  }
}

"""
group = """\
<Group> box {
  <Polygon> {
    <TRef> { one }
    <Normal> { 0 1 0 }
    <VertexRef> { 3 7 8 4 <Ref> { box } }
  }
  <Polygon> {
    <TRef> { two }
    <Normal> { 0 1 0 }
    <VertexRef> { 2 6 5 1 <Ref> { box } }
  }
  <Polygon> {
    <TRef> { two }
    <Normal> { -1 0 0 }
    <VertexRef> { 1 5 7 3 <Ref> { box } }
  }
  <Polygon> {
    <TRef> { two }
    <Normal> { 1 0 0 }
    <VertexRef> { 4 8 6 2 <Ref> { box } }
  }
  <Polygon> {
    <TRef> { five }
    <Normal> { 0 0 1 }
    <VertexRef> { 9 3 4 10 <Ref> { box } }
  }
  <Polygon> {
    <TRef> { five }
    <Normal> { 0 0 -1 }
    <VertexRef> { 7 11 12 8 <Ref> { box } }
  }
}

"""


class EggModel:
    def __init__(self, model_name, texture1, texture2, texture5):
        self.model_name = model_name
        self.texture1 = texture1
        self.texture2 = texture2
        self.texture5 = texture5

    def make(self):
        model = coordinate
        model += f'<Texture> one {{\n  "../textures/{self.texture1}.png"\n}}\n\n'
        model += f'<Texture> two {{\n  "../textures/{self.texture2}.png"\n}}\n\n'
        model += f'<Texture> five {{\n  "../textures/{self.texture5}.png"\n}}\n\n'
        model += vertex_pool + group

        print(model)

        # クライアントから送られてきたデータをファイルに書き出す
        with open(f"models/{self.model_name}.egg", "w") as f:
            f.write(model)


if __name__ == "__main__":
    blocks_1_2_5 = {
        'furnace': ['2-12', '2-13', '3-14'],
        'burning_furnace': ['3-13', '2-13', '3-14'],
        'chest': ['6-19', '6-18', '6-17'],
        'pumpkin': ['7-7', '7-6', '6-6'],
        'jack_o_lantern': ['7-8', '7-6', '6-6'],
    }

    for key, value in blocks_1_2_5.items():
        egg_model = EggModel(key, value[0], value[1], value[2])
        egg_model.make()
03_07_egg_model_maker_1_2_5.py は、たとえばチェスト(chest)のような上下の面が同じで、側面の中で正面のみ違うブロックを作成できます。変数blocks_1_2_5 は辞書であり、値はテクスチャーのリストです。1面、2面、5面の画像名を保存しています。
実行すると、5種類のブロックモデルがmodelsディレクトリに保存されます。
"""03_04_egg_model_viewer.py"""

blocks の中に追記
            # blocks_1_2_5
            'furnace': ['2-12', '2-13', '3-14'],
            'burning_furnace': ['3-13', '2-13', '3-14'],
            'chest': ['6-19', '6-18', '6-17'],
            'pumpkin': ['7-7', '7-6', '6-6'],
            'jack_o_lantern': ['7-8', '7-6', '6-6'],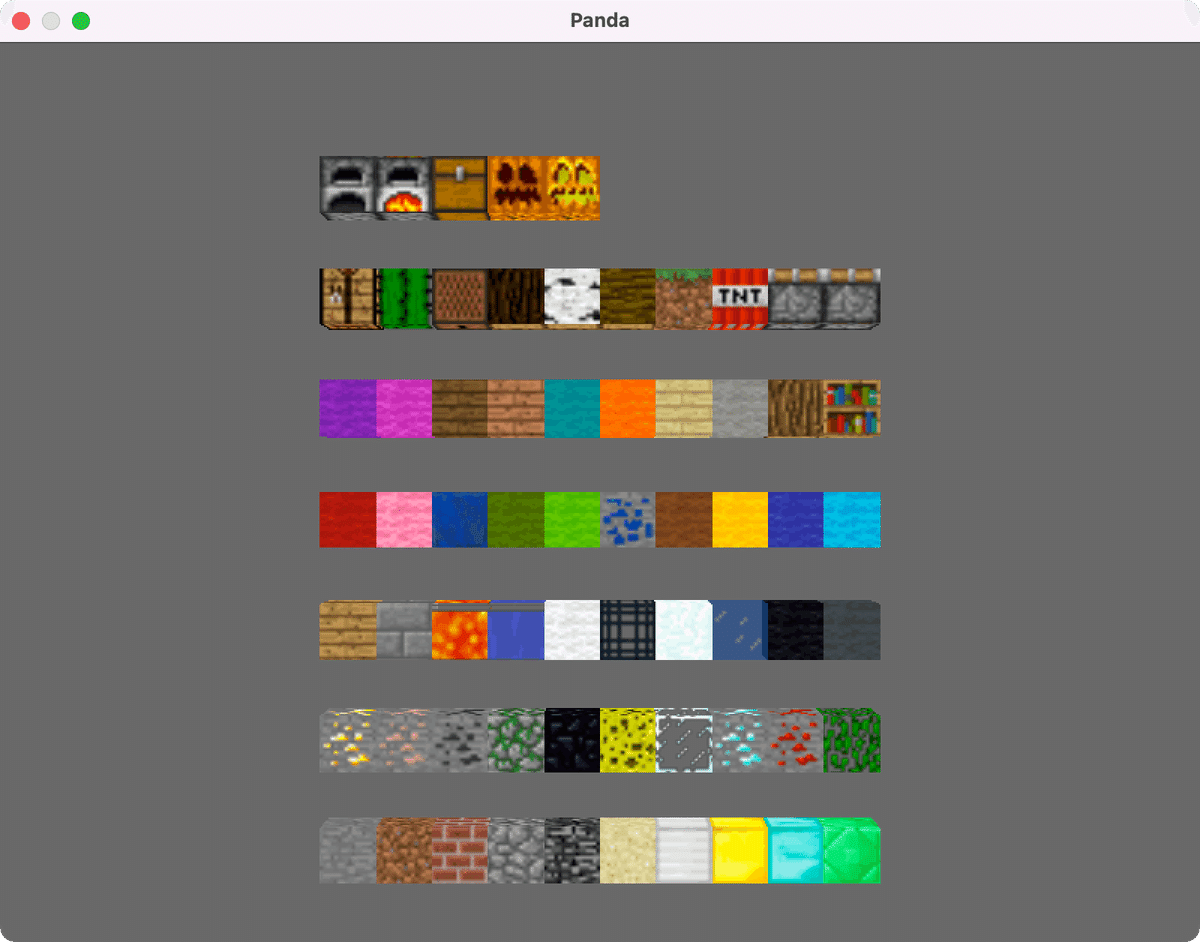
これで65種類のブロックが使えるようになりました。ブロック生成を自動化したおかげで修正や追加が簡単に行えるようになりました。さらにブロックを追加したい方はブロックID を調べて、自動化プログラムの辞書に追記して作成してくださいね。
読者様へのお願い。ブロックの名前や画像の指定などで間違っているところがあればコメントで教えてください。ご協力お願いします m(_ _)m
2万文字を超える記事になり、時間と手間がかかってしまいました。次回はブロックを使って、Pythonプログラムで建築をして遊びます。苦労の後には楽しみが待っているのです。お楽しみに!
追記(eggファイルを編集できるようにする)
コメントで、eggファイルの編集方法について質問がありましたので、追記で回答します。PyCharmでeggファイルを編集するには、ファイルの関連付けを行う必要があります。eggファイルは、単なるテキストファイルなのですが、拡張子がeggのため、PyCharmはそれが何であるか判断できず開けないのです。
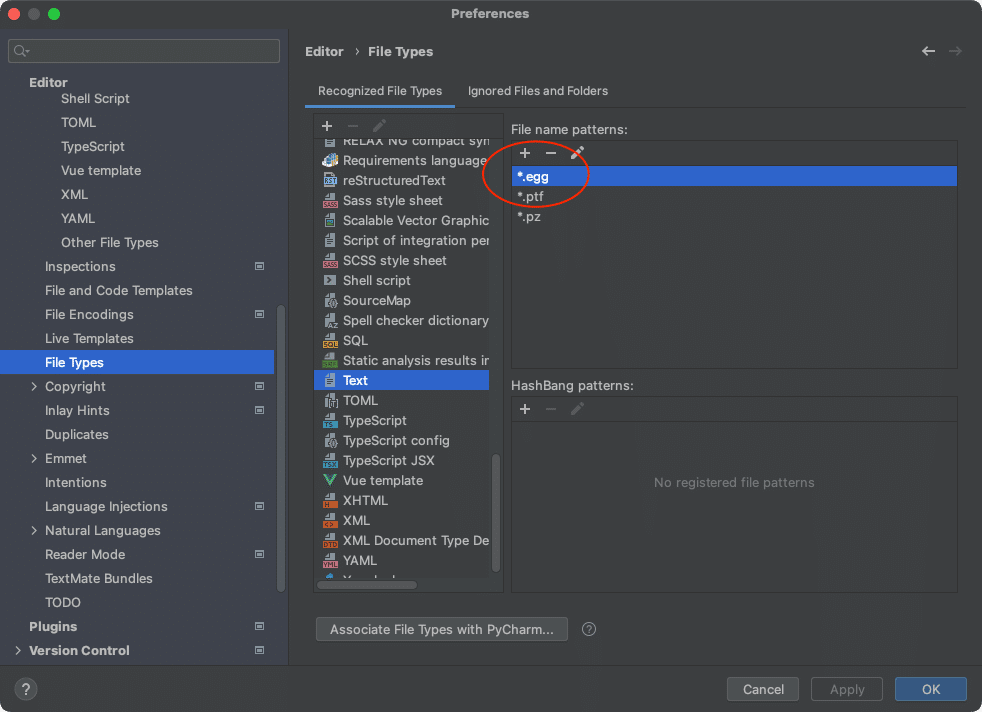
PyCharmの場合ですと、「設定」からファイルの関連付けを行います。上図のように、Textファイルとして、「*.egg」を追加してください。これで、eggファイルを開いて、編集できるようになるはずです。
もう一つの方法は、「number.egg」を「number.egg.text」とリネームします。そうすると、PyChramがテキストファイルとして開いてくれますから、編集して保存してから、元のファイル名に戻してやります。これは設定をいじらないで良いのですが、毎回、ファイル名を変えなくてはならないので、面倒であるという欠点があります。
前の記事
Pythonでマイクラを作る ②3Dゲームの基礎(座標、色、シーングラフ)
次の記事
Pythonでマイクラを作る ④プログラミングで自動建築
その他のタイトルはこちら
