
Pythonでマイクラを作る ⑨ブロックの設置と破壊を実装する

Pythonでマイクラを作る 第9回目です。
今回は、プレイヤーがブロックを設置、破壊できるようにします。まずプレイヤーの視線の先にターゲット(目標)ブロックを置くことから始めます。次にマウスクリックで、ターゲットの場所に石ブロックを置くことができるようにします。
ターゲットブロックのテクスチャー画像を作成

プレイヤーがブロックを設置、破壊するときに目標となるターゲットブロックを準備します。ドット絵エディターでサイズ 16x16のテクスチャー画像を作成してください。target_block.png の名前をつけて、texturesディレクトリの中に保存してください。
ご自分で作成されないときは、上のファイルをダウンロードしてお使いください。解凍して、中身の pngファイルを texturesディレクトリに移動します。
ターゲットブロックのモデルを作成
"""03_03_egg_model_maker_1.py"""

coordinate = """\
<CoordinateSystem> { Z-Up }

"""
vertex_pool = """\
<VertexPool> box {
  <Vertex> 1 {
    0 1 1
    <UV> { 1 1 }
  }
  <Vertex> 2 {
    1 1 1
    <UV> { 0 1 }
  }
  <Vertex> 3 {
    0 0 1
    <UV> { 0 1 }
  }
  <Vertex> 4 {
    1 0 1
    <UV> { 1 1 }
  }
  <Vertex> 5 {
    0 1 0
    <UV> { 1 0 }
  }
  <Vertex> 6 {
    1 1 0
    <UV> { 0 0 }
  }
  <Vertex> 7 {
    0 0 0
    <UV> { 0 0 }
  }
  <Vertex> 8 {
    1 0 0
    <UV> { 1 0 }
  }
  <Vertex> 9 {
    0 1 1
    <UV> { 0 0 }
  }
  <Vertex> 10 {
    1 1 1
    <UV> { 1 0 }
  }
  <Vertex> 11 {
    0 1 0
    <UV> { 0 1 }
  }
  <Vertex> 12 {
    1 1 0
    <UV> { 1 1 }
  }
}

"""
group = """\
<Group> box {
  <Polygon> {
    <TRef> { one }
    <Normal> { 0 1 0 }
    <VertexRef> { 3 7 8 4 <Ref> { box } }
  }
  <Polygon> {
    <TRef> { one }
    <Normal> { 0 1 0 }
    <VertexRef> { 2 6 5 1 <Ref> { box } }
  }
  <Polygon> {
    <TRef> { one }
    <Normal> { -1 0 0 }
    <VertexRef> { 1 5 7 3 <Ref> { box } }
  }
  <Polygon> {
    <TRef> { one }
    <Normal> { 1 0 0 }
    <VertexRef> { 4 8 6 2 <Ref> { box } }
  }
  <Polygon> {
    <TRef> { one }
    <Normal> { 0 0 1 }
    <VertexRef> { 9 3 4 10 <Ref> { box } }
  }
  <Polygon> {
    <TRef> { one }
    <Normal> { 0 0 -1 }
    <VertexRef> { 7 11 12 8 <Ref> { box } }
  }
}

"""


class EggModel:
    def __init__(self, model_name, texture1):
        self.model_name = model_name
        self.texture1 = texture1

    def make(self):
        model = coordinate
        model += f'<Texture> one {{\n  "../textures/{self.texture1}.png"\n}}\n\n'
        model += vertex_pool + group

        print(model)

        # クライアントから送られてきたデータをファイルに書き出す
        with open(f"models/{self.model_name}.egg", "w") as f:
            f.write(model)


if __name__ == "__main__":
    blocks_1 = {
        # 'stone': ['0-1'],
        # 'dirt': ['0-2'],
        # 'bricks': ['0-7'],
        # 'cobblestone': ['1-0'],
        # 'bedrock': ['1-1'],
        # 'sand': ['1-2'],
        # 'iron_block': ['1-6'],
        # 'gold_block': ['1-7'],
        # 'diamond_block': ['1-8'],
        # 'emerald_block': ['1-9'],
        # 'gold_ore': ['2-0'],
        # 'iron_ore': ['2-1'],
        # 'coal_ore': ['2-2'],
        # 'mossy_cobblestone': ['2-4'],
        # 'obsidian': ['2-5'],
        # 'sponge': ['3-0'],
        # 'glass': ['3-1'],
        # 'diamond_ore': ['3-2'],
        # 'redstone_ore': ['3-3'],
        # 'oak_leaves': ['3-4'],
        # 'dark_oak_leaves': ['3-5'],
        # 'stone_bricks': ['3-6'],
        # 'lava': ['3-21'],
        # 'water': ['3-22'],
        # 'white_wool': ['4-0'],
        # 'mob_spawner': ['4-1'],
        # 'snow': ['4-2'],
        # 'ice': ['4-3'],
        # 'black_wool': ['7-1'],
        # 'gray_wool': ['7-2'],
        # 'red_wool': ['8-1'],
        # 'pink_wool': ['8-2'],
        # 'lapis_block': ['9-0'],
        # 'green_wool': ['9-1'],
        # 'lime_wool': ['9-2'],
        # 'lapis_ore': ['10-0'],
        # 'brown_wool': ['10-1'],
        # 'yellow_wool': ['10-2'],
        # 'blue_wool': ['11-1'],
        # 'cyan_wool': ['11-2'],
        # 'purple_wool': ['12-1'],
        # 'magenta_wool': ['12-2'],
        # 'spruce_planks': ['12-6'],
        # 'jungle_planks': ['12-7'],
        # 'light_blue_wool': ['13-1'],
        # 'orange_wool': ['13-2'],
        # 'birch_planks': ['13-6'],
        # 'light_gray_wool': ['14-1'],
        'target_block': ['target_block'],  # 追記
    }

    for key, value in blocks_1.items():
        egg_model = EggModel(key, value[0])
        egg_model.make()
③ブロックのモデルを作成する でブロックモデルを自動生成するプログラムを作成しました。03_03_egg_model_maker_1.py(すべての面が同じテクスチャー)に1行追記して、ターゲットブロックを作成します。存在するブロックを再生成しないようにするため、作成済みのブロック部分はコメントアウトしておきましょう。03_03_egg_model_maker_1.py を実行すると、modelsディレクトリの中に target_block.egg が自動で作成されます。
"""03_04_egg_model_viewer.py"""
from direct.showbase.ShowBase import ShowBase
from panda3d.core import *


class App(ShowBase):
    # コンストラクタ
    def __init__(self):
        # ShowBaseを継承する
        ShowBase.__init__(self)

        # textured cube
        blocks = {
            # blocks_1
            'stone': ['0-1'],
            'dirt': ['0-2'],
            'bricks': ['0-7'],
            'cobblestone': ['1-0'],
            'bedrock': ['1-1'],
            'sand': ['1-2'],
            'iron_block': ['1-6'],
            'gold_block': ['1-7'],
            'diamond_block': ['1-8'],
            'emerald_block': ['1-9'],
            'gold_ore': ['2-0'],
            'iron_ore': ['2-1'],
            'coal_ore': ['2-2'],
            'mossy_cobblestone': ['2-4'],
            'obsidian': ['2-5'],
            'sponge': ['3-0'],
            'glass': ['3-1'],
            'diamond_ore': ['3-2'],
            'redstone_ore': ['3-3'],
            'oak_leaves': ['3-4'],
            'oak_plants': ['0-4'],
            'stone_bricks': ['3-6'],
            'lava': ['3-21'],
            'water': ['3-22'],
            'white_wool': ['4-0'],
            'mob_spawner': ['4-1'],
            'snow': ['4-2'],
            'ice': ['4-3'],
            'black_wool': ['7-1'],
            'gray_wool': ['7-2'],
            'red_wool': ['8-1'],
            'pink_wool': ['8-2'],
            'lapis_block': ['9-0'],
            'green_wool': ['9-1'],
            'lime_wool': ['9-2'],
            'lapis_ore': ['10-0'],
            'brown_wool': ['10-1'],
            'yellow_wool': ['10-2'],
            'blue_wool': ['11-1'],
            'cyan_wool': ['11-2'],
            'purple_wool': ['12-1'],
            'magenta_wool': ['12-2'],
            'spruce_planks': ['12-6'],
            'jungle_planks': ['12-7'],
            'light_blue_wool': ['13-1'],
            'orange_wool': ['13-2'],
            'birch_planks': ['13-6'],
            'light_gray_wool': ['14-1'],
            'target_block': ['target_block'],  # 追記
            # blocks_1_5
            'oak_log': ['1-4', '1-5'],
            'bookshelf': ['2-3', '0-4'],
            'crafting_table': ['3-11', '2-11'],
            'cactus': ['4-5', '4-6'],
            'jukebox': ['4-10', '4-11'],
            'spruce_log': ['7-4', '1-5'],
            'binch_log': ['7-5', '1-5'],
            'jungle_log': ['9-9', '1-5'],
            # blocks_1_5_6
            'grass_block': ['0-3', '0-0', '0-2'],
            'tnt': ['0-8', '0-9', '0-10'],
            'sticky_piston': ['6-12', '6-10', '6-13'],
            'piston': ['6-12', '6-11', '6-13'],
            # blocks_1_2_5
            'furnace': ['2-12', '2-13', '3-14'],
            'burning_furnace': ['3-13', '2-13', '3-14'],
            'chest': ['6-19', '6-18', '6-17'],
            'pumpkin': ['7-7', '7-6', '6-6'],
            'jack_o_lantern': ['7-8', '7-6', '6-6'],
            # blocks_1_2_3_4_5_6
            'player_head': ['head/1', 'head/2', 'head/3', 'head/4', 'head/5', 'head/6'],
            'player_body': ['body/1', 'body/2', 'body/3', 'body/4', 'body/5', 'body/6'],
            'player_hand': ['hand/1', 'hand/2', 'hand/3', 'hand/4', 'hand/5', 'hand/6'],
            'player_leg': ['leg/1', 'leg/2', 'leg/3', 'leg/4', 'leg/5', 'leg/6'],
        }

        for i, name in enumerate(blocks):
            self.cube = self.loader.loadModel(f'models/{name}')
            self.cube.setPos(i % 10 - 5, 30, int(i / 10) * 2 - 7)
            self.cube.reparentTo(self.render)


app = App()
app.run()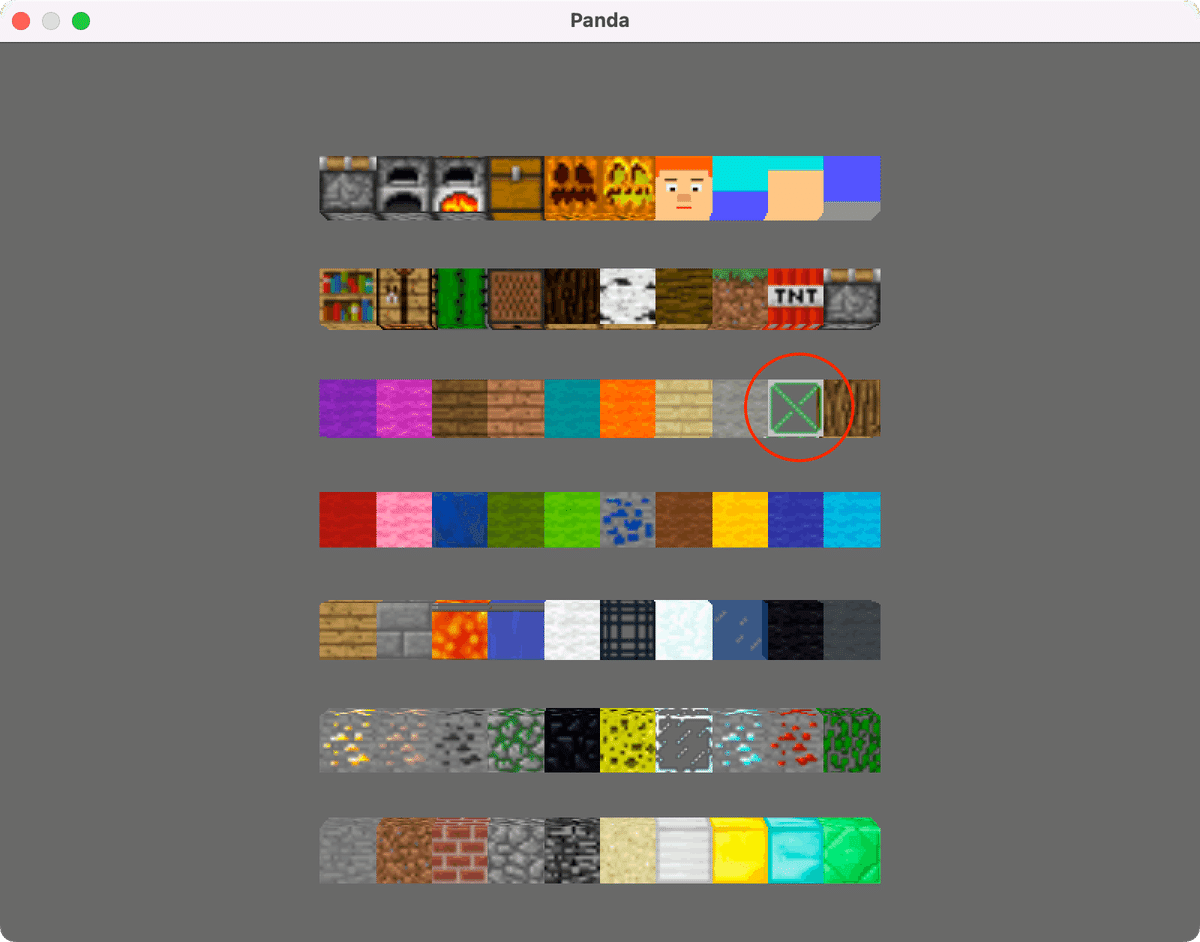
03_04_egg_model_viewer.py に1行追記して実行します。これでターゲットブロックが作成できたことが確認できました。これで使えるブロックは70個になりました。
目標地点にターゲットブロックを置く
"""src/player.py"""
from math import *
from panda3d.core import *
from direct.showbase.ShowBaseGlobal import globalClock
from .player_model import PlayerModel
from .camera import Camera
from .target import Target  # 追記


class Player(PlayerModel, Camera, Target):  # 追記
    heading_angular_velocity = 15000
    pitch_angular_velocity = 5000
    max_pitch_angle = 60
    speed = 10
    eye_height = 1.6  # 追記

    # コンストラクタ
    def __init__(self, base):
        self.base = base
        PlayerModel.__init__(self)
        Camera.__init__(self)
        Target.__init__(self)  # 追記

        self.position = Point3(0, 0, 0)
        self.direction = VBase3(0, 0, 0)
        self.velocity = Vec3(0, 0, 0)
        self.mouse_pos_x = 0
        self.mouse_pos_y = 0
        self.target_position = None  # 追記

以下略
player.py を修正します。
from .target import Targetにより、Targetクラスをインポートして使えるようにします。class Player(PlayerModel, Camera, Target):により、Tagetクラスを継承して、コンストラクタ内に Target.__init__(self)を追記して Targetクラスのプロパティーを初期化します。これで Targetクラスを取り込んで使えるようになりました。
新しいクラス変数eye_heightは、プレイヤーの目線の高さを定義します。地上 1.6メートルの位置から眺めている設定です。
インスタンス変数target_position はターゲットブロックの位置情報を表します。
"""src/target.py"""
from math import *
from panda3d.core import *


class Target:

    # コンストラクタ
    def __init__(self):
        self.target_node = self.base.render.attachNewNode(PandaNode('target_node'))
        self.target_block_model = self.base.loader.loadModel('models/target_block')
        self.target_block_model.reparentTo(self.target_node)

        self.base.taskMgr.add(self.set_target_block, "set_target_block")

    def get_target_position(self):
        x0, y0, z0 = self.position
        phi, theta, _ = self.direction

        # 方向ベクトル
        direction_vec = Vec3(
            sin(radians(90 - theta)) * cos(radians(phi + 90)),
            sin(radians(90 - theta)) * sin(radians(phi + 90)),
            cos(radians(90 - theta))
        )
        if theta < 0:
            z = 0
            x = x0 + (z - z0 - self.eye_height) * direction_vec.x / direction_vec.z
            y = y0 + (z - z0 - self.eye_height) * direction_vec.y / direction_vec.z
            # print(x, y)
            if (Point3(x, y, z) - self.position).length() < 5:
                return Point3(x, y, z)
            else:
                return None
        else:
            return None

    def set_target_block(self, task):
        self.target_position = self.get_target_position()
        if self.target_position:
            if self.target_node.isHidden():
                self.target_node.show()
            self.target_node.setPos(
                floor(self.target_position.x),
                floor(self.target_position.y),
                floor(self.target_position.z),
            )
        else:
            if not self.target_node.isHidden():
                self.target_node.hide()
        return task.cont
srcディレクトリ内に target.py を作成し、コードを書いていきます。
Targetクラスは、ブロックを設置、破壊する場所(目標地点)を操作します。ターゲットブロックを目標地点において、建築作業の目印にすることができます。
    # コンストラクタ
    def __init__(self):
        self.target_node = self.base.render.attachNewNode(PandaNode('target_node'))
        self.target_block_model = self.base.loader.loadModel('models/target_block')
        self.target_block_model.reparentTo(self.target_node)

        self.base.taskMgr.add(self.set_target_block, "set_target_block")
コンストラクタで Targetクラスの初期化を行います。target_nodeノードを作成し、ターゲットブロックのモデルを表示します。ターゲットブロックを動かすときは target_nodeノードと一緒に動かす設計です。
taskMgrクラスのaddメソッドで、フレームごとに実行する処理を指定します。set_target_blockメソッドを指定しました。
    def get_target_position(self):
        x0, y0, z0 = self.position
        phi, theta, _ = self.direction

        # 方向ベクトル
        direction_vec = Vec3(
            sin(radians(90 - theta)) * cos(radians(phi + 90)),
            sin(radians(90 - theta)) * sin(radians(phi + 90)),
            cos(radians(90 - theta))
        )
        if theta < 0:
            z = 0
            x = x0 + (z - z0 + self.eye_height) * direction_vec.x / direction_vec.z
            y = y0 + (z - z0 + self.eye_height) * direction_vec.y / direction_vec.z
            # print(x, y)
            if (Point3(x, y, z) - Point3(x0, y0, z0 + self.eye_height)).length() < 8:
                return Point3(x, y, z)
            else:
                return None
        else:
return Noneget_target_positionメソッドは、プレイヤーの視線の先を計算して、ブロックを置く(破壊する)ことができる場所の位置情報を返すメソッドです。いきなりすべての場所を調べるのは難しいため、最初は z = 0(地面に接する場所)のみ位置情報を計算します。
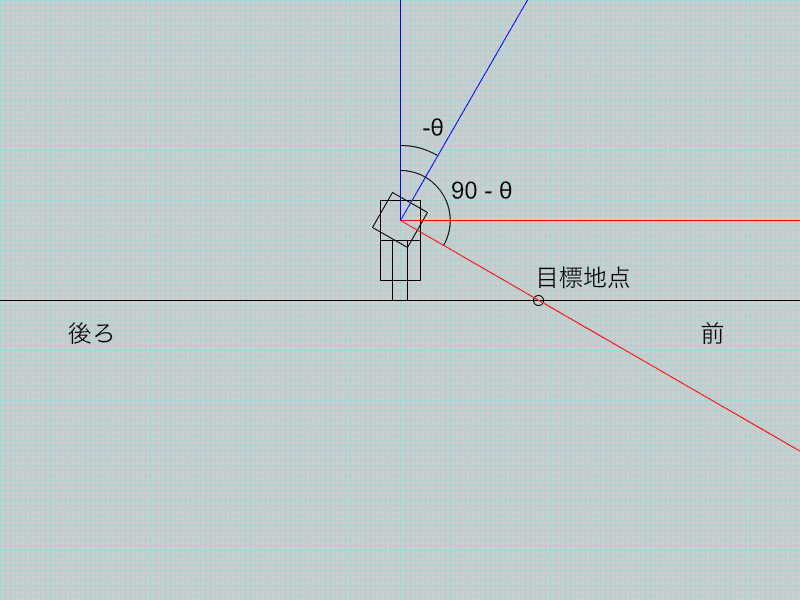
上図は、プレイヤーを横から見て、頭モデルと目標地点の関係を示しています。頭モデルの中心は (x0, y0, z0 + self.eye_height) です。Playerクラスのクラス変数eye_height は self.eye_height で取得できます。
$$
極座標 (r, \theta, \phi) を直交座標 (x, y, z) に変換すると\\
x = r \sin \theta cos \phi\\
y = r \sin \theta sin \phi\\
z = r \cos \theta
$$
上記の座標変換公式に $${r = 1, \theta = 90 - theta, \phi = phi + 90}$$ を代入すると次のコードになります。このコードから、視線の方向ベクトルが得られます。($${\theta}$$ の方向に注意)
            direction_vec = Vec3(
                sin(radians(90 - theta)) * cos(radians(phi + 90)),
                sin(radians(90 - theta)) * sin(radians(phi + 90)),
                cos(radians(90 - theta))
            )
$$
点 (x_0, y_0, z_0) を通り、方向ベクトル (a, b, c) の直線の方程式\\
\frac{x - x_0}{a} = \frac{y - y_0}{b} = \frac{z - z_0}{c}
$$
            z = 0
            x = x0 + (z - z0 + self.eye_height) * direction_vec.x / direction_vec.z
            y = y0 + (z - z0 + self.eye_height) * direction_vec.y / direction_vec.z
上記、3次元直線の公式を変形して、上記のコードから目標点の座標が得られます。
            if (Point3(x, y, z) - Point3(x0, y0, z0 + self.eye_height)).length() < 8:
                return Point3(x, y, z)
            else:
                return None
条件式により、頭の中心より 8 より近い点は、目標地点を返し、それ以外はNone を返すようにしました。これで get_target_positionメソッドの説明は終わりです。
def set_target_block(self, task):
    self.target_position = self.get_target_position()
    if self.target_position:
        if self.target_node.isHidden():
            self.target_node.show()
        self.c.setPos(
            floor(self.target_position.x),
            floor(self.target_position.y),
            floor(self.target_position.z),
        )
    else:
        if not self.target_node.isHidden():
            self.target_node.hide()
set_target_blockメソッドは、ターゲットブロックを目標地点に置きます。self.target_position が存在するときは、target_nodeノードを showメソッドで表示して、setPosメソッドでターゲットブロックの位置を決定します。存在しない(None)ときは、target_nodeノードを hideメソッドで非表示にします。

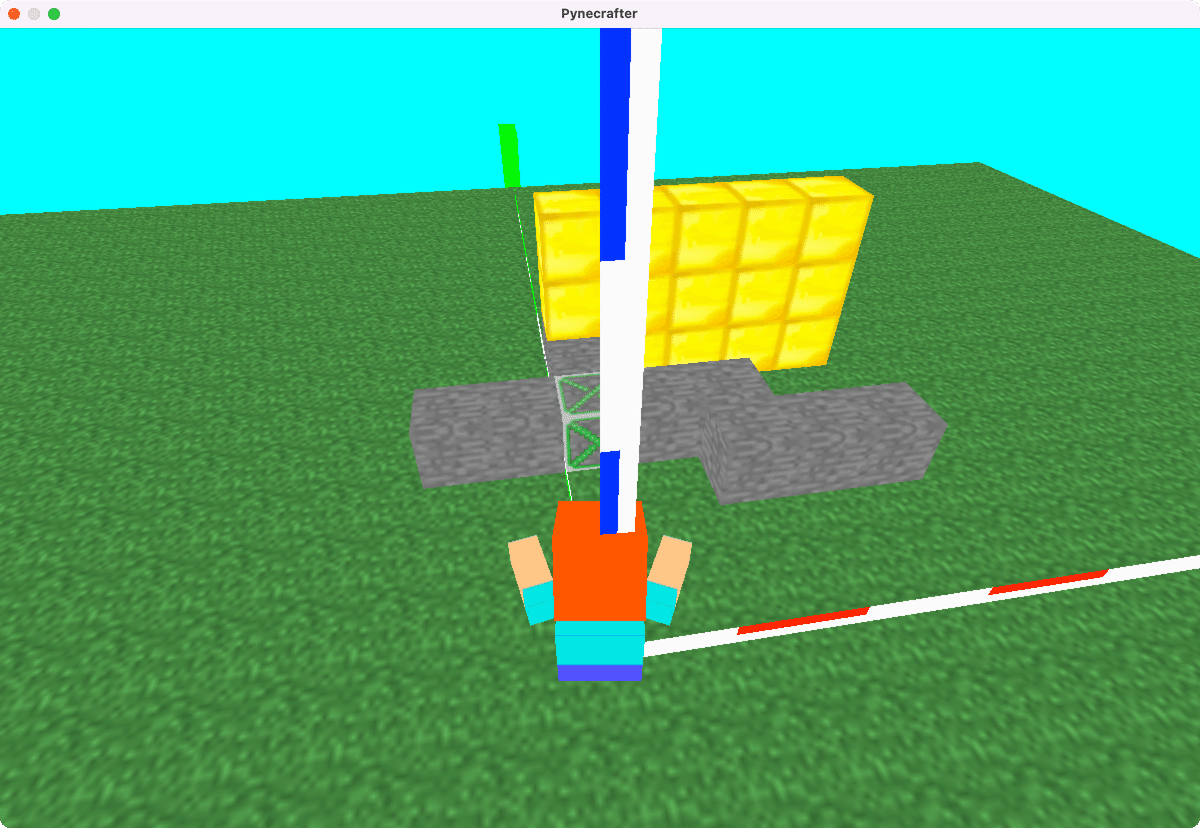
前回作成した 08_01_main.py を実行すると、プレイヤーの視線の先にターゲットブロックを置くことができます。
次にプレイヤーの操作で石ブロックを置けるようにします。
プレイヤー操作でブロックを設置、破壊する
"""src/block.py"""

クラスの最後にメソッドを追加

    def is_block_at(self, position):
        x, y, z = [floor(value) for value in position]
        key = f'{x}_{y}_{z}'
        return key in self.block_dictionary
ブロックがある場所に重ねてブロック置いたり、ブロックがない場所を破壊したりしないように、block.py を修正します。
is_block_atメソッドは、その場所にブロックがあるかどうか判定します。辞書block_dictionary はキーに位置情報を保存しているので、該当箇所のキーが存在するか調べることで、ブロックの有無を判定します。
リスト内表記 [floor(value) for value in position]により、小数で与えらる位置情報を整数に変換してから、key = f'{x}_{y}_{z}'により辞書のキーを指定します。
"""src/player.py"""

ユーザーのキー操作を追記

        # ユーザーのキー操作
        base.accept('w', self.update_key_map, ["w", 1])
        base.accept('w-up', self.update_key_map, ["w", 0])
        base.accept('a', self.update_key_map, ["a", 1])
        base.accept('a-up', self.update_key_map, ["a", 0])
        base.accept('s', self.update_key_map, ["s", 1])
        base.accept('s-up', self.update_key_map, ["s", 0])
        base.accept('d', self.update_key_map, ["d", 1])
        base.accept('d-up', self.update_key_map, ["d", 0])
        base.accept('mouse1', self.player_remove_block)  # 追記
        base.accept('mouse3', self.player_add_block)  # 追記
player.py を修正します。
ユーザーのキー操作の部分に、マウスクリックでブロックを設置、破壊するメソッドを実行するコードを追記します。引数mouse1 は左クリック、引数mouse3 は右クリックを意味します。それぞれ、player_remove_blockメソッド、player_add_blockメソッドと関連づけます。
"""src/player.py"""

クラスの最後にメソッドを追記

def player_add_block(self):
    if self.target_position and \
            not self.base.block.is_block_at(self.target_position):
        self.base.block.add_block(
            self.target_position.x,
            self.target_position.y,
            self.target_position.z,
            'stone'
        )

def player_remove_block(self):
    if self.target_position and \
            self.base.block.is_block_at(self.target_position):
        self.base.block.remove_block(
            self.target_position.x,
            self.target_position.y,
            self.target_position.z
                )
player_add_blockメソッドはブロックをターゲットブロックの位置に設置します。self.base.block.is_block_at(self.target_position)によりブロックが存在しないとき、self.base.block.add_blockメソッドで石ブロックを設置します。
player_remove_blockメソッドは、ターゲットブロックの位置にブロックが存在するとき、self.base.block.remove_blockメソッドでブロックを破壊します。
08_01_main.py を実行して、プレイヤーの操作でブロックを設置、破壊できることを確認してください。地面に接した場所(z = 0)限定ですが、石ブロックを置くことができるようになりました。
次回は、今回の続きでブロックの設置と破壊の実装を行います。ブロックを高さ1 以上に置けるようにすることと、設置するブロックの種類を選べるように機能を拡張します。
前の記事
Pythonでマイクラを作る ⑧カメラ機能を拡張する
次の記事
Pythonでマイクラを作る ⑩設置するブロックを選択する
その他のタイトルはこちら