
Pythonでマイクラを作る ⑦プレイヤーモデルを作成

Pythonでマイクラを作る 第7回目です。今回はプレイヤーモデルを自作のモデルに変更します。トップの画像のモデルは、ブロックを6つ(頭、体、両手足)組み合わせてできています。テクスチャー(3Dモデルに貼る画像のこと)は、ドット絵エディターでサクッと作りましたが、結構インパクトがあって気に入っています。
読者の皆さんはぜひ自分でテクスチャーを作って、自分だけのプレイヤーを作成してくださいね。では始めましょう。
ドット絵エディター

ドット絵エディターでテクスチャーを作ります。サイズは 16 x16 または 32x32 を推奨します。上図は 32x32 で作成した頭ブロックの正面です。これくらいの単純な画像なら数分で完成します。
Windowsを使っている方は、EDGEという素晴らしいフリーソフトがありますので試してみてください。上図は EDGE の操作画面です。
Mac の方は適当なフリーソフトが見つからなかったのですが、Asepriteは人気のあるドット絵エディターですから購入をご検討ください。ドット絵作りもプログラミングと一緒で楽しいです。
頭と体と手、足のブロックに貼り付けるテクスチャーを作成します。合計で 4種類 x 6面 = 24 枚の画像が必要になります。しかし重複している画像も多いので、実際作る画像は半分くらいで済むはずです。
レイヤー機能をうまく使って、効率よく作成してください。
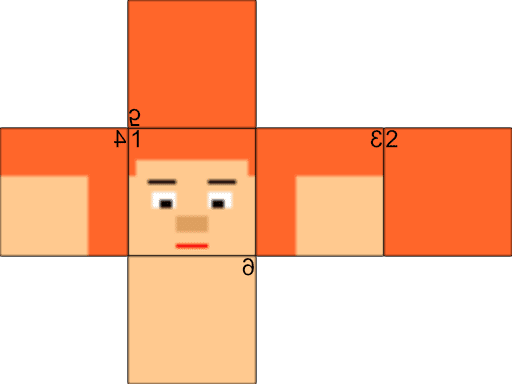
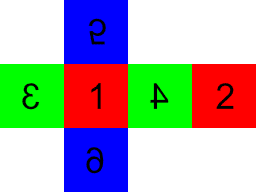
テクスチャーを貼り付ける向きには注意が必要です。上図は頭ブロックを展開した画像ですが、よく見ると側面である 3面、4面が逆さに貼り付けられています(裏から貼り付けたと考えた方がわかりやすい)。5面、6面も反転して、背面を下にして貼り付けられます。テクスチャーがうまく貼り付けられないときは、この点を思い出してください。
詳しくは、本連載の第3回「テクスチャーの貼り付け方を理解する」を参照してください。
ぜひご自分でプレイヤーのテクスチャーを作っていただきたいのですが、時間がない方は、player_textures.zip をダウンロード、解凍してお使いくださいませ。
ディレクトリ構造
# ディレクトリ構造
Documents/
  ├ pynecrafter/
  │  ├ images/
  │  │  ├ 48-488312_blockcss-minecraft-terrain-png-1-0-0.py
  │  │
  │  ├ textures/
  │  │  ├ head/
  │  │  │  ├ 1.png
  │  │  │  ├ 2.png
  │  │  │  ├ 3.png
  │  │  │  ├ 4.png
  │  │  │  ├ 5.png
  │  │  │  ├ 6.png
  │  │  ├ body/
  │  │  │  ├ 1.png
  │  │  │  ├ 2.png
  │  │  │  ├ 3.png
  │  │  │  ├ 4.png
  │  │  │  ├ 5.png
  │  │  │  ├ 6.png
  │  │  ├ hand/
  │  │  │  ├ 1.png
  │  │  │  ├ 2.png
  │  │  │  ├ 3.png
  │  │  │  ├ 4.png
  │  │  │  ├ 5.png
  │  │  │  ├ 6.png
  │  │  ├ leg/
  │  │  │  ├ 1.png
  │  │  │  ├ 2.png
  │  │  │  ├ 3.png
  │  │  │  ├ 4.png
  │  │  │  ├ 5.png
  │  │  │  ├ 6.png
  │  │  ├ 0-1.png
  │  │  ├ 0-2.png
  │  │
  │  ├ models/
  │  │  ├ grass_block.egg
  │  │  ├ stone.egg
  │  │  ├ dirt.egg
  │  │
  │  ├ src/
  │  │  ├ __init__.py
  │  │  ├ block.py  # ブロック関連
  │  │  ├ player.py  # プレイヤー関連
  │  │  ├ player_model.py  # プレイヤーモデル関連
  │  │  ├ camera.py  # カメラ関連
  │  │  ├ mc.py  # 統合クラス
  │  │
  │  ├ 01_01_showbase.py
  │  ├ 01_02_showbase.py
  │  ├ 01_03_showbase.py
  │  ├ xxx.py
  │  ├ 05_01_main.py
  │  ├ 06_01_main.py
  │  ├ 07_01_egg_model_maker_1_2_3_4_5_6.py  # ブロックを作成
  │  ├ 07_02_main.py  # 統合クラスをインポートしてゲームを起動する
  │
作成した(またはダウンロードした)テクスチャーは、texturesディレクトリの中にhead、body、hand、leg の4つのディレクトリーを作成し、その中に保存してください。
画像の名前は、どの面に貼り付けるかによって 1 〜 6 と名付けます。
srcディレクトリの中に player_model.py(プレイヤーモデル関連)、camera.py(カメラ関連)の2つのファイルを作成します。
そしてプロジェクト直下に 07_01_egg_model_maker_1_2_3_4_5_6.py(テクスチャーブロックを作成)、07_02_main.py(ゲームを起動)の2つのファイルを作成します。
以上で準備ができました。コードの説明に入っていきます。
全ての面が違うブロックの作成
"""07_01_egg_model_maker_1_2_3_4_5_6.py"""

coordinate = """\
<CoordinateSystem> { Z-Up }

"""
vertex_pool = """\
<VertexPool> box {
  <Vertex> 1 {
    0 1 1
    <UV> { 1 1 }
  }
  <Vertex> 2 {
    1 1 1
    <UV> { 0 1 }
  }
  <Vertex> 3 {
    0 0 1
    <UV> { 0 1 }
  }
  <Vertex> 4 {
    1 0 1
    <UV> { 1 1 }
  }
  <Vertex> 5 {
    0 1 0
    <UV> { 1 0 }
  }
  <Vertex> 6 {
    1 1 0
    <UV> { 0 0 }
  }
  <Vertex> 7 {
    0 0 0
    <UV> { 0 0 }
  }
  <Vertex> 8 {
    1 0 0
    <UV> { 1 0 }
  }
  <Vertex> 9 {
    0 1 1
    <UV> { 0 0 }
  }
  <Vertex> 10 {
    1 1 1
    <UV> { 1 0 }
  }
  <Vertex> 11 {
    0 1 0
    <UV> { 0 1 }
  }
  <Vertex> 12 {
    1 1 0
    <UV> { 1 1 }
  }
}

"""
group = """\
<Group> box {
  <Polygon> {
    <TRef> { one }
    <Normal> { 0 1 0 }
    <VertexRef> { 3 7 8 4 <Ref> { box } }
  }
  <Polygon> {
    <TRef> { two }
    <Normal> { 0 1 0 }
    <VertexRef> { 2 6 5 1 <Ref> { box } }
  }
  <Polygon> {
    <TRef> { three }
    <Normal> { -1 0 0 }
    <VertexRef> { 1 5 7 3 <Ref> { box } }
  }
  <Polygon> {
    <TRef> { four }
    <Normal> { 1 0 0 }
    <VertexRef> { 4 8 6 2 <Ref> { box } }
  }
  <Polygon> {
    <TRef> { five }
    <Normal> { 0 0 1 }
    <VertexRef> { 9 3 4 10 <Ref> { box } }
  }
  <Polygon> {
    <TRef> { six }
    <Normal> { 0 0 -1 }
    <VertexRef> { 7 11 12 8 <Ref> { box } }
  }
}

"""


class EggModel:
    def __init__(self, model_name, texture1, texture2, texture3, texture4, texture5, texture6):
        self.model_name = model_name
        self.texture1 = texture1
        self.texture2 = texture2
        self.texture3 = texture3
        self.texture4 = texture4
        self.texture5 = texture5
        self.texture6 = texture6

    def make(self):
        model = coordinate
        model += f'<Texture> one {{\n  "../textures/{self.texture1}.png"\n}}\n\n'
        model += f'<Texture> two {{\n  "../textures/{self.texture2}.png"\n}}\n\n'
        model += f'<Texture> three {{\n  "../textures/{self.texture3}.png"\n}}\n\n'
        model += f'<Texture> four {{\n  "../textures/{self.texture4}.png"\n}}\n\n'
        model += f'<Texture> five {{\n  "../textures/{self.texture5}.png"\n}}\n\n'
        model += f'<Texture> six {{\n  "../textures/{self.texture6}.png"\n}}\n\n'
        model += vertex_pool + group

        print(model)

        # クライアントから送られてきたデータをファイルに書き出す
        with open(f"models/{self.model_name}.egg", "w") as f:
            f.write(model)


if __name__ == "__main__":
    blocks_1_2_3_4_5_6 = {
        'player_head': ['head/1', 'head/2', 'head/3', 'head/4', 'head/5', 'head/6'],
        'player_body': ['body/1', 'body/2', 'body/3', 'body/4', 'body/5', 'body/6'],
        'player_hand': ['hand/1', 'hand/2', 'hand/3', 'hand/4', 'hand/5', 'hand/6'],
        'player_leg': ['leg/1', 'leg/2', 'leg/3', 'leg/4', 'leg/5', 'leg/6'],
    }

    for key, value in blocks_1_2_3_4_5_6.items():
        egg_model = EggModel(key, value[0], value[1], value[2], value[3], value[4], value[5])
        egg_model.make()
プレイヤーモデル用のブロックを4つ(頭、体、手、足)作成します。
③ブロックのモデルを作成する でブロックにテクスチャーを貼り付ける方法を詳しく説明しました。この記事を参考に、全ての面が違うブロックを生成するコードを作成しました。テクスチャー画像を6枚読み込んで、ブロックの各面に貼り付けたモデルを自動で作成できます。
コードを実行すると、modelsディレクトリーに player_head.egg、player_body.egg、player_hand.egg、player_leg.egg の4つのモデルが自動で作成できます。(eggファイルは Panda3D のデフォルトのモデル形式です。)
"""03_04_egg_model_viewer.py"""
from direct.showbase.ShowBase import ShowBase
from panda3d.core import *


class App(ShowBase):
    # コンストラクタ
    def __init__(self):
        # ShowBaseを継承する
        ShowBase.__init__(self)

        # textured cube
        blocks = {
            # blocks_1
            'stone': ['0-1'],
            'dirt': ['0-2'],
            'bricks': ['0-7'],
            'cobblestone': ['1-0'],
            'bedrock': ['1-1'],
            'sand': ['1-2'],
            'iron_block': ['1-6'],
            'gold_block': ['1-7'],
            'diamond_block': ['1-8'],
            'emerald_block': ['1-9'],
            'gold_ore': ['2-0'],
            'iron_ore': ['2-1'],
            'coal_ore': ['2-2'],
            'mossy_cobblestone': ['2-4'],
            'obsidian': ['2-5'],
            'sponge': ['3-0'],
            'glass': ['3-1'],
            'diamond_ore': ['3-2'],
            'redstone_ore': ['3-3'],
            'oak_leaves': ['3-4'],
            'oak_plants': ['0-4'],
            'stone_bricks': ['3-6'],
            'lava': ['3-21'],
            'water': ['3-22'],
            'white_wool': ['4-0'],
            'mob_spawner': ['4-1'],
            'snow': ['4-2'],
            'ice': ['4-3'],
            'black_wool': ['7-1'],
            'gray_wool': ['7-2'],
            'red_wool': ['8-1'],
            'pink_wool': ['8-2'],
            'lapis_block': ['9-0'],
            'green_wool': ['9-1'],
            'lime_wool': ['9-2'],
            'lapis_ore': ['10-0'],
            'brown_wool': ['10-1'],
            'yellow_wool': ['10-2'],
            'blue_wool': ['11-1'],
            'cyan_wool': ['11-2'],
            'purple_wool': ['12-1'],
            'magenta_wool': ['12-2'],
            'spruce_planks': ['12-6'],
            'jungle_planks': ['12-7'],
            'light_blue_wool': ['13-1'],
            'orange_wool': ['13-2'],
            'birch_planks': ['13-6'],
            'light_gray_wool': ['14-1'],
            # blocks_1_5
            'oak_log': ['1-4', '1-5'],
            'bookshelf': ['2-3', '0-4'],
            'crafting_table': ['3-11', '2-11'],
            'cactus': ['4-5', '4-6'],
            'jukebox': ['4-10', '4-11'],
            'spruce_log': ['7-4', '1-5'],
            'binch_log': ['7-5', '1-5'],
            'jungle_log': ['9-9', '1-5'],
            # blocks_1_5_6
            'grass_block': ['0-3', '0-0', '0-2'],
            'tnt': ['0-8', '0-9', '0-10'],
            'sticky_piston': ['6-12', '6-10', '6-13'],
            'piston': ['6-12', '6-11', '6-13'],
            # blocks_1_2_5
            'furnace': ['2-12', '2-13', '3-14'],
            'burning_furnace': ['3-13', '2-13', '3-14'],
            'chest': ['6-19', '6-18', '6-17'],
            'pumpkin': ['7-7', '7-6', '6-6'],
            'jack_o_lantern': ['7-8', '7-6', '6-6'],
            # blocks_1_2_3_4_5_6
            'player_head': ['head/1', 'head/2', 'head/3', 'head/4', 'head/5', 'head/6'],
            'player_body': ['body/1', 'body/2', 'body/3', 'body/4', 'body/5', 'body/6'],
            'player_hand': ['hand/1', 'hand/2', 'hand/3', 'hand/4', 'hand/5', 'hand/6'],
            'player_leg': ['leg/1', 'leg/2', 'leg/3', 'leg/4', 'leg/5', 'leg/6'],
        }

        for i, name in enumerate(blocks):
            self.cube = self.loader.loadModel(f'models/{name}')
            self.cube.setPos(i % 10 - 5, 30, int(i / 10) * 2 - 7)
            self.cube.reparentTo(self.render)


app = App()
app.run()
作成したブロックモデルを確認するコード(03_04_egg_model_viewer.py)で自作のブロックモデルを表示できます。変数blocks の中に、今回作成した4つのブロックのデータを追記します。コードを実行してください。
プレイヤーの頭、体、手、足の4つが追加されました。これで合計 69個のブロックモデルを使えるようになりました。
mc.py
"""src/mc.py"""
from direct.showbase.ShowBase import ShowBase
from panda3d.core import *
from . import *


class MC(ShowBase):
    def __init__(self, ground_size=128):
        # ShowBaseを継承する
        ShowBase.__init__(self)

        # ウインドウの設定
        self.properties = WindowProperties()
        self.properties.setTitle('Pynecrafter')
        self.properties.setSize(1200, 800)
        self.win.requestProperties(self.properties)
        self.setBackgroundColor(0, 1, 1)

        # ブロック
        self.block = Block(self, ground_size)

        # プレイヤー
        self.player = Player(self)

        # ゲーム終了
        self.accept('escape', exit)

    def get(self, var):
        try:
            return getattr(self, var)
        except AttributeError:
            return None

    def set(self, var, val):
        setattr(self, var, val)
全てのクラスを統合する MCクラスからカメラの設定を削除して、camera.py に移動します。
エスケープキーを押すと、ゲームが終了するコードを追記します。self.accept('escape', exit) により、ユーザーがキーボードの左上のキー「esc」を押すと、exit が実行されます。Panda3D デフォルトのexitメソッドは現在実行中のゲームを終了します。
camera.py
"""src/camera.py"""
from math import *
from panda3d.core import *


class Camera:
    def __init__(self):

        # マウス操作を禁止
        base.disableMouse()
        # カメラの設定
        base.camera.setPos(10, -25, 15)
        base.camera.lookAt(0, 0, 0)
Cameraクラスに mc.py から移動したカメラのコードを記載します。このクラスにはカメラ機能を追加するときに、そのコードを追記していくことになります。
player_model.py
"""src/player_model.py"""
from panda3d.core import *


class PlayerModel:
    def __init__(self):

        # player model
        self.base.player_node = self.base.render.attachNewNode(PandaNode('player_node'))
        # head
        self.player_head_model = self.base.loader.loadModel('models/player_head')
        self.player_head_model.setScale(0.8)
        self.player_head_model.setH(180)
        self.player_head_model.setPos(0.4, 0.4, 0)
        self.base.player_head_node = self.base.player_node.attachNewNode(PandaNode('player_head_node'))
        self.base.player_head_node.setPos(0, 0, 1.2)
        self.player_head_model.reparentTo(self.base.player_head_node)
        # body
        self.player_body_model = self.base.loader.loadModel('models/player_body')
        self.player_body_model.setScale(0.8)
        self.player_body_model.setH(180)
        self.player_body_model.setPos(0.4, 0.4, 0)
        self.base.player_body_node = self.base.player_node.attachNewNode(PandaNode('player_body_node'))
        self.base.player_body_node.setPos(0, 0, 0.4)
        self.player_body_model.reparentTo(self.base.player_body_node)
        # right_hand
        self.player_right_hand_model = self.base.loader.loadModel('models/player_hand')
        self.player_right_hand_model.setScale(0.3, 0.3, 0.8)
        self.player_right_hand_model.setH(180)
        self.player_right_hand_model.setPos(0.15, 0.15, -0.7)
        self.base.player_right_hand_node = self.base.player_node.attachNewNode(PandaNode('player_right_hand_node'))
        self.base.player_right_hand_node.setPos(0.55, 0, 1.1)
        self.base.player_right_hand_node.setR(-20)
        self.base.player_right_hand_node.setP(90)
        self.player_right_hand_model.reparentTo(self.base.player_right_hand_node)
        # left_hand
        self.player_left_hand_model = self.base.loader.loadModel('models/player_hand')
        self.player_left_hand_model.setScale(0.3, 0.3, 0.8)
        self.player_left_hand_model.setH(180)
        self.player_left_hand_model.setPos(0.15, 0.15, -0.7)
        self.base.player_left_hand_node = self.base.player_node.attachNewNode(PandaNode('player_left_hand_node'))
        self.base.player_left_hand_node.setPos(-0.55, 0, 1.1)
        self.base.player_left_hand_node.setR(20)
        self.base.player_left_hand_node.setP(90)
        self.player_left_hand_model.reparentTo(self.base.player_left_hand_node)
        # right_leg
        self.player_right_leg_model = self.base.loader.loadModel('models/player_leg')
        self.player_right_leg_model.setScale(0.3, 0.3, 0.4)
        self.player_right_leg_model.setH(180)
        self.player_right_leg_model.setPos(0.15, 0.15, -0.4)
        self.base.player_right_leg_node = self.base.player_node.attachNewNode(PandaNode('player_right_leg_node'))
        self.base.player_right_leg_node.setPos(0.25, 0, 0.4)
        self.player_right_leg_model.reparentTo(self.base.player_right_leg_node)
        # left_leg
        self.player_left_leg_model = self.base.loader.loadModel('models/player_leg')
        self.player_left_leg_model.setScale(0.3, 0.3, 0.4)
        self.player_left_leg_model.setH(180)
        self.player_left_leg_model.setPos(0.15, 0.15, -0.4)
        self.base.player_left_leg_node = self.base.player_node.attachNewNode(PandaNode('player_left_leg_node'))
        self.base.player_left_leg_node.setPos(-0.25, 0, 0.4)
        self.player_left_leg_model.reparentTo(self.base.player_left_leg_node)
PlayerModelクラスは、ブロックモデルを読み込んでプレイヤーモデルを作成します。少し複雑なコードですが、やっていることは難しくありません。

6つのモデル(頭、体、右手、左手、右足、左足)をそれぞれ別のノードに入れて、6つのノードを作成します。その6つのノードを player_nodeノードにまとめて、一つのグループにします。player_nodeノードを render に配置して、画面に表示します。

各パーツの位置合わせは面倒な作業でした。モデル設計図を参考に右手のみ説明します。
        # right_hand
        self.player_right_hand_model = self.base.loader.loadModel('models/player_hand')
        self.player_right_hand_model.setScale(0.3, 0.3, 0.8)
        self.player_right_hand_model.setH(180)
        self.player_right_hand_model.setPos(0.15, 0.15, -0.7)
        self.base.player_right_hand_node = self.base.player_node.attachNewNode(PandaNode('player_right_hand_node'))
        self.base.player_right_hand_node.setPos(0.55, 0, 1.1)
        self.base.player_right_hand_node.setR(-20)
        self.base.player_right_hand_node.setP(90)
        self.player_right_hand_model.reparentTo(self.base.player_right_hand_node)
右手用のブロック(player_hand.egg)を読み込んで、setScale(0.3, 0.3, 0.8)で、0.3 x 0. 3 x 0.8 のサイズに変形します。モデルの正面をY方向にするため、setH(180)により、180度回転しました。setPos(0.15, 0.15, -0.7)により、モデルの回転中心とplayer_right_hand_nodeノードの中心を合わせます。
setPos(0.55, 0, 1.1)により、player_right_hand_nodeノードの位置合わせができます。体のサイズ0.8、腕のサイズ0.3 から (0.8 + 0.3) / 2 = 0.55 の値が得られます。X方向に 0.55、Z方向に 1.1 移動することで、右手ブロックと体ブロックと接続できます。setR(-20)、setP(90) により脇を少し開いて右手を前に出します。
他のパーツも同様な計算により、回転中心と位置合わせの調整を行いました。興味のある方は別のパーツも検証してみてください。
player.py
"""src/player.py"""
from math import *
from panda3d.core import *
from direct.showbase.ShowBaseGlobal import globalClock
from .player_model import PlayerModel
from .camera import Camera


class Player(PlayerModel, Camera):
    heading_angular_velocity = 15000
    pitch_angular_velocity = 5000
    max_pitch_angle = 30
    speed = 10

    # コンストラクタ
    def __init__(self, base):
        self.base = base
        PlayerModel.__init__(self)
        Camera.__init__(self)

        self.position = Point3(0, 0, 0)
        self.direction = VBase3(0, 0, 0)
        self.velocity = Vec3(0, 0, 0)
        self.mouse_pos_x = 0
        self.mouse_pos_y = 0

        # キー操作を保存
        self.key_map = {
            'w': 0,
            'a': 0,
            's': 0,
            'd': 0,
        }

        # ユーザーのキー操作
        base.accept('w', self.update_key_map, ["w", 1])
        base.accept('a', self.update_key_map, ["a", 1])
        base.accept('s', self.update_key_map, ["s", 1])
        base.accept('d', self.update_key_map, ["d", 1])
        base.accept('w-up', self.update_key_map, ["w", 0])
        base.accept('a-up', self.update_key_map, ["a", 0])
        base.accept('s-up', self.update_key_map, ["s", 0])
        base.accept('d-up', self.update_key_map, ["d", 0])

        # プレイヤーのアップデート
        base.taskMgr.add(self.player_update, "player_update")

    def update_direction(self):
        if self.base.mouseWatcherNode.hasMouse():
            dt = globalClock.getDt()
            x, y = self.base.mouseWatcherNode.getMouse()
            dx = x - self.mouse_pos_x
            dy = y - self.mouse_pos_y
            if dx or dy:
                heading = self.direction.x - dx * Player.heading_angular_velocity * dt
                pitch = self.direction.y + dy * Player.pitch_angular_velocity * dt
                if pitch < -Player.max_pitch_angle:
                    pitch = -Player.max_pitch_angle
                elif pitch > Player.max_pitch_angle:
                    pitch = Player.max_pitch_angle
                self.direction = VBase3(heading, pitch, 0)
                self.mouse_pos_x = x
                self.mouse_pos_y = y

    def update_key_map(self, key_name, key_state):
        self.key_map[key_name] = key_state

    def update_velocity(self):
        key_map = self.key_map

        if key_map['w'] or key_map['a'] or key_map['s'] or key_map['d']:
            heading = self.direction.x
            if key_map['w'] and key_map['a']:
                angle = 135
            elif key_map['a'] and key_map['s']:
                angle = 225
            elif key_map['s'] and key_map['d']:
                angle = 315
            elif key_map['d'] and key_map['w']:
                angle = 45
            elif key_map['w']:
                angle = 90
            elif key_map['a']:
                angle = 180
            elif key_map['s']:
                angle = 270
            else:  # key_map['d']
                angle = 0
            self.velocity = \
                Vec3(
                    cos(radians(angle + heading)),
                    sin(radians(angle + heading)),
                    0
                ) * Player.speed
        else:
            self.velocity = Vec3(0, 0, 0)

    def update_position(self):
        self.update_velocity()
        dt = globalClock.getDt()
        self.position = self.position + self.velocity * dt
        # print(self.position)

    def draw(self):
        self.base.player_node.setH(self.direction.x)
        self.base.player_head_node.setP(self.direction.y)
        self.base.player_node.setPos(self.position)

    def player_update(self, task):
        self.update_direction()
        self.update_position()
        self.draw()
        return task.cont
Playerクラスを説明します。
自作したプレイヤーモデルを読み込む準備として、まずPlayerクラスからパンダモデルを読み込んでいたコードを削除します。
class Player(PlayerModel, Camera):
    略

    # コンストラクタ
    def __init__(self, base):
        self.base = base
        PlayerModel.__init__(self)
        Camera.__init__(self)
そして作成した PlayerModelクラス、Cameraクラスを継承するコードを追記します。コンストラクタ内で、(クラス名).__init__(self) とすることで継承するクラスのプロパティーを初期化します。これで継承元のインスタンス変数とメソッドを継承先で使えるようになります。
    def update_direction(self):
        if self.base.mouseWatcherNode.hasMouse():
            dt = globalClock.getDt()
            x, y = self.base.mouseWatcherNode.getMouse()
            dx = x - self.mouse_pos_x
            dy = y - self.mouse_pos_y
            if dx or dy:
                heading = self.direction.x - dx * Player.heading_angular_velocity * dt
                pitch = self.direction.y + dy * Player.pitch_angular_velocity * dt
                if pitch < -Player.max_pitch_angle:
                    pitch = -Player.max_pitch_angle
                elif pitch > Player.max_pitch_angle:
                    pitch = Player.max_pitch_angle
                self.direction = VBase3(heading, pitch, 0)
                self.mouse_pos_x = x
                self.mouse_pos_y = y
update_directionメソッドに少し手を加えました。プレイヤー方向の微調整を簡単にするために、マウスの移動差分dx, dyによってプレイヤーの向きを変更するようにしました。この修正によりマウスの動きを止めると、プレイヤーの向きを固定できるようになります。
heading = self.direction.x - dx * Player.heading_angular_velocity * dt
の式で、dx の符号がマイナスなのが気になる人がおられるかもしれません。例えばマウスを右に動かすと dx はプラスになりますが、動かしたいheadingの方向はマイナスのため、符号がマイナスになっています。
3次元の角度にはいつも混乱させられますね。
    def draw(self):
        self.base.player_node.setH(self.direction.x)
        self.base.player_head_node.setP(self.direction.y)
        self.base.player_node.setPos(self.position)
drawメソッドも修正が必要です。
Z方向の回転(self.direction.x)は、player_nodeノード(=プレイヤーモデル全体)を回転させます。マウスを右(プラス方向)に動かすと、プレイヤーの右(マイナス方向)を向きます。
X方向の回転(self.direction.y)は、頭のノード(player_head_node)を動かすことで、頭ブロックのみ上下に動かすようにしました。マウスと上(プラス方向)に動かすと、プレイヤーは上(プラス方向)を向きます。
"""07_02_main.py"""
from math import *
from src import MC


class Game(MC):
    def __init__(self):
        # MCを継承する
        MC.__init__(self)

        # 座標軸
        self.axis = self.loader.loadModel('models/zup-axis')
        self.axis.setPos(0, 0, 0)
        self.axis.setScale(1.5)
        self.axis.reparentTo(self.render)


game = Game()
game.run()
07_02_main.py はゲームを起動するモジュールです。
実行すると、自作モデルのプレイヤーが表示されキー操作で動かすことができます。プレイヤー「パンダさん」を自由に動かして遊んでください。
今回は自作のモデルをマイクラクローンに導入する方法を検討しました。ドット絵の作成からブロックモデルの作成、コードの作成と大変な作業でしたが、自作のモデルが動いているのを見ると楽しくなりますね。
次回はカメラ機能の拡張を行います。斜め上から見下ろすカメラ(TPSカメラ)、プレイヤー視点のカメラ(FPSカメラ)、そしてミラーカメラを切り替えて使用する方法を学びます。プレイヤー視点を実装すると、マイクラクローン Pynecrafter の世界に入り込むことができます。お楽しみに。
ゲーム用語の説明
プレイヤーとカメラの位置により対戦型ゲームを分類する
TPS = Third Person Shooting game の略(CoDシリーズ、レインボーシックスシージ、APEX など)
FPS = First Person Shooting game の略(フォートナイト、PUBG、スプラトゥーンシリーズなど)
前の記事
Pythonでマイクラを作る ⑥プレイヤーを動かす
次の記事
Pythonでマイクラを作る ⑧カメラ機能を拡張する
その他のタイトルはこちら
この記事が気に入ったらサポートをしてみませんか?