
[Shopify]コピペで簡単!タグ検索セクションを追加(Dawn)4/100
こんにちは。まりん(@crowd37cord)です。
あれば便利、タグをポコポコ簡単に挿入できるセクションを作成しました♪
デザインは全部で6種類。
タグをクリックするとタグ名でサイト内検索します。動作確認はこちら
✔︎今回のゴール
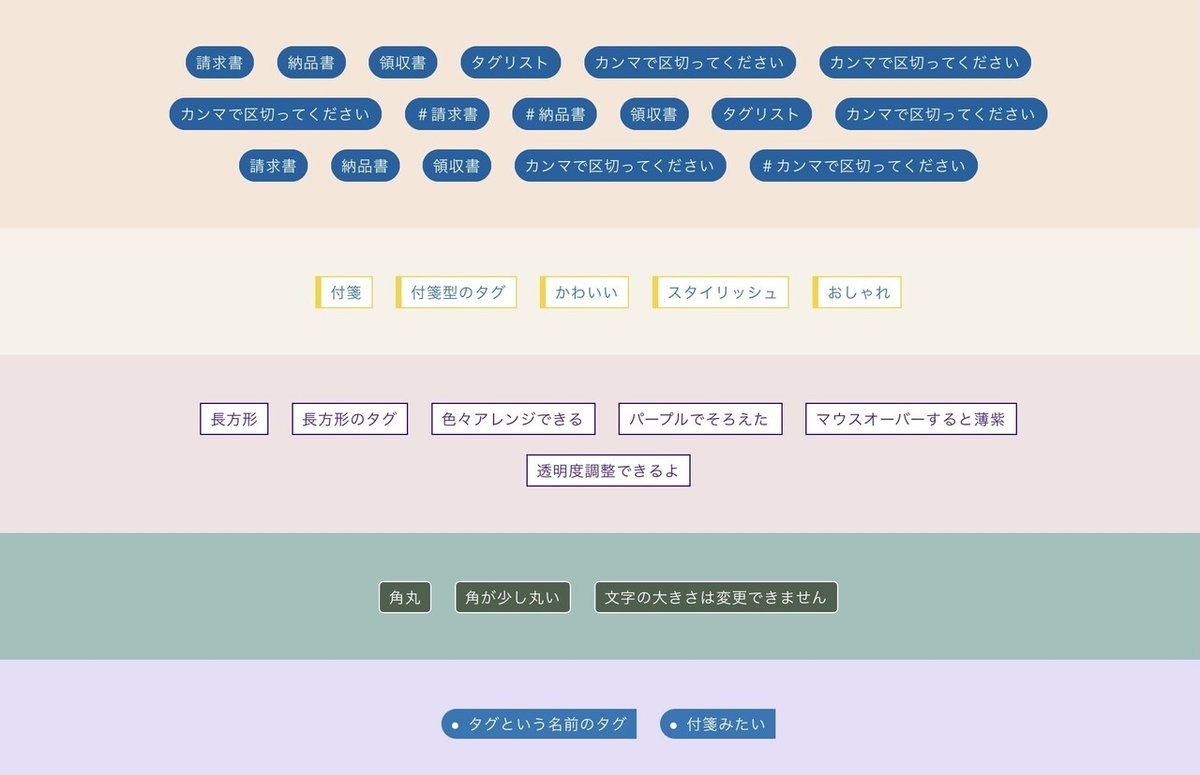

【全6種】
✔︎楕円型
✔︎付箋型
✔︎長方形型
✔︎角が少し丸い長方形
✔︎左端が丸まった付箋っぽいカタチ
✔︎文字だけ
✔︎タグセクションの特徴&使い方
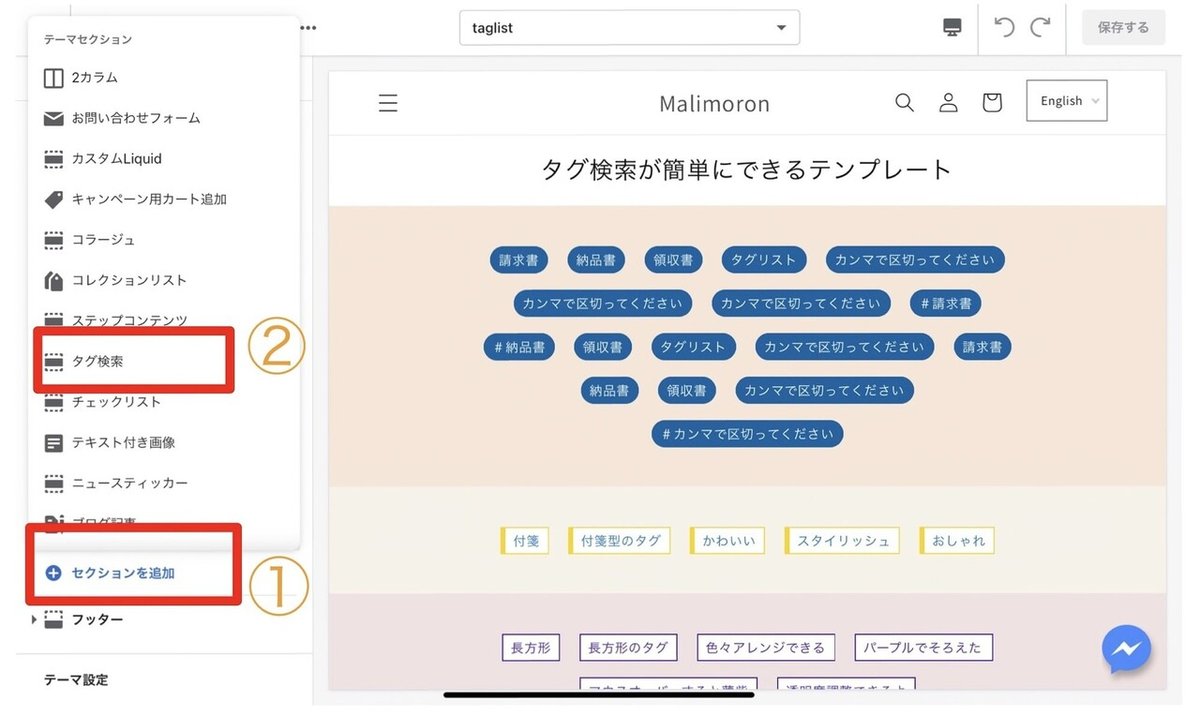
❶セクションを追加をクリック
❷タグ検索を選択
「タグ検索」は今回のテンプレートを設置すると表示されます。
\タグリストのセクション内を設定していきます/
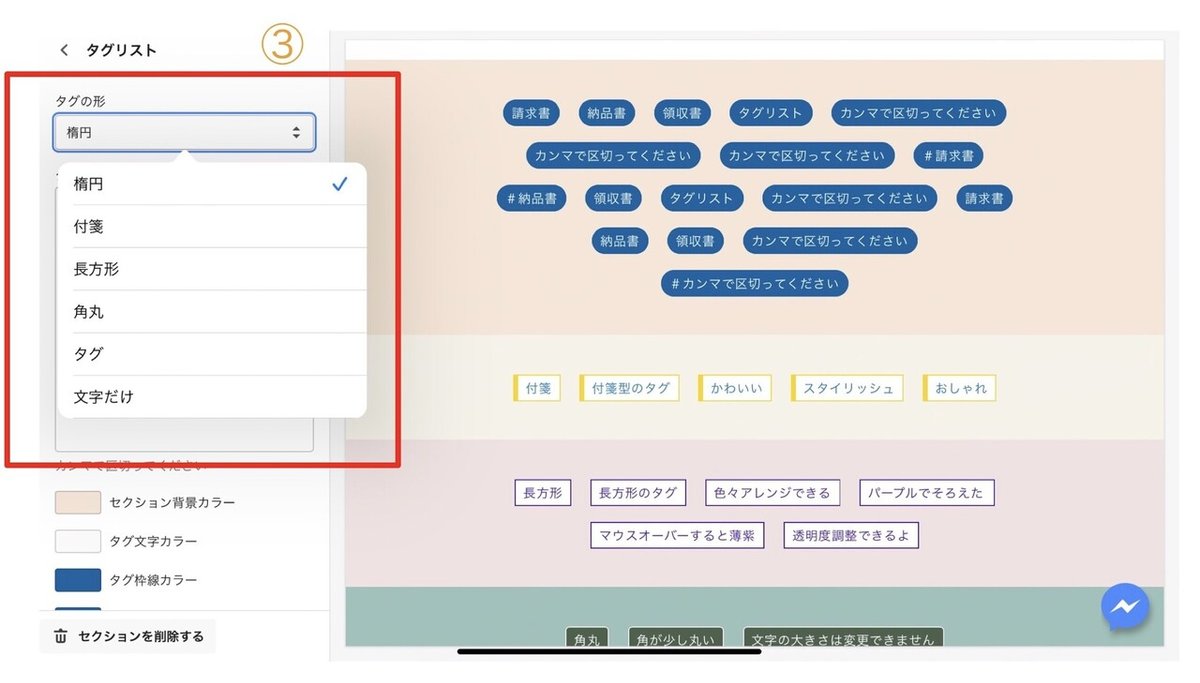
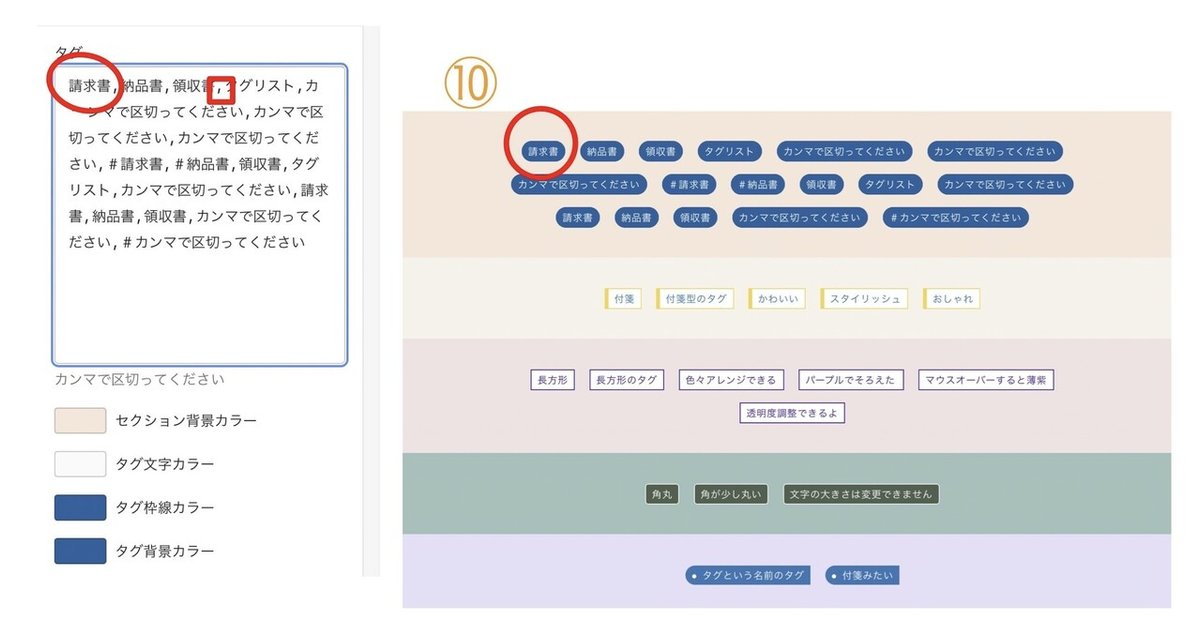
❸タグの形を選択
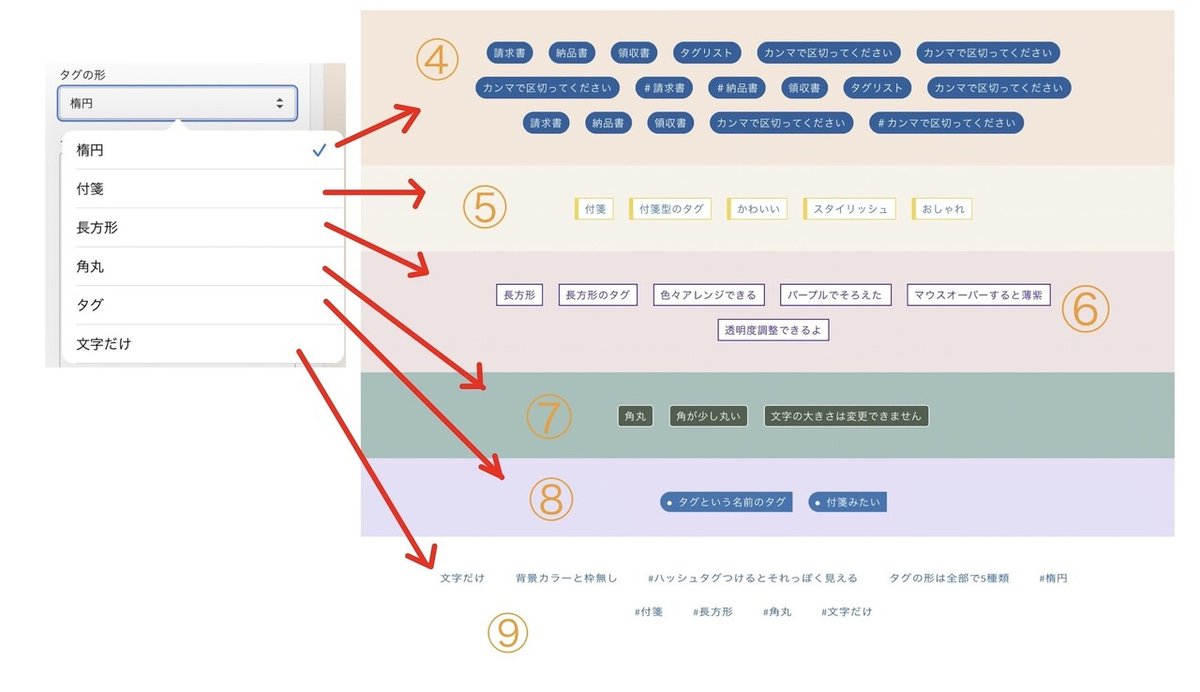
❹楕円 |両端が丸まってます
❺付箋 |付箋みたいで可愛い
❻長方形 |スタイリッシュな長方形
❼角丸 |角が少し丸まった長方形
❽タグ |タグっぽさ全開
❾文字だけ|背景&枠なし
➓半角カンマ「,」で区切るとポコポコ作れます。
\カラー設定も色々/
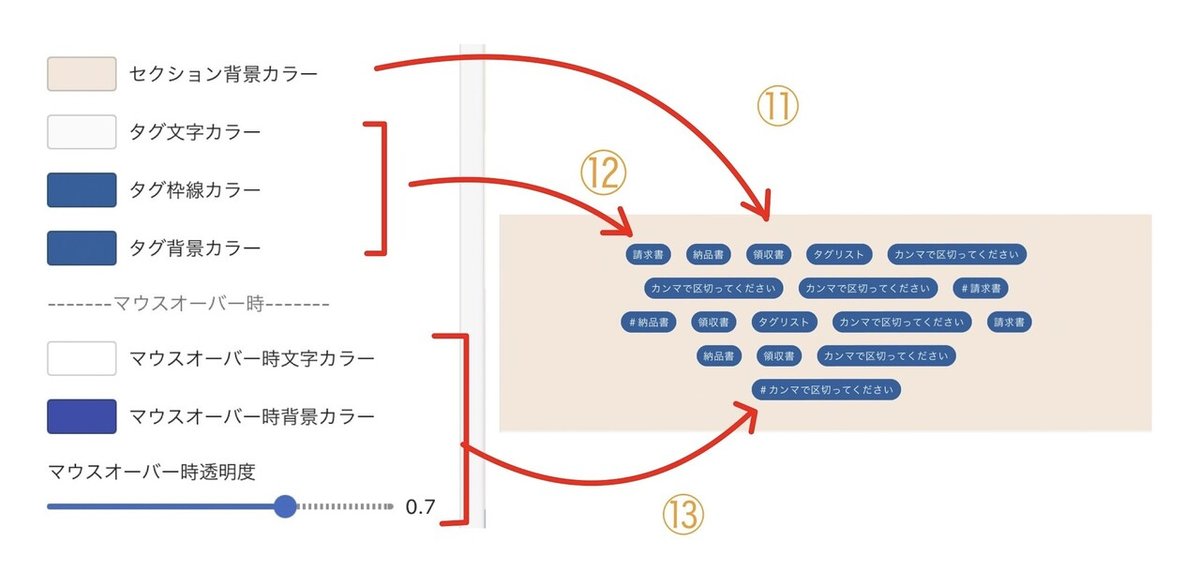
(11)セクション全体の背景カラー
サイトのイメージカラーで設定してね。
(12)タグのカラー
・文字
・タグの枠
・タグ背景
(13)マウスオーバーした時のカラー
・文字
・タグの背景
・透明度
以上で完了です♪
こちらから確認できます。
✔︎設置方法
①管理画面からコード編集>Sectionsで「新しいSection」追加
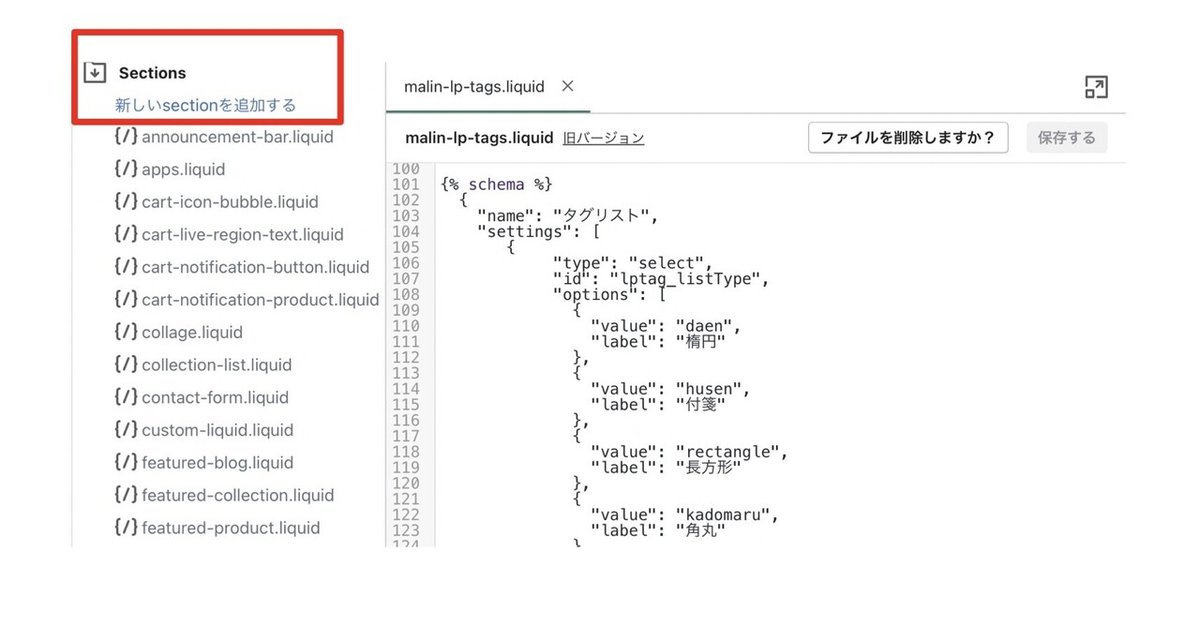
セクション名はなんでもOK
今回は、malin-lP-tagsにしてみました。
②Schemaを挿入
{% schema %}
 {
   "name": "タグリスト",
   "settings": [
      {
           "type": "select",
           "id": "lptag_listType",
           "options": [
             {
               "value": "daen",
               "label": "楕円"
             },
             {
               "value": "husen",
               "label": "付箋"
             },
             {
               "value": "rectangle",
               "label": "長方形"
             },
             {
               "value": "kadomaru",
               "label": "角丸"
             },
             {
               "value": "tagshape",
               "label": "タグ"
             },
             {
               "value": "none",
               "label": "文字だけ"
             }
           ],
           "default": "daen",
           "label": "タグの形"
      },
      {
           "type": "html",
           "id": "lptag_list",
           "label": "タグ",
           "info": "カンマで区切ってください"
      },
	   {
           "type": "color",
           "id": "lptag_sectionBkColor",
           "label": "セクション背景カラー",
           "default": "#fff"
      },
	   {
           "type": "color",
           "id": "lptag_txtColor",
           "label": "タグ文字カラー",
           "default": "#0063A3 "
      },
	   {
           "type": "color",
           "id": "lptag_borderColor",
           "label": "タグ枠線カラー",
           "default": "#0063A3 "
      },
	   {
           "type": "color",
           "id": "lptag_bkColor",
           "label": "タグ背景カラー",
           "default": "#fff "
      },
      {
            "type": "paragraph",
            "content": "-------マウスオーバー時-------"
      },
	   {
           "type": "color",
           "id": "lptag_txtHoverColor",
           "label": "マウスオーバー時文字カラー",
           "default": "#fff "
      },
	   {
           "type": "color",
           "id": "lptag_bkHoverColor",
           "label": "マウスオーバー時背景カラー",
           "default": "#0063A3 "
      },
      {
         "type": "range",
         "id": "lptag_opacity",
         "min": 0,
         "max": 1,
         "step": 0.1,
         "label": "マウスオーバー時透明度",
         "default": 0.6
      }

	],
   "presets": [
     {
       "name": "タグ検索"
     }
   ]
 }
{% endschema %}
③HTMLを作成
<div class="malin-tags-{{ section.id }}">
 <div class="page-width center">
   {% assign tags = section.settings.lptag_list | split: "," %}
   <ul>
      {% for tag in tags %}
           <li><a href="../search?q={{ tag }}">{{ tag }}</a></li>
      {% endfor %}
   </ul>

 </div>
</div>
④最後にCSSの設定。一部ご紹介
 .malin-tags-{{ section.id }} a {
   font-size: 13px;
   text-decoration: none;
   padding: 0.3em 0.6em;
   color: {{ section.settings.lptag_txtColor }};
   {% if section.settings.lptag_listType == "none" %}
    border: none;
   {% elsif section.settings.lptag_listType == "tagshape" %}
     border: none;
    display: inline-block;
   {% else %}
    border: 1px solid {{ section.settings.lptag_borderColor }};
   {% endif %}

   {% if section.settings.lptag_listType == "none" %}
     background-color:none;
   {% else %}
     background-color:{{ section.settings.lptag_bkColor }};
   {% endif %}


   {% if section.settings.lptag_listType == "daen" %}
     border-radius: 20px;
   {% elsif section.settings.lptag_listType == "kadomaru" %}
     border-radius: 4px;
   {% elsif section.settings.lptag_listType == "tagshape" %}
     border-radius: 2em 0 0 2em;
   {% endif %}

   {% if section.settings.lptag_listType == "husen" %}
     border-left: 5px solid {{ section.settings.lptag_borderColor }};
     background-color:{{ section.settings.lptag_bkColor }};
   {% endif %}

   -webkit-transition: .2s;
   transition: .2s;
 }
あとは保存し完了です。
✔︎コピペで簡単!フルコードはこちら
ここからはCSS含めたフルコードのみのご紹介です。
Dawnテーマ対象です。他のテーマも動作すると思いますが調整は必要かもしれません。
解説などはしておりません。
※返金&サポートはしておりません
ここから先は
4,642字
この記事が気に入ったらチップで応援してみませんか?
