
[GASでNotion連携] リスキリングの効率化〜レクチャーノートをNotionデータベースで管理するカスタムGPTの作り方

今回は「リスキリング」をする上で学びを効率化するChatGPTの使い方のご紹介です。
リスキリングとは?
働き方の変化によって今後新たに発生する業務で役立つスキルや知識の習得を目的に、勉強してもらう取り組みのことだ。
AIをはじめとしたテクノロジーの発展は大きく私たちの働き方や求められるスキルに影響を与えます。テクノロジーの進化が早いということは、常に自分をアップデートしないとキャッチアップできない!!ということです。
そこで、私も最近Courseraで「AIプロダクトマネジメント」というコースで日々仕事と育児の合間に勉強しています。
Courseraコースの素晴らしいところは、
一つのレクチャー時間が10分以下のものが多く、スマホアプリが使いやすい
スキマ時間を有効活用できる!私は料理中やジムでトレッドミルしながら勉強してます。トランスクリプトなどレクチャーファイルをダウンロードできる
ChatGPTなど生成AIに読み込ませてレクチャーノート化できる。
私はChatGPTに生成してもらったレクチャーノートをNotionに保存して時間のある時に復習しています。
が!!この「テキストファイルをChatGPTにアップロード」→ 「プロンプト入力」→「Notionにコピペ」が地味〜〜にめんどくさいんですよね。
こういうちょっとした「めんどくさい(ペインポイント)」が習慣化の邪魔になることってよくあると思うのです。良い習慣は「息を吸って吐くかの如く」自然に、シームレスに行えるのが理想!!
解決したい問題
UXをシームレスにしてリスキリングのフリクションをミニマイズしたい!!(ルー大柴になってしまってすみません。UXは「User Experience(ユーザー体験)」の略です。)
つまり、一連のユーザー体験から「めんどくさい」をなるべく取り除くことでリスキリングを継続しやすくしたい!!ということです。(だったら最初からそう言え)
今のUX
トランスクリプト(txt)をダウンロード
ChatGPTにアップロードし、サマリーと重要な用語リストを生成するようプロンプト
ChatGPTのレスポンスをNotionデータベースに手動でコピペ
時間ある時にスマホからNotionデータベースを見て復習
理想のUX
トランスクリプト(txt)をダウンロード(ここは大きなペインポイントじゃないからこのままでOK)
ChatGPTにアップロードしたら、プロンプトなしですぐにサマリー等を生成してくれる
サマリー等生成したら、Notionデータベースに保存してくれる
時間ある時にスマホからNotionデータベースを見て復習、もしくはChatGPTからNotionデータベースにアクセスしてその内容についてインタラクティブに学ぶ
これを実現するにはカスタムGPTを作るしかない!!
技術的課題と解決策
まずはじめに思い立ったのはGPTsのActionからNotion APIを呼ぶというシンプルな方法でしたが、実際にやってみようとするとできない!!
調べてみてわかったのは、GPTsのアクションでは認証キーしかAPIリクエストのヘッダーに含められない(これほんと改善してほしい)。しかしNotion APIには「Notion-Version」というパラメターがヘッダーに必要。
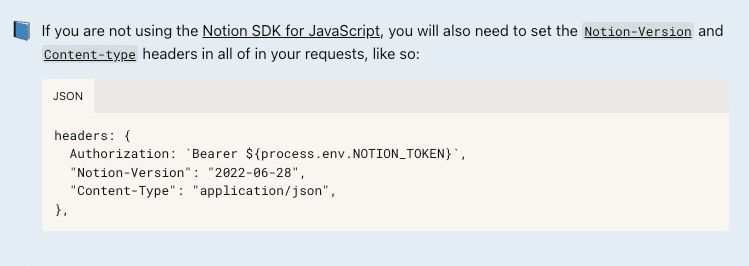
というわけで、GPTsからNotion APIを直接呼ぶのは現状無理っぽい。
解決策としては、「どっか別のサーバー経由させる」しかなく、自分でサーバー立てるのは色々と大変なのでGASでいいじゃん。むしろサクッと作れるGAS最高じゃん。ということで今回もGASを使っていきます。
GASでNotion連携
やることは以下の通りです。
NotionのAPIキー取得とデータベース接続
GASのセットアップ
GASコード生成(by ChatGPT)
カスタムGPTのActionスキーマ生成(by ChatGPT)
カスタムGPTのインストラクション入力
それでは一つずつ詳しく説明していきます。
NotionのAPIキー取得とデータベース接続
まずはNotionでデータベースを作っていきます。新しいページ上に「/database」と入力していくとオプションが表示されるので、一番上の「Database - Inline」を選択。

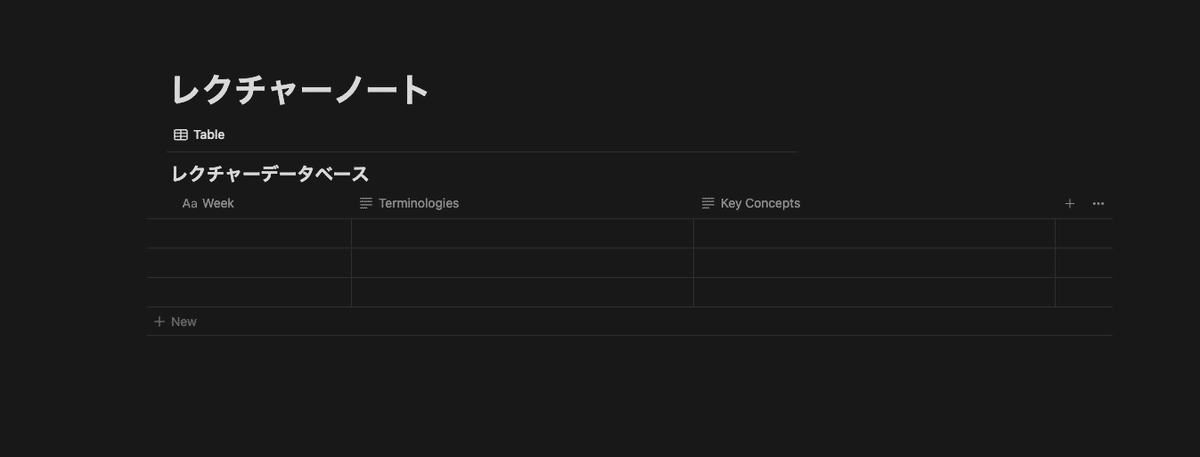
ページのタイトルとデータベースのプロパティを入力します。以下の3つをプロパティとします。
「Week」:Courseraのカリキュラムが週単位のため、週毎にノートをまとめます。
「Terminologies」:週毎の学習内容(トランスクリプトのファイル)から重要な用語リストをGPTで生成し、データベースに保存します。
「 Key Concepts」:週毎の学習内容(トランスクリプトのファイル)から重要なコンセプトのリストをGPTで生成し、データベースに保存します。
ここで少し、Notionのページ構造について説明します。
構造的には、親ページ>データベース>子ページ>ブロックという階層になっています。データベースを開くには以下のようにデータベースタイトルの右の「…」をクリックして「View database」を選択します。

すると、「https://www.notion.so/{データベースID}?v=bbbbbbbbb」のURL形式のページになるので、URLからデータベースIDを取得します。
データベースの各行は子ページに対応します。なので、各行の先頭のプロパティ(タイトルプロパティ)の「Open」ボタンをクリックすると、右側にページが表示されることが確認できます。

次にAPIキーを取得していきます。
Notionの開発者ページからNew Integrationボタンで新しくアプリ作成し、APIキーを発行します。
先ほど作成したデータベースを開いて、右上の「…」メニューから「Connect to」を選択し、先ほど作ったアプリを選択します。
これでAPI経由でのこのデータベースへのアクセスができるようになりました。

GASのセットアップ
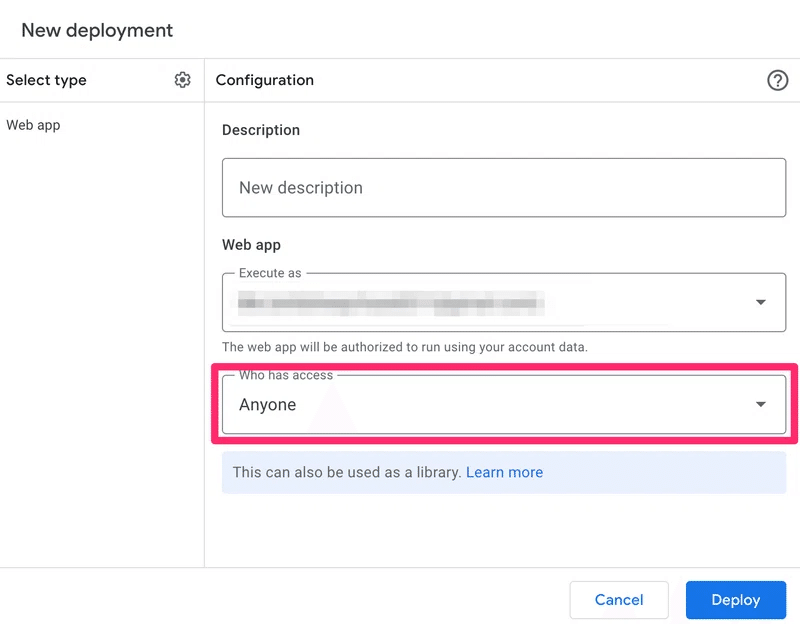
GASのセットアップ方法については、この記事の「Google App Script(GAS)のセットアップ」セクションをご参照ください。
注意:上の記事ではアクセス権限で「Only me」を選択していましたが、今回はGPTからアクセスするため「Anyone」を選択します。
Code.gsに入力するコードは次のステップで生成していきます。
GASコード生成
先述した通り、今回の仕様としては「データベースに保存」と「データベースからデータ取得」を行いたいので、以下のNotion APIを使っていきます。
データベースに保存:
POST https://api.notion.com/v1/pages
このAPIでデータベースに行を追加(=子ページ)を作成します。PATCH https://api.notion.com/v1/blocks/{block_id}/children
このAPIでページに子ブロックを追加します。
データベースからデータ取得:
POST https://api.notion.com/v1/databases/{database_id}/query
このAPIでデータベースにクエリをかけます。GET https://api.notion.com/v1/pages/{page_id}
このAPIでクエリにヒットした行のページを取得して内容を表示します。
GASのコードは、以前の記事でChatGPTに生成してもらったコードから不要な部分を除き、こちらの記事のコードからNotionデータベースにページを追加する関数を取ってきて貼り付けました。
これだけだと、「データベースに保存」機能しかないので、ChatGPTに以下のプロンプトで機能追加してもらいました。
以下のGASスクリプトを変更して、Notionデータベースをクエリし、クエリに一致するページの内容を表示する機能を追加してください。
データベースには`Week`、`Terminologies`、`Key Concepts`のプロパティがあります。
クエリは`Week`に基づいて行います(例:Week = 1)。
さらに、データベースクエリエンドポイントの応答から取得された`page_id`を使用して、このエンドポイント`https://api.notion.com/v1/pages/{page_id}`を使用して子ページの内容を表示するようにスクリプトを変更してください。
少し手修正して出来上がったコードがこちら👇
なお、コード内の「スプレッドシートID」「シート名」と「セルアドレス」に関しては、GASを呼ぶ際の簡易APIキーの実装に関する部分になります。詳しくはこちらの記事の「補足〜セキュリティ強化のためにしたこと」セクションをご参照ください。
const spreadsheetId = 'スプレッドシートID';
const sheetName = 'シート名 例:Sheet1';
const cellAddress = 'ランダム文字列の入力セル 例:B1';
const notion_api_key = 'NotionのAPIキー'
// NotionデータベースのID
const notionDatabaseId = 'NotionデータベースID'

// GASでNotion APIを使用するためのヘッダー
const notion_headers = {
  'Authorization': 'Bearer ' + notion_api_key,
  'Content-Type': 'application/json',
  'Notion-Version': '2022-06-28', // Notion APIのバージョン
};

function doPost(e) {
  var data = JSON.parse(e.postData.contents);
  var apiKey = data.apiKey;
  var expectedApiKey = getCellValue(spreadsheetId, sheetName, cellAddress);

  if (!isApiKeyValid(apiKey, expectedApiKey)) {
    return ContentService.createTextOutput(JSON.stringify({ error: 'Invalid or missing API key' }))
      .setMimeType(ContentService.MimeType.JSON);
  }

  var action = data.action;
  var result;

  if (action === 'retrieveDatabase') {
    var week = data.week;
    var page = queryNotionDatabase(week);

    if (page) {
      var pageContent = getPageContent(page.id);
      result = JSON.stringify(pageContent);
    } else {
      result = JSON.stringify({ error: 'No matching page found' });
    }

  } else if (action === 'addToDatabase') {
    var body = data.content;
    var week = data.week;
    var terminologies = data.terminologies;
    var keyConcepts = data.keyConcepts;

    const page = addToNotionDatabase(week, terminologies, keyConcepts);
    result = appendPageText(JSON.parse(page), body);
  } else {
    result = JSON.stringify({ error: 'Invalid action' });
  }

  return ContentService.createTextOutput(result).setMimeType(ContentService.MimeType.JSON);
}

// Check API Key
function isApiKeyValid(apiKey, expectedValue) {
  return apiKey === expectedValue;
}

function getCellValue(spreadsheetId, sheetName, cellAddress) {
  // Open the spreadsheet by ID
  var spreadsheet = SpreadsheetApp.openById(spreadsheetId);

  // Get the sheet by name
  var sheet = spreadsheet.getSheetByName(sheetName);

  // Get the value of the specified cell
  var cellValue = sheet.getRange(cellAddress).getValue();

  // Return the cell value
  return cellValue;
}

// Notionデータベースをクエリする関数
function queryNotionDatabase(week) {
  const notionDatabaseQueryEndpoint = `https://api.notion.com/v1/databases/${notionDatabaseId}/query`;

  const data = {
    filter: {
      property: 'Week',
      title: {
        equals: week
      }
    }
  };

  const options = {
    method: 'post',
    headers: notion_headers,
    payload: JSON.stringify(data),
  };

  const response = UrlFetchApp.fetch(notionDatabaseQueryEndpoint, options);
  const responseData = JSON.parse(response.getContentText());

  if (responseData.results && responseData.results.length > 0) {
    return responseData.results[0];
  } else {
    return null;
  }
}

// Notionページの内容を取得する関数
function getPageContent(pageId) {
  const notionPageEndpoint = `https://api.notion.com/v1/pages/${pageId}`;

  const options = {
    method: 'get',
    headers: notion_headers,
  };

  const response = UrlFetchApp.fetch(notionPageEndpoint, options);
  return JSON.parse(response.getContentText());
}

// Notionにデータを追加する関数
function addToNotionDatabase(week, terminologies, key_concepts) {
  const notionPageEndpoint = `https://api.notion.com/v1/pages`;

  const data = {
    parent: {
      database_id: notionDatabaseId,
    },
    properties: {
      "Week": {
        title: [
          {
            text: {
              content: week,
            },
          },
        ],
      },
      "Terminologies": {
        rich_text: [
          {
            text: {
              content: terminologies
            }
          }
        ]
      },
      "Key Concepts": {
        rich_text: [
          {
            text: {
              content: key_concepts
            }
          }
        ]
      }
    }
  };

  const options = {
    method: 'post',
    headers: notion_headers,
    payload: JSON.stringify(data),
  };

  // Notionにデータを追加
  return UrlFetchApp.fetch(notionPageEndpoint, options);
}

function appendPageText(page, text) {
  var data = {
    "children": []
  };
  let maxLineCount = text.split("\n").length;
  let lineCount = 1;
  text.split("\n").forEach(function (line) {
    lineCount += 1;
    if (line.replace(' ', '').trim().length == 0) {
      return;
    }
    data["children"].push({
      "type": "paragraph",
      "paragraph": {
        "rich_text": [{
          "type": "text",
          "text": {
            "content": line,
            "link": null
          },
          "plain_text": line,
          "href": null
        }],
        "color": "default"
      }
    });
    if (data["children"].length == 100) {
      postBody(page['id'], data);
      data["children"] = [];
    }
    if (lineCount >= maxLineCount && data["children"].length > 0) {
      Logger.log(data);
      let _result = postBody(page['id'], data);
    }
  });
}

function postBody(page_id, data) {
  const options = {
    method: 'patch',
    headers: notion_headers,
    payload: JSON.stringify(data),
    muteHttpExceptions: true
  };
  const notionBlocksEndpoint = Utilities.formatString(
    'https://api.notion.com/v1/blocks/%s/children', page_id);
  // Notionにデータを追加
  return UrlFetchApp.fetch(notionBlocksEndpoint, options);
}
このコードをGASのCode.gsにコピペしてデプロイします(デプロイ方法はこの記事参照)。
すると以下の画面になるので、「Deployment ID」をコピーしておきます(次のステップで必要)。
このIDを含んだURL(「Web app」のURL)がこのGASのWebhook URLとなります。つまり、外部からこのURLにリクエストを送ることでこのGASがトリガー(実行)されます。
重要:絶対にこのURLとDeployment IDを他人に共有・公開しないでください。

カスタムGPTのActionスキーマ生成
「APIスキーマって何?」という人もいると思うので、それについては以前の記事の「ChatGPTにAPIスキーマを書いてもらう」セクションを見てください。
それでは毎度お馴染みの「ActionsGPT」さんにスキーマを書いてもらいましょう!
このGASスクリプトを呼び出すための仕様をOpenAPIバージョン3.1.0で作成してください。

------------------------------------------------
<ここに前のステップで生成したGASをコピペ>
------------------------------------------------
で、出来上がったのがこちら👇
自分の「Deployment ID」とスプレッドシートのapiKey(こちらの記事の「補足〜セキュリティ強化のためにしたこと」セクション参照)を入力してください。
openapi: 3.1.0
info:
  title: Notion Integration API
  description: API for integrating Google Sheets with Notion to add, update, or retrieve content based on incoming requests.
  version: 1.0.0
servers:
  - url: https://script.google.com
    description: Google Apps Script deployment URL
paths:
  /macros/s/{ここにDeployment IDをコピペする}/exec:
    post:
      operationId: handlePostRequest
      summary: Handles incoming POST requests to add, update, or retrieve content in Notion.
      requestBody:
        required: true
        content:
          application/json:
            schema:
              type: object
              properties:
                action:
                  type: string
                  description: Action to be performed, either 'addToDatabase' or 'retrieveDatabase'.
                  enum: [addToDatabase, retrieveDatabase]
                apiKey:
                  type: string
                  description: {ここにスプレッドシートのapiKeyをコピペする}
                content:
                  type: string
                  description: Content to be added to the Notion page. Required if action is 'addToDatabase'.
                week:
                  type: string
                  description: Week information to be added to or retrieved from the Notion database.
                terminologies:
                  type: string
                  description: List of terminologies to be added to the Notion database. Required if action is 'addToDatabase'.
                keyConcepts:
                  type: string
                  description: List of key concepts to be added to the Notion database. Required if action is 'addToDatabase'.
      responses:
        "200":
          description: Success response with the result of the operation.
          content:
            application/json:
              schema:
                type: object
                properties:
                  result:
                    type: string
                  data:
                    oneOf:
                      - $ref: '#/components/schemas/NotionPageResponse'
                      - type: string
        "400":
          description: Invalid request due to missing or incorrect API key.
          content:
            application/json:
              schema:
                type: object
                properties:
                  error:
                    type: string
        "500":
          description: Server error while processing the request.
          content:
            application/json:
              schema:
                type: object
                properties:
                  error:
                    type: string
components:
  schemas:
    NotionPageResponse:
      type: object
      properties:
        id:
          type: string
        object:
          type: string
        created_time:
          type: string
          format: date-time
        last_edited_time:
          type: string
          format: date-time
        parent:
          type: object
        archived:
          type: boolean
        properties:
          type: object
        url:
          type: string
カスタムGPTのインストラクション入力
GPTsの作り方はこの記事の「カスタムGPTのセットアップ」セクションを参照してください。
スキーマ入力のステップでは、前のステップで生成したスキーマをコピペします。
以下のインストラクションをコピペします。
You are a specialized AI model designed to generate concise and informative summaries of lecture transcripts and send them to a Notion database. Additionally, you can retrieve specific entries from the Notion database based on the week number.

## Instructions
**Important**: Always make sure to include `apiKey` in the payload, which is already defined in the action schema.

1. **User Action Selection**: Prompt the user to select an action:
   - Retrieve database
   - Add to database

### Retrieve from Database:

- **User Instruction**: If the user selects "retrieve database," ask for the required parameters:
  - **week**: Ask the user for the week they want to retrieve.

#### Required Parameters for Adding:

- **week**: Ask the user for the week.
- **apiKey**: Use the value already defined in the action schema.

### Add to Database:

2. **Lecture Transcripts**: If the user uploads lecture transcripts, proceed with the following steps:

- **Task Overview**: Read through the provided lecture transcripts, extract key concepts, terminologies, and their meanings, and present a summary that captures the essence of the lectures. Your summaries should be organized, clear, and concise, highlighting the most important points discussed.

### Guidelines for Summary Creation:

- **Key Concepts**: Extract and list the main topics and ideas discussed in the lecture. Limit the list to 10 numbered bullet points, with each point being within 50 words of concise and clear explanations.
- **Terminologies**: Highlight important terminologies mentioned in the lecture along with their concise and clear definitions. Limit the list to 10 numbered bullet points, with each point being within 30 words.
- **Summary**: Generate a concise and clear summary of the lecture, 1500 - 2000 words.

3. **User Confirmation for Database Addition**: After creating the summary, ask the user if they want to send the summary to Notion. If the user confirms, gather the required parameters for submission.

#### Required Parameters for Adding:

- **week**: Ask the user for the week.
- **terminologies**: The list of terminologies you extracted.
- **key_concepts**: The list of key concepts you extracted.
- **content**: The summary you created. Exclude key concepts and terminologies and only include the summary.
- **apiKey**: Use the value already defined in the action schema.

### Webhook Actions

4. **Webhook Payload**: Based on the user's choice, the webhook payload will have an `action` property that takes the values `retrieveDatabase` or `addToDatabase`.

- If `action = retrieveDatabase`, the required properties will be `week` and `apiKey`.
- If `action = addToDatabase`, the required properties will be `content`, `week`, `terminologies`, `key_concepts`, and `apiKey`.

### Example Payloads

**Add to Database:**
```json
{
  "action": "addToDatabase",
  "week": "1",
  "terminologies": ["term1", "term2"],
  "key_concepts": ["concept1", "concept2"],
  "content": "The summary of the lecture content.",
  "apiKey": "apiKey defined in action schema"
}
```

**Retrieve from Database:**
```json
{
  "action": "retrieveDatabase",
  "week": "1",
  "apiKey": "apiKey defined in action schema"
}
```
これで「Create」ボタンをクリックして完成です!共有設定は「Only me」を選択してください。
使ってみよう!

Conversation starterには「Retrieve Notion database」(データベースからデータ取得)と「Add to Notion database」(データベースにデータ保存)を設定しました。
以下のターゲットデータベースを使います。

Conversation starterの「Retrieve Notion database」を選択してみる。

すると無事データベースのデータを取得して表示してくれました!!
学習内容をチャットに取り込むことで、学習内容に沿ったゲームを作ってもらってインタラクティブに学ぶことも可能!!

では次に「Add to Notion database」を選択してみましょう。トランスクリプトファイルをアップロードするように言われるので、アップロードするとすぐにサマリーを生成してくれます。

サマリー生成後、データベースに保存するかと聞かれるので、Weekを指定する。

すると無事データベースに保存できたとのこと。

おおー!!ちゃんと新しい行が追加されてる!!

おわりに
自分用の自動化アプリやカスタムGPTを作ることが、生成AIのコーディング能力のおかげですごく容易になっていて今回の「Lecture Summariser」も実働2時間もかからず完成しました。
プログラマーではない私がサクサク作れてしまうのだから、「ちょっとしたコードが書ける」ことの価値はどんどんなくなっていくのかも。(でもそれって逆にプログラマーのハードルをめちゃめちゃ上げてるのかな。)
で、これからも価値のあるスキルってなんだろうと考えた時、「ペインポイントを顕在化する」ことなのではないだろうか、と思いました。
「何かうまくいってない」を言語化して顕在化することがはじめの第一歩。逆に言うと、そこまで行ければあとは生成AIを相手に解決策をブレインストームできる。言語化力、磨いていきたいです!!
それと、もう一つ大事な発見がありました。
カスタムGPTからサードパーティAPIを呼ぶときはGASをミドルマンとして使うのが便利!!
ということです。
現状GPTsにはAPIリクエストのヘッダー縛りがあるため、APIによってはすんなり連携できないことが多い。それならGASを叩いてそこからAPIリクエストを呼ぶのが楽だし、自分用ツールならそれで十分。
この記事が気に入ったらサポートをしてみませんか?