
[GASで自動化] ChatGPTにGAS書いてもらってサクッと自動化〜画像から文字起こし→Notionデータベース保存

スクショやレクチャースライドなど、ノート取る代わりに画像で保存することってよくやりますよね。
今回はGoogleドライブにアップロードした画像ファイルから文字起こししたテキストをNotionデータベースに保存する自動化をサクッとChatGPTに書いてもらった話です。文字起こしはGPT-4oにやってもらいます。
GAS生成に使ったプロンプト
Create a GAS to execute the following tasks:
- get Google Drive file ID of an image file that is added to a specific folder in last 1 hour
- download the file from Google Drive and convert it to base64
- send it to OpenAI API endpoint to extract texts from the image
- send the extracted texts to Notion API endpoint to add a page under a specified database

(日本語訳)
以下のタスクを実行するGASを作成してください:
- 過去1時間以内に特定のフォルダに追加された画像ファイルのGoogleドライブファイルIDを取得する
- Googleドライブからファイルをダウンロードし、base64に変換する
- 画像からテキストを抽出するために、OpenAI APIエンドポイントに送信する
- 抽出したテキストを指定されたデータベースの下にページとして追加するために、Notion APIエンドポイントに送信する
なお、このままだと出力されたコードのAPIリクエストが実際と違うので、各サービスのAPIドキュメントから使いたいAPIエンドポイントのフォーマットをコピペして、「以下のフォーマットに合うようコードを変更してください」とプロンプトします。
あと、ChatGPTに作成してもらったコードは一つの大きい関数の中で複数の処理をして(モノリシック)いたりしたのでリファクタリングなどは手動で行いました。
各サービスのAPIキーとID取得
NotionのAPIキーについてもNotionの開発者ページからNew Integrationボタンで新しくAPIキーを発行します。
次に新規データベースをNotionに作成します。データベースの作り方はこちら。
データベースIDはURLから取得できます。URLはhttps://www.notion.so/{database_id}?v=bbbbbbbbbの形式になっていて{database_id}の箇所の文字列がデータベースIDです。
Google DriveのフォルダIDはフォルダのURLから取得できます。URLはhttps://drive.google.com/drive/u/0/folders/{folder_id}のフォーマットになっていてフォルダIDは{folder_id}になります。
Google App Scriptのセットアップ
こちらのページのセットアップ方法を参考にしてください。
実際のコード
以下が実際のコードです。このコードをそのままGASにコピペしたら必要なAPIキーやID等を入力して使用してください。
const folderId = 'folder_id'; // Google DriveフォルダIDを入力
const openaiApiKey = 'openai_key';   // OpenAI APIキーを入力
const notionApiKey = 'notion_key';   // Notion APIキーを入力
const notionDatabaseId = 'db_id'; // NotionデータベースIDを入力
const numHour = 24 // GASのトリガーの頻度(1日1回実行なら24時間)

const notion_headers = {
  'Authorization': 'Bearer ' + notionApiKey,
  'Content-Type': 'application/json',
  'Notion-Version': '2022-06-28', // Notion APIのバージョン
};

function main() {
  const folder = DriveApp.getFolderById(folderId);
  const now = new Date();
  const oneHourAgo = new Date(now.getTime() - (numHour * 60 * 60 * 1000)); // X hours ago

  const files = folder.getFiles();
  let processedFiles = 0;

  while (files.hasNext()) {
    const file = files.next();
    if (file.getDateCreated() > oneHourAgo) {
      processedFiles++;
      const fileId = file.getId();
      const fileName = file.getName();
      const fileDateCreated = file.getDateCreated();
      const blob = file.getBlob();
      const base64Image = Utilities.base64Encode(blob.getBytes());

      const extractedText = sendToOpenAI(base64Image);
      const page = addToNotionDatabase(fileDateCreated, fileName);
      appendPageText(JSON.parse(page), extractedText);
    }
  }

  if (processedFiles === 0) {
    Logger.log("No recent files found.");
  }
}

function sendToOpenAI(base64Image) {
  const openaiPayload = {
    "model": "gpt-4o",
    "messages": [
      {
        "role": "user",
        "content": [
          {
            "type": "text",
            "text": "Extract the texts from this image and return only the texts contained within it."
          },
          {
            "type": "image_url",
            "image_url": {
              "url": "data:image/jpeg;base64," + base64Image
            }
          }
        ]
      }
    ],
    "max_tokens": 1000
  };

  const openaiOptions = {
    "method": "post",
    "contentType": "application/json",
    "headers": {
      "Authorization": "Bearer " + openaiApiKey
    },
    "payload": JSON.stringify(openaiPayload)
  };

  const openaiResponse = UrlFetchApp.fetch("https://api.openai.com/v1/chat/completions", openaiOptions);
  const openaiResult = JSON.parse(openaiResponse.getContentText());
  const extractedText = openaiResult.choices[0].message.content;

  return extractedText;
}

function addToNotionDatabase(date, name) {
  const notionPageEndpoint = `https://api.notion.com/v1/pages`;

  const data = {
    parent: {
      database_id: notionDatabaseId,
    },
    properties: {
      "Date": {
        title: [
          {
            text: {
              content: date.toISOString(),
            },
          },
        ],
      },
      "File name": {
        rich_text: [
          {
            text: {
              content: name
            }
          }
        ]
      }
    }
  };

  const options = {
    method: 'post',
    headers: notion_headers,
    payload: JSON.stringify(data),
  };

  return UrlFetchApp.fetch(notionPageEndpoint, options);
}

function appendPageText(page, text) {
  const data = {
    "children": []
  };
  let maxLineCount = text.split("\n").length;
  let lineCount = 1;
  text.split("\n").forEach(function (line) {
    lineCount += 1;
    if (line.replace(' ', '').trim().length == 0) {
      return;
    }
    data["children"].push({
      "type": "paragraph",
      "paragraph": {
        "rich_text": [{
          "type": "text",
          "text": {
            "content": line,
            "link": null
          },
          "plain_text": line,
          "href": null
        }],
        "color": "default"
      }
    });
    if (data["children"].length == 100) {
      postBody(page['id'], data);
      data["children"] = [];
    }
    if (lineCount >= maxLineCount && data["children"].length > 0) {
      postBody(page['id'], data);
      data["children"] = [];
    }
  });
  if (data["children"].length > 0) {
    postBody(page['id'], data);
  }
}

function postBody(page_id, data) {
  const options = {
    method: 'patch',
    headers: notion_headers,
    payload: JSON.stringify(data),
    muteHttpExceptions: true
  };
  const notionBlocksEndpoint = Utilities.formatString(
    'https://api.notion.com/v1/blocks/%s/children', page_id);

  return UrlFetchApp.fetch(notionBlocksEndpoint, options);
}
トリガーの設定
上のコードでnumHourは何時間前までに追加されたファイルを取得するかを指定します。なので、上の例のように24時間とした場合は過去24時間以内に追加されたファイルの処理を行うことになるので、トリガーの設定は1日に一回になります。
このnumHourを例えば6にした場合はhourly timerで6時間毎に実行されるようにトリガーを設定することになります。
動かしてみる
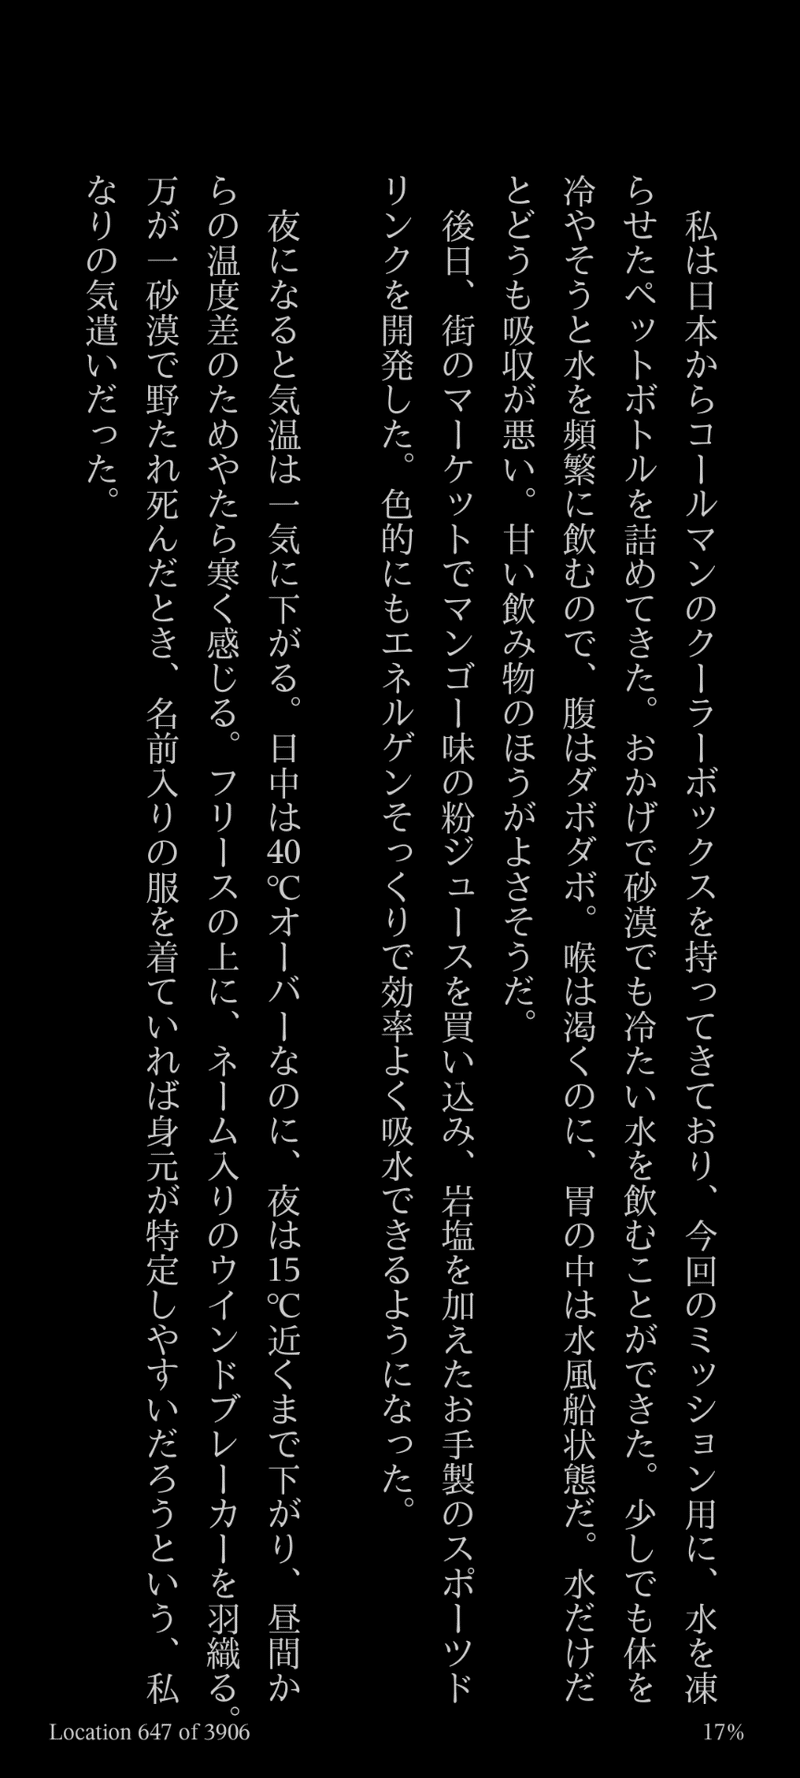
スマホでスクショを撮って、それをGoogle Driveの指定したフォルダに保存する(以下のKindleアプリからの画像)
指定したトリガー頻度によってGASがトリガーされる
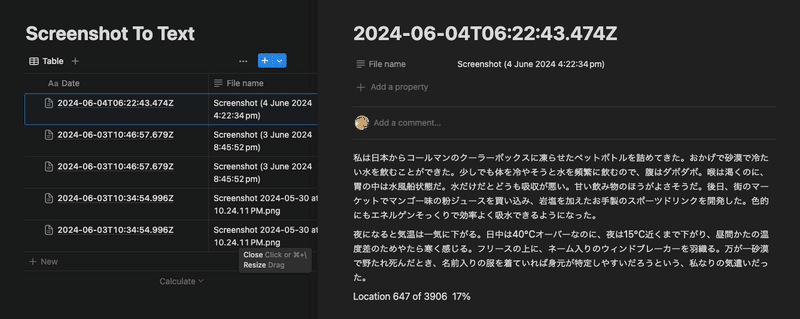
Notionデータベースに文字起こしテキストが保存される(以下2番目の画像)
この記事が気に入ったらサポートをしてみませんか?