はじめてPytorchで画像認識にチャレンジ!

今は移動と移動の合間でホーチミンにいます。
あるお客様から画像認識をしてARで表示したいと言う依頼がありました。
弊社のエンジニアなら簡単なのでしょうが、僕もちょっとやってみます。
ということで、
モデル作成用、24枚、検証用で5枚使おうかと思います。
さあ、始めましょうー
要件定義
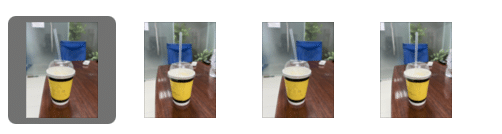
20本の同じペットボトルの様々な角度からの写真でトレーニングしてモデルを作成する。比較対象がないとダメなことを後から知り、実は後から追加でコーヒーの紙コップを2枚用意して、モデル作成用と検証用に後から追加しました。
検証用として3本の同じペットボトルのまた違う角度の3枚の写真を認識できるか試したい。紙コップも検証用に入れる。
実験的に素早く試したかったのでデータ作成は雑にしちゃいましたのでご了承を
データの準備
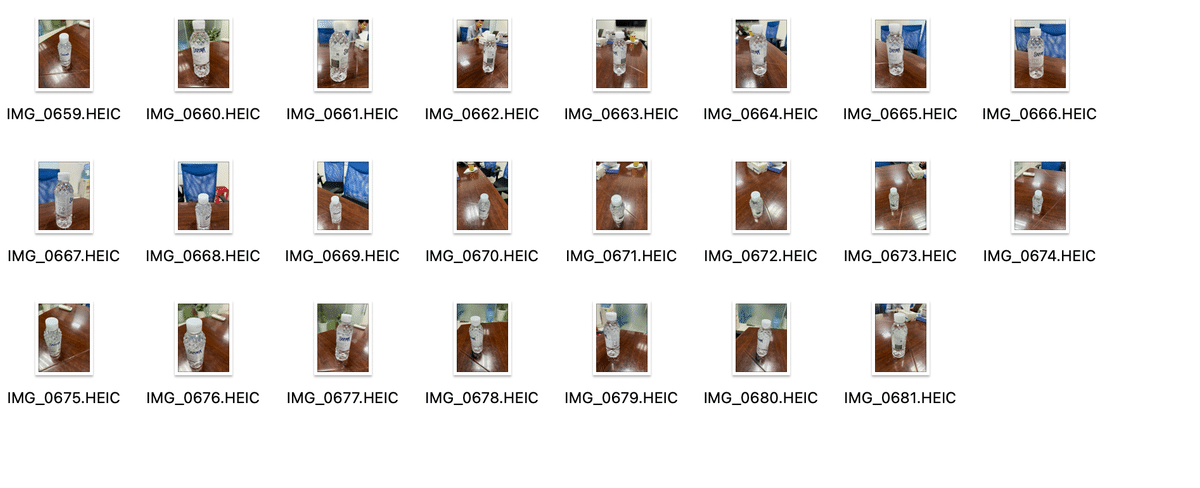
用意した画像はこんな感じ
iPhoneで撮影
色々な角度から撮影
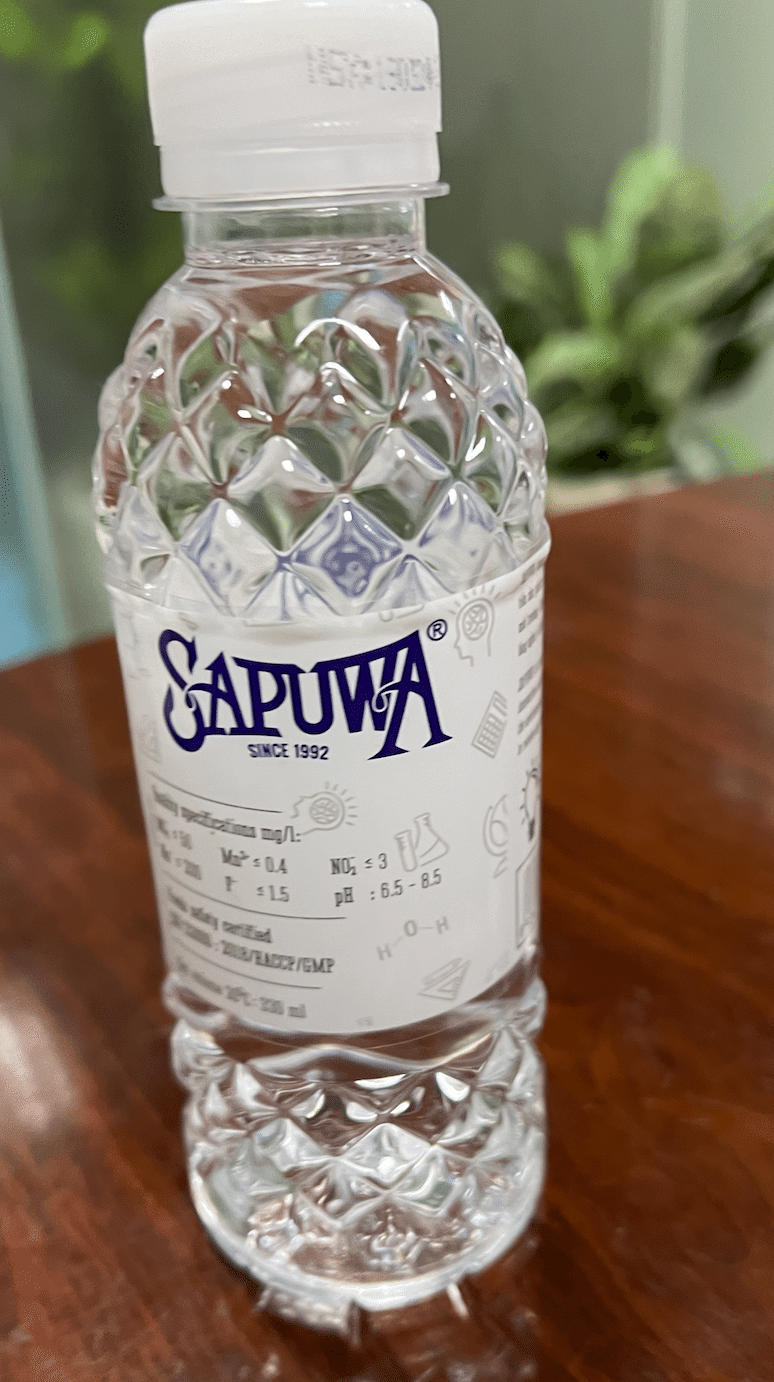
拡大するとこんな感じ
日本にはないミネラルウォーター

HEIC画像をJPGに一括変換
PillowとPillow-helfをインストール
pip3 install pillow pillow-heifPillow
Pillowは、Pythonで画像を処理するためのライブラリ。Pillowの主な機能。
画像の読み込みと保存
画像のサイズ変更やトリミング
画像のフィルタリングや変換(例:モノクロ化、ぼかし)
画像へのテキストや図形の描画
pillow-heif
pillow-heifは、PillowのHEIF/HEIC形式の画像を読み込むための拡張ライブラリ。HEIF(High Efficiency Image Format)は、JPEGやPNGよりも高い圧縮率で高画質な画像を保存できる形式。iPhoneでは、カメラで撮影した画像がデフォルトでHEIC形式で保存。
convert_heic_to_jpeg.pyを作成
touch convert_heic_to_jpeg.pyimport os
from PIL import Image
import pillow_heif
# ソースディレクトリ
src_dir = '~/Desktop/image-recognition-demo' # 正しいディレクトリ名に修正
# パスの展開
src_dir = os.path.expanduser(src_dir)
print(f"ソースディレクトリ: {src_dir}")
# 変換関数
def convert_heic_to_jpeg(src_path, dest_path):
try:
print(f"変換中: {src_path} -> {dest_path}")
heif_file = pillow_heif.read_heif(src_path)
image = Image.frombytes(
heif_file.mode,
heif_file.size,
heif_file.data,
"raw",
heif_file.mode,
heif_file.stride,
)
image.save(dest_path, "JPEG")
print(f"保存完了: {dest_path}")
except Exception as e:
print(f"エラーが発生しました: {e}")
# ファイルの変換
files = [f for f in os.listdir(src_dir) if f.lower().endswith('.heic')]
print(f"変換対象ファイル: {files}")
for file in files:
src_path = os.path.join(src_dir, file)
dest_path = os.path.splitext(src_path)[0] + '.jpg'
convert_heic_to_jpeg(src_path, dest_path)
print("変換が完了しました")
うまくいきました!
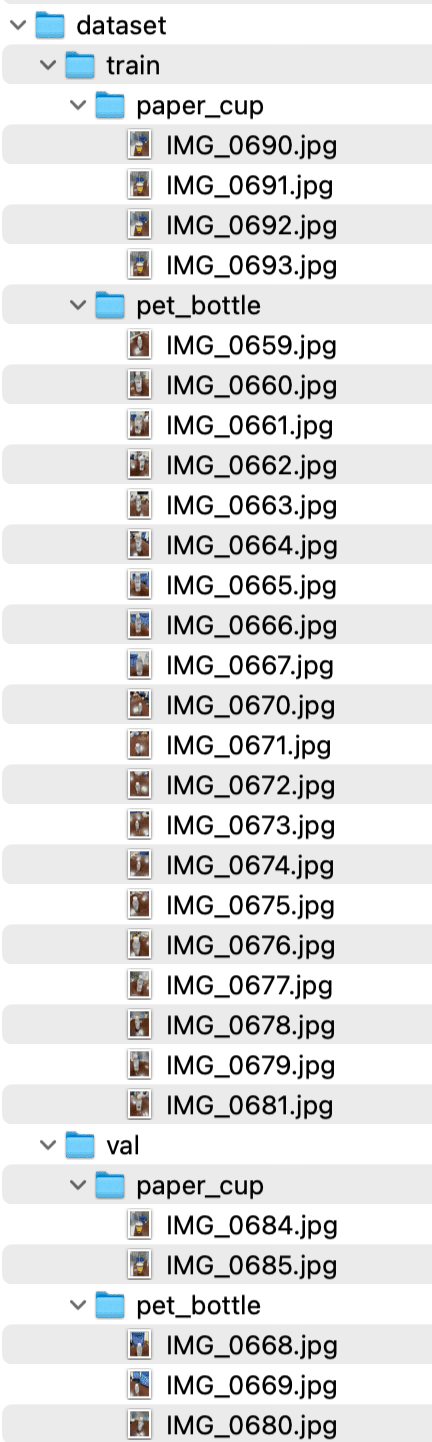
Datasetを作成
データセットは、機械学習モデルをトレーニングするために使用されるデータの集合。通常、データセットはトレーニング用、検証用、テスト用のサブセットに分割されモデル作成と検証する。
今回は20枚をトレーニング
3枚を検証用にしてみる。
move_images_to_dataset.pyを作成
import os
import shutil

# ソースディレクトリ
src_dir = '~/Desktop/image-recognition-demo'
train_dir = '~/Desktop/image-recognition-demo/dataset/train/pet_bottle'
val_dir = '~/Desktop/image-recognition-demo/dataset/val/pet_bottle'

# パスの展開
src_dir = os.path.expanduser(src_dir)
train_dir = os.path.expanduser(train_dir)
val_dir = os.path.expanduser(val_dir)

# ディレクトリの作成
os.makedirs(train_dir, exist_ok=True)
os.makedirs(val_dir, exist_ok=True)

# ファイルの移動
files = [f for f in os.listdir(src_dir) if f.lower().endswith('.jpg')]
print(f"移動対象ファイル: {files}")

for i, file in enumerate(files):
    src_path = os.path.join(src_dir, file)
    if i < 20:
        dest_path = os.path.join(train_dir, file)
    else:
        dest_path = os.path.join(val_dir, file)
    try:
        shutil.move(src_path, dest_path)
        print(f"移動完了: {src_path} -> {dest_path}")
    except Exception as e:
        print(f"エラーが発生しました: {e}")

print("すべてのファイルの移動が完了しました")
データの準備完了
いよいよPyTorchで画像認識モデル作成
必要なライブラリのインストール
pip install torch torchvision matplotlibtorch: PyTorchのコアライブラリ。テンソル演算や自動微分を提供。
torchvision: 画像データ用のPyTorchライブラリ。データセット、モデル、変換を提供。
matplotlib: Pythonのデータ可視化ライブラリ。グラフやプロットを作成。
モデルのトレーニングのスクリプト
train_model.pyを作成
import torch
import torch.nn as nn
import torch.optim as optim
import torchvision
import torchvision.transforms as transforms
from torchvision.datasets import ImageFolder
from torch.utils.data import DataLoader
import os

# 画像の前処理
transform = transforms.Compose([
    transforms.Resize((128, 128)),
    transforms.ToTensor(),
    transforms.Normalize(mean=[0.485, 0.456, 0.406], std=[0.229, 0.224, 0.225]),
])

# データセットのロード
train_dataset = ImageFolder(root=os.path.expanduser('~/Desktop/image-recognition-demo/dataset/train'), transform=transform)
train_loader = DataLoader(train_dataset, batch_size=4, shuffle=True)

# デバッグのためにクラスとサンプル数を表示
print(f'Training classes: {train_dataset.classes}, number of samples: {len(train_dataset)}')

# 簡単なモデルの定義(ResNet18の利用)
weights = torchvision.models.ResNet18_Weights.DEFAULT
model = torchvision.models.resnet18(weights=weights)
model.fc = nn.Linear(model.fc.in_features, len(train_dataset.classes))  # クラス数に合わせる

# デバイスの設定
device = torch.device('cuda' if torch.cuda.is_available() else 'cpu')
model.to(device)

# 損失関数と最適化
criterion = nn.CrossEntropyLoss()
optimizer = optim.Adam(model.parameters(), lr=0.001)

# トレーニング関数
def train_model(model, train_loader, criterion, optimizer, device):
    model.train()
    running_loss = 0.0
    for inputs, labels in train_loader:
        inputs, labels = inputs.to(device), labels.to(device)

        optimizer.zero_grad()

        outputs = model(inputs)
        loss = criterion(outputs, labels)
        loss.backward()
        optimizer.step()

        running_loss += loss.item() * inputs.size(0)

    epoch_loss = running_loss / len(train_loader.dataset)
    return epoch_loss

# トレーニングの実行
num_epochs = 10
train_losses = []

for epoch in range(num_epochs):
    train_loss = train_model(model, train_loader, criterion, optimizer, device)
    train_losses.append(train_loss)

    print(f'Epoch {epoch+1}/{num_epochs}')
    print(f'Train Loss: {train_loss:.4f}')

# モデルの保存
os.makedirs('models', exist_ok=True)
torch.save(model.state_dict(), 'models/pet_bottle_model.pth')

print("モデルのトレーニングが完了し、保存されました")
python train_model.pyターミナルではいい感じで計算しているように感じます、がんばれMAC、仮想環境
トレーニングされたモデルのパラメータが
models/pet_bottle_model.pthに保存されました。
中身はよくわかりません。
モデルが学習した重みとバイアスが含まれているようです。
(venv) U@H ~/Desktop/image-recognition-demo $ python train_model.py

Training classes: ['paper_cup', 'pet_bottle'], number of samples: 24
Labels: [1 1 1 0], Predictions: [1 0 0 0]
Labels: [1 1 1 1], Predictions: [1 1 1 0]
Labels: [1 0 1 0], Predictions: [1 0 1 0]
Labels: [1 1 1 1], Predictions: [1 1 0 1]
Labels: [1 1 1 1], Predictions: [1 1 0 1]
Labels: [0 1 1 1], Predictions: [0 1 1 1]
Epoch 1/10
Train Loss: 0.5459
Labels: [1 1 1 0], Predictions: [0 1 1 1]
Labels: [0 1 1 1], Predictions: [0 1 1 1]
Labels: [1 1 1 1], Predictions: [1 1 1 1]
Labels: [1 0 1 1], Predictions: [1 0 1 1]
Labels: [1 1 0 1], Predictions: [1 1 0 1]
Labels: [1 1 1 1], Predictions: [1 1 1 1]
Epoch 2/10
Train Loss: 0.4934
Labels: [1 0 1 1], Predictions: [1 0 1 1]
Labels: [1 1 1 0], Predictions: [1 1 1 0]
Labels: [1 1 1 1], Predictions: [0 1 1 1]
Labels: [1 0 1 1], Predictions: [1 0 1 1]
Labels: [1 1 1 0], Predictions: [1 1 1 0]
Labels: [1 1 1 1], Predictions: [1 1 1 1]
Epoch 3/10
Train Loss: 0.1517
Labels: [1 1 1 0], Predictions: [1 1 1 0]
Labels: [1 1 1 0], Predictions: [1 1 1 0]
Labels: [1 1 0 1], Predictions: [1 1 0 1]
Labels: [1 1 1 1], Predictions: [1 1 1 1]
Labels: [1 1 0 1], Predictions: [1 1 0 1]
Labels: [1 1 1 1], Predictions: [1 1 1 1]
Epoch 4/10
Train Loss: 0.0448
Labels: [1 1 1 1], Predictions: [1 1 1 1]
Labels: [1 1 1 1], Predictions: [1 1 1 1]
Labels: [1 0 0 1], Predictions: [1 1 1 1]
Labels: [1 1 1 1], Predictions: [1 1 1 1]
Labels: [1 1 1 1], Predictions: [1 1 1 1]
Labels: [1 0 0 1], Predictions: [1 0 0 1]
Epoch 5/10
Train Loss: 0.1870
Labels: [1 1 1 1], Predictions: [1 1 1 1]
Labels: [0 1 1 1], Predictions: [0 1 1 1]
Labels: [1 1 1 0], Predictions: [1 1 1 0]
Labels: [1 1 1 1], Predictions: [1 1 1 0]
Labels: [0 1 1 1], Predictions: [0 1 1 1]
Labels: [1 1 0 1], Predictions: [1 1 0 1]
Epoch 6/10
Train Loss: 0.0574
Labels: [1 1 0 1], Predictions: [1 1 0 1]
Labels: [1 1 1 1], Predictions: [0 1 1 1]
Labels: [1 0 1 1], Predictions: [1 0 1 1]
Labels: [1 0 1 0], Predictions: [1 0 1 1]
Labels: [1 1 1 1], Predictions: [1 1 1 1]
Labels: [1 1 1 1], Predictions: [1 1 1 1]
Epoch 7/10
Train Loss: 0.2213
Labels: [1 1 1 1], Predictions: [1 1 1 1]
Labels: [0 1 0 1], Predictions: [0 1 0 1]
Labels: [1 1 1 1], Predictions: [1 1 1 1]
Labels: [1 1 1 0], Predictions: [1 1 1 0]
Labels: [1 1 1 0], Predictions: [1 1 1 0]
Labels: [1 1 1 1], Predictions: [1 1 1 1]
Epoch 8/10
Train Loss: 0.0083
Labels: [1 0 1 1], Predictions: [1 0 1 1]
Labels: [1 0 1 1], Predictions: [1 0 1 1]
Labels: [1 1 1 1], Predictions: [1 1 1 1]
Labels: [1 1 1 1], Predictions: [1 1 1 1]
Labels: [1 0 1 1], Predictions: [1 0 1 1]
Labels: [0 1 1 1], Predictions: [0 1 1 1]
Epoch 9/10
Train Loss: 0.0060
Labels: [1 1 1 1], Predictions: [1 1 1 1]
Labels: [1 1 1 1], Predictions: [1 1 1 1]
Labels: [1 1 1 1], Predictions: [1 1 1 1]
Labels: [0 1 1 1], Predictions: [0 1 1 1]
Labels: [0 0 1 0], Predictions: [0 1 1 0]
Labels: [1 1 1 1], Predictions: [1 1 1 1]
Epoch 10/10
Train Loss: 0.8401
モデルのトレーニングが完了し、保存されました
エポックごとの損失値が変動しているのはデータのばらつきやバッチサイズの影響を受けている可能性があるようです。
画像認識できているか
検証スクリプト (validate_model.py)
validate_model.pyを作成
import torch
import torch.nn as nn
import torchvision
import torchvision.transforms as transforms
from torchvision.datasets import ImageFolder
from torch.utils.data import DataLoader
import os

# 画像の前処理
transform = transforms.Compose([
    transforms.Resize((128, 128)),
    transforms.ToTensor(),
    transforms.Normalize(mean=[0.485, 0.456, 0.406], std=[0.229, 0.224, 0.225]),
])

# データセットのロード
val_dataset = ImageFolder(root=os.path.expanduser('~/Desktop/image-recognition-demo/dataset/val'), transform=transform)
val_loader = DataLoader(val_dataset, batch_size=4, shuffle=False)

# デバッグのためにクラスとサンプル数を表示
print(f'Validation classes: {val_dataset.classes}, number of samples: {len(val_dataset)}')

# 簡単なモデルの定義(ResNet18の利用)
weights = torchvision.models.ResNet18_Weights.DEFAULT
model = torchvision.models.resnet18(weights=weights)
model.fc = nn.Linear(model.fc.in_features, len(val_dataset.classes))  # クラス数に合わせる

# モデルのロード
model.load_state_dict(torch.load('models/pet_bottle_model.pth'))

# デバイスの設定
device = torch.device('cuda' if torch.cuda.is_available() else 'cpu')
model.to(device)

# 損失関数
criterion = nn.CrossEntropyLoss()

# 検証関数
def val_model(model, val_loader, criterion, device):
    model.eval()
    running_loss = 0.0
    correct = 0

    with torch.no_grad():
        for inputs, labels in val_loader:
            inputs, labels = inputs.to(device), labels.to(device)

            outputs = model(inputs)
            loss = criterion(outputs, labels)

            _, preds = torch.max(outputs, 1)
            correct += torch.sum(preds == labels).item()
            print(f'Validation Labels: {labels.cpu().numpy()}, Predictions: {preds.cpu().numpy()}')

            running_loss += loss.item() * inputs.size(0)

    epoch_loss = running_loss / len(val_loader.dataset)
    accuracy = correct / len(val_loader.dataset)
    return epoch_loss, accuracy

# 検証の実行
val_loss, val_accuracy = val_model(model, val_loader, criterion, device)

print(f'Validation Loss: {val_loss:.4f}')
print(f'Validation Accuracy: {val_accuracy:.4f}')
python validate_model.py検証結果
さてどうでしょうか?
(venv) U@H ~/Desktop/image-recognition-demo $ python validate_model.py
Validation classes: ['paper_cup', 'pet_bottle'], number of samples: 5
Validation Labels: [0 0 1 1], Predictions: [1 0 1 1]
Validation Labels: [1], Predictions: [1]
Validation Loss: 0.2358
Validation Accuracy: 0.8000
Validation Loss(検証損失): 0.2358:
検証データセットに対する平均損失が0.2358。損失が低いとモデルの予測が実際のラベルに近い。
Validation Accuracy(検証精度): 0.8000:
モデルの検証精度が80%。検証データセットに対して80%の正確さ。
Validation Labels: [0 0 1 1]:
実際のラベル(真のラベル)。
最初の2つのサンプルは paper_cup(ラベル0)で、次の2つのサンプルは pet_bottle(ラベル1)。
Predictions: [1 0 1 1]:
モデルが予測したラベル。
最初のサンプルを pet_bottle(ラベル1)と予測し、2番目のサンプルを paper_cup(ラベル0)と正しく予測。3番目と4番目のサンプルも正しく pet_bottle(ラベル1)と予測。
つまり、最初のサンプルはpaper_cupなのにpet_bottleと間違って予測された。
Validation Labels: [1], Predictions: [1]:
Validation Labels: [1]
Validation Labels は、検証データの実際のラベル(正解ラベル)。
バッチに含まれる1つのデータポイントのラベルが 1 。
ラベル 1 は、データセットの pet_bottle クラス。
Predictions: [1]
Predictions は、モデルが予測したラベル。
モデルがそのデータポイントを 1 と予測。
予測ラベル 1 は、pet_bottle クラス。
まとめ
結論、初めてとしてはうまくいったと思う。
chatGPTを使いながら実質試行錯誤をしながらデータ準備からコードを動かして検証まで3時間くらいで体験できた。
データの準備が重要だということがわかったが、ブログには書いていないが画像のランダムな回転、スケーリング、クロッピングなどのデータ増強技術を使用して、データセットの多様性を人工的に増やすことができることもわかった。
# データ増強と画像の前処理
transform = transforms.Compose([
    transforms.Resize((128, 128)),
    transforms.RandomHorizontalFlip(),  # ランダムに画像を左右反転
    transforms.RandomRotation(10),  # ランダムに画像を回転
    transforms.ToTensor(),
    transforms.Normalize(mean=[0.485, 0.456, 0.406], std=[0.229, 0.224, 0.225]),
])上記で再度試すとValidation Accuracyは100になった。
理論的にはUDEMYのG検定の学習やYOUTUBEのハンズオンでざっと学んだが実際にやってみると面白い。
INPUT→OUTPUTの繰り返し!
今はホーチミンにいます。
この記事が気に入ったらサポートをしてみませんか?