
【徒然iOS】気ままにUIKit58〜おもしろトレース(CLLocationManager 現在地にピンを刺す)〜

概要
このマガジンは四十を過ぎたおっさんが、
を参考にStoryboardでiOSアプリを完全に趣味で楽しんでいるだけな記事を気ままに上げてます。
今回
をハイ、レッツゴ🕺
前準備
念の為、
バックアップ
新しいクラス
ビューコントローラの追加
イニシャルビューの変更
をいつも通りやってから本題へ💃

本題
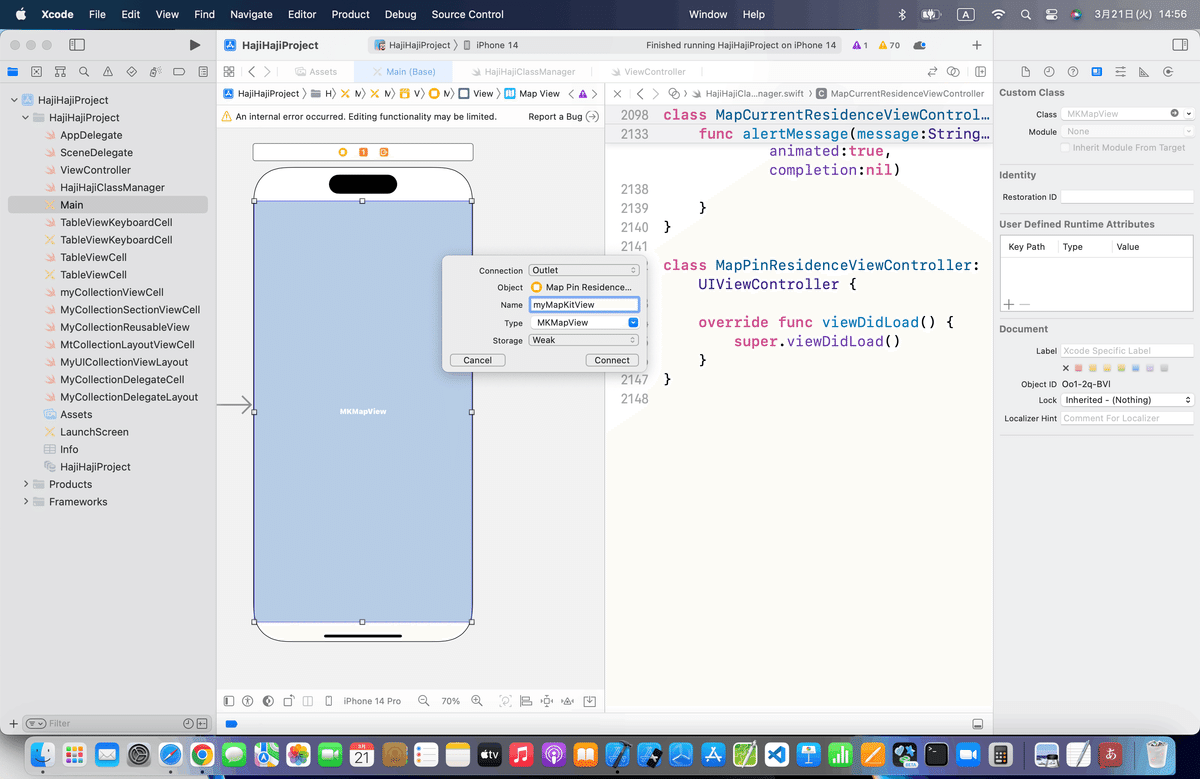
⒈とりあえずMapKitをいつものように配置してアウトレット接続
⒉コードを組み込む
サイト記事のコードを参考に
//
//  ViewController.swift
//
import UIKit
import MapKit
class ViewController: UIViewController, CLLocationManagerDelegate {
    @IBOutlet weak var testMapView: MKMapView!
    var testManager:CLLocationManager = CLLocationManager()
    //最初からあるメソッド
    override func viewDidLoad() {
        super.viewDidLoad()
        //デリゲート先に自分を設定する。
        testManager.delegate = self
        //位置情報の取得を開始する。
        testManager.startUpdatingLocation()
        //位置情報の利用許可を変更する画面をポップアップ表示する。
        testManager.requestWhenInUseAuthorization()
    }
    //位置情報取得時の呼び出しメソッド
    func locationManager(manager: CLLocationManager, didUpdateLocations locations: [CLLocation]) {
        for location in locations {
            //中心座標
            let center = CLLocationCoordinate2DMake(location.coordinate.latitude, location.coordinate.longitude)
            //表示範囲
            let span = MKCoordinateSpanMake(0.01, 0.01)
            //中心座標と表示範囲をマップに登録する。
            let region = MKCoordinateRegionMake(center, span)
            testMapView.setRegion(region, animated:true)
            //ピンを作成してマップビューに登録する。
            let annotation = MKPointAnnotation()
            annotation.coordinate = CLLocationCoordinate2DMake(location.coordinate.latitude, location.coordinate.longitude)
            testMapView.addAnnotation(annotation)
        }
    }
}
以下のコードに変更して〜〜〜
今回のコード(現在地取得)
class MapPinResidenceViewController: UIViewController, CLLocationManagerDelegate {
@IBOutlet weak var myMapKitView: MKMapView!
let latitudeDelta = 0.01
let longitudeDelta = 0.01
var myManager:CLLocationManager = CLLocationManager()
//最初からあるメソッド
override func viewDidLoad() {
super.viewDidLoad()
//デリゲート先に自分を設定する。
myManager.delegate = self
//位置情報の取得を開始する。
myManager.startUpdatingLocation()
//位置情報の利用許可を変更する画面をポップアップ表示する。
myManager.requestWhenInUseAuthorization()
}
//位置情報取得時の呼び出しメソッド
func locationManager(_ manager: CLLocationManager, didUpdateLocations locations: [CLLocation]) {
for location in locations {
//中心座標
let center = CLLocationCoordinate2DMake(location.coordinate.latitude, location.coordinate.longitude)
//表示範囲
let span = MKCoordinateSpan(latitudeDelta: latitudeDelta, longitudeDelta: longitudeDelta)
//中心座標と表示範囲をマップに登録する。
let region = MKCoordinateRegion(center: center, span: span)
myMapKitView.setRegion(region, animated:true)
//ピンを作成してマップビューに登録する。
let annotation = MKPointAnnotation()
annotation.coordinate = CLLocationCoordinate2DMake(location.coordinate.latitude, location.coordinate.longitude)
myMapKitView.addAnnotation(annotation)
}
}
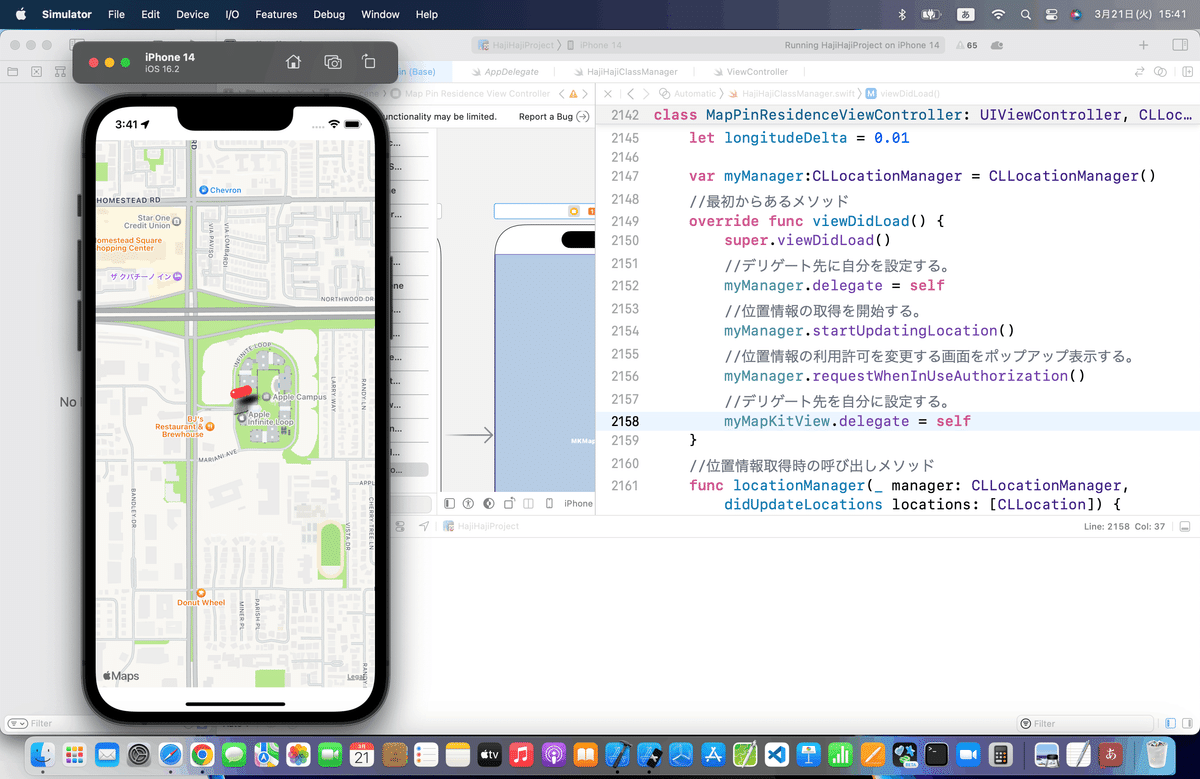
}⒊シミュレータ実行
実機ではきちんと現住所で表示されることも確認したけど〜〜〜
身バレしたくないので、

いや〜〜〜ん、見栄っ張りな感じ🕺大歓迎
で調べたら、どうやらカリフォルニアらしい、、、💦
もう、現在地から近いじゃないか!!!!
っと大見得はここら辺にして。
(福岡市内のカリフォルニアと言われる地区で書いてます 嘘)
とまあ、冗談はこのくらいにして、続きを💃
⒋便利機能で設定を変更してみる


カリフォルニアに居る俺氏が勝手に移動してます👀
面白怪奇現象でしかない😱😱😱
おもしろトレースを実装
今回も、独立の機能にしたいので、ここでビューを分ける〜〜〜
独立の方が多分、理解しやすい
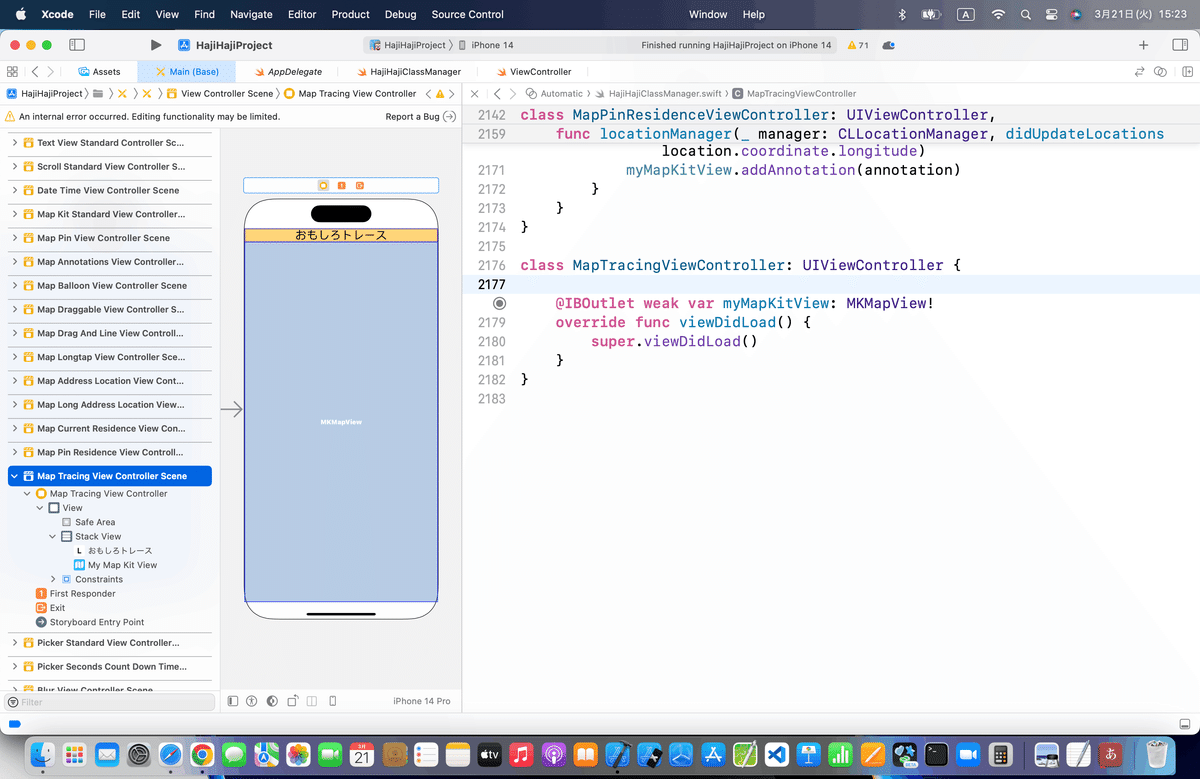
⒈新しいビューにVerticalStackViewを配置して、ラベルとMapKitを格納し、アウトレット接続
これまでの記事で何回かやってるので
⒉現在位置の軌跡に線を引くを組み込む
//
//  ViewController.swift
//
import UIKit
import MapKit
class ViewController: UIViewController, CLLocationManagerDelegate, MKMapViewDelegate {
    @IBOutlet weak var testMapView: MKMapView!
    var testManager:CLLocationManager = CLLocationManager()
    //アノテーション
    var annotation:MKPointAnnotation!
    //最初からあるメソッド
    override func viewDidLoad() {
        super.viewDidLoad()
        //デリゲート先に自分を設定する。
        testManager.delegate = self
        //位置情報の取得を開始する。
        testManager.startUpdatingLocation()
        //位置情報の利用許可を変更する画面をポップアップ表示する。
        testManager.requestWhenInUseAuthorization()
        //デリゲート先を自分に設定する。
        testMapView.delegate = self
    }
    //位置情報取得時の呼び出しメソッド
    func locationManager(manager: CLLocationManager, didUpdateLocations locations: [CLLocation]) {
        for location in locations {
            //中心座標
            let center = CLLocationCoordinate2DMake(location.coordinate.latitude, location.coordinate.longitude)
            //表示範囲
            let span = MKCoordinateSpanMake(0.01, 0.01)
            //中心座標と表示範囲をマップに登録する。
            let region = MKCoordinateRegionMake(center, span)
            testMapView.setRegion(region, animated:true)
            if(annotation == nil) {
                //初回はマップにピンを格納する。
                annotation = MKPointAnnotation()
                annotation.coordinate = CLLocationCoordinate2DMake(location.coordinate.latitude, location.coordinate.longitude)
                testMapView.addAnnotation(annotation)
            } else {
                //2回目以降は移動前と後の座標間に直線を引く。
                //始点と終点の座標
                var lineLocation:[CLLocationCoordinate2D] = [CLLocationCoordinate2D(latitude: annotation.coordinate.latitude, longitude: annotation.coordinate.longitude),
                    CLLocationCoordinate2D(latitude: location.coordinate.latitude, longitude: location.coordinate.longitude)]
                //2点間に直線を描画する。
                let line = MKPolyline(coordinates: &lineLocation, count: 2)
                testMapView.addOverlay(line)
                //ピンの位置を更新する。
                annotation.coordinate = CLLocationCoordinate2DMake(location.coordinate.latitude, location.coordinate.longitude)
            }
        }
    }
    //描画メソッド実行時の呼び出しメソッド
    func mapView(mapView: MKMapView, rendererForOverlay overlay: MKOverlay) -> MKOverlayRenderer {
        let testRender = MKPolylineRenderer(overlay: overlay)
        //直線の幅を設定する。
        testRender.lineWidth = 3
        //直線の色を設定する。
        testRender.strokeColor = UIColor.redColor()
        return testRender
    }
}
を参考に〜〜〜
以下のコードに買い換え〜〜〜
今回のコード(おもしろトレース)
class MapTracingViewController: UIViewController, CLLocationManagerDelegate, MKMapViewDelegate {

    @IBOutlet weak var myMapKitView: MKMapView!
    let latitudeDelta = 0.01
    let longitudeDelta = 0.01

    var myManager:CLLocationManager = CLLocationManager()
    //アノテーション
    var annotation:MKPointAnnotation!
    //最初からあるメソッド
    override func viewDidLoad() {
        super.viewDidLoad()
        //デリゲート先に自分を設定する。
        myManager.delegate = self
        //位置情報の取得を開始する。
        myManager.startUpdatingLocation()
        //位置情報の利用許可を変更する画面をポップアップ表示する。
        myManager.requestWhenInUseAuthorization()
        //デリゲート先を自分に設定する。
        myMapKitView.delegate = self
    }
    //位置情報取得時の呼び出しメソッド
    func locationManager(_ manager: CLLocationManager, didUpdateLocations locations: [CLLocation]) {
        for location in locations {
            //中心座標
            let center = CLLocationCoordinate2DMake(location.coordinate.latitude, location.coordinate.longitude)
            //表示範囲
            let span = MKCoordinateSpan(latitudeDelta: latitudeDelta, longitudeDelta: longitudeDelta)
            //中心座標と表示範囲をマップに登録する。
            let region = MKCoordinateRegion(center: center, span: span)
            myMapKitView.setRegion(region, animated:true)
            if(annotation == nil) {
                //初回はマップにピンを格納する。
                annotation = MKPointAnnotation()
                annotation.coordinate = CLLocationCoordinate2DMake(location.coordinate.latitude, location.coordinate.longitude)
                myMapKitView.addAnnotation(annotation)
            } else {
                //2回目以降は移動前と後の座標間に直線を引く。
                //始点と終点の座標
                var lineLocation:[CLLocationCoordinate2D] = [
                    CLLocationCoordinate2D(
                        latitude: annotation.coordinate.latitude,
                        longitude: annotation.coordinate.longitude),
                    CLLocationCoordinate2D(
                        latitude: location.coordinate.latitude,
                        longitude: location.coordinate.longitude
                    )
                ]
                //2点間に直線を描画する。
                let line = MKPolyline(coordinates: &lineLocation, count: 2)
                myMapKitView.addOverlay(line)
                //ピンの位置を更新する。
                annotation.coordinate = CLLocationCoordinate2DMake(location.coordinate.latitude, location.coordinate.longitude)
            }
        }
    }
    //描画メソッド実行時の呼び出しメソッド
    func mapView(_ mapView: MKMapView, rendererFor overlay: MKOverlay) -> MKOverlayRenderer {
        let myRender = MKPolylineRenderer(overlay: overlay)
        //直線の幅を設定する。
        myRender.lineWidth = 3
        //直線の色を設定する。
        myRender.strokeColor = UIColor.red
        return myRender
    }
}
⒊シミュレータをCity Bicycle Ride(バイセコー)で実行

サイト記事は以上🕺
ブラッシュアップ
今回もここまででやってるから特にないかな💦
と思ったけど、
PINが気になるので〜〜〜
    //アノテーションビューを返すメソッド
    func mapView(_ mapView: MKMapView, viewFor annotation: MKAnnotation) -> MKAnnotationView? {
        let myView = MKPinAnnotationView(annotation: annotation, reuseIdentifier: nil)
        //吹き出しを表示可能にする。
        myView.canShowCallout = true
        return myView
    }
を追加して、、、、

なんか時間帯といい、オイラがApple大学から帰宅してるみたいだね💦
憧れる〜〜〜〜🕺
今回のコード(まとめ)
//現在地表示
class MapPinResidenceViewController: UIViewController, CLLocationManagerDelegate, MKMapViewDelegate{
    @IBOutlet weak var myMapKitView: MKMapView!
    let latitudeDelta = 0.01
    let longitudeDelta = 0.01

    var myManager:CLLocationManager = CLLocationManager()
    //最初からあるメソッド
    override func viewDidLoad() {
        super.viewDidLoad()
        //デリゲート先に自分を設定する。
        myManager.delegate = self
        //位置情報の取得を開始する。
        myManager.startUpdatingLocation()
        //位置情報の利用許可を変更する画面をポップアップ表示する。
        myManager.requestWhenInUseAuthorization()
        //デリゲート先を自分に設定する。
        myMapKitView.delegate = self
    }
    //位置情報取得時の呼び出しメソッド
    func locationManager(_ manager: CLLocationManager, didUpdateLocations locations: [CLLocation]) {
        for location in locations {
            //中心座標
            let center = CLLocationCoordinate2DMake(location.coordinate.latitude, location.coordinate.longitude)
            //表示範囲
            let span = MKCoordinateSpan(latitudeDelta: latitudeDelta, longitudeDelta: longitudeDelta)
            //中心座標と表示範囲をマップに登録する。
            let region = MKCoordinateRegion(center: center, span: span)
            myMapKitView.setRegion(region, animated:true)
            //ピンを作成してマップビューに登録する。
            let annotation = MKPointAnnotation()
            annotation.coordinate = CLLocationCoordinate2DMake(location.coordinate.latitude, location.coordinate.longitude)
            myMapKitView.addAnnotation(annotation)
        }
    }
    //アノテーションビューを返すメソッド
    func mapView(_ mapView: MKMapView, viewFor annotation: MKAnnotation) -> MKAnnotationView? {
        let myView = MKPinAnnotationView(annotation: annotation, reuseIdentifier: nil)
        //吹き出しを表示可能にする。
        myView.canShowCallout = true
        return myView
    }
}

//おもしろトレース
class MapTracingViewController: UIViewController, CLLocationManagerDelegate, MKMapViewDelegate {

    @IBOutlet weak var myMapKitView: MKMapView!
    let latitudeDelta = 0.01
    let longitudeDelta = 0.01

    var myManager:CLLocationManager = CLLocationManager()
    //アノテーション
    var annotation:MKPointAnnotation!
    //最初からあるメソッド
    override func viewDidLoad() {
        super.viewDidLoad()
        //デリゲート先に自分を設定する。
        myManager.delegate = self
        //位置情報の取得を開始する。
        myManager.startUpdatingLocation()
        //位置情報の利用許可を変更する画面をポップアップ表示する。
        myManager.requestWhenInUseAuthorization()
        //デリゲート先を自分に設定する。
        myMapKitView.delegate = self
    }
    //位置情報取得時の呼び出しメソッド
    func locationManager(_ manager: CLLocationManager, didUpdateLocations locations: [CLLocation]) {
        for location in locations {
            //中心座標
            let center = CLLocationCoordinate2DMake(location.coordinate.latitude, location.coordinate.longitude)
            //表示範囲
            let span = MKCoordinateSpan(latitudeDelta: latitudeDelta, longitudeDelta: longitudeDelta)
            //中心座標と表示範囲をマップに登録する。
            let region = MKCoordinateRegion(center: center, span: span)
            myMapKitView.setRegion(region, animated:true)
            if(annotation == nil) {
                //初回はマップにピンを格納する。
                annotation = MKPointAnnotation()
                annotation.coordinate = CLLocationCoordinate2DMake(location.coordinate.latitude, location.coordinate.longitude)
                myMapKitView.addAnnotation(annotation)
            } else {
                //2回目以降は移動前と後の座標間に直線を引く。
                //始点と終点の座標
                var lineLocation:[CLLocationCoordinate2D] = [
                    CLLocationCoordinate2D(
                        latitude: annotation.coordinate.latitude,
                        longitude: annotation.coordinate.longitude),
                    CLLocationCoordinate2D(
                        latitude: location.coordinate.latitude,
                        longitude: location.coordinate.longitude
                    )
                ]
                //2点間に直線を描画する。
                let line = MKPolyline(coordinates: &lineLocation, count: 2)
                myMapKitView.addOverlay(line)
                //ピンの位置を更新する。
                annotation.coordinate = CLLocationCoordinate2DMake(location.coordinate.latitude, location.coordinate.longitude)
            }
        }
    }
    //描画メソッド実行時の呼び出しメソッド
    func mapView(_ mapView: MKMapView, rendererFor overlay: MKOverlay) -> MKOverlayRenderer {
        let myRender = MKPolylineRenderer(overlay: overlay)
        //直線の幅を設定する。
        myRender.lineWidth = 3
        //直線の色を設定する。
        myRender.strokeColor = UIColor.red
        return myRender
    }
    //アノテーションビューを返すメソッド
    func mapView(_ mapView: MKMapView, viewFor annotation: MKAnnotation) -> MKAnnotationView? {
        let myView = MKPinAnnotationView(annotation: annotation, reuseIdentifier: nil)
        //吹き出しを表示可能にする。
        myView.canShowCallout = true
        return myView
    }
}
Apple公式
さて、次回は
をレッツゴする🕺
この記事が気に入ったらサポートをしてみませんか?