Beebotteを使ってLINEメッセージでLEDをON/OFFする(その4)LINEリッチメニューからESP32のLEDを点灯

今日はRaspberryPiの部分をESP32に替えてみます!💪
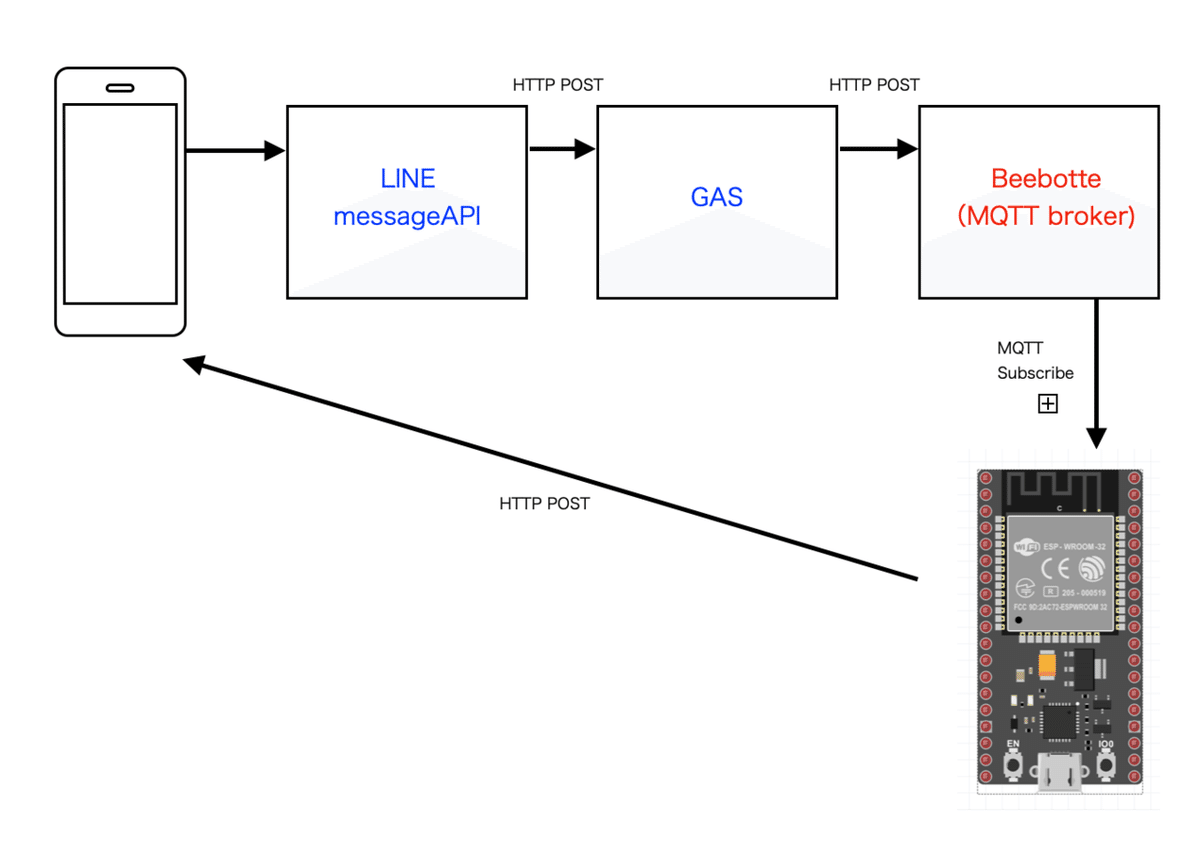
イメジージはこんな感じです。
これまでの話が分からない人は下記を参考に!
LINE MessageAPIの設定、GASのAPI、Beebotteの設定は変えてません。
早速プログラムです。
#include <WiFi.h>
#include <WiFiClientSecure.h>
#include <HTTPClient.h>
#include <PubSubClient.h>
#include <Arduino_JSON.h>
#define OnB_LED 4
JSONVar obj1;
   // WiFi
   const char ssid[] = "your ssid";
   const char passwd[] = "your password";
   // Pub/Sub
   const char* mqttHost = "mqtt.beebotte.com"; // MQTTのIPかホスト名
   const int mqttPort = 1883;       // MQTTのポート
   const char* mqttUser = "token_xxxxxxxxxxxx";
   const char* mqttPassword = "";
   int qos =0;
  WiFiClient wifiClient;
  PubSubClient mqttClient(wifiClient);
   const char* topic =  "lineChatBot/message";     // リクエストするトピック名
   char* payload;                   // 受信データ
   /**
    * Connect WiFi
    */
   void connectWiFi()
   {
       WiFi.begin(ssid, passwd);
       Serial.print("WiFi connecting...");
       while(WiFi.status() != WL_CONNECTED) {
           Serial.print(".");
           delay(100);
       }
       Serial.print(" connected. ");
       Serial.println(WiFi.localIP());
   }
   /*line Message*/
   int lineSend(String replyToken,String message) {

     //String rToken = replyToken.substring(1,replyToken.length()-1);
     Serial.println(replyToken);

    const char* host = "api.line.me";
    const char* URL = "https://api.line.me/v2/bot/message/reply";
    const char* token = "Bearer xxxxxxxxxxxxxxxxxxxxxxxxxxxxxxxxxxxxx";
    String query = "{\"replyToken\":" + replyToken +",\"messages\":[{\"type\":\"text\",\"text\":\"" + message + "\"}]}";
    Serial.println(query);
    const char* body = query.c_str();

    HTTPClient http;
    http.begin(URL);
    http.addHeader("Content-Type","application/json; charset=UTF-8");
    http.addHeader("Authorization",token);
    int status_code = http.POST((uint8_t*)body, strlen(body));
    Serial.printf("status_code=%d\r\n", status_code);
    http.end();
    return(1);
   }
   /**
    * Connect MQTT
    */
    void callback(char* topic, byte* payload, unsigned int length)
  {
   char td[length+1];

    Serial.print("Message arrived in topic: ");
    Serial.println(topic);
    Serial.print("Message:");
  for (int i = 0; i < length; i++)
  {
    td[length] ='\0';
    td[i] = (char)payload[i];
  }
   Serial.println(td);
   Serial.println("-----------------------");
   obj1=JSON.parse(td);
    String result = JSON.stringify(obj1["data"][0]["MESG"]);
    String replytoken = JSON.stringify(obj1["data"][0]["TOKEN"]);
    Serial.println(result);


    if(result.equals("\"LED OFF\"")){
                digitalWrite(OnB_LED, LOW);

    }
    if(result.equals("\"LED ON\"")){
                digitalWrite(OnB_LED, HIGH);
    }
    lineSend(replytoken,"hello esp32");

 }
   void connectMqtt()
   {
       mqttClient.setServer(mqttHost, mqttPort);
       mqttClient.setCallback(callback);
       Serial.println("Connecting to MQTT...");

       while( ! mqttClient.connected() ) {

           if (mqttClient.connect("ESP32Client", mqttUser, mqttPassword )) {
               Serial.println("connected");
           }
           delay(1000);
   }

        mqttClient.subscribe(topic);
}
   void setup() {
       Serial.begin(115200);
       pinMode(OnB_LED, OUTPUT);

       // Connect WiFi
       connectWiFi();
       // Connect MQTT
       connectMqtt();

   }
   void loop() {
       delay(100);
       mqttClient.loop();
   }
今回はHTTPclient.hのライブラリーを使いました。
RaspberryPiのプログラム同様、MQTTにSubscribeされたreplyTokenを利用してLINEのMessageAPIにhttp:postでデータを送っています。
送信するbodyの部分はバイナリーデータになるので、String型で送信フォーマットとなるデータを作成しc_str()関数を使って格納されているデータのポインタを取り出し(uint8_t*)でバイナリーデータとして送信しています。
String query = "{\"replyToken\":" + replyToken +",\"messages\":[{\"type\":\"text\",\"text\":\"" + message + "\"}]}";
Serial.println(query);
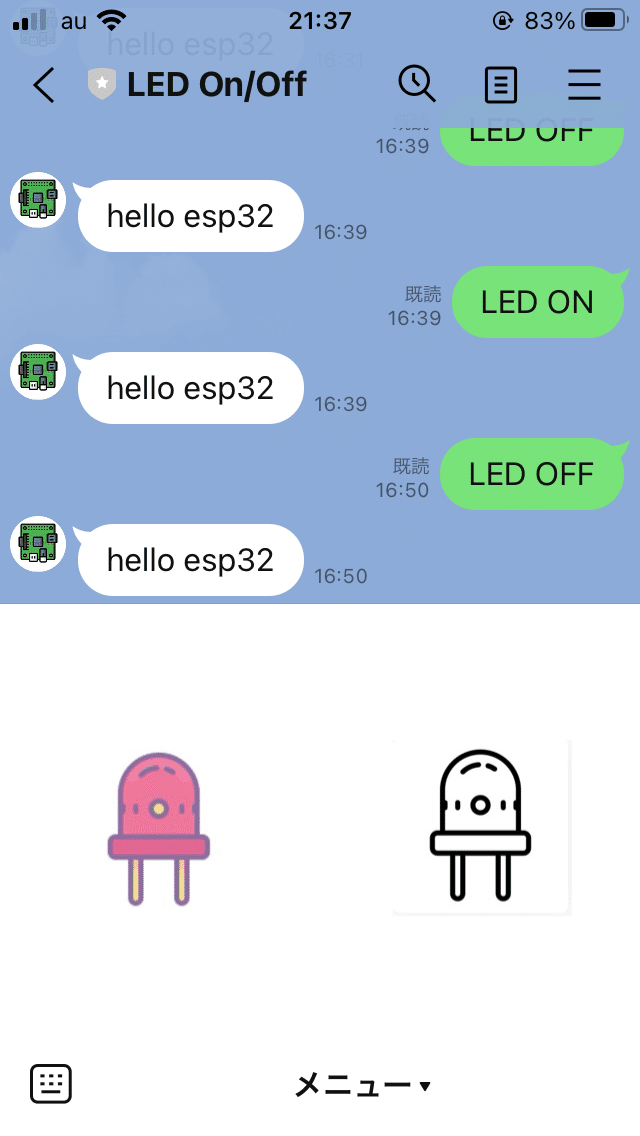
const char* body = query.c_str();int status_code = http.POST((uint8_t*)body, strlen(body));LINEの画面はこんな結果になりました。💯
ところで今回気がついたのですが、ESP32のJSONライブラリーは、テキストデータを取り出すと ”” 付きになるようですね。今回点灯判断の判断文を ”” 付きになったのもそのためです。
if(result.equals("\"LED OFF\"")){
                digitalWrite(OnB_LED, LOW);
    }
ちなみにsubstringを使って下記のような処理をすれば簡単に消せますが。
String rToken = replyToken.substring(1,replyToken.length()-1);今回、ESP32でも簡単に動かせそうなことが分かりました。💮
常時稼働させるなら、消費電力の少ないESP32ですかね。😃
ESP32で動くということは、当然M5stackでも動きますよ!
では🤚
この記事が気に入ったらサポートをしてみませんか?