
【Unityメモ】FlyWeightの使い方

どうもマカロンです。
新しい取り組みとして技術的な部分を未来の自分のためにnoteにまとめていきたいと思います。
なので記事自体はすごく短くなりますが、逆に単的に一つのものについて書いていくので「これってどうだっけ?」みたいなピンポイントで思い出したいときとかの需要はあるかもです。
また僕が勉強が苦手なのもあって、できるだけわかりやすく丁寧に(書こうとは思っているので初心者の方のお役には立てるかもです。
概要
今回はデザインパターンの一つであるFlyWeightを実装していきます。
単的に説明するとこれは
「データを再利用してメモリーの消費を抑える」ためのものです。
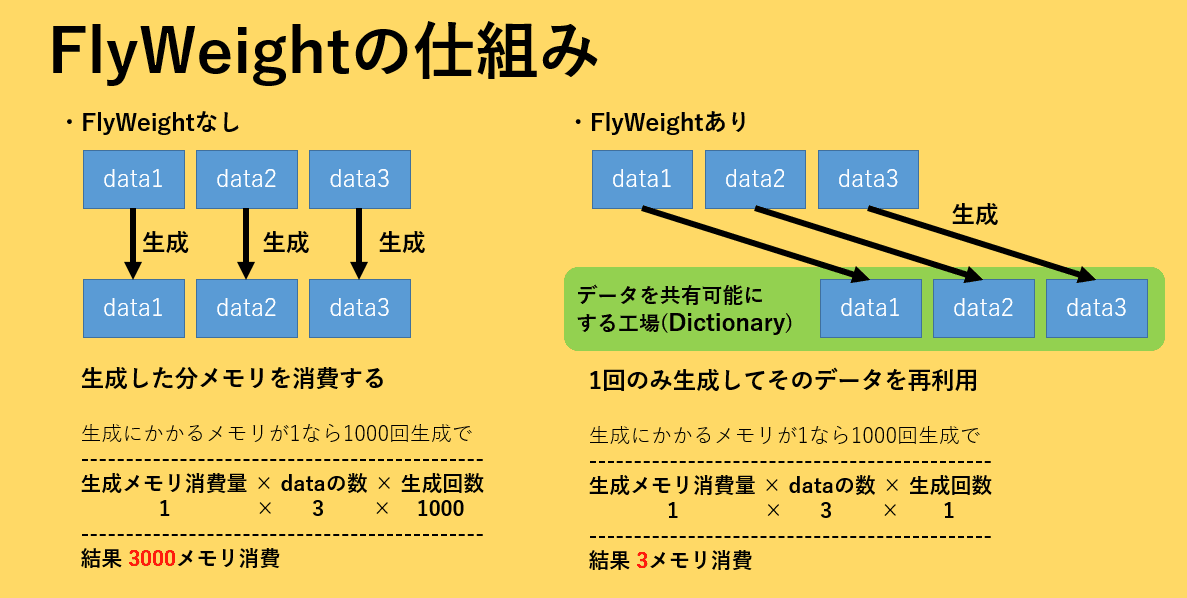
こんな感じのイメージで一度生成したものを工場で再利用可能にしてそれを利用することでメモリの消費を大幅に抑えることが出来ます。
※実際はメモリ消費量がこんなに簡単な仕組みではないので図のようなきれいな値になるわけではありません。
参考リンク
前回に引き続きこの方の記事から僕なりに解釈したものを載せて行きます。
ぜひ先にリンク先をチェック!
未来の自分へ解説
using System.Collections.Generic;
using UnityEngine;

public class TestCode : MonoBehaviour
{
   public interface Monster
   {
       void NameLog();
   }

   class Slime : Monster
   {
       int[] a = new int[1000];
       public void NameLog()
       {
           Debug.Log("スライム");
       }
   }
   class Dragon : Monster
   {
       int[] a = new int[1000];
       public void NameLog()
       {
           Debug.Log("ドラゴン");
       }
   }
   class Golem : Monster
   {
       int[] a = new int[1000];
       public void NameLog()
       {
           Debug.Log("ゴーレム");
       }
   }

   class PictureBook
   {
       private Dictionary<string, Monster> monsters = new Dictionary<string, Monster>();

       public PictureBook()
       {
           //共有化させたいオブジェクトを追加
           monsters.Add("Slime", new Slime());
           monsters.Add("Dragon", new Dragon());
           monsters.Add("Golem", new Golem());
       }
       public Monster GetMonster(string name)
       {
           return monsters[name];
       }
   }

   // Start is called before the first frame update
   void Start()
   {
       Loop(1);
       Loop(10);
   }

   void Loop(int number)
   {
       //FlyWeight適用前の処理
       long before_memory = System.GC.GetTotalMemory(false);
       Monster monster = null;

       for (int i = 0; i < number; i++)
       {
           monster = new Dragon();
           monster.NameLog();

           monster = new Golem();
           monster.NameLog();

           monster = new Slime();
           monster.NameLog();
       }
       long after_memory = System.GC.GetTotalMemory(false);
       long use_memory = after_memory - before_memory;
       Debug.Log("使用メモリ" + use_memory);


       //FlyWeight適用後の処理
       long before_memory2 = System.GC.GetTotalMemory(false);
       PictureBook pictureBook = new PictureBook();
       Monster monster2 = null;
       for (int j = 0; j < number; j++)
       {
           monster2 = pictureBook.GetMonster("Dragon");
           monster2.NameLog();

           monster2 = pictureBook.GetMonster("Golem");
           monster2.NameLog();

           monster2 = pictureBook.GetMonster("Slime");
           monster2.NameLog();
       }
       long after_memory2 = System.GC.GetTotalMemory(false);
       long use_memory2 = after_memory2 - before_memory2;
       Debug.Log("使用メモリ" + use_memory2);
   }
}メモリの差をわかりやすく確認するためにinterfaceで親クラス、子クラスの関係を作ります。
int[] a = new int[1000];
さらに子クラスの中に無駄なデータを用意しておきます。
これで下準備は完了です、次は工場の部分についてです。
   class PictureBook
   {
       private Dictionary<string, Monster> monsters = new Dictionary<string, Monster>();

       public PictureBook()
       {
           //共有化させたいオブジェクトを追加
           monsters.Add("Slime", new Slime());
           monsters.Add("Dragon", new Dragon());
           monsters.Add("Golem", new Golem());
       }
       public Monster GetMonster(string name)
       {
           return monsters[name];
       }
}こここではDictionaryを使用してデータの再利用を可能にします。
またGetMonsterで名前から子クラスを特定できるようにします。
最後に呼び出し部分について
   void Loop(int number)
   {
       //FlyWeight適用前の処理
       long before_memory = System.GC.GetTotalMemory(false);
       Monster monster = null;

       for (int i = 0; i < number; i++)
       {
           monster = new Dragon();
           monster.NameLog();

           monster = new Golem();
           monster.NameLog();

           monster = new Slime();
           monster.NameLog();
       }
       long after_memory = System.GC.GetTotalMemory(false);
       long use_memory = after_memory - before_memory;
       Debug.Log("使用メモリ" + use_memory);


       //FlyWeight適用後の処理
       long before_memory2 = System.GC.GetTotalMemory(false);
       PictureBook pictureBook = new PictureBook();
       Monster monster2 = null;
       for (int j = 0; j < number; j++)
       {
           monster2 = pictureBook.GetMonster("Dragon");
           monster2.NameLog();

           monster2 = pictureBook.GetMonster("Golem");
           monster2.NameLog();

           monster2 = pictureBook.GetMonster("Slime");
           monster2.NameLog();
       }
       long after_memory2 = System.GC.GetTotalMemory(false);
       long use_memory2 = after_memory2 - before_memory2;
       Debug.Log("使用メモリ" + use_memory2);
}上半分はFlyWeight適用前、下半分はFlyWeight適用後の処理になります。
適用前は
monster = new Dragon();
がループの中に入っていて毎回新しいクラスを生成しています。
しかし適用後は
monster2 = pictureBook.GetMonster("Dragon");
といった感じで生成済みのクラスを参照して再利用しています。
データの比較
さあデータ比較です。結果を見ていきましょう!
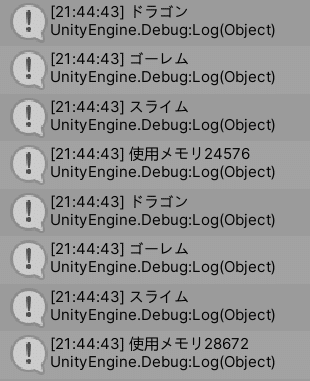
上4つが適用前、下4つが適用後です。
一度のみの処理だと工場を経由した適用後の方が処理は当然増えますがこのデザインパターンは複数の生成の最適化が目的なので次はループを10回した方のデータを見ていきましょう。
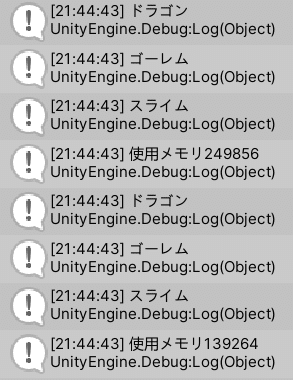
上4つが適用前、下4つが適用後です。
10回ループした際の結果です。
先ほどの上のメモリが24576だったことからそれが10回ループされ、ほぼ10倍に近い値になっていることがわかります。
それに対して下のメモリは139264です。
・適用前ループ10回 249856
・適用後ループ10回 139264
ということで10万近くのメモリを抑えることに成功しています。
こんな感じでデータの消費を抑えることが出来ました。
終わりに
なんか理解の仕方が大きく間違っていたら先人の知恵でご指摘いただければと思います。
ゲームを作るにはやはりお金がないとできることが限られてしまいます。なのでよろしければどうか支援してくださるとうれしいです