【Unityメモ】get setの使い方

どうもマカロンです。
新しい取り組みとして技術的な部分を未来の自分のためにnoteにまとめていきたいと思います。
なので記事自体はすごく短くなりますが、逆に単的に一つのものについて書いていくので「これってどうだっけ?」みたいなピンポイントで思い出したいときとかの需要はあるかもです。
また僕が勉強が苦手なのもあって、できるだけわかりやすく丁寧に(書こうとは思っているので初心者の方のお役には立てるかもです。
概要
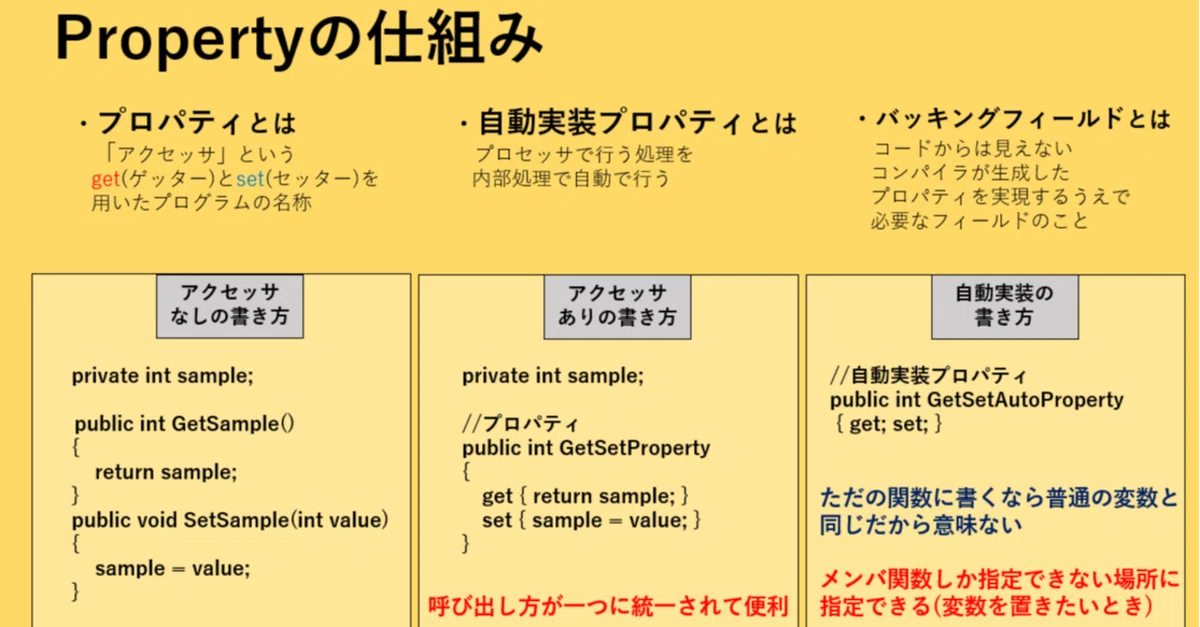
get,setのことをアクセッサと呼び、これを実装したプログラムをプロパティといいます。
この記事では
・プロパティの使い方
・自動実装プロパティの誤った使い方
・自動実装プロパティの正しい使い方
の3点について書きたいと思います。
参考記事
プロパティの使い方
・目的
外部から直接も元々の変数をいじれないようにするために実装する
int GetHoge()
void SetHoge(int hoge)
みたいな宣言を簡略化することが出来ます。
・実装
適用前の書き方です。
using UnityEngine;

public class Sample
{
   private int sample;

   public int GetSample()
   {
       return sample;
   }
   public void SetSample(int value)
   {
       sample = value;
   }
}

public class SampleGetSet : MonoBehaviour
{
   // Start is called before the first frame update
   void Start()
   {
       Sample sample = new Sample();

       sample.SetSample(10);

       int a = sample.GetSample();
   }
}
これはaという変数にsampleで設定した値を代入するプログラムです。
そして適用後です。
using UnityEngine;

public class Sample
{
   private int sample;

   //プロパティ
   public int GetSetProperty
   {
       get { return sample; }
       set { sample = value; }
   }
}

public class SampleGetSet : MonoBehaviour
{
   // Start is called before the first frame update
   void Start()
   {
       Sample sample = new Sample();

       sample.GetSetProperty = 10;

       int a = sample.GetSetProperty;
   }
}
はい、完成です。
・解説
まず特徴としてさっきはGetとSetの2つを用意していた関数が合体して一つの関数になっています。
さらに呼び出す際に先ほどは
・sample.SetSample(10);
・int a = sample.GetSample();
と代入と呼び出しで別々の書き方をしなくてはいけなかったですが、
プロパティで書くことで
・sample.GetSetProperty
という一つの書き方で代入と呼び出しができるようになりました。
自動実装プロパティの誤った使い方
続いて先ほどのプロパティを自動実装プロパティに書き換えていきます。
・実装
using UnityEngine;

public class Sample
{
   //自動実装プロパティ
   public int GetSetAutoProperty { get; set; }
}

public class SampleGetSet : MonoBehaviour
{
   // Start is called before the first frame update
   void Start()
   {
       Sample sample = new Sample();

       sample.GetSetAutoProperty = 10;

       int a = sample.GetSetAutoProperty;
   }
}
さらにget,setを簡略化し、変数までもいらなくなりました。
ちなみにコードからは見えない、コンパイラが生成した、プロパティを実現するうえで必要なフィールドのことをバッキングフィールドといいます。
・問題点
しかしここで問題が生じます。
プロパティのそもそもの目的は「外部から直接も元々の変数をいじれないようにするために実装の簡略化」でした。
変数すらなくなった自動実装プロパティではその優位性が完全に失われてしまいます。なので今回コードを自動生成プロパティに書き換えるのは間違った例です。
自動実装プロパティの正しい使い方
正しい使い方の一例としてここではinterfaceに使用してみます。
・目的
interfaceはメンバー関数しか登録できないので変数を置くことが出来ませんがプロパティを利用することで登録することが可能になります。
しかし、通常のプロパティだと無駄に変数を用意することになるのでここで自動実装プロパティの出番です!
・実装例
using UnityEngine;

public interface Sample
{
   //自動実装プロパティ
   int GetSetAutoProperty { get; set; }
}

public class Test1 : Sample
{
   public int GetSetAutoProperty { get; set; } = 10;
}
public class Test2 : Sample
{
   public int GetSetAutoProperty { get; set; } = 20;
}

public class SampleGetSet : MonoBehaviour
{
   // Start is called before the first frame update
   void Start()
   {
       Sample test1 = new Test1();
       Sample test2 = new Test2();

       int a;

       a = test1.GetSetAutoProperty;
       Debug.Log(a);
       a = test2.GetSetAutoProperty;
       Debug.Log(a);
       a = test1.GetSetAutoProperty + test2.GetSetAutoProperty;
       Debug.Log(a);
       test2.GetSetAutoProperty = a;
       a = test1.GetSetAutoProperty + test2.GetSetAutoProperty;
       Debug.Log(a);
   }
}
Test1とTest2で違う値を初期値として代入でき、aに値を代入したり、aの値に更新したりできます。
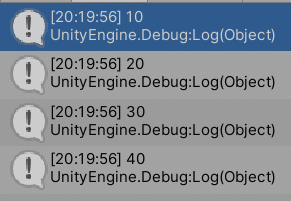
実行結果はこうなります。
PR
まとめ
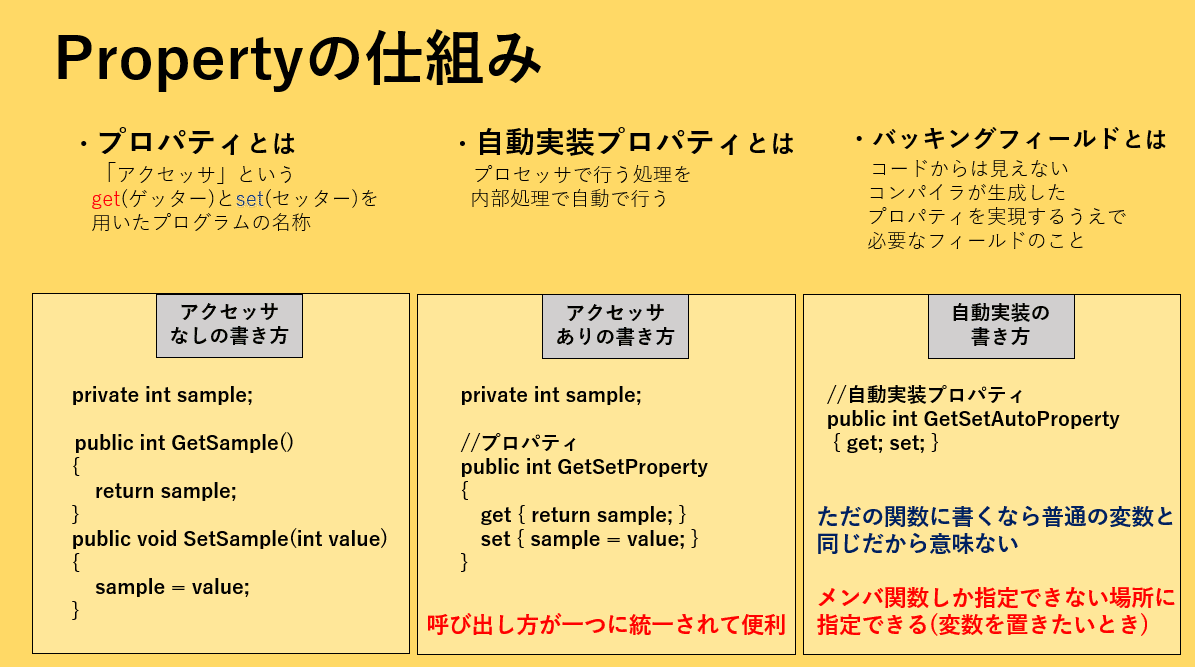
要はこういうことです(バァーン!)
ちなみにこれを作りながら僕も習得したので3時間半くらいかかりました笑
皆様のお役に立てたら幸いです。
ではまた!
ゲームを作るにはやはりお金がないとできることが限られてしまいます。なのでよろしければどうか支援してくださるとうれしいです