
[Shopify]商品一覧の商品表示部分を可愛くアレンジ(Dawn)69/100

こんにちは。Shopify専門エンジニアのまりん(@crowd37cord)です。
通常の商品一覧とは別に3〜5商品を特集商品として紹介するのを想定したコレクション用のセクションを作ってみました♪
対象テーマ:Dawn
Dawnでもバージョンによってレイアウト崩れるかも!
その際は調整してご使用ください。
✔️今日のゴール
デモ
①デモページアクセス(PW:stahsk40jw1Mf)
②このコレクションのみに設定してます
赤枠箇所のコレクション一覧のセクションを作ります

◆CMSの特徴
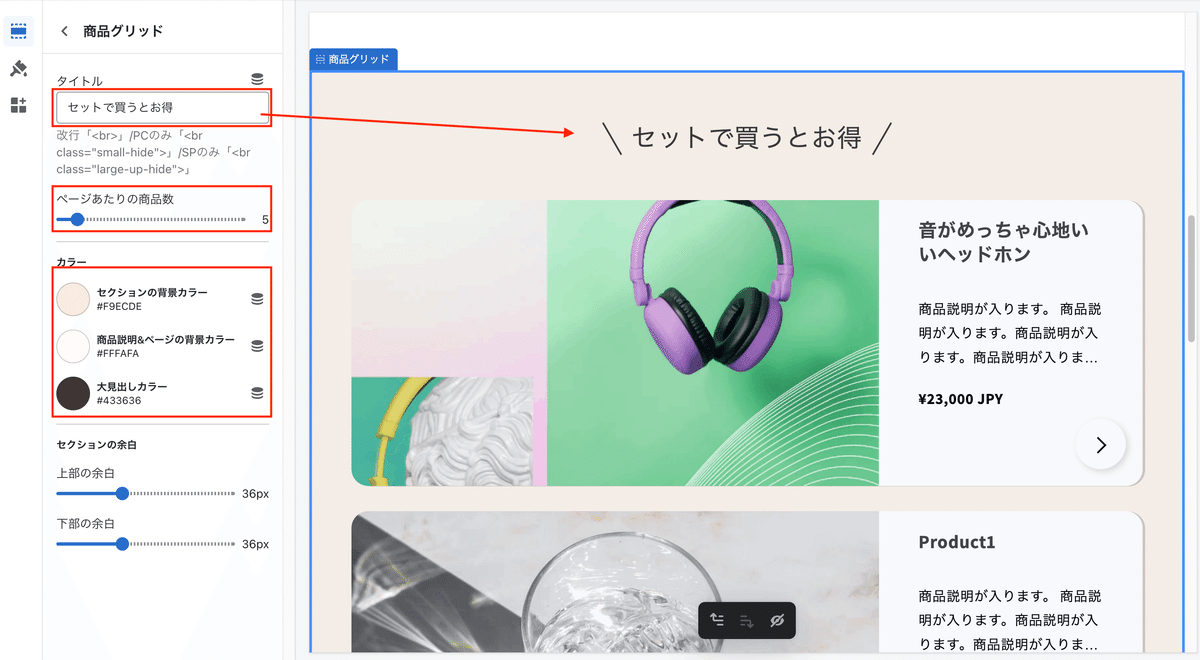
タイトル
商品表示数
カラー各種
余白
3カラムのセクションは前回作成したのを使用しています。
✔️設置方法
Step1 新規セクション追加
管理画面>テーマ>コード編集>セクション>新規追加
ファイル名はcollection-cuteで作成します!
コレクション一覧のテンプレートは前回作成したCuteを使用しようかと思います。
新規セクションファイルを追加できたらまずはSchemaを挿入
◆Schemaのコード
{% schema %}
{
  "name": "t:sections.main-collection-product-grid.name",
  "class": "section",
  "settings": [
    {
        "type": "text",
        "id": "title",
        "default": "ここにタイトルを入れてね",
        "label": "タイトル",
        "info": "改行「<br>」/PCのみ「<br class=\"small-hide\">」/SPのみ「<br class=\"large-up-hide\">」"
    },
    {
      "type": "range",
      "id": "products_per_page",
      "min": 1,
      "max": 50,
      "step": 1,
      "default": 5,
      "label": "t:sections.main-collection-product-grid.settings.products_per_page.label"
    },
    {
      "type": "header",
      "content": "カラー"
    },
    {
        "type": "color",
        "id": "color_bk",
        "default": "#dedede",
        "label": "セクションの背景カラー"
    },
    {
        "type": "color",
        "id": "color_card",
        "default": "#fff",
        "label": "商品説明&ページの背景カラー"
    },
    {
        "type": "color",
        "id": "color_h2",
        "default": "#212529",
        "label": "大見出しカラー"
    },
    {
        "type": "header",
        "content": "t:sections.all.padding.section_padding_heading"
      },
      {
        "type": "range",
        "id": "padding_top",
        "min": 0,
        "max": 100,
        "step": 4,
        "unit": "px",
        "label": "t:sections.all.padding.padding_top",
        "default": 36
      },
      {
        "type": "range",
        "id": "padding_bottom",
        "min": 0,
        "max": 100,
        "step": 4,
        "unit": "px",
        "label": "t:sections.all.padding.padding_bottom",
        "default": 36
      }

  ]
}
{% endschema %}
HTMLを追記する前に、テンプレートJSONに紐づけるのを忘れていたのでこのセクションファイルを追記しておきます。
Step2 テンプレートJSONファイルにStep1のセクションファイルを追記
私は前回作成したcollection.cute.jsonファイルを編集します。ここはお好みのテンプレートファイルを編集でOKです。
ちょうどproduct-gridというところがあったので不要なところを削除してtypeに先ほどStep1で作成したセクションファイル名を差し替えておきます。
    "product-grid": {
      "type": "collection-cute"
    },
これで準備完了です!
ここで一度CMSを見てみます。
商品グリッドのセクションが追加されていましたね♪
私はテンプレートを編集しましたが、ややこしければ、テンプレートのJSONファイルに入れなくてもCMSからセクション追加から商品グリッドを選択しても挿入できると思います^^
Step3 HTMLを追記
下記のコードをコピペ
◆HTML
<div class="malin__collection_cute malin__collection-{{ section.id }} section-{{ section.id }}-padding" style="background-color:{{ section.settings.color_bk }}">
  {% comment %} Sort is the first tabbable element when filter type is vertical {% endcomment %}

  <div class="page-width">
    <div class="malin__heading"><h2 style="color:{{ section.settings.color_h2 }}">{{ section.settings.title }}</h2></div>
      {%- paginate collection.products by section.settings.products_per_page -%}
            <ul id="product-grid" data-id="{{ section.id }}">
              {%- for product in collection.products -%}
                <a href="{{ product.url }}">
                    <li class="malin__product-grid malin__card" style="background-color: {{ section.settings.color_card }};">

                            <div class="grid__item-col2three">
                                <img
                                srcset="{{ product.featured_media | image_url }}"
                                src="{{ product.featured_media | image_url: 'master' }}"
                                alt="{{ product.featured_media.alt | escape }}"
                                loading="lazy"
                                >
                            </div>
                            <div class="grid__item-col1three txt__feild">
                                <h3>{{ product.title | escape }}</h3>
                                <p>{{ product.description | truncate: 100 }}</p>
                                <p class="txt__feild-price">{{ product.price | money_with_currency }}</p>
                            </div>
                            <div class="arrow_t"></div>
                            <div class="malin__arrow">
                                <span class="arrow"></span>
                            </div>
                    </li>
                </a>
              {%- endfor -%}
            </ul>

            {%- if paginate.pages > 1 -%}
              {% render 'pagination', paginate: paginate, anchor: '' %}
            {%- endif -%}

      {%- endpaginate -%}
  </div>
</div>
管理画面でコレクションに商品を指定していなかったので対象商品を選択しておきます。
うまく反映されました。
あとはレイアウトを調整します。
Step4 CSSファイルを新規作成しコードをコピペ
アセット>新規追加
ファイル名はcollection-cute.cssで作成します。
下記のCSSコードをコピペ。
【ご注意】
※返金&サポートはしておりません。
※最新のDawnテーマ対象です。
別テーマでも使用できるかもしれませんが検証はしてません。
※コードのみのご紹介で解説などはしておりません。
※2022.12.25時点のコードです。メンテナンスは今後する予定はありません。
※環境によりレイアウト崩れることもありますので適当にCSSで調整していただければと思います。
ここから先は
この記事が参加している募集
この記事が気に入ったらサポートをしてみませんか?