【Unity】DOPath()の移動ルートをScriptableObjectから取得する方法
ご!ピクジンです。
今回は、シューティングゲームの敵の移動パターンを効率よく作るために考えたことを共有します。
noteに書けることができて内心ウハウハでございます。
今回は(というか今回も)DOTweenを使います。
ScriptableObjectを使う理由
ScriptableObjectについての説明はこちらのサイトでもみてください。
ちょーぜつわかりやすいです。
移動のパターン以外にも敵のHPを個々に設定しておきたかったので、容量節約も兼ねて使用しました。
何よりEnemyMoveクラスに長々と移動パターンを書いていくのは見栄えが悪いし編集もしにくいんです。
DOPath()で移動
まずはDOPathについて軽く説明します。
詳しいことは自分で調べてください。
DOPath(Vector3[] path, float duration, PathType pathType)
pathは移動するルート、durationがTweenの秒数、pathTypeで動き方が決まります。
それを踏まえた上で次のコードを御覧ください。
//敵を移動させるクラス

using System.Collections;
using System.Collections.Generic;
using UnityEngine;
using DG.Tweening;

public class EnemyMove : MonoBehaviour
{
   Sequence moveSq;

   List<Vector3> path;
   float pathTime;

   public void pathSet(List<Vector3> vectors, float time)
   {
       path = vectors;
       pathTime = time;
       enemyMove();
   }

   private void enemyMove()
   {
       Vector3[] movePath = new Vector3[path.Count];
       for(int i = 0; i < path.Count; i++)
       {
           movePath[i] = transform.position + path[i];
       }

       moveSq = DOTween.Sequence()
           .Append(transform.DOPath(
               movePath,
               pathTime,
               PathType.CatmullRom)
           .SetEase(Ease.Linear))
           .OnComplete(() =>
           {
               Destroy(this.gameObject);
           })
           ;

       moveSq.Play();
   }

   public void SqKill()
   {
        moveSq.Kill();

       Destroy(this.gameObject);
   }
}
DOPathの第一引数にList<Vector3>は使えなかったので、配列に直してからDOTweenシーケンスに移っています。
private void enemyMove()
   {
       Vector3[] movePath = new Vector3[path.Count];
       for(int i = 0; i < path.Count; i++)
       {
           movePath[i] = transform.position + path[i];
       }

       moveSq = DOTween.Sequence()
           .Append(transform.DOPath(
               movePath,
               pathTime,
               PathType.CatmullRom)
           .SetEase(Ease.Linear))
           .OnComplete(() =>
           {
               Destroy(this.gameObject);
           })
           ;

       moveSq.Play();
   }
配列に変換する際にtransform.positionを加えてる理由は後で詳しく説明します。
ScriptableObjectで動き方を決める
次に、動きのパターンとかHPを設定できるようにScriptableObjectを用意します。
//敵の情報を格納しておくScriptableObject

using System.Collections;
using System.Collections.Generic;
using UnityEngine;

[CreateAssetMenu(
 fileName = "ParametersList",
 menuName = "ScriptableObject/ParametersList",
 order = 0)
]
public class EnemyParametersList : ScriptableObject
{
   public List<EnemyParameters> enemyParameters = new List<EnemyParameters>();
}

[System.Serializable]
public class EnemyParameters
{
   public string name = "直進";

   public int hp = 1;

   public List<Vector3> movePath = new List<Vector3>();

   public float moveTime = 5.0f;
}
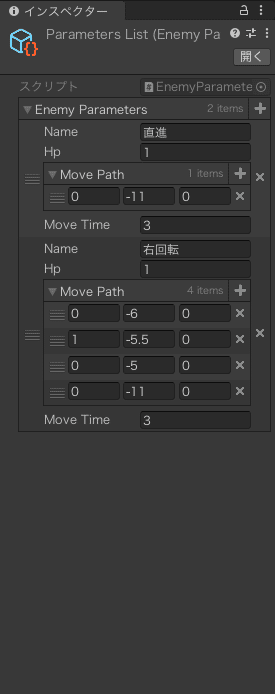
作ったものをResourcesに入れて、いい感じに数値を設定します。
(名前は適当)

movePathには、開始地点を(0,0,0)とした時の移動値だけを入れます。
こうすることで、たとえ生成位置が変わったとしても同じ動きにすることができます。
前章でtransform.positionを加えていたのはこのためです。
さて、今度はこれらを読み込むためのクラスを用意します。
//ScriptableObjectを読み込んで他のクラスに数値を受け渡す

using System.Collections;
using System.Collections.Generic;
using UnityEngine;

public class EnemyManager : MonoBehaviour
{
   EnemyHealth enemyHealth;
   EnemyMove enemyMove;

   [SerializeField]
   int enemyNum = 0;

   private void Awake()
   {
       enemyHealth = GetComponent<EnemyHealth>();
       enemyMove = GetComponent<EnemyMove>();
   }

   void Start()
   {
       EnemyParameters enemyParameter = Resources.Load<EnemyParametersList>("ParametersList").enemyParameters[enemyNum];

       enemyMove.pathSet(enemyParameter.movePath, enemyParameter.moveTime);
       enemyHealth.Enemy_HP = enemyParameter.hp;
   }
}
enemyNumで指定したEnemyParametersを取り出して、他のクラスに数値を渡します。
そしてこうなります。
動画ではenemyNum=1です。
敵を移動させる処理をDOTween.Path()で行う
— ピクジン (@pikuzin24) January 21, 2021
ScriptableObjectでpathを指定しておけばこのようになる、だぜ pic.twitter.com/LBs3E52pW8
なお、Tweenが実行中にオブジェクトをDestroyするとエラーを吐いてしまう(DOTweenはSafeモードがあるので止まらないけど)ため、EnemyHealthでHPが0になった時の処理を変更します。
//敵の体力管理

using System.Collections;
using System.Collections.Generic;
using UnityEngine;

public class EnemyHealth : MonoBehaviour
{
   private float enemy_HP = 1;
   public float Enemy_HP
   {
       set
       {
           enemy_HP = value;
           currentHP = enemy_HP;
       }
   }
   float currentHP = 1;

   EnemyMove enemyMove;

   private void Awake()
   {
       enemyMove = GetComponent<EnemyMove>();
   }

   private void OnTriggerEnter2D(Collider2D collision)
   {
       if (collision.tag != "bullet") return;

       //「collision.gameObject.GetComponent<Bullet>().Attack」は弾の攻撃力
       currentHP = Mathf.Clamp
           (currentHP - collision.gameObject.GetComponent<Bullet>().Attack
           , 0, enemy_HP);
       //enemyMoveで処理中のシーケンスをKillさせる
       if (currentHP <= 0) enemyMove.SqKill();
   }
}
終わり
雑ですがこんな感じです。
このScriptableObject、後々敵のSpriteも格納しておこうと思います。
今は何も用意してないので後ほどね。
次回は敵の生成処理でも作ろうかと思います。
まだちゃんと決めてませんが、おそらくエクセルを引っ張り出すことになるかと思います。
またこんど。
この記事が気に入ったらサポートをしてみませんか?
