
Firebase Cloud Messaging によるメッセージング機能を試す (1)

「Firebase Cloud Messaging」によるメッセージング機能を試したのでまとめました。FirebaseコンソールからiOS端末にメッセージを送信します。
・Xcode 14
・iOS 16
1. Firebase Cloud Messaging
「Firebase Cloud Messaging」(FCM)は、無料で確実にメッセージを通知できるクロスプラットフォームなメッセージング機能です。新規メールやその他のデータを同期できることをクライアントアプリに通知することができます。データ量は、最大4000バイトです。
対象となるクライアントは、次のとおりです。
・iOS
・Android
・Flutter
・C++
・Unity
・Web
2. Firebaseプロジェクトの準備
Firebaseプロジェクトの準備手順は、次のとおりです。
(1) Firebaseのコンソールでプロジェクトを作成。
(2) 「アプリを追加」ボタンを押し、「iOS」を選択。
(3) 「バンドルID」と「アプリのニックネーム」を指定して、「アプリを登録」ボタンを押す。
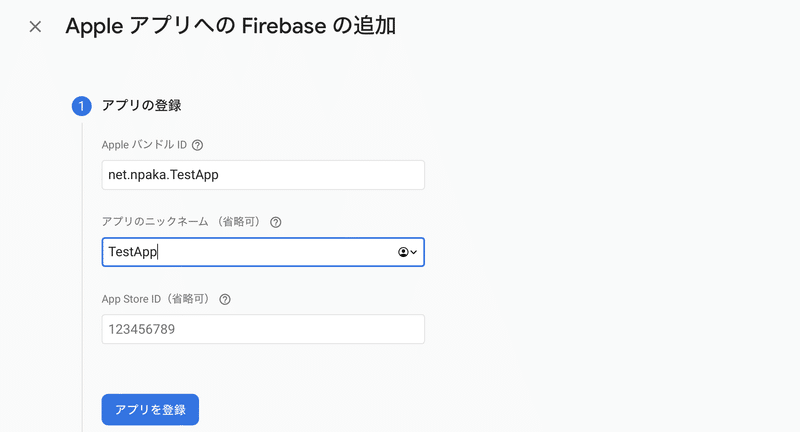
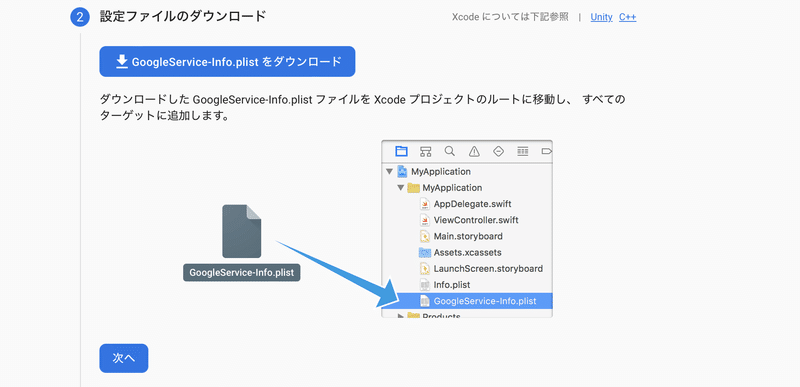
(4) 「GoogleService-Info.plistをダウンロード」ボタンで「GoogleService-Info.plist」ダウンロードし、Xcodeプロジェクトのルートにドラッグ&ドロップして全ターゲットに追加し、「次へ」ボタンを押す。
(5) Xcodeの「PROJECT」の「Package Dependencies」の「+」を押し、右上に以下のURLを入力し、「firebase-ios-sdk」を選択し、「Add Package」ボタンを押す。
https://github.com/firebase/firebase-ios-sdk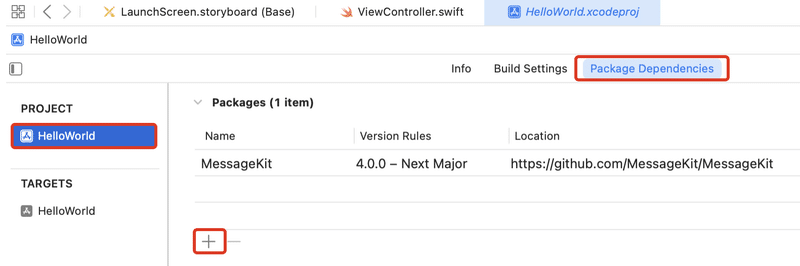
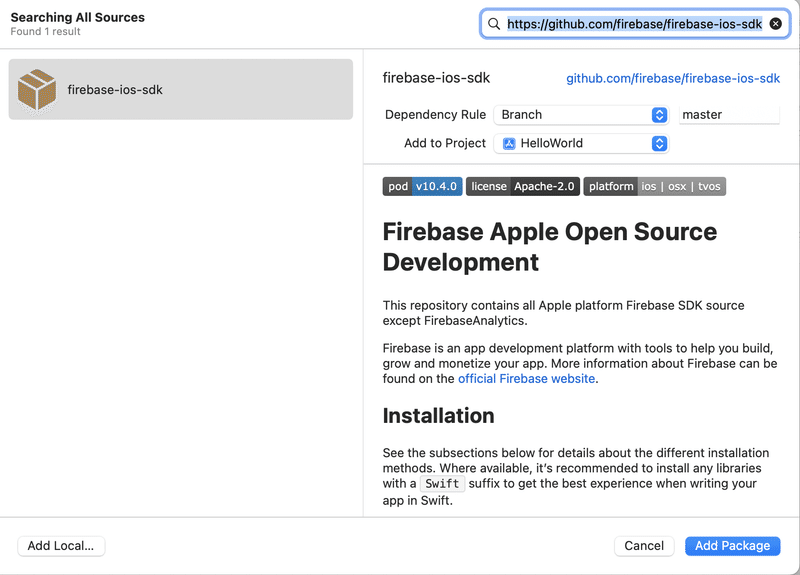
(6) パッケージプロダクトの選択で、「FirebaseAnalytics」と「FirebaseMessaging」を選択し、「Add Package」ボタンを押す

(7) 「AppDelegate.swift」にFirebaseの初期化コードを追加。
import UIKit
import FirebaseCore  // Firebaseのパッケージ宣言も追加

@main
class AppDelegate: UIResponder, UIApplicationDelegate {

    // アプリ起動時に呼ばれる
    func application(_ application: UIApplication,
        didFinishLaunchingWithOptions launchOptions:
        [UIApplication.LaunchOptionsKey: Any]?) -> Bool {

        // Firebaseの初期化コード
        FirebaseApp.configure()
        return true
    }

        :
}
3. APNs認証キーの準備
APNs認証キーの準備手順は、次のとおりです。
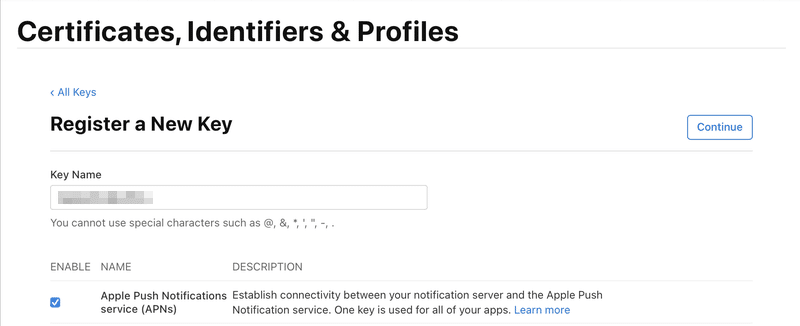
(1) 「Apple Developer」の「Certificates, Identifiers & Profiles」を開く。
(2)「Keys」を選択し、「Create a key」をクリック。
(3) 「Key Name」を入力し、「Apple Push Notifications service (APNs)」を選択し、「Continue」ボタンを押す。
(4) 「Register」ボタンを押し、「Download」ボタンを押す。
ANPs認証キーがダウンロードされます。キーの再ダウンロードはできません。
4. FirebaseへのAPNsキーの登録
FirebaseへのAPNsキーの登録の手順は、次のとおりです。
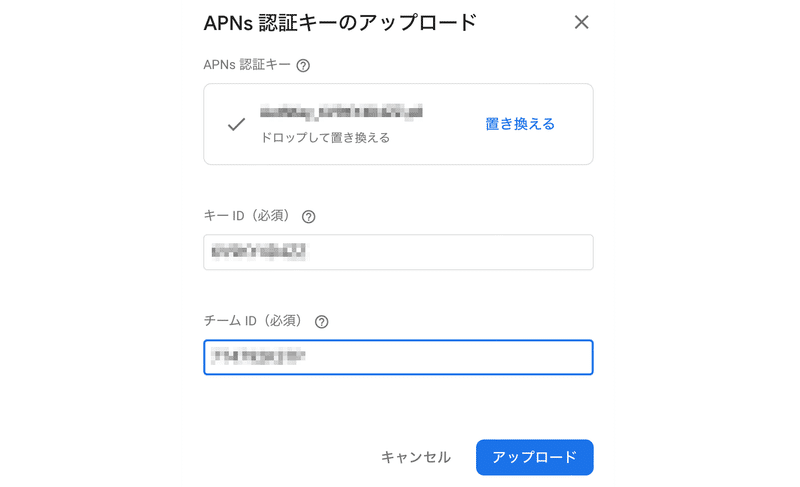
(1) Firebaseプロジェクトの歯車アイコンをクリックし、「プロジェクトの設定」を選択し、「Cloud Messaging」タブを選択。
(2) 「iOSアプリの構成」の「APNs 認証キー」の「アップロード」 ボタンを押す。
(3) 「APIs認証キー」と「キーID」と「チームID」を指定し、「アップロード」ボタンを押す。
「キーID」と「チームID」は、「Apple Developer」で確認できます (?アイコンのリンクから飛べます)。
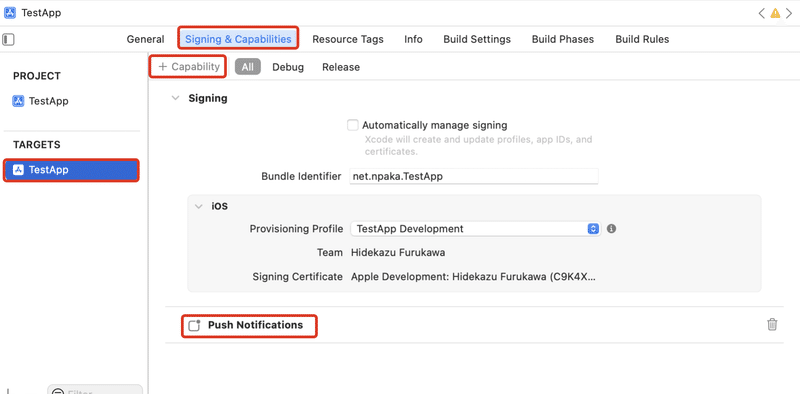
5. Push Notificationの有効化
Push Notificationの有効化の手順は、次のとおりです。
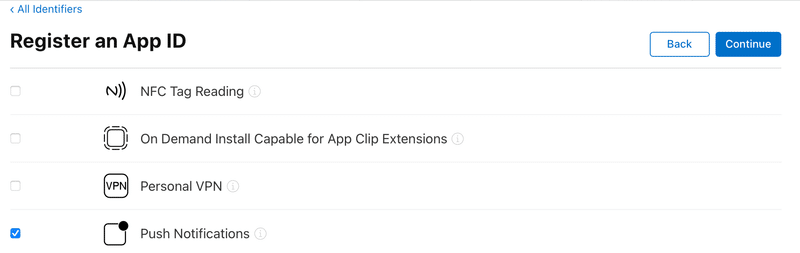
(1) 「Apple Developer」の「Identifiers」で「App ID」を生成する際に、「Push Notifications」を有効化。
Xcodeでビルドする時に、この「App ID」の「Provisioning Profile」を使います。
(2) Xcodeの「Signing & Capabilities」の「+Capabilities」を押し、「Push Notifications」を追加。
(3) AppDelegate.swiftを以下のように編集。
import UIKit
import FirebaseCore
import FirebaseMessaging
import Firebase
import UserNotifications

@main
class AppDelegate: UIResponder, UIApplicationDelegate {

    // アプリ起動時に呼ばれる
    func application(_ application: UIApplication,
        didFinishLaunchingWithOptions launchOptions:
        [UIApplication.LaunchOptionsKey: Any]?) -> Bool {

        // Firebaseの初期化コード
        FirebaseApp.configure()

        // MessagingDelegateの指定
        Messaging.messaging().delegate = self

        // UNUserNotificationCenterDelegateの指定
        UNUserNotificationCenter.current().delegate = self

        // リモート通知の登録
        let authOptions: UNAuthorizationOptions = [.alert, .badge, .sound]
        UNUserNotificationCenter.current().requestAuthorization(
            options: authOptions,
            completionHandler: { _, _ in }
        )
        application.registerForRemoteNotifications()
        return true
    }

    // シーン起動時に呼ばれる
    func application(_ application: UIApplication,
        configurationForConnecting connectingSceneSession:
        UISceneSession, options: UIScene.ConnectionOptions) -> UISceneConfiguration {
        return UISceneConfiguration(name: "Default Configuration",
            sessionRole: connectingSceneSession.role)
    }

    // アプリ終了時に呼ばれる
    func application(_ application: UIApplication,
        didDiscardSceneSessions sceneSessions: Set<UISceneSession>) {
    }
}

// MessagingDelegate
extension AppDelegate: MessagingDelegate {
    // FCMトークン受信時に呼ばれる
    func messaging(_ messaging: Messaging, didReceiveRegistrationToken fcmToken: String?) {
        print("FCMToken: \(String(describing: fcmToken))")
    }
}

// UNUserNotificationCenterDelegate
extension AppDelegate: UNUserNotificationCenterDelegate {
    // フォアグラウンドでの通知受信時に呼ばれる
    func userNotificationCenter(_ center: UNUserNotificationCenter,
        willPresent notification: UNNotification) async
        -> UNNotificationPresentationOptions {
        let userInfo = notification.request.content.userInfo
        print("Receive: \(userInfo)")
        return [[.banner, .list, .sound]]
    }

    // 受信した通知のタップ時に呼ばれる
    func userNotificationCenter(_ center: UNUserNotificationCenter,
        didReceive response: UNNotificationResponse) async {
        let userInfo = response.notification.request.content.userInfo
        print("Tap: \(userInfo)")
    }
}
実行すると、Xcodeのコンソールに「FCM登録トークン」が表示されます。

FCMトークンは、以下のタイミングで更新されます。
・アプリが新しいデバイスで復元される時
・ユーザーがアプリをアンインストール 、再インストールする時
・ユーザーがアプリのデータを消去する時
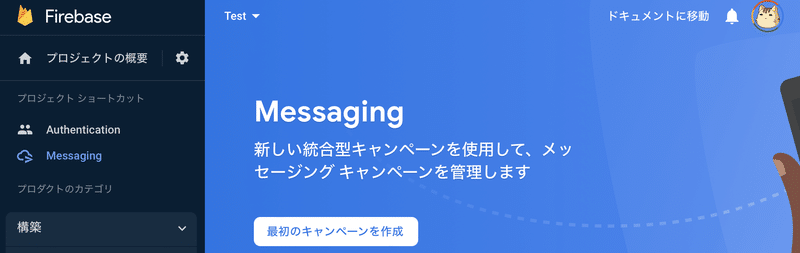
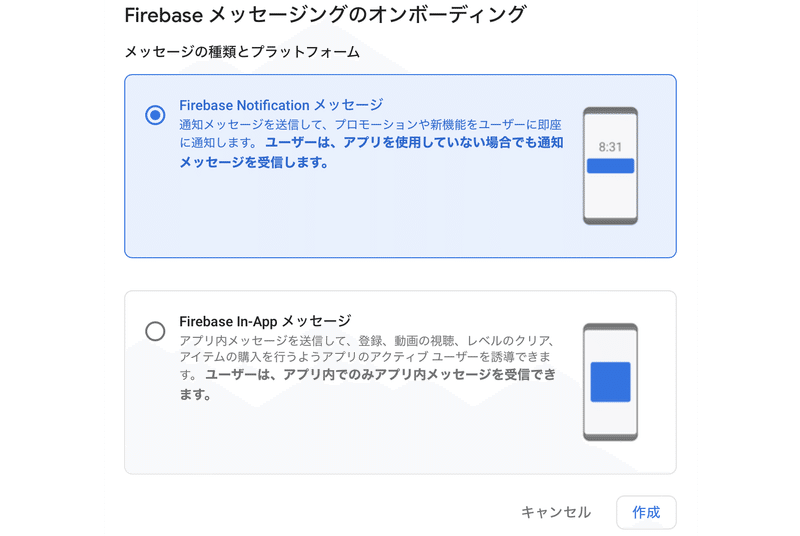
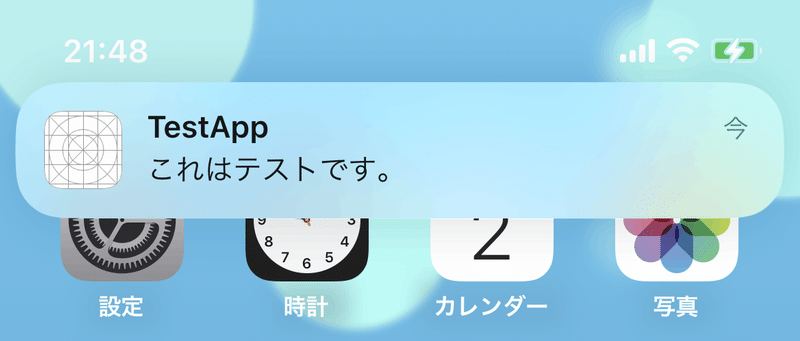
6. テストメッセージの送信
テストメッセージの送信手順は、次のとおりです。
(1) Firebaseプロジェクトの「Messaging」を開き、「最初のキャンペーンを作成」ボタンを押す。
(2) 「Firebase Notification」を選択し、「作成」ボタンを押す。
(3) 「通知テキスト」を指定し、「テストメッセージを送信」ボタンを押す。
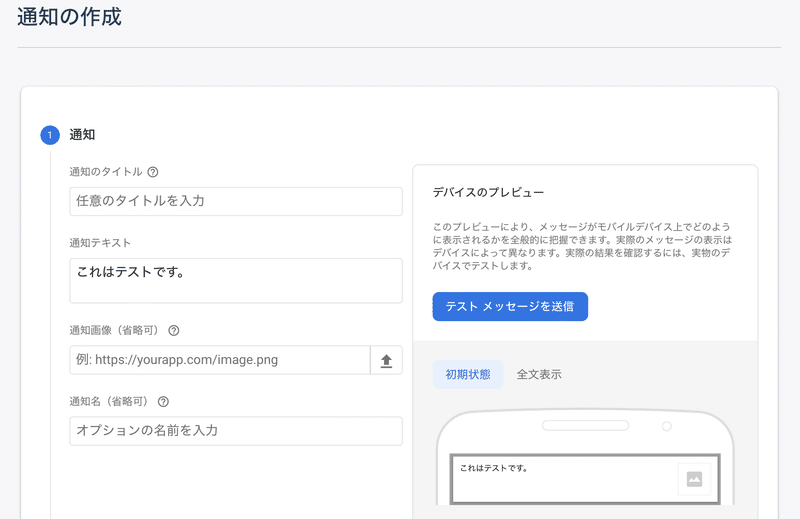
(4) 「FCM登録トークン」を追加して、「テスト」ボタンを押す。
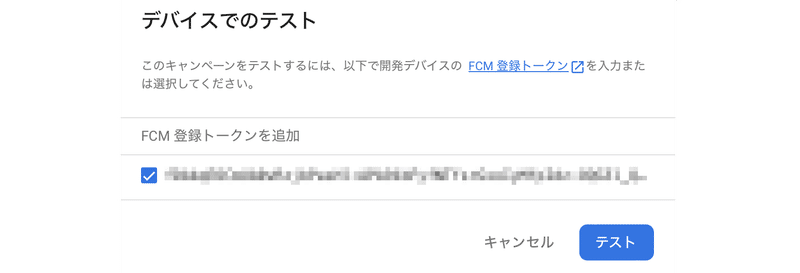
数秒後に通知がくることを確認します。
参考
次回
この記事が気に入ったらサポートをしてみませんか?