
Unity ML-Agents Release 9 のチュートリアル

前回
1. はじめに
「Unity ML-Agents」で、強化学習の学習環境を作成する手順を説明します。ボール(RollerAgent)が立方体(Target)に向かって転がるように訓練する学習環境になります。
今回の学習環境の要素は次のとおりです。
・観察
 ・Vector Observation (サイズ8)
     0 : TargetのX座標
     1 : TargetのY座標
     2 : TargetのZ座標
     3 : RollerAgentのX座標
     4 : RollerAgentのY座標
     5 : RollerAgentのZ座標
     6 : RollerAgentのX速度
     7 : RollerAgentのZ速度
・行動
 ・Continuous (サイズ2)
     0: RollerAgentのX方向に加える力
     1: RollerAgentのZ方向に加える力
・報酬 :
 ・RollerAgentがTargetの位置に到着 : +1.0 (エピソード完了)
 ・RollerAgentが落下 : +0.0 (エピソード完了)
・決定
 ・10フレーム毎
2. 開発環境のインストール
「Unity ML-Agents」に必要な開発ツールは次のとおりです。
・Unity 2018.4以降
・Unity ML-Agents Release 9
・Python 3.7
◎ Unity ML-Agentsのダウンロード
(1) 「Unity ML-Agents」のサイトの「Release 9」の「download」から、ZIPファイルをダウンロード。
(2) Zipファイルを解凍して、フォルダ名を「ml-agents」に変更。
「ml-agents」のフォルダ構成は、次のとおりです。
・com.unity.ml-agentsフォルダ : Unityプラグイン
・ml-agentsフォルダ : 強化学習を行うPythonパッケージ
・ml-agents-envsフォルダ : Unity-Python間のインタフェース
・configフォルダ : 訓練設定ファイル
◎ Pythonの開発環境の準備と仮想環境の作成
◎ ML AgentsのPythonパッケージのインストール
(1) ml-agentsフォルダで以下のコマンドを入力し、Pythonパッケージ「ml-agents-env」「ml-agents」をインストール。
$ pip install -e ./ml-agents-envs
$ pip install -e ./ml-agents【情報】「pip install」で「ERROR: After October 2020 you may...」というエラーが発生したら、以下を参照してください。
・「ERROR: After October 2020 you may...」の回避方法
4. Unity ML-Agentsのプロジェクトの準備
「Unity ML-Agents」のプロジェクトの準備の手順は、次のとおりです。
(1) Unityを起動し、Unityのプロジェクトを「3D」で新規作成。
(2) メニュー「Window → Package Manager」を開き、「+ → Add package from disk」を選択し、「ml-agents/com.unity.ml-agents/package.json」を選択。
5. 学習環境の作成
◎ カメラの位置と向きの調整
(1) Hierarchyウィンドウで「Main Camera」を選択。
(2) Inspectorウィンドウで以下を設定。
Position = (0, 4, -10)
Rotation = (20, 0, 0)
Scale = (1, 1, 1)
◎ マテリアルの作成
(1) Projectウィンドウで「Create → Material」で「Material」を作成し、名前に「Gray」を指定。
(2) 「Gray」を選択し、Inspectorウィンドウの「Main Maps → Albedo」(テクスチャ色)で灰色(168,168,168)を指定。
(3) 同様に茶色(212,154,33)のマテリアル「Brown」と、青色(0,35,255)のマテリアル「Blue」を作成。
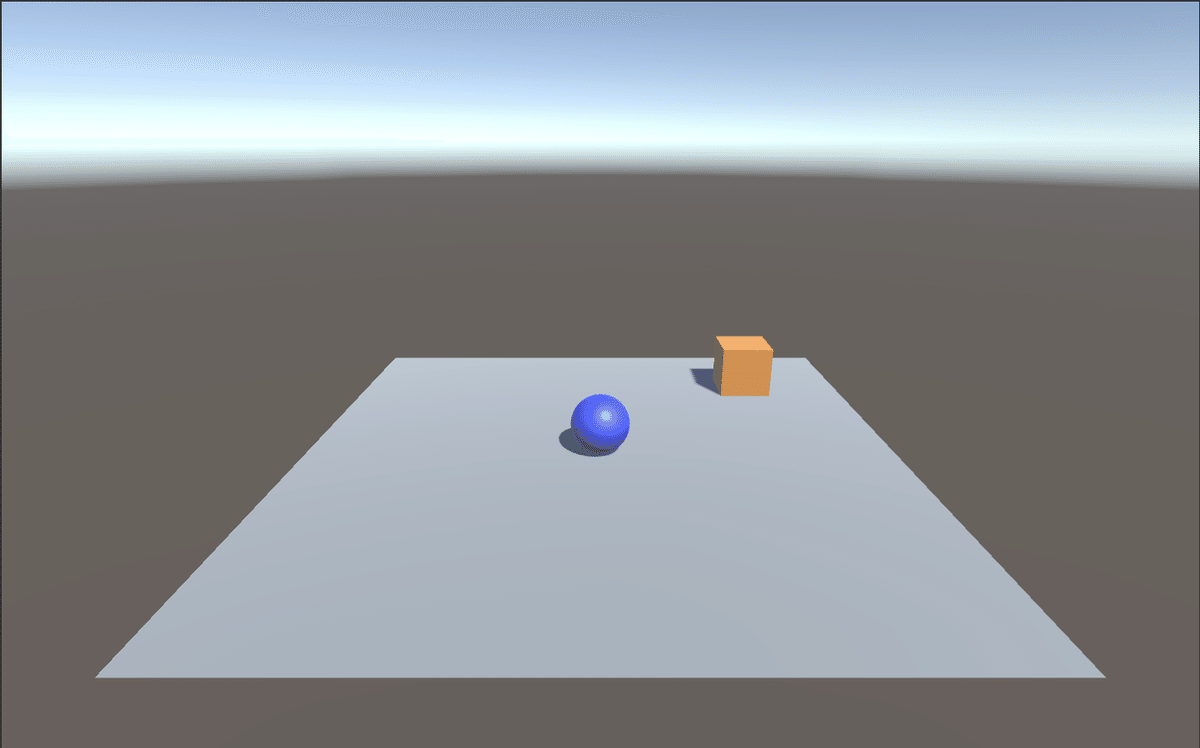
◎ Floorの追加
(1) Hierarchyウィンドウの「Create → 3D Object → Plane」で「Plane」を追加し、名前に「Floor」を指定。
(2) 「Floor」を選択し、Inspectorウィンドウで以下を設定。
Position = (0, 0, 0)
Rotation = (0, 0, 0)
Scale = (1, 1, 1)
(3) 「Floor」の「Mesh Renderer」の「Materials → Element 0」に灰色のマテリアル「Gray」を指定。
◎ Targetの追加
(1) Hierarchyウィンドウの「Create → 3D Object → Cube」で「Cube」を追加し、名前に「Target」を指定。
(2) 「Target」を選択し、Inspectorウィンドウで以下を設定。
Position = (3, 0.5, 3)
Rotation = (0, 0, 0)
Scale = (1, 1, 1)
(3) 「Target」の「Mesh Renderer」の「Materials → Element 0」に茶色のマテリアル「Brown」を指定。
◎ RollerAgentの追加
(1) Hierarchyウィンドウの「Create → 3D Object → Sphere」で「Sphere」を追加し、名前に「RollerAgent」を指定。
(2) 「RollerAgent」を選択し、Inspectorウィンドウで以下を設定。
Position = (0, 0.5, 0)
Rotation = (0, 0, 0)
Scale = (1, 1, 1)
(3) 「Mesh Renderer」の「Materials → Element 0」に青のマテリアル「Blue」を指定。
(4) 「Add Component」で「Rigidbody」を追加。
6. Unity ML-Agentsのコンポーネント
学習環境に「観察」「行動」「報酬」を設定するため、「ML-Agentsのコンポーネント」を追加します。
◎ Behaviour Parameters
「観察」や「行動」のデータ型を指定します。
◎ Agentクラスを継承したスクリプト
Agentクラスを継承したスクリプトを作成し、人工知能への観察の提供、人工知能が決定した行動の受け取りと実行、行動結果に応じた報酬の提供、といった処理を実装します。
◎ Decision Requester
何フレーム毎に行動を決定(変更)するかを指定します。
7. Behavior Parametersの追加
(1) 「RollerAgent」に「Add Component」で「Behavior Parameters」を追加。
(2) 「RollerAgent」を選択し、Inspectorウィンドウで以下を設定。
Behavior Name = RollerBall
Vector Observation → Space Size = 8
Vector Observation → Stacked Vectors = 1
Vector Action → Space Type = Continuous
Vector Action → Space Size = 2
8. Agentクラスを継承したスクリプトの追加
(1) コンポーネント「RollerAgent」を選択して、「Add Component」で新規スクリプト「RollerAgent」を追加。
using System.Collections.Generic;
using UnityEngine;
using Unity.MLAgents;
using Unity.MLAgents.Sensors;

// RollerAgent
public class RollerAgent : Agent
{
    public Transform target;
    Rigidbody rBody;

    // 初期化時に呼ばれる
    public override void Initialize()
    {
        this.rBody = GetComponent<Rigidbody>();
    }

    // エピソード開始時に呼ばれる
    public override void OnEpisodeBegin()
    {
        // RollerAgentが床から落下している時
        if (this.transform.localPosition.y < 0)
        {
            // RollerAgentの位置と速度をリセット
            this.rBody.angularVelocity = Vector3.zero;
            this.rBody.velocity = Vector3.zero;
            this.transform.localPosition = new Vector3(0.0f, 0.5f, 0.0f);
        }

        // Targetの位置のリセット
        target.localPosition = new Vector3(
            Random.value*8-4, 0.5f, Random.value*8-4);
    }

    // 観察取得時に呼ばれる
    public override void CollectObservations(VectorSensor sensor)
    {
        sensor.AddObservation(target.localPosition); //TargetのXYZ座標
        sensor.AddObservation(this.transform.localPosition); //RollerAgentのXYZ座標
        sensor.AddObservation(rBody.velocity.x); // RollerAgentのX速度
        sensor.AddObservation(rBody.velocity.z); // RollerAgentのZ速度
    }

    // 行動実行時に呼ばれる
    public override void OnActionReceived(float[] vectorAction)
    {
        // RollerAgentに力を加える
        Vector3 controlSignal = Vector3.zero;
        controlSignal.x = vectorAction[0];
        controlSignal.z = vectorAction[1];
        rBody.AddForce(controlSignal * 10);

        // RollerAgentがTargetの位置に到着した時
        float distanceToTarget = Vector3.Distance(
            this.transform.localPosition, target.localPosition);
        if (distanceToTarget < 1.42f)
        {
            AddReward(1.0f);
            EndEpisode();
        }

        // RollerAgentが床から落下した時
        if (this.transform.localPosition.y < 0)
        {
            EndEpisode();
        }
    }

    // ヒューリスティックモードの行動決定時に呼ばれる
    public override void Heuristic(float[] actionsOut)
    {
        actionsOut[0] = Input.GetAxis("Horizontal");
        actionsOut[1] = Input.GetAxis("Vertical");
    }
}
(2) Hierarchyウィンドウで「RollerAgent」を選択し、Inspectorウィンドウで以下を設定。
Targetには、HierarchyウィンドウのTargetを「RollerAgent」のTargetにドラッグ&ドロップします。
Max Step = 1000
Target = Target
9. Decision Requesterの追加
(1) 「RollerAgent」に「Add Component」で「Decision Requester」を追加。
(2) 「RollerAgent」を選択し、Inspectorウィンドウで以下を設定。
Decision Period = 1010. 学習環境ので動作確認
UnityエディタのPlayボタンで実行すると、学習前の学習環境の動作確認ができます。方向キーでボールを動かし、立方体に衝突すると立方体が移動し、ボールが落下すると床の上に戻ります。

UnityエディタをPlayボタンで実行した時に、適用されるモードは、次のとおりです。
(1) 学習を行うPythonスクリプトが実行中 → 学習
(2) (1)以外で、Behavior ParametersのModelが存在 → 推論
(3) (1)(2)以外で、Heuristic()を定義 → ヒューリスティック (今回はこれ)
11. Pythonスクリプトによる学習
Pythonスクリプトによる学習を行い、「推論モデル」を生成します。
(1) 「ml-agents/sample」に「RollerBall.yaml」を作成し、以下のように編集。
これは、「訓練設定ファイル」で、学習時に必要なハイパーパラメータを設定します。各パラメータについては「Training Configuration File」を参照してください。
behaviors:
  RollerBall:
    trainer_type: ppo
    hyperparameters:
      batch_size: 10
      buffer_size: 100
      learning_rate: 0.0003
      beta: 0.005
      epsilon: 0.2
      lambd: 0.95
      num_epoch: 3
      learning_rate_schedule: linear
    network_settings:
      normalize: true
      hidden_units: 128
      num_layers: 2
      vis_encode_type: simple
    reward_signals:
      extrinsic:
        gamma: 0.99
        strength: 1.0
    keep_checkpoints: 5
    checkpoint_interval: 500000
    max_steps: 500000
    time_horizon: 64
    summary_freq: 1000
    threaded: true
(2) mlagents-learnの実行。
$ mlagents-learn ./config/sample/RollerBall.yaml --run-id=RollerBall-ppo-1(3) Unity EditorのPlayボタンを押して学習開始。
20,000ステップ未満で学習できます。
【情報】Macで「XXXXは、開発元を検証できないため開けません。」というエラーが発生したら、「セキュリティとプライバシー」で「このまま許可」をクリックして、再度実行してください。
次回
この記事が気に入ったらサポートをしてみませんか?