MediaPipe 入門 (2) - Face Detection

以下の記事を参考にして書いてます。
前回
1. MediaPipe Face Detection
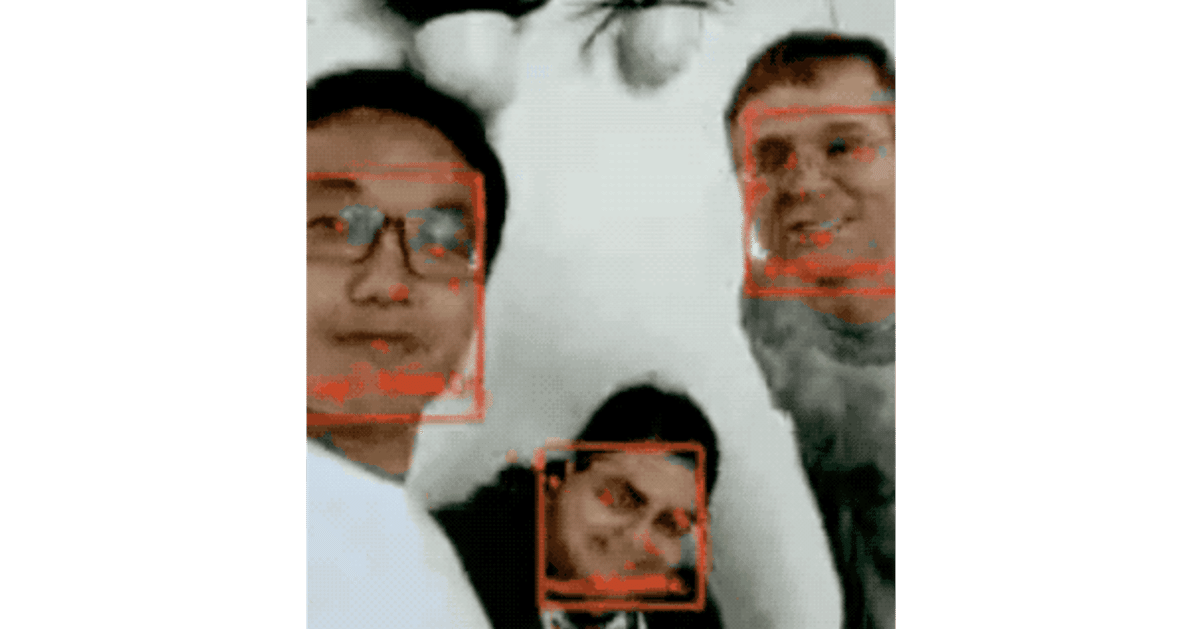
「MediaPipe Face Detection」は、動画から顔の位置とランドマーク位置(右目、左目、鼻先、口の中心、右耳、左耳)を推論するライブラリです。複数人の顔検出をサポートしています。
2. ソリューションAPI
◎ オプション
・MIN_DETECTION_CONFIDENCE : ランドマーク検出成功とみなすための最小信頼値。([0.0、1.0], デフォルト:0.5)
◎ 出力
・DETECTIONS
検出した顔のリスト。
各顔は、以下で構成されている。
- boundingBox : バウンディングボックス
- xmin : バウンディングボックスのX座標([0.0、1.0])
- width : バウンディングボックスの幅([0.0、1.0])
- ymin : バウンディングボックスのY座標([0.0、1.0])
- height : バウンディングボックスの高さ([0.0、1.0])
- landmarks : ランドマークのリスト(右目、左目、鼻先、口の中心、右耳、左耳)
- x : ランドマークのX座標([0.0、1.0])
- y : ランドマークのX座標([0.0、1.0])
3. Python ソリューションAPI
◎ サポートオプション
・min_detection_confidence
◎ コード
import cv2
import mediapipe as mp
mp_face_detction = mp.solutions.face_detection

# 静止画像の場合:
with mp_face_detection.FaceDetection(
    min_detection_confidence=0.5) as face_detection:
  for idx, file in enumerate(file_list):
    image = cv2.imread(file)
    # 処理する前にBGR画像をRGBに変換
    results = face_detection.process(cv2.cvtColor(image, cv2.COLOR_BGR2RGB))

    # 各顔の顔検出を描画
    if not results.detections:
      continue
    annotated_image = image.copy()
    for detection in results.detections:
      print('Nose tip:')
      print(mp_face_detection.get_key_point(
          detection, mp_face_detection.FaceKeyPoint.NOSE_TIP))
      mp_drawing.draw_detection(annotated_image, detection)
    cv2.imwrite('/tmp/annotated_image' + str(idx) + '.png', annotated_image)

# Webカメラ入力の場合:
cap = cv2.VideoCapture(0)
with mp_face_detection.FaceDetection(
    min_detection_confidence=0.5) as face_detection:
  while cap.isOpened():
    success, image = cap.read()
    if not success:
      print("Ignoring empty camera frame.")
      # ビデオをロードする場合は、「continue」ではなく「break」を使用してください
      continue

    # 後で自分撮りビューを表示するために画像を水平方向に反転し、BGR画像をRGBに変換
    image = cv2.cvtColor(cv2.flip(image, 1), cv2.COLOR_BGR2RGB)
    # To improve performance, optionally mark the image as not writeable to
    # pass by reference.
    image.flags.writeable = False
    results = face_detection.process(image)

    # 画像に顔検出アノテーションを描画
    image.flags.writeable = True
    image = cv2.cvtColor(image, cv2.COLOR_RGB2BGR)
    if results.detections:
      for detection in results.detections:
        mp_drawing.draw_detection(image, detection)
    cv2.imshow('MediaPipe Face Detection', image)
    if cv2.waitKey(5) & 0xFF == 27:
      break
cap.release()
4. JavaScript ソリューションAPI
◎ サポートオプション
・minDetectionConfidence
◎ コード
<!DOCTYPE html>
<html>
<head>
  <meta charset="utf-8">
  <script src="https://cdn.jsdelivr.net/npm/@mediapipe/camera_utils/camera_utils.js" crossorigin="anonymous"></script>
  <script src="https://cdn.jsdelivr.net/npm/@mediapipe/control_utils/control_utils.js" crossorigin="anonymous"></script>
  <script src="https://cdn.jsdelivr.net/npm/@mediapipe/drawing_utils/drawing_utils.js" crossorigin="anonymous"></script>
  <script src="https://cdn.jsdelivr.net/npm/@mediapipe/face_detection/face_detection.js" crossorigin="anonymous"></script>
</head>

<body>
  <div class="container">
    <video class="input_video"></video>
    <canvas class="output_canvas" width="1280px" height="720px"></canvas>
  </div>
</body>
</html>
<script type="module">
const videoElement = document.getElementsByClassName('input_video')[0];
const canvasElement = document.getElementsByClassName('output_canvas')[0];
const canvasCtx = canvasElement.getContext('2d');
function onResults(results) {
// オーバーレイの描画
canvasCtx.save();
canvasCtx.clearRect(0, 0, canvasElement.width, canvasElement.height);
canvasCtx.drawImage(
results.image, 0, 0, canvasElement.width, canvasElement.height);
if (results.detections.length > 0) {
drawingUtils.drawRectangle(
canvasCtx, results.detections[0].boundingBox,
{color: 'blue', lineWidth: 4, fillColor: '#00000000'});
drawingUtils.drawLandmarks(canvasCtx, results.detections[0].landmarks, {
color: 'red',
radius: 5,
});
}
canvasCtx.restore();
}
const faceDetection = new Objectron({locateFile: (file) => {
return `https://cdn.jsdelivr.net/npm/@mediapipe/objectron@0.0/${file}`;
}});
faceDetection.setOptions({
minDetectionConfidence: 0.5
});
faceDetection.onResults(onResults);
const camera = new Camera(videoElement, {
onFrame: async () => {
await faceDetection.send({image: videoElement});
},
width: 1280,
height: 720
});
camera.start();
</script>【おまけ】 npmによる実行
◎ インストール
$ npm i -S @mediapipe/camera_utils
$ npm i -S @mediapipe/control_utils
$ npm i -S @mediapipe/drawing_utils
$ npm i -S @mediapipe/face_detection
◎ コード
<!DOCTYPE html>
<html>
<body>
  <div class="container">
    <video class="input_video"></video>
    <canvas class="output_canvas" width="1280px" height="720px"></canvas>
    <script type="text/javascript" src="main.js"></script>
  </div>
</body>
</html>
import { drawRectangle, drawLandmarks } from '@mediapipe/drawing_utils/drawing_utils';
import { Camera } from '@mediapipe/camera_utils/camera_utils';
import { FaceDetection } from '@mediapipe/face_detection/face_detection';
// 参照
const videoElement = document.getElementsByClassName('input_video')[0];
const canvasElement = document.getElementsByClassName('output_canvas')[0];
const canvasCtx = canvasElement.getContext('2d');
// 結果取得時に呼ばれる
function onResults(results) {
canvasCtx.save();
canvasCtx.clearRect(0, 0, canvasElement.width, canvasElement.height);
canvasCtx.drawImage(results.image, 0, 0, canvasElement.width, canvasElement.height);
if (results.detections.length > 0) {
drawRectangle(canvasCtx, results.detections[0].boundingBox,
{color: 'blue', lineWidth: 4, fillColor: '#00000000'});
drawLandmarks(canvasCtx, results.detections[0].landmarks,
{color: 'red', radius: 5, });
}
canvasCtx.restore();
}
// FaceDetectionの生成
const faceDetection = new FaceDetection({locateFile: (file) => {
return `https://cdn.jsdelivr.net/npm/@mediapipe/face_detection/${file}`;
}});
faceDetection.setOptions({
minDetectionConfidence: 0.5
});
faceDetection.onResults(onResults);
// カメラの生成
const camera = new Camera(videoElement, {
onFrame: async () => {
await faceDetection.send({image: videoElement});
},
width: 1280,
height: 720
});
camera.start();次回
この記事が気に入ったらサポートをしてみませんか?