
36歳がDjangoの今までの設定内容をまとめてみた

この記事は毎回過去の記事を見直すのがめんどくさいため、今まで設定した以下のマガジンの内容をまとめたものです。
サーバ構築は、paiza cloudを利用しています。
●プロジェクトを作成するコマンド
コマンド
django-admin startproject プロジェクト名

サンプルコマンド
~$ django-admin startproject myapp
●新規アプリケーションを作成するコマンド
コマンド
python manage.py startapp アプリケーション名

サンプルコマンド
~/myapp$ python manage.py startapp helloworld
【注意】
ここから下は、プロジェクト名「myapp」、アプリケーション名「helloworld」をサンプルとして記載します。
もし、別名にしたい場合は、適宜コードを読み替えてください。
●設定変更するファイルとコード
ファイル:myapp>helloworld>views.py
コード:
from django.shortcuts import render, get_object_or_404
from django.http import HttpResponse
from .models import Article

def index(request):
 articles = Article.objects.all()
 context = {
     'message': 'Welcome Hello 習慣',
     'articles': articles,
 }
 return render(request, 'helloworld/index.html', context)

def detail(request, id):
  article = get_object_or_404(Article, pk=id)
  context = {
      'message': 'Show Article ' + str(id),
      'article': article,
  }
  return render(request, 'helloworld/detail.html', context)
ファイル:myapp>helloworld>urls.py
※urls.pyファイルは新規作成する。
作成ファイル:urls.py
コード:
from django.urls import path
from . import views

app_name = 'helloworld'

urlpatterns = [
         path('', views.index, name='index'),
         path('<int:id>', views.detail, name='detail')
         ]
ファイル:myapp>helloworld>templates>helloworld>index.html
※フォルダとファイルを作成する。
作成フォルダ:templatesとhelloworld
作成ファイル:index.html
コード
<!DOCTYPE html>
<html>
<head>
   <meta charset='utf-8'>
   <title>hello 習慣</title>
   <style>body {padding: 10px;}</style>
</head>
<body>
   <h1>hello 習慣</h1>
   <p>{{ message }}</p>
   {% for article in articles %}
       <p>
           {{ article.content }}
       <a href="{% url 'helloworld:detail' article.id %}">詳細</a>
       </p>
   {% endfor %}
</body>
</html>
ファイル:myapp>helloworld>templates>helloworld>detail.html
※ファイルを作成する。
作成ファイル:detail.html
コード:
<!DOCTYPE html>
<html>
<head>
   <meta charset='utf-8'>
   <title>hello 習慣</title>
   <style>body {padding: 10px;}</style>
</head>
<body>
   <h1>hello 習慣</h1>
   <p>{{ message }}</p>
   <p>{{ article.content }}</p>
   <p><a href="{% url 'helloworld:index' %}">一覧></a></p>
</body>
</html>
ファイル:myapp>helloworld>models.py
コード:
from django.db import models

class Article(models.Model):
  content = models.CharField(max_length=200)
  def __str__(self):
      return self.content
ファイル:myapp>helloworld>admin.py
コード:
from django.contrib import admin
from .models import Article

admin.site.register(Article)
ファイル:myapp>urls.py
コード:
from django.contrib import admin
from django.urls import include, path

urlpatterns = [
  path('helloworld/', include('helloworld.urls')),
  path('admin/', admin.site.urls),
]
ファイル:myapp>settings.py
コード:一部変更する
ALLOWED_HOSTS = ['*']
INSTALLED_APPSの下に以下のコードを入力します。
INSTALLED_APPS = [
'helloworld.apps.HelloworldConfig',
DATABASES = {
# 'default': {
# 'ENGINE': 'django.db.backends.sqlite3',
# 'NAME': os.path.join(BASE_DIR, 'db.sqlite3'),
# }
'default': {
'ENGINE': 'django.db.backends.mysql',
'NAME': 'mydb',
'USER': 'root',
'PASSWORD': '',
'HOST': '127.0.0.1',
'PORT': '3306',
}
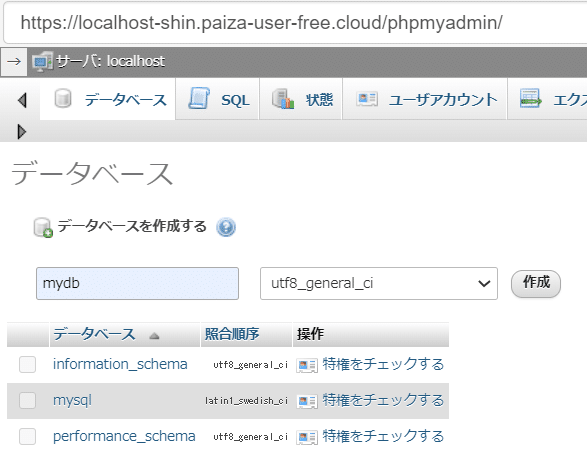
}●phpmyadminを開いて、「mydb」を登録する
phpmyadmin>Open phpmyadmin

データベース名:mydb、utf8_general_ci
●マイグレーションを実行する
~/myapp$ python manage.py makemigrations helloworld
Migrations for 'helloworld':
helloworld/migrations/0001_initial.py
- Create model Article
~/myapp$ python manage.py migrate
Operations to perform:
Apply all migrations: admin, auth, contenttypes, helloworld, sessions
●スーパーユーザを作成する
~/myapp$ python manage.py createsuperuser

admin
admin@test.co.jp

パスワードを入力
●サーバを起動する
~/myapp$ python manage.py runserver●以下URLにブラウザでアクセスして、DBにデータを登録
※ID/PWは作成したスーパーユーザを使う
Articles>Add
【登録データ】
習慣
セルフコントロール
計画
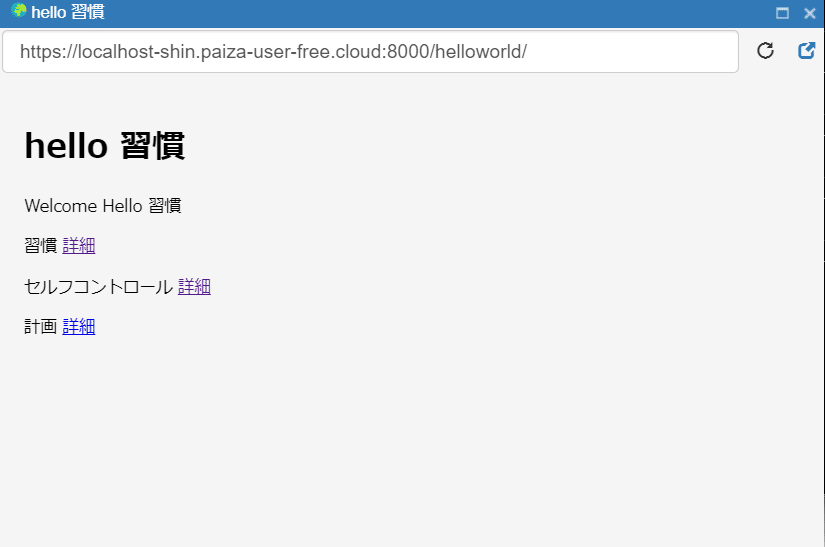
●正常に動作しているかを確認します。
以下URLにブラウザでアクセス
https://localhost:8000/helloworld
以下のような画面が表示されていれば成功です。
以上です。ありがとうございました。
この記事が気に入ったらサポートをしてみませんか?