
【GAS】Google Apps Script 活用事例 2020年6月版 V8で、Twitter APIとの連携タイムラインをSpreadsheet に書き出してみる。

Photo by Sara Kurfeß on Unsplash
ぐぉぉぉ、英語.......。行く手を阻むAPIの申請の壁
Q1. 何のために、API申請をするのですか?
A1. The reason of applying Twitter API is to analyze tweets that includes specific words. Linked Google Spreadsheet and Twitter, I would like to get knowledge automatically from them. In advance, I would like to share the information among our team.
Twitter APIを申請する理由は、特定の単語が含まれたツイートを分析するためです。Google Spreadsheetと、Twitterを連携し、ツイートから知識を得るためです。そして、チームで、その情報を共有するためです。
Q2. どんな用途で、データを使うのですか?
A2. I would like to analyze Twitter's contents in terms of Twitter's users emotions. Such as negative or positive feelings.
Twitterのコンテンツを、ユーザーの感情という観点から分析したいと考えています。例えば、肯定的な感情なのか、否定的な感情なのかと行った具合です。
英語力が残念な僕は、帰国子女の妹にすぐさま、助けを求め、一緒に考えてもらいました。日本語で何を言いたいかを僕が考え、妹に翻訳を手伝ってもらいました。なので、わりかし、事実に近いものを飾らず、ありのままに書いています。
200文字以上という制約があり、字数を稼ぐ必要があったので、I want to ではなく、I would like toにしたり、1回1回、Twitter APIやTweetとか書いています。(妹談)
他のブログに記載されているサンプルが使えない。
他のブログに掲載されているものは、Rhino、つまりvarで書かれているものが、ほとんどでした。しかし、どうもライブラリを使って実現するタイプのスクリプトがV8に対応していないためか、エラーになってしまい先に進めませんでした。途方にくれ、今回はライブラリを使うのを諦め、V8で、やることにしました。
おそらく、appscript.jsonを触って、RuntimeでV8を無効にすれば、良かったのだと思います.....
Twitterにログインするだけのスクリプト
//Twitterにログインする。
function loginTwitter() {
 const LOGIN_URL = 'https://twitter.com/login';
 const USER_ID   = PropertiesService.getScriptProperties().getProperty('USER_ID');
 const PASSWORD  = PropertiesService.getScriptProperties().getProperty('PASSWORD');

 console.log(`USER_ID: ${USER_ID} \nPASSWORD: ${PASSWORD}`);


 // HTTPリクエストのパラメータをobjectで設定
 // POSTで渡すフォームデータはpayloadで指定
 const options = {
   method : "post",
   followRedirects: false,
   contentType: "application/x-www-form-urlencoded",
   payload : {
     userId: USER_ID,
     password: PASSWORD
   }
 };

 //HTTP 200 OK はリクエストが成功した場合に返すレスポンスコード。
 const response = UrlFetchApp.fetch(LOGIN_URL, options);
 console.log(response.getResponseCode());

 return
}//end
Slack botや、LINE botを何度か作った事はありましたが、情報をポストするのみで、情報をgetする。いわゆるスクレイピングみたいな事は試してみた事はありませんでした。
IMPORTXML関数とか、IMPORTHTML関数で、ちょっとしたRSS風に使ったりする事がある程度でした。
もし、ソースコードをコピペしてエラーが出でしまったら
ソースコードをコピペしてエラーが出たら、次の事が正しく設定されているか確認してみてください。
1. Appの登録を済ませているか?(使用目的やURLの登録)
2. Appとプロジェクトのリンクが出来ているか?
これらがないと、Twitterでは、基本的にスクレイピングが禁止されているため、情報を書き出す事が出来ないようになっています。
2に関しては、Twitter API 2.0がリリースされた事による仕様変更で、プロジェクトとAppを結び付けないとエラーが出るようになってしまいました。こちらに関しては、実際に遭遇したエラー内容などをこちらの記事で紹介しています。
実際に遭遇したエラーコード
console.log(`HTTPデータ: ${responseApi.getContentText()}`);
//HTTPデータ: {"client_id":"*********","required_enrollment":"Standard Basic","detail":"When authenticating requests to the Twitter API v2 endpoints, you must use keys and tokens from a Twitter developer app that is attached to a Project. You can create a project via the developer portal.","registration_url":"https://developer.twitter.com/en/portal/opt-in","title":"Client Forbidden","reason":"client-not-enrolled","type":"https://api.twitter.com/2/problems/client-forbidden"}
When authenticating requests to the Twitter API v2 endpoints, you must use keys and tokens from a Twitter developer app that is attached to a Project. You can create a project via the developer portal.
Twitter API v2エンドポイントへのリクエストを認証するときは、プロジェクトに接続されているTwitter開発者アプリからのキーとトークンを使用する必要があります。開発者ポータル経由でプロジェクトを作成できます。
上記のリンクから、Appとprojectを結びつける作業をします。
PropertiesServiceってなんぞ
普段であれば、スクリプトエディタに直打ちしているんですが、今回は気分で、こちら使ってみました。
UrlFetchApp.fetch() では、どのURLにアクセスするかがクソ大事。
ぶっちゃけ、どのURLにアクセスすればいいのか分からない。それが今回躓いて、時間がかかったポイントでした。TwitterのDevloper向けの資料に、きちんと書いてあります。読んでなかっただけ。英語読もうぜ、俺。
Resource URLというのを、エディタに書けば良いみたいです。
タイムラインを読み込み、書き出した時のイメージ
上記の事が分からなかった事もあり、ほぼ丸1日掛かって、書いたスクリプトはこのような感じです。
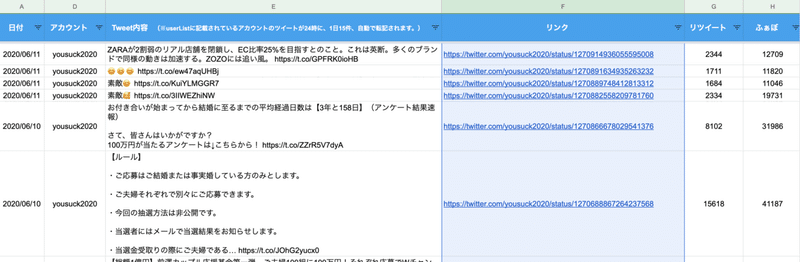
日付、アカウント名、ツイート内容、ツイートのリンク、リツイート数、お気に入り数などを書き出しました。
どのタイミングで集計されているのか分かりませんが、リツイート数などのデータは結構な誤差があり、実際の回数がリアルタイムで反映されているという訳ではなさそうでした。
とりわけ、誰かの投稿をリツイートした場合は、本家のリツイート数ではなく、タイムラインを取得したアカウントの投稿がリツイートされた数となっているようです。
タイムラインを読み込みと、そのスクリプト
function getUserList() {
 const spreadsheet = SpreadsheetApp.getActiveSpreadsheet();
 const sheet       = spreadsheet.getSheetByName('userList');
 const lastRow     = sheet.getLastRow();

 //A2から最終行まで
 const userArray   = sheet.getRange(2, 1, lastRow -1, 1).getValues().flat();
 console.log(`1次元配列の内容 ${userArray}`);

 return userArray;
}
まず、このスクリプトで、userListというシートから、タイムラインを取得したいアカウントの配列を読み込みます。そうすれば、複数のアカウントのタイムラインを一度に取得し、書き出してくれます。
function getToken() {
 // アクセストークンの取得
 const API = {
   KEY: PropertiesService.getScriptProperties().getProperty('API_KEY'),
   SECRET_KEY: PropertiesService.getScriptProperties().getProperty('API_SECRET_KEY'),
   MILLISECOND: 100000 //tokenの有効期限(ミリ秒)
 }
 const tokenUrl = 'https://api.twitter.com/oauth2/token';
 const tokenCredential = Utilities.base64EncodeWebSafe(API.KEY + ':' + API.SECRET_KEY);
 const tokenOptions = {
   headers : {
     authorization: 'Basic ' + tokenCredential,
     'Content-Type': 'application/x-www-form-urlencoded;charset=UTF-8'
   },
   method: 'post',
   payload: 'grant_type=client_credentials'
 };
 const responseToken = UrlFetchApp.fetch(tokenUrl, tokenOptions);
 const parsedToken = JSON.parse(responseToken);
 const token = parsedToken.access_token;

 return token;
}
上記が、肝となる部分のスクリプトで、タイムラインの取得する許可をもらっています。他でも使い回します。
function getUserTimeline(){
 //Twitterの複数アカウントのタイムラインを読み込むため、配列で取得
 const users = getUserList();

 let results = [];

 for(let i = 0; i < users.length; i++){
   const user         = users[i];
   const tweetCounter = 15;
   console.log(users);

   // Application-only authenticationでTwitter APIの利用
   const apiUrl = 'https://api.twitter.com/1.1/statuses/user_timeline.json?screen_name=' + user + '&' + 'count=' + tweetCounter;
   const token  = getToken();
   const apiOptions = {
     headers : {
       Authorization: 'Bearer ' + token
     },
     'method' : 'get'
   };
   const responseApi = UrlFetchApp.fetch(apiUrl, apiOptions);

   //HTTP リスポンスが200以外だったら、処理を終了
   if (responseApi.getResponseCode() !== 200) return '';
   const tweets = JSON.parse(responseApi.getContentText());
   if (!tweets) return '';
   console.log(tweets);

   for (let j = 0; j < tweets.length; j++) {

     //ツイート内容
     const tweet       = tweets[j].text;

     //ツイートのリンク
     const tweetPageId = tweets[j].id_str;
     const tweetUrl    = 'https://twitter.com/' + user + '/status/' + tweetPageId;

     //ツイートした時間
     const date        = new Date(tweets[j].created_at);
     const tweetDate   = Utilities.formatDate(date, 'Tokyo/Asia', 'yyyy/MM/dd E HH:mm');
     let tweetContents = tweetDate.split(' ');

     const favorite    = tweets[j].favorite_count
     const retweet     = tweets[j].retweet_count;

     //1次元配列の末尾にTweet内容を追加
     tweetContents.push(user, tweet, tweetUrl, retweet, favorite);

     //1次元配列を2次元配列の中に格納
     results.push(tweetContents);
   }//for_j
 }//for_i

 console.log(results);
 return results;
 //  return ContentService.createTextOutput(results);
}


function setUserTweets() {
 const spreadsheet = SpreadsheetApp.getActiveSpreadsheet();
 const sheet       = spreadsheet.getSheetByName('RAW');
 const lastRow     = sheet.getLastRow() + 1;

 const userTweets  = getUserTimeline();

 sheet.getRange(lastRow, 1, userTweets.length, userTweets[0].length).setValues(userTweets);
}//ends
Special thanks to all the fans & artists who celebrated Tim’s life & music at the Avicii Tribute Concert in Stockholm last week ❤️ watch the full concert on https://t.co/WSmPejQJdv
— Tim Bergling (@Avicii) December 15, 2019
https://twitter.com/Avicii/status/1206327577318756354
一つのツイートは、status以下がツイートの個別ページにアクセスするためのユニークな値となっているようです。
https://twitter.com/アカウント名/status/***********
とすれば、リンクを生成することが出来ます
あとはツイートした時間の文字列を、配列化し、どんどん後ろにアカウント名、内容、ツイートのリンク、リツイート数などと、配列の後ろに足していきます。
パラメータも、ちゃんと書いてある。英語が嫌いでも、マジで読んだ方が良い。

IMAGE関数用のURLを抽出する方法

function setAcountInfo() {
 const users       = getUserList();
 const token       = getToken();

 let newValues     = [];
 let formulas      = [];


 for(let i = 0; i < users.length; i++){

   const user       = users[i];
   const requestUrl = 'https://api.twitter.com/1.1/statuses/user_timeline.json?screen_name=' + user + '&' + 'count=1';

   const token  = getToken();
   const apiOptions = {
     headers : {
       Authorization: 'Bearer ' + token
     },
     'method' : 'get'
   };
   const responseApi = UrlFetchApp.fetch(requestUrl, apiOptions);

   //HTTP リスポンスが200以外だったら、処理を終了
   if (responseApi.getResponseCode() !== 200) return '';
   const usersTimeLine = JSON.parse(responseApi.getContentText());
   if (!usersTimeLine) return '';
//    console.log(usersTimeLine);

   const userTimeLine       = usersTimeLine[0];
   const usePorfileImageUrl = userTimeLine.user.profile_image_url_https;
   const usePorfileImage    = `=IMAGE("${usePorfileImageUrl}",1)`;
   const profileUrl         = 'https://twitter.com/' + user;

   //imageは、image関数で表示させるため、空白にしている
   const userInfo = {

     name : userTimeLine.user.name,
     image: '',
     url  : profileUrl,
     followers: userTimeLine.user.followers_count

   }

   newValues.push([userInfo.name, userInfo.image, userInfo.url, userInfo.followers]);
   formulas.push([usePorfileImage]);

 }//for

 console.log(newValues);
 console.log(formulas);


 const spreadsheet = SpreadsheetApp.getActiveSpreadsheet();
 const sheet       = spreadsheet.getSheetByName('userList');
 sheet.getRange(2, 2, newValues.length, newValues[0].length).setValues(newValues);
 sheet.getRange(2, 3, formulas.length, formulas[0].length).setFormulas(formulas);
}//end
.user.profile_image_url_httpsで、Twitterのアカウントに使っている画像のURLを抽出することが出来ます。オブジェクトでデータが格納されています。法則性があって分かりやすいです。
そこで今回はイメージ関数と組み合わせて、シート上にアカウント画像を表示させてみました。
Twitter APIを利用して、検索結果をシートに書き出す方法
Twitter API v2のリリースに伴い、書きました。
Evernoteや、LINEでもGASを使いまくっています。
この記事が気に入ったらサポートをしてみませんか?