DataBindingチュートリアル第4回 – カスタムフォント

これまでカスタムフォントをUIで表示するのはコード上で全てのTextViewにフォントを設定したり、TextViewのサブクラスを作ったりと非常に手間のかかる作業でした↓
Android Oからはxmlにフォントを定義して使えるような新しい仕組みが導入された↓のですが、
Android O - Working With Fonts
それ以前のバージョンのOSをサポートする場合、データバインディングを使うと下のようにカスタムフォントをレイアウト上で簡単に指定できるようになります。
<TextView android:layout_width="wrap_content"
   android:layout_height="wrap_content"
   android:text="@{user.name}"
   android:textSize="20sp"
   app:font="@{`AppleGaramond-BoldItalic.ttf`}"
   />
app:fontタグにフォントのファイル(ttfやotfファイル)の名前を指定するだけです。 これでActivityクラスのOnCreateの中で1つ1つTextViewにフォントを設定したり、フォントの種類ごとにTextViewのサブクラスを作っていた今までのやり方から解放されます。
第1回〜第3回のDataBindingチュートリアルを見た人はもうピンときたかもしれません。それではどのようにこのapp:fontタグを実現しているか説明します。
今回のサンプルコードはこちらからダウンロードできます↓↓↓
BindingAdapterの作成
下のようなBindingAdapterを作ります。
作る場所はどのクラスでもいいのですが、第3回でつくったBindingAdapter.ktに追加しましょう。
@BindingAdapter("font")
@JvmStatic
fun setTypeface(textView: TextView, fontName: String) {
   val typeface =
       if (typefaceCache.containsKey(fontName)) {
           typefaceCache.get(fontName)
       } else {
           Typeface.createFromAsset(textView.context.assets, "fonts/$fontName")
       }
   typeface?.let {
       textView.setTypeface(typeface)
   }
}
このメソッドの中でtypefaceCacheというHashMapを使っていますが、これはBindingAdapter Singletonクラスの中に下のように宣言します。
   //Typefaceオブジェクトを保持するキャッシュ
   private val typefaceCache: Map<String, Typeface> =
       HashMap()
これで完了です!
実行結果
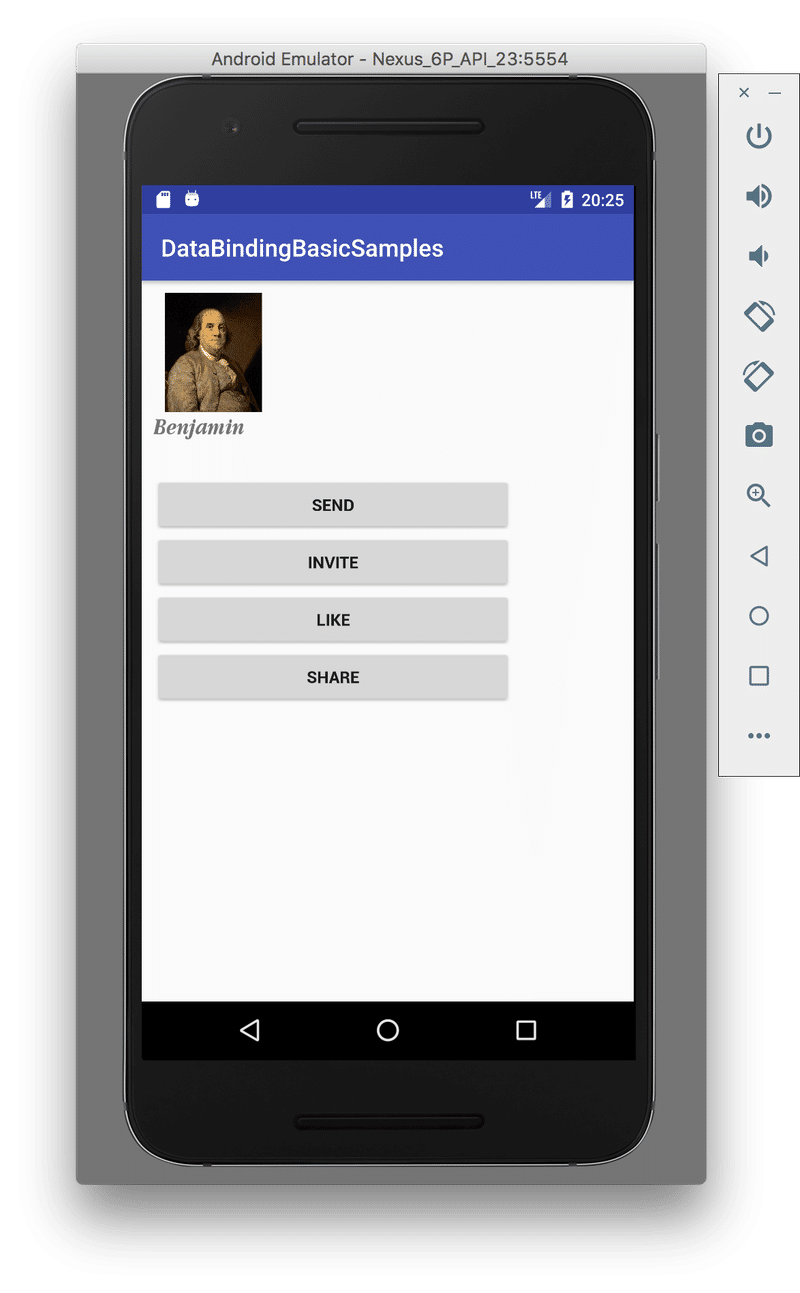
実行するとこのようにフォントがカスタムフォントに入れ替わっているのがわかると思います。
Benjaminの部分はAppleGaramond-BoldItalicというフォントを、ボタンのところにRoboto-Boldというフォントを指定しています。
setTypefaceメソッドの詳細
もう一度見て見ますとBindingAdapterの実装は下のようになります。
object BindingAdapter {

   //Typefaceオブジェクトを保持するキャッシュ
   private val typefaceCache: Map<String, Typeface> =
       HashMap()


   @BindingAdapter("font")
   @JvmStatic
   fun setTypeface(textView: TextView, fontName: String) {
       val typeface =
           if (typefaceCache.containsKey(fontName)) {
               typefaceCache.get(fontName)
           } else {
               Typeface.createFromAsset(textView.context.assets, "fonts/$fontName")
           }
       typeface?.let {
           textView.setTypeface(typeface)
       }
   }
}
タイプフェースのファイルからTypefaceクラスのオブジェクトを作成し、それをTextViewにセットしています。
一度作ったTypefaceオブジェクトはtypefaceCacheというHashMapに保存して2回目からそれを使うようにしています。これで1フォントファイルあたり1つのTypefaceオブジェクトしか作られないようにしました。このようにキャッシュしない場合TextViewやButtonの数だけTypefaceオブジェクトが作られてしまうので注意してください。
(補足ですが、このsetTypefaceメソッドは第1引数にTextViewオブジェクトを取るようになっていますが、app:fontタグはButtonやImageButtonなどにも使えます。これはButtonなどのこれらのクラスがTextViewの子クラスだからです。)
最終的なレイアウト
確認までにactivity_main.xmlの最終的な形は下のようになります。
<?xml version="1.0" encoding="utf-8"?>
<layout xmlns:android="http://schemas.android.com/apk/res/android"
   xmlns:app="http://schemas.android.com/apk/res-auto"
   xmlns:tools="http://schemas.android.com/tools"
   tools:context=".MainActivity">

   <data>
       <variable
           name="user"
           type="com.goldrushcomputing.databindingtutorial.model.User" />

       <variable
           name="handler"
           type="com.goldrushcomputing.databindingtutorial.MainActivity" />
   </data>

   <LinearLayout
       android:layout_width="match_parent"
       android:layout_height="match_parent"
       android:orientation="vertical">

       <ImageView
           android:layout_width="100dp"
           android:layout_height="100dp"
           app:imageUrl="@{user.profileImageUrl}"
           />


       <TextView android:layout_width="wrap_content"
           android:layout_height="wrap_content"
           android:text="@{user.name}"
           android:textSize="20sp"
           app:font="@{`AppleGaramond-BoldItalic.ttf`}"
           />

       <Button
           android:layout_width="300dp"
           android:layout_height="wrap_content"
           android:layout_marginTop="30dp"
           android:text="SEND"
           android:onClick="@{handler::onClickSend}"
           app:font="@{`Roboto-Bold.ttf`}"
           />

       <Button
           android:layout_width="300dp"
           android:layout_height="wrap_content"
           android:text="INVITE"
           android:onClick="@{() -> handler.onClickInvite(user)}"
           app:font="@{`Roboto-Bold.ttf`}"
           />

       <Button
           android:layout_width="300dp"
           android:layout_height="wrap_content"
           android:text="LIKE"
           android:onClick="@{(view) -> handler.onClickLike(user)}"
           app:font="@{`Roboto-Bold.ttf`}"
           />

       <Button
           android:layout_width="300dp"
           android:layout_height="wrap_content"
           android:text="SHARE"
           android:onClick="@{(view) -> handler.onClickShare(view, user)}"
           app:font="@{`Roboto-Bold.ttf`}"
           />
   </LinearLayout>

</layout>
まとめ
DataBidningを使うことでonCreateの中で1つ1つTextViewにフォントを設定したり、フォントの種類ごとにTextViewのサブクラスを作ることなくシンプルなタグだけでカスタムフォントの設定ができるようになりました。
これでデザイナーさんがプロジェクトの途中にタイプフェースをどんどん変えていっても心を乱すことなく対応ができるようになるのではないでしょうか?
GitHub
DataBindingTutorialのコードはこちらのGitHubでも公開しています。
https://github.com/mizutori/AndroidDataBindingTutorial
今回のサンプルはコミットハッシュ
a1ee0ad9183341a269edc6294131db8eea5ebc48
で保存してあります。下のコマンドでこちらのコミットを参照できます↓↓
git clone git@github.com:mizutori/AndroidDataBindingTutorial.git
git checkout a1ee0ad9183341a269edc6294131db8eea5ebc48
この記事が気に入ったらサポートをしてみませんか?