
【徒然iOS】気ままにUIKit53〜MKMapViewDelegate。ピンの色や画像を変更しよう〜

概要
このマガジンは四十を過ぎたおっさんが、
を参考にStoryboardでiOSアプリを完全に趣味で楽しんでいるだけな記事を気ままに上げてます。
今回
をハイ、レッツゴ🕺
前準備
念の為、
バックアップ
新しいクラス
ビューコントローラの追加
イニシャルビューの変更
をいつも通りやってから本題へ💃

今回やるところを事前にひととおり、記事にしながら流してみたんだけど、
果てしなくコードが長い(真面目に1個ずつ丁寧に書いたら余裕で24000文字以上になってしまった)
重要部分がぼやける可能性が高い
ので、サイト記事を参考に、必要なコードだけに削りながら、解説する〜〜〜〜🕺
本題
⒈前回までの機能を新規のビューに組み込む

⒉デリゲートメソッドを実装
まずは、 MKMapViewDelegateプロトコルを適用
, MKMapViewDelegate
で、viewDidLoad()の最後に
//デリゲート先に自分を設定する。
testMapView.delegate = self
を追加

で、デリゲートメソッドをその下に追加

まずはこの状態で、実行すると、、、

と、、、ここでポイント
非推奨の黄色エラーが
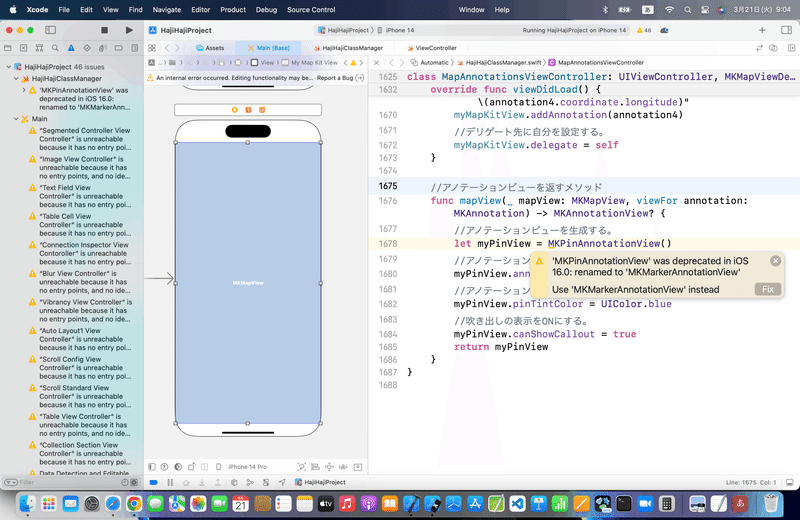
てな感じで残っていて、どうやら
'MKPinAnnotationView' was deprecated in iOS 16.0: renamed to 'MKMarkerAnnotationView'
👉MKPinAnnotationView'はiOS 16.0では、非推奨になったから MKMarkerAnnotationViewに変更しろ
って言ってるみたいなんだけど、、、実際に、指示に従って、
    //アノテーションビューを返すメソッド
    func mapView(_ mapView: MKMapView, viewFor annotation: MKAnnotation) -> MKAnnotationView? {
        //アノテーションビューを生成する。
        let myPinView = MKMarkerAnnotationView()
        //アノテーションビューに座標、タイトル、サブタイトルを設定する。
        myPinView.annotation = annotation
        //アノテーションビューに色を設定する。
        myPinView.tintColor = UIColor.blue
        //吹き出しの表示をONにする。
        myPinView.canShowCallout = true
        return myPinView
    }
てコードに変更して、シミュレータで実行してみると、、、

理由はもちろん簡単で、
適用してるプロトコルが違うから
だし、
みたいな記事を参考に手直しできなくはないんだけど、、、
今、目先でそれをやってしまうと、後続の記事と大きく乖離することになりかねないので、今回はやらない。
*昨日、前回の記事をアップし終えて、何でだろうと
みたいな記事を調べてると、

自分で作ったマップ機能付きアプリを調べると、バージョンがiOS14でも
ちゃんとピン表示されていたから違うなと判断
👉過去にアプリを作り溜めとくとこういう時にも役に立つね🕺
なので、変更したコードは元に戻して〜〜〜〜
以降の手順を進めよう!
⒊ピンの色を個別に変更する
で、ここまでよくCocoaTouchClassをこういう時にはサイト記事で作ってきてたんだけど、

モデルクラスを作る程度で、Xibとも連携させないのに、流石にこれは増大しすぎなので、、、
class TestMKPointAnnotation: MKPointAnnotation {
    //ピンの色
    var pinColor:UIColor = UIColor.redColor()
}
だけを、今回は

てな感じで追加👀
あとは、元々のコードを変更するだけなんだけど、
要は、
ピンの色分けが出来ばいいだけ
👉中心と左下くらいあれば十分
なので、、、

//中心にピンを立てる。
let annotation = TestMKPointAnnotation()
annotation.coordinate = CLLocationCoordinate2DMake(y, x)
annotation.title = "中心"
annotation.subtitle = "\(annotation.coordinate.latitude), \(annotation.coordinate.longitude)"
annotation.pinColor = UIColor.redColor()
testMapView.addAnnotation(annotation)

//左下のピン
let annotation1 = TestMKPointAnnotation()
annotation1.coordinate = CLLocationCoordinate2DMake(y-1.0, x-1.0)
annotation1.title = "左下"
annotation1.subtitle = "\(annotation1.coordinate.latitude), \(annotation1.coordinate.longitude)"
annotation1.pinColor = UIColor.orangeColor()
testMapView.addAnnotation(annotation1)
を参考にコードを書き換え〜〜〜〜〜🕺
今回のコード(色分け)
class MapAnnotationsViewController: UIViewController, MKMapViewDelegate{
    @IBOutlet weak var myMapKitView: MKMapView!
    let x = 139.692101
    let y = 35.689634
    let latitudeDelta = 10.0
    let longitudeDelta = 10.0

    override func viewDidLoad() {
        super.viewDidLoad()
        //中心座標
        let center = CLLocationCoordinate2DMake(y, x)
        //表示範囲
        let span = MKCoordinateSpan(latitudeDelta: latitudeDelta, longitudeDelta: longitudeDelta)
        //中心座標と表示範囲をマップに登録する。
        let region = MKCoordinateRegion(center: center, span: span)
        myMapKitView.setRegion(region, animated:true)
        //中心にピンを立てる。
        let annotation = MyMKPointAnnotation()
        annotation.coordinate = CLLocationCoordinate2DMake(y, x)
        annotation.title = "中心"
        annotation.subtitle = "\(annotation.coordinate.latitude), \(annotation.coordinate.longitude)"
        annotation.pinColor = UIColor.red
        myMapKitView.addAnnotation(annotation)
        //左下のピン
        let annotation1 = MyMKPointAnnotation()
        annotation1.coordinate = CLLocationCoordinate2DMake(y-1.0, x-1.0)
        annotation1.title = "左下"
        annotation1.subtitle = "\(annotation1.coordinate.latitude), \(annotation1.coordinate.longitude)"
        annotation1.pinColor = UIColor.orange
        myMapKitView.addAnnotation(annotation1)

        //デリゲート先に自分を設定する。
        myMapKitView.delegate = self
    }

    //アノテーションビューを返すメソッド
    func mapView(_ mapView: MKMapView, viewFor annotation: MKAnnotation) -> MKAnnotationView? {
        //アノテーションビューを生成する。
        let myPinView = MKPinAnnotationView()
        //アノテーションビューに座標、タイトル、サブタイトルを設定する。
        myPinView.annotation = annotation
        //アノテーションビューに色を設定する。
        if let test = annotation as? MyMKPointAnnotation {
            myPinView.pinTintColor = test.pinColor
        }
        //吹き出しの表示をONにする。
        myPinView.canShowCallout = true
        return myPinView
    }
}

class MyMKPointAnnotation: MKPointAnnotation {
    //ピンの色
    var pinColor:UIColor = UIColor.red
}
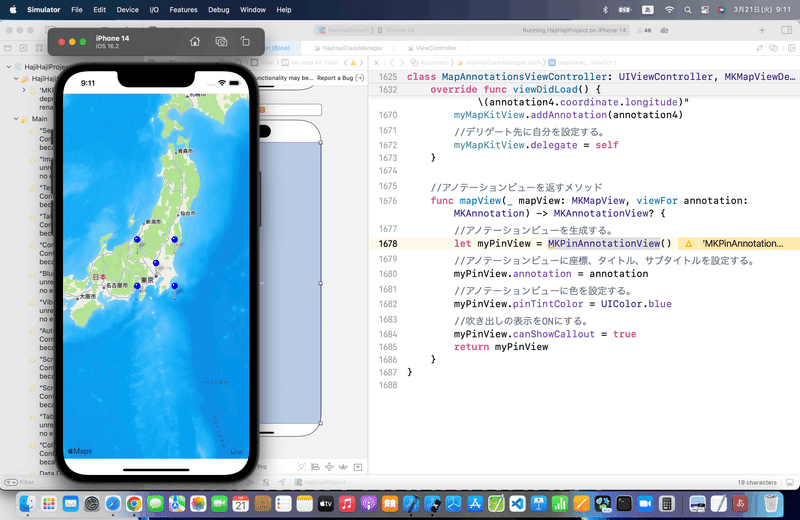
シミュレータを実行すると、、、

画像表示編
ここからは、単体の機能を繋いでるので、基本を押さえるように、二つに分ける〜〜〜〜
⒈画像をセット


⒉書き換え
//ピンの色
var pinColor:UIColor!

//ピンの画像
var pinImage:String!
をさっき追加したクラスに〜〜〜

⒊メインのコードを書き換え
class MapAnnotationsViewController: UIViewController, MKMapViewDelegate{
    @IBOutlet weak var myMapKitView: MKMapView!
    let x = 139.692101
    let y = 35.689634
    let latitudeDelta = 10.0
    let longitudeDelta = 10.0

    override func viewDidLoad() {
        super.viewDidLoad()
        //中心座標
        let center = CLLocationCoordinate2DMake(y, x)
        //表示範囲
        let span = MKCoordinateSpan(latitudeDelta: latitudeDelta, longitudeDelta: longitudeDelta)
        //中心座標と表示範囲をマップに登録する。
        let region = MKCoordinateRegion(center: center, span: span)
        myMapKitView.setRegion(region, animated:true)
        //中心のピン(画像を設定)
        let annotation = MyMKPointAnnotation()
        annotation.coordinate = CLLocationCoordinate2DMake(y, x)
        annotation.title = "中心"
        annotation.subtitle = "\(annotation.coordinate.latitude), \(annotation.coordinate.longitude)"
        annotation.pinImage = "pinImage"
        myMapKitView.addAnnotation(annotation)
        //左下のピン(色を設定)
        let annotation1 = MyMKPointAnnotation()
        annotation1.coordinate = CLLocationCoordinate2DMake(y-1.0, x-1.0)
        annotation1.title = "左下"
        annotation1.subtitle = "\(annotation1.coordinate.latitude), \(annotation1.coordinate.longitude)"
        annotation1.pinColor = UIColor.orange
        myMapKitView.addAnnotation(annotation1)

        //デリゲート先に自分を設定する。
        myMapKitView.delegate = self
    }

    //アノテーションビューを返すメソッド
    @objc func mapView(_ mapView: MKMapView, viewFor annotation: MKAnnotation) -> MKAnnotationView? {
        if let mine = annotation as? MyMKPointAnnotation {
            if(mine.pinColor != nil) {
                //色が設定されている場合
                let myPinView = MKPinAnnotationView()
                myPinView.annotation = annotation
                myPinView.pinTintColor = mine.pinColor
                myPinView.canShowCallout = true
                return myPinView
            } else if(mine.pinImage != nil) {
                //画像が設定されている場合
                let myImageView = MKAnnotationView()
                myImageView.annotation = annotation
                myImageView.image = UIImage(named:mine.pinImage)
                myImageView.canShowCallout = true
                return myImageView
            }
        }
        //色も画像も設定されていない場合
        let myPinView = MKPinAnnotationView()
        myPinView.canShowCallout = true
        myPinView.annotation = annotation
        return myPinView
    }
}

class MyMKPointAnnotation: MKPointAnnotation {
    //ピンの色
    var pinColor:UIColor!
    //ピンの画像
    var pinImage:String!
}
こんな感じ
⒋シミュレータ実行


基本の説明は以上🕺
ブラッシュアップ
で、最後のアノテーションメソッドをみると、
//色も画像も設定されていない場合
let myPinView = MKPinAnnotationView()
myPinView.canShowCallout = true
myPinView.annotation = annotation
return myPinView
が含まれているから、
元々のサンプルコードできちんと最後は表示してあげよう👀
今回のコード(画像連携)
class MapAnnotationsViewController: UIViewController, MKMapViewDelegate{
    @IBOutlet weak var myMapKitView: MKMapView!
    let x = 139.692101
    let y = 35.689634
    let latitudeDelta = 10.0
    let longitudeDelta = 10.0

    override func viewDidLoad() {
        super.viewDidLoad()
        //中心座標
        let center = CLLocationCoordinate2DMake(y, x)
        //表示範囲
        let span = MKCoordinateSpan(latitudeDelta: latitudeDelta, longitudeDelta: longitudeDelta)
        //中心座標と表示範囲をマップに登録する。
        let region = MKCoordinateRegion(center: center, span: span)
        myMapKitView.setRegion(region, animated:true)
        //中心のピン(画像を設定)
        let annotation = MyMKPointAnnotation()
        annotation.coordinate = CLLocationCoordinate2DMake(y, x)
        annotation.title = "中心"
        annotation.subtitle = "\(annotation.coordinate.latitude), \(annotation.coordinate.longitude)"
        annotation.pinImage = "pinImage"
        myMapKitView.addAnnotation(annotation)
        //左下のピン(色を設定)
        let annotation1 = MyMKPointAnnotation()
        annotation1.coordinate = CLLocationCoordinate2DMake(y-1.0, x-1.0)
        annotation1.title = "左下"
        annotation1.subtitle = "\(annotation1.coordinate.latitude), \(annotation1.coordinate.longitude)"
        annotation1.pinColor = UIColor.orange
        myMapKitView.addAnnotation(annotation1)
        //右下のピン(色を設定)
        let annotation2 = MyMKPointAnnotation()
        annotation2.coordinate = CLLocationCoordinate2DMake(y-1.0, x+1.0)
        annotation2.title = "右下"
        annotation2.subtitle = "\(annotation2.coordinate.latitude), \(annotation2.coordinate.longitude)"
        annotation2.pinColor = UIColor.green
        myMapKitView.addAnnotation(annotation2)
        //左上のピン(色を設定)
        let annotation3 = MyMKPointAnnotation()
        annotation3.coordinate = CLLocationCoordinate2DMake(y+1.0, x-1.0)
        annotation3.title = "左上"
        annotation3.subtitle = "\(annotation3.coordinate.latitude), \(annotation3.coordinate.longitude)"
        annotation3.pinColor = UIColor.blue
        myMapKitView.addAnnotation(annotation3)
        //右上のピン(画像も色も設定しない)
        let annotation4 = MKPointAnnotation()
        annotation4.coordinate = CLLocationCoordinate2DMake(y+1.0, x+1.0)
        annotation4.title = "右上"
        annotation4.subtitle = "\(annotation4.coordinate.latitude), \(annotation4.coordinate.longitude)"
        myMapKitView.addAnnotation(annotation4)
        //デリゲート先に自分を設定する。
        myMapKitView.delegate = self
    }

    //アノテーションビューを返すメソッド
    @objc func mapView(_ mapView: MKMapView, viewFor annotation: MKAnnotation) -> MKAnnotationView? {
        if let mine = annotation as? MyMKPointAnnotation {
            if(mine.pinColor != nil) {
                //色が設定されている場合
                let myPinView = MKPinAnnotationView()
                myPinView.annotation = annotation
                myPinView.pinTintColor = mine.pinColor
                myPinView.canShowCallout = true
                return myPinView
            } else if(mine.pinImage != nil) {
                //画像が設定されている場合
                let myImageView = MKAnnotationView()
                myImageView.annotation = annotation
                myImageView.image = UIImage(named:mine.pinImage)
                myImageView.canShowCallout = true
                return myImageView
            }
        }
        //色も画像も設定されていない場合
        let myPinView = MKPinAnnotationView()
        myPinView.canShowCallout = true
        myPinView.annotation = annotation
        return myPinView
    }
}

class MyMKPointAnnotation: MKPointAnnotation {
    //ピンの色
    var pinColor:UIColor!
    //ピンの画像
    var pinImage:String!
}
今回のポイント
⒈コードが冗長なものについては、基本コードを見極めて、そこから小さく実践し、最終的に大きく繋げる
👉どんなに大きなシステムも紐解いていけば、所詮小さなコードのかたまり
⒉CocoaTouchClassファイルをあえて作らなくても、クラス自体を管理することはできる。
👉管理しやすいファイルの構成を考えよう🕺
⒊強制アンラップに気を付ける
おかわり
さてと、ここら辺でバルーンが気になってる人もいるだろうから。
バルーンの簡単な実践例だけ〜〜〜〜
おかわりで!!!!
あんまり話が脱線しすぎても、混乱するだけなんで
のコードを少し変えてはめ込む程度にしとくね
enum PizzaType {
    case thin
    case deepDish
    case potPie
}

class PizzaAnnotation:NSObject,MKAnnotation{
    var coordinate: CLLocationCoordinate2D
    var title: String?
    var subtitle: String?
    var type: PizzaType
    init(_ latitude:CLLocationDegrees,_ longitude:CLLocationDegrees,title:String,subtitle:String,type:PizzaType){
        self.coordinate = CLLocationCoordinate2DMake(latitude, longitude)
        self.title = title
        self.subtitle = subtitle
        self.type = type
    }
}

class PizzaAnnotations: NSObject {
    var restaurants:[PizzaAnnotation]
    override init(){
       //build an array of pizza loactions literally
        restaurants = [PizzaAnnotation(41.892472,-87.62687676, title: "Pizzeria Uno", subtitle:"First Deep Dish Pizza", type: .deepDish)]
        restaurants += [PizzaAnnotation(41.8931164,-87.6267778, title: "Pizzeria Due", subtitle:"Second Uno Location", type: .deepDish)]
        restaurants += [PizzaAnnotation(41.8957338,-87.6229457, title: "Gino's East", subtitle:"Deep Dish if you can't cross Michigan Avenue", type: .deepDish)]
        restaurants += [PizzaAnnotation(41.9206924,-87.6375364, title: "Chicago Pizza and Oven Grinder", subtitle:"Pizza baked in a bowl", type: .potPie)]
         restaurants += [PizzaAnnotation(41.9217837,-87.6645778, title: "Pequods", subtitle:"Carmelized Crust Deep Dish", type: .deepDish)]
         restaurants += [PizzaAnnotation(42.0018732,-87.7258586 , title: "Lou Malnati's", subtitle:"Ex Uno's Manager goes solo", type: .deepDish)]
         restaurants += [PizzaAnnotation(41.8910953,-87.6597941 , title: "CoalFire", subtitle:"Coal fired thin pizza", type: .thin)]
         restaurants += [PizzaAnnotation(41.9105463,-87.6760223, title: "Piece", subtitle:"White, thin square pizza", type: .thin)]
         restaurants += [PizzaAnnotation(41.9633682,-87.6737948, title: "Spacca Napoli", subtitle:"Authentic Neopolitan pizza", type: .thin)]
    }
}

class MapBalloonViewController: UIViewController, MKMapViewDelegate {
    let pizzaAnnotations = PizzaAnnotations()
    let initialCoordinate = CLLocationCoordinate2DMake(41.9180474,-87.661767)
    let latitudeDelta = 0.1
    let longitudeDelta = 0.1

    @IBOutlet weak var myMapView: MKMapView!

    func mapView(_ mapView: MKMapView, viewFor annotation: MKAnnotation) -> MKAnnotationView? {
        var annotationView = MKMarkerAnnotationView()
        guard let annotation = annotation as? PizzaAnnotation else {return nil}
        var identifier = ""
        var color = UIColor.red
        switch annotation.type{
        case .deepDish:
            identifier = "Deep Dish"
            color = .red
        case .potPie:
            identifier = "Pot pie"
            color = .black
        case .thin:
            identifier = "Thin crust"
            color = .blue
        }
        if let dequedView = mapView.dequeueReusableAnnotationView(
            withIdentifier: identifier)
            as? MKMarkerAnnotationView {
            annotationView = dequedView
        } else{
            annotationView = MKMarkerAnnotationView(annotation: annotation, reuseIdentifier: identifier)
        }
        annotationView.markerTintColor = color
        annotationView.glyphImage = UIImage(named: "pizza")
        annotationView.glyphTintColor = .yellow
        annotationView.clusteringIdentifier = identifier
        return annotationView
    }
    override func viewDidLoad() {
        super.viewDidLoad()
        myMapView.delegate = self
        let initialregion = MKCoordinateRegion(center: initialCoordinate, span: MKCoordinateSpan(latitudeDelta: latitudeDelta, longitudeDelta: longitudeDelta))
        myMapView.setRegion(initialregion, animated: true)
        myMapView.addAnnotations(pizzaAnnotations.restaurants)
    }
    override func didReceiveMemoryWarning() {
        super.didReceiveMemoryWarning()
    }
}
クラス名なんかを変えたりで色々遊べると思うので、
練習台で色々やってみてね〜〜〜〜🕺
冒頭でも言ったけど、後続のサイト記事の手順に影響するから、ここではやらない〜〜〜〜!
Apple公式
さて、次回は
をレッツゴする🕺
この記事が気に入ったらサポートをしてみませんか?