
ESP32をPS5 Controllerから操作する

背景
今までPS4コントローラからArduino(ESP32)を使ったロボットを操作していたが、充電インターフェースのMicroUSBは古くなりケーブルを持ち歩かなくなったので、これから作るロボットはPS5 Controllerから動かしたいと思った。
やり方を備忘録として記事に残す。
環境
PC:M1 macbook, M2 macbook
macOS Ver.:Sonoma
開発環境:Visual Stduio Code(Arduino IDEを使っても手順に変化なし)
その他:PS5本体は所持していない
やり方
①Githubから有志の開発したライブラリをDownload
②PS5 ControllerのMACアドレスを調べる
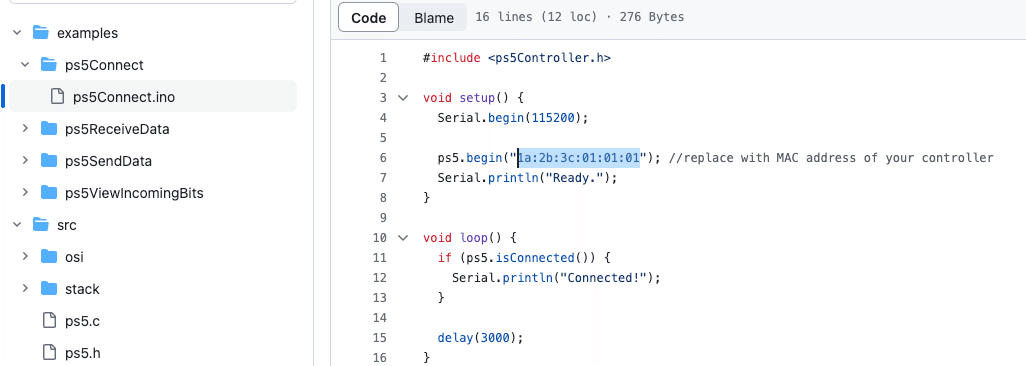
上記ライブラリのexampleに入っているps5Connect.inoで接続を試みるとps5.bebinという関数の引数でPS5 ControllerのMACアドレスが必要になる。
PS5を所持している人であればPS5の設定から調べられるらしいが私は本体を持っていないため下記のプログラムをESP32に書き込みSerial Monitorに出力される情報からMACアドレスを取得した。
#include <Arduino.h> #include <BluetoothSerial.h> #if !defined(CONFIG_BT_ENABLED) || !defined(CONFIG_BLUEDROID_ENABLED) #error Bluetooth is not enabled! Please run `make menuconfig` to and enable it #endif #if !defined(CONFIG_BT_SPP_ENABLED) #error Serial Bluetooth not available or not enabled. It is only available for the ESP32 chip. #endif BluetoothSerial SerialBT; #define BT_DISCOVER_TIME 10000 esp_spp_sec_t sec_mask = ESP_SPP_SEC_NONE; // or ESP_SPP_SEC_ENCRYPT|ESP_SPP_SEC_AUTHENTICATE to // request pincode confirmation esp_spp_role_t role = ESP_SPP_ROLE_SLAVE; // or ESP_SPP_ROLE_MASTER void setup() { Serial.begin(115200); if (!SerialBT.begin("ESP32test", true)) { Serial.println("========== serialBT failed!"); abort(); } // SerialBT.setPin("1234"); // doesn't seem to change anything // SerialBT.enableSSP(); // doesn't seem to change anything } void loop() { Serial.println("Starting discoverAsync..."); BTScanResults* btDeviceList = SerialBT.getScanResults(); // maybe accessing from different threads! if (SerialBT.discoverAsync([](BTAdvertisedDevice* pDevice) { // BTAdvertisedDeviceSet*set = // reinterpret_cast<BTAdvertisedDeviceSet*>(pDevice); // btDeviceList[pDevice->getAddress()] = * set; Serial.printf(">>>>>>>>>>>Found a new device asynchronously: %s\n", pDevice->toString().c_str()); })) { delay(BT_DISCOVER_TIME); Serial.print("Stopping discoverAsync... "); SerialBT.discoverAsyncStop(); Serial.println("discoverAsync stopped"); delay(5000); if (btDeviceList->getCount() > 0) { BTAddress addr; int channel = 0; Serial.println("Found devices:"); for (int i = 0; i < btDeviceList->getCount(); i++) { BTAdvertisedDevice* device = btDeviceList->getDevice(i); Serial.printf(" ----- %s %s %d\n", device->getAddress().toString().c_str(), device->getName().c_str(), device->getRSSI()); std::map<int, std::string> channels = SerialBT.getChannels(device->getAddress()); Serial.printf("scanned for services, found %d\n", channels.size()); for (auto const& entry : channels) { Serial.printf(" channel %d (%s)\n", entry.first, entry.second.c_str()); } if (channels.size() > 0) { addr = device->getAddress(); channel = channels.begin()->first; } } if (addr) { Serial.printf("connecting to %s - %d\n", addr.toString().c_str(), channel); SerialBT.connect(addr, channel, sec_mask, role); } } else { Serial.println("Didn't find any devices"); } } else { Serial.println( "Error on discoverAsync f.e. not workin after a \"connect\""); } }
上記プログラムをESP32で実行するとSerial Monitorに下記画像のようにPS5 Controllerが「DualSense Wireless Controller」という名前で見つかる。名前の直前に表記されている10:19: ….が取得したいMACアドレス。
右端の数字は電波強度。沢山Bluetooth Deviceが存在する空間では沢山出力されてきて探すのが面倒になるので可能な限りControllerとESP32を近づけておいた方が良い。

取得したMACアドレスをexampleプログラムに書き込んで実行し完了。
ちなみに、ps5ReceiveData.inoを実行すると各ボタンの取得値がリアルタイムにSerial Monitorから確認できる。

以上。
この記事が気に入ったらサポートをしてみませんか?