
35. 最新の IoT Edge Module 開発環境を試す

はじめに
前回の記事を書く時、久しぶりに、Visual Studio Code + IoT Edge 拡張で新しく IoT Edge Module を作ってみたら、生成された C# コードがかなり変わっていて驚きました。今回は、最新の IoT Edge 拡張で生成したコードをガン見することにします。
おさらい
Visual Studio Code に IoT Edge 拡張をインストールすると、IoT Edge Module を開発できるようになるのは、以前からこの定期購読マガジンでも紹介してきました。この開発環境について、簡単に振り返りを行います。
開発に関する概要は、
Visual Studio Code を使用して Azure IoT Edge モジュールを開発およびデバッグする | Microsoft Learn
に書いてあるので、こちらを参照してもらうとして、ポイントだけ書いておきます。…まてまて、このリンク、Visual Studio Code + IoT Edge 拡張による開発に関するものではないですね。PowerShell や Bash 等のコマンドラインでの開発方法の説明が書いてありました。Visual Studio Code は開発したコードのリモートデバッグで使うという事です。まぁ、この記事も実際の開発では役立つ情報なので、覚えておくとよいでしょう。
で、Visual Studio Code + IoT Edge 拡張のセッティングや、IoT Edge Module の開発については、
Visual Studio Code を使用して Azure IoT Edge モジュールを開発およびデバッグする | Microsoft Learn
こちらの方でした。あれ?字面一緒?それぞれの URL を確認すると、最後の pivots の値が異なります。
Windows PC で Visual Studio Code + IoT Edge 拡張 を使うには、
が、必要です。ってことは、Windows Home でなく、Windows Professional 以上の OS が必要という事ですね。ご注意ください。
Visual Studio Code は、https://visualstudio.microsoft.com/ からインストーラをダウンロード・実行すれば簡単にインストールできます。
IoT Edge 拡張は、Azure IoT Edge - Visual Studio Marketplace から公開されています。インストールは簡単で、
Visual Studio Code の Extension で ”Azure IoT Edge” を検索してインストールを行います。
この拡張ツールでは、C/C++、C#、Node.JS、Python 等、様々なプログラミング言語での開発が可能ですが、それぞれ、
Python - Python - Visual Studio Marketplace
の拡張インストールが必要です。他にも、C# の場合は、.NET Framework SDK、Node.JS の場合は、node.js と npm の、Windows PC へのインストールが必要です。
最新の Visual Studio Code +IoT Edge extension で IoT Edge Module プロジェクトを作ってみる
それでは、2023/2/21 現在の最新の Azure IoT Edge 拡張で、C言語、C#、Node.js、Python の IoT Edge Module プロジェクトを作ってみます。
Azure IoT Edge のバージョンは、1.25.1 です。
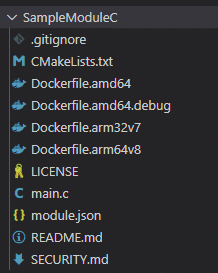
C言語
生成されたファイル群は以下の通りです。構成自体は変わっていません。
main.c のコードは、
// Copyright (c) Microsoft. All rights reserved.
// Licensed under the MIT license. See LICENSE file in the project root for full license information.

#include <stdio.h>
#include <stdlib.h>

#include "iothub_module_client_ll.h"
#include "iothub_client_options.h"
#include "iothub_message.h"
#include "azure_c_shared_utility/threadapi.h"
#include "azure_c_shared_utility/crt_abstractions.h"
#include "azure_c_shared_utility/platform.h"
#include "azure_c_shared_utility/shared_util_options.h"
#include "iothubtransportmqtt.h"
#include "iothub.h"
#include "time.h"

typedef struct MESSAGE_INSTANCE_TAG
{
    IOTHUB_MESSAGE_HANDLE messageHandle;
    size_t messageTrackingId;  // For tracking the messages within the user callback.
}
MESSAGE_INSTANCE;

size_t messagesReceivedByInput1Queue = 0;

// SendConfirmationCallback is invoked when the message that was forwarded on from 'InputQueue1Callback'
// pipeline function is confirmed.
static void SendConfirmationCallback(IOTHUB_CLIENT_CONFIRMATION_RESULT result, void* userContextCallback)
{
    // The context corresponds to which message# we were at when we sent.
    MESSAGE_INSTANCE* messageInstance = (MESSAGE_INSTANCE*)userContextCallback;
    printf("Confirmation[%zu] received for message with result = %d\r\n", messageInstance->messageTrackingId, result);
    IoTHubMessage_Destroy(messageInstance->messageHandle);
    free(messageInstance);
}

// Allocates a context for callback and clones the message
// NOTE: The message MUST be cloned at this stage.  InputQueue1Callback's caller always frees the message
// so we need to pass down a new copy.
static MESSAGE_INSTANCE* CreateMessageInstance(IOTHUB_MESSAGE_HANDLE message)
{
    MESSAGE_INSTANCE* messageInstance = (MESSAGE_INSTANCE*)malloc(sizeof(MESSAGE_INSTANCE));
    if (NULL == messageInstance)
    {
        printf("Failed allocating 'MESSAGE_INSTANCE' for pipelined message\r\n");
    }
    else
    {
        memset(messageInstance, 0, sizeof(*messageInstance));

        if ((messageInstance->messageHandle = IoTHubMessage_Clone(message)) == NULL)
        {
            free(messageInstance);
            messageInstance = NULL;
        }
        else
        {
            messageInstance->messageTrackingId = messagesReceivedByInput1Queue;
        }
    }

    return messageInstance;
}

static IOTHUBMESSAGE_DISPOSITION_RESULT InputQueue1Callback(IOTHUB_MESSAGE_HANDLE message, void* userContextCallback)
{
    IOTHUBMESSAGE_DISPOSITION_RESULT result;
    IOTHUB_CLIENT_RESULT clientResult;
    IOTHUB_MODULE_CLIENT_LL_HANDLE iotHubModuleClientHandle = (IOTHUB_MODULE_CLIENT_LL_HANDLE)userContextCallback;

    unsigned const char* messageBody;
    size_t contentSize;

    if (IoTHubMessage_GetByteArray(message, &messageBody, &contentSize) != IOTHUB_MESSAGE_OK)
    {
        messageBody = "<null>";
    }

    printf("Received Message [%zu]\r\n Data: [%s]\r\n",
            messagesReceivedByInput1Queue, messageBody);

    // This message should be sent to next stop in the pipeline, namely "output1".  What happens at "outpu1" is determined
    // by the configuration of the Edge routing table setup.
    MESSAGE_INSTANCE *messageInstance = CreateMessageInstance(message);
    if (NULL == messageInstance)
    {
        result = IOTHUBMESSAGE_ABANDONED;
    }
    else
    {
        printf("Sending message (%zu) to the next stage in pipeline\n", messagesReceivedByInput1Queue);

        clientResult = IoTHubModuleClient_LL_SendEventToOutputAsync(iotHubModuleClientHandle, messageInstance->messageHandle, "output1", SendConfirmationCallback, (void *)messageInstance);
        if (clientResult != IOTHUB_CLIENT_OK)
        {
            IoTHubMessage_Destroy(messageInstance->messageHandle);
            free(messageInstance);
            printf("IoTHubModuleClient_LL_SendEventToOutputAsync failed on sending msg#=%zu, err=%d\n", messagesReceivedByInput1Queue, clientResult);
            result = IOTHUBMESSAGE_ABANDONED;
        }
        else
        {
            result = IOTHUBMESSAGE_ACCEPTED;
        }
    }

    messagesReceivedByInput1Queue++;
    return result;
}

static IOTHUB_MODULE_CLIENT_LL_HANDLE InitializeConnection()
{
    IOTHUB_MODULE_CLIENT_LL_HANDLE iotHubModuleClientHandle;

    if (IoTHub_Init() != 0)
    {
        printf("Failed to initialize the platform.\r\n");
        iotHubModuleClientHandle = NULL;
    }
    else if ((iotHubModuleClientHandle = IoTHubModuleClient_LL_CreateFromEnvironment(MQTT_Protocol)) == NULL)
    {
        printf("ERROR: IoTHubModuleClient_LL_CreateFromEnvironment failed\r\n");
    }
    else
    {
        // Uncomment the following lines to enable verbose logging.
        // bool traceOn = true;
        // IoTHubModuleClient_LL_SetOption(iotHubModuleClientHandle, OPTION_LOG_TRACE, &trace);
    }

    return iotHubModuleClientHandle;
}

static void DeInitializeConnection(IOTHUB_MODULE_CLIENT_LL_HANDLE iotHubModuleClientHandle)
{
    if (iotHubModuleClientHandle != NULL)
    {
        IoTHubModuleClient_LL_Destroy(iotHubModuleClientHandle);
    }
    IoTHub_Deinit();
}

static int SetupCallbacksForModule(IOTHUB_MODULE_CLIENT_LL_HANDLE iotHubModuleClientHandle)
{
    int ret;

    if (IoTHubModuleClient_LL_SetInputMessageCallback(iotHubModuleClientHandle, "input1", InputQueue1Callback, (void*)iotHubModuleClientHandle) != IOTHUB_CLIENT_OK)
    {
        printf("ERROR: IoTHubModuleClient_LL_SetInputMessageCallback(\"input1\")..........FAILED!\r\n");
        ret = 1;
    }
    else
    {
        ret = 0;
    }

    return ret;
}

void iothub_module()
{
    IOTHUB_MODULE_CLIENT_LL_HANDLE iotHubModuleClientHandle;

    srand((unsigned int)time(NULL));

    if ((iotHubModuleClientHandle = InitializeConnection()) != NULL && SetupCallbacksForModule(iotHubModuleClientHandle) == 0)
    {
        // The receiver just loops constantly waiting for messages.
        printf("Waiting for incoming messages.\r\n");
        while (true)
        {
            IoTHubModuleClient_LL_DoWork(iotHubModuleClientHandle);
            ThreadAPI_Sleep(100);
        }
    }

    DeInitializeConnection(iotHubModuleClientHandle);
}

int main(void)
{
    iothub_module();
    return 0;
}
このコードは、以降で紹介する、C#、Node.JS、Python と同等のロジックです。ロゼッタストーン的に見てみるのも面白いでしょう。
次に、CMakeList.txt を見てみます。これは、C/C++ の開発プロジェクトでよく使われる Makefile 自動生成ツールの "cmake”用のファイルです。
cmake_minimum_required(VERSION 2.8.11)

macro(compileAsC99)
  if (CMAKE_VERSION VERSION_LESS "3.1")
    if (CMAKE_C_COMPILER_ID STREQUAL "GNU")
      set (CMAKE_C_FLAGS "--std=c99 ${CMAKE_C_FLAGS}")
      set (CMAKE_CXX_FLAGS "--std=c++11 ${CMAKE_CXX_FLAGS}")
    endif()
  else()
    set (CMAKE_C_STANDARD 99)
    set (CMAKE_CXX_STANDARD 11)
  endif()
endmacro(compileAsC99)

compileAsC99()

set(CMAKE_CXX_FLAGS "${CMAKE_CXX_FLAGS} -DUSE_EDGE_MODULES")
set(CMAKE_C_FLAGS "${CMAKE_C_FLAGS} -DUSE_EDGE_MODULES")

set(AZUREIOT_INC_FOLDER "/usr/include/azureiot" "/usr/include/azureiot/inc")

include_directories(${AZUREIOT_INC_FOLDER})

set(main_c_files
    ./main.c
)

add_executable(main ${main_c_files})

target_link_libraries(main
    iothub_client_mqtt_transport
    iothub_client
    parson
    umqtt
    prov_auth_client
    hsm_security_client
    uhttp
    aziotsharedutil
    pthread
    curl
    ssl
    crypto
    m
    uuid
)
次は、Dockerfile を見てみます。amd64 向けの、Dockerfile.amd64 を取り上げると、
FROM ubuntu:bionic AS base
RUN apt-get update && \
    apt-get install -y --no-install-recommends software-properties-common && \
    add-apt-repository -y ppa:aziotsdklinux/ppa-azureiot && \
    apt-get update && \
    apt-get install -y azure-iot-sdk-c-dev && \
    rm -rf /var/lib/apt/lists/*

FROM base AS build-env
RUN apt-get update && \
    apt-get install -y --no-install-recommends cmake gcc g++ make && \
    rm -rf /var/lib/apt/lists/*
WORKDIR /app
COPY . ./
RUN cmake .
RUN make

FROM base
WORKDIR /app
COPY --from=build-env /app ./
RUN useradd -ms /bin/bash moduleuser
USER moduleuser
CMD ["./main"]
Base Image は、ubuntu:bionic なので、Ubuntu 18.04 が使われています。C/C++ 言語の開発環境のインストールと、cmake により Makefile を生成して、make でビルドし、main という実行ファイルが作成されて、その実行ファイルを起動する、といった内容が定義されています。
まぁ、Docker テクノロジーを活用した IoT Edge Module では、C 言語を使っての開発はレアだと思うので、これくらいにしておきます。C言語については、後日また改めて、小規模 HW での IoT Hub 接続と絡めて深~く取り上げる予定です。
C#
C# は結構変わりました。
ここから先は
Azure の最新機能で IoT を改めてやってみる
2022年3月にマイクロソフトの中の人から外の人になった Embedded D. George が、現時点で持っている知識に加えて、頻繁に…
この記事が気に入ったらサポートをしてみませんか?