ClaudeのArtifactsで動くアートを作ってみよう!

Claude 3.5の新機能であるArtifactsを使えば、簡単に動くアートを作ることができます。プロンプトは以下の通りです。
HTMLアーティファクトで○○をテーマにした動くアートを作成して
1.宇宙をテーマにした動くアート
HTMLアーティファクトで宇宙をテーマにした動くアートを作成して
以下はClaudeの回答です。
はい、宇宙をテーマにした動くHTMLアートを作成いたします。これは単一のHTMLファイルで、アニメーションのためにCSSとJavaScriptを使用します。
<!DOCTYPE html>
<html lang="ja">
<head>
    <meta charset="UTF-8">
    <meta name="viewport" content="width=device-width, initial-scale=1.0">
    <title>宇宙アート</title>
    <style>
        body {
            margin: 0;
            overflow: hidden;
            background-color: #000;
        }
        .space {
            position: absolute;
            width: 100%;
            height: 100%;
        }
        .star {
            position: absolute;
            background-color: #fff;
            border-radius: 50%;
        }
        .planet {
            position: absolute;
            border-radius: 50%;
        }
    </style>
</head>
<body>
    <div class="space" id="space"></div>

    <script>
        const space = document.getElementById('space');

        function createStar() {
            const star = document.createElement('div');
            star.className = 'star';
            star.style.left = `${Math.random() * 100}%`;
            star.style.top = `${Math.random() * 100}%`;
            star.style.width = `${Math.random() * 3}px`;
            star.style.height = star.style.width;
            star.style.animationDuration = `${Math.random() * 3 + 1}s`;
            star.style.animationName = 'twinkle';
            star.style.animationIterationCount = 'infinite';
            star.style.animationDirection = 'alternate';
            space.appendChild(star);
        }

        function createPlanet(color, size) {
            const planet = document.createElement('div');
            planet.className = 'planet';
            planet.style.backgroundColor = color;
            planet.style.width = `${size}px`;
            planet.style.height = `${size}px`;
            planet.style.left = `${Math.random() * (100 - size / window.innerWidth * 100)}%`;
            planet.style.top = `${Math.random() * (100 - size / window.innerHeight * 100)}%`;
            space.appendChild(planet);
            animatePlanet(planet);
        }

        function animatePlanet(planet) {
            let x = parseFloat(planet.style.left);
            let y = parseFloat(planet.style.top);
            // 速度を3倍に増加
            let dx = (Math.random() - 0.5) * 0.3;
            let dy = (Math.random() - 0.5) * 0.3;

            function move() {
                x += dx;
                y += dy;
                if (x <= 0 || x >= 100 - parseFloat(planet.style.width) / window.innerWidth * 100) dx = -dx;
                if (y <= 0 || y >= 100 - parseFloat(planet.style.height) / window.innerHeight * 100) dy = -dy;
                planet.style.left = `${x}%`;
                planet.style.top = `${y}%`;
                requestAnimationFrame(move);
            }
            move();
        }

        // 星を作成
        for (let i = 0; i < 200; i++) {
            createStar();
        }

        // 惑星を作成
        createPlanet('#ff4500', 50); // 赤い惑星
        createPlanet('#4169e1', 30); // 青い惑星
        createPlanet('#32cd32', 40); // 緑の惑星

        // キラキラ効果のアニメーション
        const style = document.createElement('style');
        style.textContent = `
            @keyframes twinkle {
                0% { opacity: 0.3; }
                100% { opacity: 1; }
            }
        `;
        document.head.appendChild(style);
    </script>
</body>
</html>
この宇宙をテーマにした動くアートは以下の特徴を持っています:
暗い背景に、ランダムに配置された多数の星が点滅しています。
3つの異なる色と大きさの惑星が、ゆっくりと画面上を動き回ります。
惑星は画面の端に達すると跳ね返ります。
このHTMLファイルをブラウザで開くと、動くアートを見ることができます。星の数や惑星の色、大きさなどは簡単に調整できます。
アニメーションやデザインについて、何か特定の変更や追加の要素を加えたいですか?
(ここまでClaudeの回答)
Canvasを使用した動くアートの作成
Canvasで宇宙をテーマとした動くアートを作成して
このアニメーションのコードはCanvasを使っています。Canvasは、HTML5で導入された技術仕様で、JavaScriptを使ってブラウザ上で動的な2Dグラフィックスを描画します。線、円、矩形、画像、テキストを描くことができ、アニメーションやインタラクティブなグラフィックスの作成も可能です。Canvasは、ゲーム開発、データビジュアライゼーション、インタラクティブなウェブアプリケーションなど、様々な用途に利用されています。
2.光の反射と波形をテーマにした動くアート
HTMLアーティファクトで光の反射と波形をテーマにした動くアートを作成して
このアニメーションのコードもCanvasを使っています。以下はClaudeの回答です。
はい、光の反射と波形をテーマにした動くアートをHTMLアーティファクトで作成いたします。このアートでは、波紋が広がる水面に光が反射するような効果を表現します。
<!DOCTYPE html>
<html lang="ja">
<head>
    <meta charset="UTF-8">
    <meta name="viewport" content="width=device-width, initial-scale=1.0">
    <title>光の反射と波形アート</title>
    <style>
        body {
            margin: 0;
            overflow: hidden;
            background-color: #000;
        }
        canvas {
            display: block;
        }
    </style>
</head>
<body>
    <canvas id="canvas"></canvas>
    <script>
        const canvas = document.getElementById('canvas');
        const ctx = canvas.getContext('2d');

        let width, height;
        let time = 0;
        const waves = [];

        function resizeCanvas() {
            width = window.innerWidth;
            height = window.innerHeight;
            canvas.width = width;
            canvas.height = height;
        }

        function createWave() {
            return {
                x: Math.random() * width,
                y: Math.random() * height,
                radius: 0,
                speed: 1 + Math.random() * 2,
                color: `hsl(${Math.random() * 360}, 100%, 50%)`,
                alpha: 1
            };
        }

        function drawWave(wave) {
            ctx.beginPath();
            ctx.arc(wave.x, wave.y, wave.radius, 0, Math.PI * 2);
            ctx.strokeStyle = wave.color;
            ctx.globalAlpha = wave.alpha;
            ctx.stroke();
        }

        function drawLightReflection() {
            const gradient = ctx.createRadialGradient(width / 2, height / 2, 0, width / 2, height / 2, width / 2);
            gradient.addColorStop(0, 'rgba(255, 255, 255, 0.3)');
            gradient.addColorStop(1, 'rgba(255, 255, 255, 0)');

            ctx.fillStyle = gradient;
            ctx.fillRect(0, 0, width, height);
        }

        function animate() {
            ctx.fillStyle = 'rgba(0, 0, 0, 0.1)';
            ctx.fillRect(0, 0, width, height);

            drawLightReflection();

            if (Math.random() < 0.05) {
                waves.push(createWave());
            }

            for (let i = waves.length - 1; i >= 0; i--) {
                const wave = waves[i];
                wave.radius += wave.speed;
                wave.alpha -= 0.003;

                drawWave(wave);

                if (wave.alpha <= 0) {
                    waves.splice(i, 1);
                }
            }

            time += 0.05;
            requestAnimationFrame(animate);
        }

        window.addEventListener('resize', resizeCanvas);
        resizeCanvas();
        animate();
    </script>
</body>
</html>
このHTMLアーティファクトは、光の反射と波形をテーマにした動くアートを作成します。以下の特徴があります:
画面中央に光の反射を模した放射状のグラデーションが表示されます。
ランダムな位置から波紋が発生し、徐々に広がっていきます。
波紋は様々な色で表現され、時間とともに透明度が上がっていきます。
複数の波紋が重なり合うことで、複雑な模様を作り出します。
このアニメーションは以下のように動作します:
画面全体に薄い黒の矩形を重ねることで、前のフレームの残像効果を生み出しています。
中央の光の反射は放射状のグラデーションで表現されています。
ランダムな間隔で新しい波紋が生成されます。
各波紋は時間とともに大きくなり、同時に透明度が上がっていきます。
波紋が完全に透明になると、配列から削除されます。
このアートは水面に映る光と、そこに生じる波紋の相互作用を表現しており、幻想的な雰囲気を醸し出します。
アニメーションの特定の側面を変更したい場合(例えば、波紋の速度、色の変化方法、光の反射の強さなど)や、何か追加の要素を加えたい場合は、お知らせください。
(ここまでClaudeの回答)
3.粒子が集まって文字を形成するアニメーション
HTMLアーティファクトで、散らばった粒子が流星のように飛んできて、「ARTIFACTS」という大きな文字になるアニメーションを作成して
以下はClaudeの回答です。
はい、ご要望の通り、散らばった粒子が流星のように飛んできて「ARTIFACTS」という大きな文字を形成するアニメーションをHTMLアーティファクトで作成いたします。
<!DOCTYPE html>
<html lang="ja">
<head>
    <meta charset="UTF-8">
    <meta name="viewport" content="width=device-width, initial-scale=1.0">
    <title>Particle Text Animation</title>
    <style>
        body {
            margin: 0;
            overflow: hidden;
            background-color: #000;
        }
         #canvas {
            display: block;
        }
    </style>
</head>
<body>
    <canvas id="canvas"></canvas>
    <script>
        const canvas = document.getElementById('canvas');
        const ctx = canvas.getContext('2d');
        canvas.width = window.innerWidth;
        canvas.height = window.innerHeight;

        const particles = [];
        const text = 'ARTIFACTS';
        const fontSize = Math.min(canvas.width / text.length * 0.8, canvas.height * 0.3);

        ctx.font = `bold ${fontSize}px Arial`;
        ctx.fillStyle = 'white';
        ctx.textAlign = 'center';
        ctx.textBaseline = 'middle';
        ctx.fillText(text, canvas.width / 2, canvas.height / 2);

        const imageData = ctx.getImageData(0, 0, canvas.width, canvas.height);
        ctx.clearRect(0, 0, canvas.width, canvas.height);

        class Particle {
            constructor(x, y, targetX, targetY) {
                this.x = Math.random() * canvas.width;
                this.y = Math.random() * canvas.height;
                this.size = Math.random() * 2 + 1;
                this.targetX = targetX;
                this.targetY = targetY;
                this.speed = Math.random() * 0.02 + 0.01;
                this.velocityX = 0;
                this.velocityY = 0;
                this.color = `hsl(${Math.random() * 60 + 200}, 100%, 50%)`;
            }

            update() {
                this.velocityX = (this.targetX - this.x) * this.speed;
                this.velocityY = (this.targetY - this.y) * this.speed;
                this.x += this.velocityX;
                this.y += this.velocityY;
            }

            draw() {
                ctx.fillStyle = this.color;
                ctx.beginPath();
                ctx.arc(this.x, this.y, this.size, 0, Math.PI * 2);
                ctx.fill();
            }
        }

        function init() {
            for (let y = 0; y < imageData.height; y += 5) {
                for (let x = 0; x < imageData.width; x += 5) {
                    if (imageData.data[(y * imageData.width + x) * 4 + 3] > 128) {
                        particles.push(new Particle(x, y, x, y));
                    }
                }
            }
        }

        function animate() {
            ctx.fillStyle = 'rgba(0, 0, 0, 0.05)';
            ctx.fillRect(0, 0, canvas.width, canvas.height);

            particles.forEach(particle => {
                particle.update();
                particle.draw();
            });

            requestAnimationFrame(animate);
        }

        init();
        animate();

        window.addEventListener('resize', () => {
            canvas.width = window.innerWidth;
            canvas.height = window.innerHeight;
        });
    </script>
</body>
</html>
このHTMLアーティファクトは、以下の特徴を持つアニメーションを作成します:
画面全体に散らばった粒子が、「ARTIFACTS」という文字の形に向かって移動します。
粒子は流星のように、尾を引きながら移動します。
粒子の色は青から紫の範囲でランダムに設定されます。
文字のサイズは画面のサイズに応じて自動的に調整されます。
このHTMLファイルをブラウザで開くと、アニメーションを見ることができます。以下のような調整が可能です:
文字列を変更する(`const text = 'ARTIFACTS';`の行を編集)
粒子の色範囲を変更する(`hsl(${Math.random() * 60 + 200}, 100%, 50%)`の部分を編集)
粒子の大きさや速度を調整する(`this.size`や`this.speed`の計算を編集)
アニメーションの特定の側面を変更したり、何か追加の要素を加えたりしたい場合は、お知らせください。
(ここまでClaudeの回答)
4.p5.jsを使ったアニメーション
p5.jsは、Processing言語のJavaScriptライブラリで、ウェブブラウザ上で簡単にグラフィックスやインタラクティブなコンテンツを作成するためのツールです。初心者でも直感的に使えるように設計されており、Canvasを使った描画やアニメーション、ユーザー入力の処理を簡単に実現できます。デザイナーやアーティスト、教育者に人気があります。
HTMLアーティファクトでp5.jsを使って宇宙をテーマにした動くアートを作成して
以下はClaudeの回答です。
はい、p5.jsを使って宇宙をテーマにした動くアートを作成しましょう。HTMLアーティファクトを使ってインタラクティブな宇宙のシーンを作ります。
<!DOCTYPE html>
<html lang="ja">
<head>
    <meta charset="UTF-8">
    <meta name="viewport" content="width=device-width, initial-scale=1.0">
    <title>宇宙アート</title>
    <script src="https://cdnjs.cloudflare.com/ajax/libs/p5.js/1.4.0/p5.js"></script>
    <style>
        body { margin: 0; padding: 0; overflow: hidden; }
    </style>
</head>
<body>
    <script>
        let stars = [];
        let planets = [];

        function setup() {
            createCanvas(windowWidth, windowHeight);
            for (let i = 0; i < 200; i++) {
                stars.push(new Star());
            }
            for (let i = 0; i < 3; i++) {
                planets.push(new Planet());
            }
        }

        function draw() {
            background(0, 10, 30);

            stars.forEach(star => {
                star.update();
                star.show();
            });

            planets.forEach(planet => {
                planet.update();
                planet.show();
            });
        }

        class Star {
            constructor() {
                this.x = random(width);
                this.y = random(height);
                this.size = random(0.5, 3);
                this.t = random(TAU);
            }

            update() {
                this.t += 0.1;
                this.brightness = map(sin(this.t), -1, 1, 100, 255);
            }

            show() {
                noStroke();
                fill(this.brightness);
                ellipse(this.x, this.y, this.size);
            }
        }

        class Planet {
            constructor() {
                this.r = random(50, 150);
                this.angle = random(TAU);
                this.speed = random(0.005, 0.02);
                this.size = random(20, 60);
                this.color = color(random(100, 255), random(100, 255), random(100, 255));
            }

            update() {
                this.angle += this.speed;
            }

            show() {
                let x = width / 2 + cos(this.angle) * this.r;
                let y = height / 2 + sin(this.angle) * this.r;
                noStroke();
                fill(this.color);
                ellipse(x, y, this.size);
            }
        }

        function windowResized() {
            resizeCanvas(windowWidth, windowHeight);
        }
    </script>
</body>
</html>
このHTMLアーティファクトでは、p5.jsを使用して宇宙をテーマにした動くアートを作成しました。主な特徴は以下の通りです:
暗い青色の背景で宇宙空間を表現しています。
ランダムに配置された200個の星が、明るさを変えてきらめいています。
3つの惑星が中心点の周りを異なる速度で公転しています。
このアートは以下の動的な要素を含んでいます:
星のきらめき:各星の明るさが時間とともに変化します。
惑星の公転:各惑星が中心点の周りを回転します。
ブラウザでこのHTMLファイルを開くと、美しい宇宙のシーンが表示されます。ウィンドウのサイズを変更すると、キャンバスも自動的にリサイズされます。
このアートをさらにカスタマイズしたり、新しい要素を追加したりすることもできます。例えば、彗星や小惑星、宇宙船などを追加することで、よりダイナミックなシーンを作ることができます。
何か特定の要素を追加したり、変更したりしたい場合は、お知らせください。
(ここまでClaudeの回答)
p5.jsを使用すると、Canvasのみよりも複雑なアニメーションを作成することができるようになります。
もう一つ、p5,jsを使った動くアートを作成します。
HTMLアーティファクトでp5.jsを使って幻想的な動くアートを作成して
マウスの動きにアニメーションが連動する動くアートを作成できました。
以下はClaudeの回答です。
はい、JavaScriptとp5.jsライブラリを使用して、幻想的な動くアートを作成しましょう。この例では、幻想的な光の粒子が漂う様子を表現します。
<!DOCTYPE html>
<html lang="ja">
<head>
    <meta charset="UTF-8">
    <meta name="viewport" content="width=device-width, initial-scale=1.0">
    <title>幻想的なアート</title>
    <script src="https://cdnjs.cloudflare.com/ajax/libs/p5.js/1.4.0/p5.js"></script>
    <style>
        body { margin: 0; padding: 0; overflow: hidden; }
    </style>
</head>
<body>
    <script>
        let particles = [];
        let hue = 0;

        function setup() {
            createCanvas(windowWidth, windowHeight);
            colorMode(HSB, 360, 100, 100, 1);
            background(0);
        }

        function draw() {
            // 半透明の背景を重ねて、軌跡を徐々に消す
            background(0, 0, 0, 0.03);

            // 新しい粒子を追加
            if (frameCount % 2 === 0) {
                let p = new Particle();
                particles.push(p);
            }

            // 粒子を更新して描画
            for (let i = particles.length - 1; i >= 0; i--) {
                particles[i].update();
                particles[i].display();
                if (particles[i].isDead()) {
                    particles.splice(i, 1);
                }
            }

            // 色相を変化させる
            hue = (hue + 0.1) % 360;
        }

        class Particle {
            constructor() {
                this.pos = createVector(random(width), random(height));
                this.vel = createVector(0, 0);
                this.acc = createVector(0, 0);
                this.maxSpeed = 2;
                this.size = random(2, 8);
                this.lifespan = 255;
                this.hue = hue;
            }

            update() {
                // ノイズを使用して動きを生成
                let angle = noise(this.pos.x * 0.01, this.pos.y * 0.01, frameCount * 0.01) * TWO_PI * 2;
                this.acc.set(cos(angle), sin(angle));

                this.vel.add(this.acc);
                this.vel.limit(this.maxSpeed);
                this.pos.add(this.vel);
                this.lifespan -= 1;

                // 画面端での処理
                if (this.pos.x < 0) this.pos.x = width;
                if (this.pos.x > width) this.pos.x = 0;
                if (this.pos.y < 0) this.pos.y = height;
                if (this.pos.y > height) this.pos.y = 0;
            }

            display() {
                noStroke();
                fill(this.hue, 80, 100, this.lifespan / 255);
                ellipse(this.pos.x, this.pos.y, this.size);
            }

            isDead() {
                return this.lifespan < 0;
            }
        }

        function windowResized() {
            resizeCanvas(windowWidth, windowHeight);
            background(0);
        }

        function mouseMoved() {
            // マウス位置に新しい粒子を追加
            for (let i = 0; i < 5; i++) {
                let p = new Particle();
                p.pos.set(mouseX, mouseY);
                particles.push(p);
            }
        }
    </script>
</body>
</html>
このコードは、p5.jsを使用して幻想的な動くアートを作成します。主な特徴は以下の通りです:
粒子システム:
色とりどりの光の粒子が画面上を漂います。
各粒子は、ノイズ関数を使用してランダムな動きをします。
カラーパレット:
HSB色空間を使用し、時間とともに色相が変化します。
粒子は徐々に透明になり、消えていきます。
インタラクティブ性:
マウスを動かすと、その位置に新しい粒子が生成されます。
視覚効果:
半透明の背景を重ねることで、粒子の軌跡が徐々に消えていく効果を生み出しています。
レスポンシブデザイン:
ウィンドウのリサイズに対応して、キャンバスのサイズが自動的に調整されます。
この幻想的なアートは、以下の方法でさらにカスタマイズや改善ができます:
粒子の形状をバリエーション豊かにする(円以外の形状を追加)。
背景に緩やかに動く図形やグラデーションを追加する。
音楽や音声入力に反応して、粒子の動きや色を変化させる。
重力や引力のシミュレーションを追加して、粒子の動きをより複雑にする。
クリックやタッチでの特殊効果(例:大きな波紋やエクスプロージョン)を追加する。
このアートについて、特定の部分をさらに詳しく説明したり、新しい機能を追加したりすることはできますか?または、p5.jsを使用した他の幻想的なアイデアはありますか?
(ここまでClaudeの回答)
5.Three.jsを使ったアニメーション
Three.jsは、JavaScriptで3Dグラフィックスを簡単に描画できるライブラリです。WebGLを基盤にしており、高性能なレンダリングを可能にします。光源、カメラ、マテリアル、アニメーションなど、3D制作に必要な機能が豊富に揃っています。ブラウザ上で動作するため、特別なソフトを必要とせずに利用できます。豊富なドキュメントやサンプルがあり、学習や問題解決も容易です。
HTMLアーティファクトでThree.jsを使って宇宙をテーマにした動くアートを作成して
以下はClaudeの回答です。
はい、Three.jsを使って宇宙をテーマにした動くアートを作成しましょう。以下にHTMLとJavaScriptのコードを含むシンプルな例を示します。
(コードは省略)
このコードは、Three.jsを使用して宇宙をテーマにした動くアートを作成します。主な特徴は以下の通りです:
背景に多数の星を配置し、ゆっくりと回転させています。
中央に緑色の惑星を配置し、より速く回転させています。
ブラウザのウィンドウサイズに応じて自動的にリサイズします。
このコードをHTMLファイルとして保存し、ウェブブラウザで開くと、宇宙をイメージした動くアートが表示されます。
カスタマイズの提案:
惑星の色や大きさを変更できます。
複数の惑星を追加できます。
星の数や色を調整できます。
Three.jsのさまざまな機能を使って、より複雑な効果を追加できます。
これらの変更や追加機能について詳しく知りたい場合は、お気軽にお問い合わせください。
(ここまでClaudeの回答)
ここで、「もっと激しく動くようにして」とプロンプトで指示しました。以下はClaudeの回答です。
承知しました。より激しく動くように、アニメーションを強化してみましょう。星の動きを速くし、惑星の動きをより複雑にし、さらにいくつかの新しい要素を追加します。
(コードは省略)
このバージョンでは、以下の変更を加えて、より激しく動くようにしました:
星の数を増やし(20,000個)、それぞれにランダムな色を割り当てました。
星の動きを速くし、さらに波打つような動きを追加しました。
4つの異なる色の惑星を追加し、それぞれが複雑な軌道を描くようにしました。
惑星にPhongマテリアルを使用し、光沢感と自己発光効果を追加しました。
ポイントライトを追加して、惑星の見た目を改善しました。
カメラ自体も動くようにし、視点が変化するようにしました。
これらの変更により、シーンはより動的で魅力的になりました。惑星は複雑な軌道を描いて動き、星々は波打つように動きます。また、カメラの動きにより、全体的な印象がより立体的になっています。
さらなるカスタマイズの提案:
惑星の数や大きさ、色を調整できます。
惑星にテクスチャを追加して、より現実的な外観にすることができます。
パーティクルエフェクトを追加して、彗星や流星のような効果を作れます。
Three.jsのポストプロセッシング効果を使用して、全体的な視覚効果を強化できます。
これらの追加機能や他の改善点について詳しく知りたい場合は、お気軽にお問い合わせください。
(ここまでClaudeの回答)
更に、効果音を付けるため、「音も付けて」とプロンプトで指示しました。以下はClaudeの回答です。
もちろん、音を追加しましょう。Web Audio APIを使用して、宇宙をイメージした背景音と、惑星が動くときの効果音を追加します。
<!DOCTYPE html>
<html lang="ja">
<head>
    <meta charset="UTF-8">
    <meta name="viewport" content="width=device-width, initial-scale=1.0">
    <title>動的宇宙アート with サウンド</title>
    <style>
        body { margin: 0; overflow: hidden; }
        canvas { display: block; }
        #startButton {
            position: absolute;
            top: 50%;
            left: 50%;
            transform: translate(-50%, -50%);
            padding: 10px 20px;
            font-size: 18px;
            cursor: pointer;
        }
    </style>
</head>
<body>
    <button id="startButton">Start Experience</button>
    <script src="https://cdnjs.cloudflare.com/ajax/libs/three.js/r128/three.min.js"></script>
    <script>
        let audioContext, backgroundSound, planetSounds = [];

        function setupAudio() {
            audioContext = new (window.AudioContext || window.webkitAudioContext)();

            // 背景音の作成
            const backgroundOscillator = audioContext.createOscillator();
            backgroundOscillator.type = 'sine';
            backgroundOscillator.frequency.setValueAtTime(50, audioContext.currentTime);

            const backgroundGain = audioContext.createGain();
            backgroundGain.gain.setValueAtTime(0.05, audioContext.currentTime);

            backgroundOscillator.connect(backgroundGain);
            backgroundGain.connect(audioContext.destination);

            backgroundOscillator.start();
            backgroundSound = backgroundOscillator;

            // 惑星の音の作成
            for (let i = 0; i < 4; i++) {
                const oscillator = audioContext.createOscillator();
                oscillator.type = 'sine';
                oscillator.frequency.setValueAtTime(200 + i * 100, audioContext.currentTime);

                const gain = audioContext.createGain();
                gain.gain.setValueAtTime(0, audioContext.currentTime);

                oscillator.connect(gain);
                gain.connect(audioContext.destination);

                oscillator.start();
                planetSounds.push({ oscillator, gain });
            }
        }

        const scene = new THREE.Scene();
        const camera = new THREE.PerspectiveCamera(75, window.innerWidth / window.innerHeight, 0.1, 1000);
        const renderer = new THREE.WebGLRenderer();
        renderer.setSize(window.innerWidth, window.innerHeight);
        document.body.appendChild(renderer.domElement);

        // 星の作成
        const starsGeometry = new THREE.BufferGeometry();
        const starsMaterial = new THREE.PointsMaterial({
            size: 0.1,
            vertexColors: true
        });

        const starsVertices = [];
        const starsColors = [];
        for (let i = 0; i < 20000; i++) {
            const x = (Math.random() - 0.5) * 2000;
            const y = (Math.random() - 0.5) * 2000;
            const z = (Math.random() - 0.5) * 2000;
            starsVertices.push(x, y, z);

            const r = Math.random();
            const g = Math.random();
            const b = Math.random();
            starsColors.push(r, g, b);
        }

        starsGeometry.setAttribute('position', new THREE.Float32BufferAttribute(starsVertices, 3));
        starsGeometry.setAttribute('color', new THREE.Float32BufferAttribute(starsColors, 3));
        const starField = new THREE.Points(starsGeometry, starsMaterial);
        scene.add(starField);

        // 惑星の作成
        const planets = [];
        const planetColors = [0x00FF00, 0xFF0000, 0x0000FF, 0xFFFF00];
        for (let i = 0; i < 4; i++) {
            const planetGeometry = new THREE.SphereGeometry(2 + Math.random() * 3, 32, 32);
            const planetMaterial = new THREE.MeshPhongMaterial({
                color: planetColors[i],
                shininess: 30,
                emissive: new THREE.Color(planetColors[i]).multiplyScalar(0.2)
            });
            const planet = new THREE.Mesh(planetGeometry, planetMaterial);
            planet.position.set(
                (Math.random() - 0.5) * 50,
                (Math.random() - 0.5) * 50,
                (Math.random() - 0.5) * 50
            );
            planets.push(planet);
            scene.add(planet);
        }

        // 光源の追加
        const light = new THREE.PointLight(0xFFFFFF, 1, 100);
        light.position.set(0, 0, 50);
        scene.add(light);

        camera.position.z = 50;

        // アニメーション関数
        let time = 0;
        function animate() {
            requestAnimationFrame(animate);
            time += 0.01;

            starField.rotation.y += 0.002;
            starField.rotation.x = Math.sin(time * 0.5) * 0.1;

            planets.forEach((planet, index) => {
                planet.rotation.y += 0.02 + index * 0.01;
                planet.rotation.x += 0.01 + index * 0.005;
                planet.position.x = Math.sin(time + index) * 20;
                planet.position.y = Math.cos(time * 0.5 + index) * 15;
                planet.position.z = Math.sin(time * 0.3 + index) * 25;

                // 惑星の音を更新
                if (planetSounds[index]) {
                    const distance = planet.position.distanceTo(camera.position);
                    const volume = Math.max(0, 1 - distance / 50);
                    planetSounds[index].gain.gain.setValueAtTime(volume * 0.1, audioContext.currentTime);
                    planetSounds[index].oscillator.frequency.setValueAtTime(
                        200 + index * 100 + Math.sin(time * 2) * 50, audioContext.currentTime
                    );
                }
            });

            camera.position.x = Math.sin(time * 0.2) * 10;
            camera.position.y = Math.cos(time * 0.2) * 10;
            camera.lookAt(scene.position);

            renderer.render(scene, camera);
        }

        // スタートボタンのセットアップ
        const startButton = document.getElementById('startButton');
        startButton.addEventListener('click', () => {
            setupAudio();
            startButton.style.display = 'none';
            animate();
        });

        window.addEventListener('resize', () => {
            camera.aspect = window.innerWidth / window.innerHeight;
            camera.updateProjectionMatrix();
            renderer.setSize(window.innerWidth, window.innerHeight);
        });
    </script>
</body>
</html>
この更新されたバージョンでは、以下の音声要素を追加しました:
背景音:低音の持続音で、宇宙空間の雰囲気を表現します。
惑星の音:各惑星に対して異なる音を割り当て、惑星の動きに合わせて音が変化します。惑星がカメラに近づくほど音が大きくなり、遠ざかるほど小さくなります。
スタートボタン:ブラウザの自動再生ポリシーに対応するため、ユーザーがボタンをクリックしたときに音声を開始するようにしました。
主な変更点:
Web Audio APIを使用して、オシレーターとゲインノードを作成し、音を生成しています。
背景音は低い周波数(50Hz)の正弦波で、小さな音量で常に再生されます。
各惑星には異なる周波数の音が割り当てられ、惑星の動きに応じて周波数と音量が変化します。
カメラと惑星の距離に基づいて音量を調整し、近い惑星ほど大きく聞こえるようにしています。
ユーザーインタラクションを必要とするスタートボタンを追加し、クリックすると体験が始まるようにしました。
この変更により、視覚的な体験に加えて聴覚的な体験も提供され、より没入感のある宇宙アートとなりました。ユーザーは星々の動きを見ながら、宇宙を感じさせる音を聴くことができます。
さらなる改善案:
より複雑な音響効果を追加する(例:リバーブやフィルターを使用)
ユーザーが音量を調整できるコントロールを追加する
特定のイベント(例:惑星の衝突)に対応する特別な音効果を追加する
これらの追加機能や他の改善点について詳しく知りたい場合は、お気軽にお問い合わせください。
(ここまでClaudeの回答)
3Dのアニメーションに効果音を付けることができました。
もう一つ、Three.jsを使った動くアートを作成します。
HTMLアーティファクトでThree.jsを使って幾何学図形がぬるぬる動くアートを作成して
もっと複雑で面白い動きをさせて。背景も装飾して
面白い効果音も付けて
最初のプロンプトで指示して作成した後、2番目、3番目のプロンプトで修正を指示して作成しました。
<!DOCTYPE html>
<html lang="ja">
<head>
    <meta charset="UTF-8">
    <meta name="viewport" content="width=device-width, initial-scale=1.0">
    <title>Three.js Geometric Art with Sound</title>
    <style>
        body { margin: 0; overflow: hidden; }
        canvas { display: block; }
        #startButton {
            position: absolute;
            top: 50%;
            left: 50%;
            transform: translate(-50%, -50%);
            padding: 10px 20px;
            font-size: 18px;
            cursor: pointer;
        }
    </style>
</head>
<body>
    <button id="startButton">Start Experience</button>
    <script src="https://cdnjs.cloudflare.com/ajax/libs/three.js/r128/three.min.js"></script>
    <script>
        let audioContext, oscillator1, oscillator2, gainNode;
        const scene = new THREE.Scene();
        const camera = new THREE.PerspectiveCamera(75, window.innerWidth / window.innerHeight, 0.1, 1000);
        const renderer = new THREE.WebGLRenderer();
        renderer.setSize(window.innerWidth, window.innerHeight);
        document.body.appendChild(renderer.domElement);

        function initAudio() {
            audioContext = new (window.AudioContext || window.webkitAudioContext)();
            oscillator1 = audioContext.createOscillator();
            oscillator2 = audioContext.createOscillator();
            gainNode = audioContext.createGain();

            oscillator1.connect(gainNode);
            oscillator2.connect(gainNode);
            gainNode.connect(audioContext.destination);

            gainNode.gain.setValueAtTime(0.1, audioContext.currentTime);

            oscillator1.start();
            oscillator2.start();
        }

        function createStars() {
            const geometry = new THREE.BufferGeometry();
            const vertices = [];
            for (let i = 0; i < 10000; i++) {
                vertices.push(
                    Math.random() * 2000 - 1000,
                    Math.random() * 2000 - 1000,
                    Math.random() * 2000 - 1000
                );
            }
            geometry.setAttribute('position', new THREE.Float32BufferAttribute(vertices, 3));
            const material = new THREE.PointsMaterial({ color: 0xFFFFFF, size: 0.7 });
            const stars = new THREE.Points(geometry, material);
            scene.add(stars);
        }
        createStars();

        const torusGeometry = new THREE.TorusGeometry(1, 0.4, 16, 100);
        const torusMaterial = new THREE.MeshPhongMaterial({ color: 0x00ff00 });
        const torus = new THREE.Mesh(torusGeometry, torusMaterial);
        scene.add(torus);

        const octahedronGeometry = new THREE.OctahedronGeometry(0.7);
        const octahedronMaterial = new THREE.MeshPhongMaterial({ color: 0xff00ff });
        const octahedron = new THREE.Mesh(octahedronGeometry, octahedronMaterial);
        octahedron.position.set(2, 0, 0);
        scene.add(octahedron);

        const light = new THREE.PointLight(0xffffff, 1, 100);
        light.position.set(0, 0, 10);
        scene.add(light);

        camera.position.z = 5;

        let time = 0;
        function animate() {
            requestAnimationFrame(animate);
            time += 0.01;

            torus.rotation.x = Math.sin(time) * 2;
            torus.rotation.y = Math.cos(time) * 2;
            torus.position.y = Math.sin(time * 1.5) * 0.5;

            octahedron.rotation.x += 0.02;
            octahedron.rotation.y += 0.03;
            octahedron.position.x = Math.cos(time) * 2;
            octahedron.position.z = Math.sin(time) * 2;

            camera.position.x = Math.sin(time * 0.5) * 3;
            camera.position.y = Math.cos(time * 0.5) * 3;
            camera.lookAt(scene.position);

            if (audioContext) {
                // トーラスの位置に基づいて音程を変更
                const frequency1 = 200 + torus.position.y * 100;
                oscillator1.frequency.setValueAtTime(frequency1, audioContext.currentTime);

                // 八面体の位置に基づいて音程を変更
                const frequency2 = 300 + octahedron.position.x * 50;
                oscillator2.frequency.setValueAtTime(frequency2, audioContext.currentTime);
            }

            renderer.render(scene, camera);
        }

        document.getElementById('startButton').addEventListener('click', function() {
            this.style.display = 'none';
            initAudio();
            animate();
        });

        window.addEventListener('resize', () => {
            camera.aspect = window.innerWidth / window.innerHeight;
            camera.updateProjectionMatrix();
            renderer.setSize(window.innerWidth, window.innerHeight);
        });
    </script>
</body>
</html>
効果音付きの3Dアニメーションです。
6.Babylon.jsを使ったアニメーション
Babylon.jsは、WebGLを基盤にしたJavaScriptライブラリで、高性能な3Dグラフィックスやゲームをブラウザ上で作成できます。直感的なAPIと豊富な機能を提供し、光や影、物理エンジンなどを簡単に利用できます。クロスプラットフォームで動作し、特別なソフトを必要とせずに3Dコンテンツを表示できます。拡張性が高く、モジュールを追加して機能を強化できます。豊富なドキュメントと活発なコミュニティにより、学習や問題解決がしやすい環境が整っています。
HTMLアーティファクトでBabylon.jsを使って宇宙をテーマにした動くアートを作成して
以下はClaudeの回答です。
はい、Babylon.jsを使って宇宙をテーマにした動くアートを作成しましょう。これには、回転する惑星と星空の背景を含めます。
<!DOCTYPE html>
<html>
<head>
    <meta charset="utf-8">
    <title>Space Art with Babylon.js</title>
    <style>
        html, body {
            overflow: hidden;
            width: 100%;
            height: 100%;
            margin: 0;
            padding: 0;
        }
        #renderCanvas {
            width: 100%;
            height: 100%;
            touch-action: none;
        }
    </style>
    <script src="https://cdnjs.cloudflare.com/ajax/libs/babylonjs/5.0.0/babylon.js"></script>
</head>
<body>
    <canvas id="renderCanvas"></canvas>
    <script>
        const canvas = document.getElementById("renderCanvas");
        const engine = new BABYLON.Engine(canvas, true);

        const createScene = function () {
            const scene = new BABYLON.Scene(engine);

            // カメラの設定
            const camera = new BABYLON.ArcRotateCamera("camera", -Math.PI / 2, Math.PI / 2.5, 15, new BABYLON.Vector3(0, 0, 0), scene);
            camera.attachControl(canvas, true);

            // ライトの設定
            const light = new BABYLON.HemisphericLight("light", new BABYLON.Vector3(1, 1, 0), scene);

            // 惑星の作成
            const planet = BABYLON.MeshBuilder.CreateSphere("planet", {diameter: 5}, scene);
            const planetMaterial = new BABYLON.StandardMaterial("planetMaterial", scene);
            planetMaterial.diffuseTexture = new BABYLON.Texture("https://www.babylonjs-playground.com/textures/earth.jpg", scene);
            planet.material = planetMaterial;

            // 星空の背景
            const skybox = BABYLON.MeshBuilder.CreateBox("skyBox", {size:1000.0}, scene);
            const skyboxMaterial = new BABYLON.StandardMaterial("skyBoxMaterial", scene);
            skyboxMaterial.backFaceCulling = false;
            skyboxMaterial.reflectionTexture = new BABYLON.CubeTexture("https://www.babylonjs-playground.com/textures/TropicalSunnyDay", scene);
            skyboxMaterial.reflectionTexture.coordinatesMode = BABYLON.Texture.SKYBOX_MODE;
            skyboxMaterial.diffuseColor = new BABYLON.Color3(0, 0, 0);
            skyboxMaterial.specularColor = new BABYLON.Color3(0, 0, 0);
            skybox.material = skyboxMaterial;

            // アニメーション
            scene.registerBeforeRender(function () {
                planet.rotation.y += 0.005;
            });

            return scene;
        };

        const scene = createScene();

        engine.runRenderLoop(function () {
            scene.render();
        });

        window.addEventListener("resize", function () {
            engine.resize();
        });
    </script>
</body>
</html>
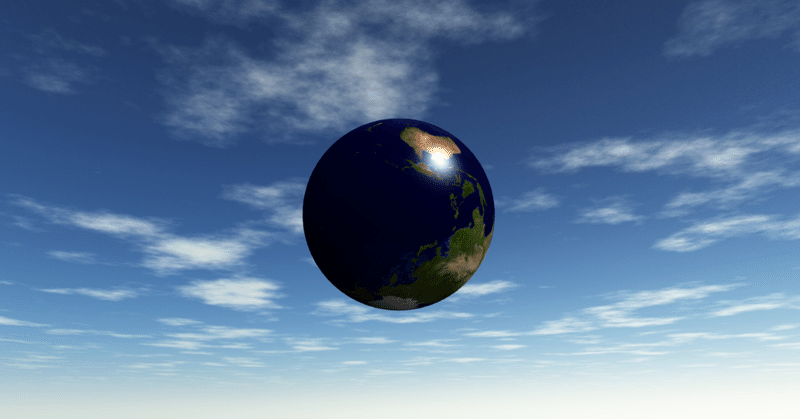
このHTMLファイルは、Babylon.jsを使用して宇宙をテーマにした動くアートを作成します。主な特徴は以下の通りです:
回転する地球:テクスチャ付きの球体が中央にあり、ゆっくりと回転しています。
星空の背景:キューブマップテクスチャを使用して、周囲に星空の背景を作成しています。
動的なカメラ:ユーザーはマウスやタッチ操作でシーンを自由に見回すことができます。
このコードを実行するには、HTMLファイルとして保存し、Webブラウザで開いてください。インターネット接続が必要です(テクスチャをロードするため)。
さらにカスタマイズしたい場合は、以下のような修正が可能です:
惑星のテクスチャを変更して、他の惑星や月を表現する。
複数の惑星や衛星を追加し、それぞれに軌道を設定する。
パーティクルシステムを使用して、星や彗星を追加する。
これらの拡張について詳しく知りたい場合は、お気軽にお問い合わせください。
(ここまでClaudeの回答)
なぜか南が上になった地球が現れ、背景も星空ではなく、青空が広がっています。マウス操作で地球の向きを変えたり、回転方向や回転速度を変えたりすることができます。
この記事が気に入ったらサポートをしてみませんか?