Unity ハイパフォーマンスゲーム制作入門 Vol.3-2

はじめに
この記事は 作って学ぶ Unity ハイパフォーマンスゲーム制作入門Vol.3 の続きです。
前回の記事はこちら👇
ネットワーク接続
次にサーバーとクライアントでの接続を行うスプリクトを書いていきます。次のようなスクリプトを追加します。
using Unity.Entities;
using Unity.NetCode;
using Unity.Networking.Transport;

[UpdateInWorld(UpdateInWorld.TargetWorld.Default)]
public class Game : ComponentSystem
{
    struct InitGameComponent : IComponentData
    {
    }
    protected override void OnCreate()
    {
        RequireSingletonForUpdate<InitGameComponent>();
        EntityManager.CreateEntity(typeof(InitGameComponent));
    }

    protected override void OnUpdate()
    {
        EntityManager.DestroyEntity(GetSingletonEntity<InitGameComponent>());
        foreach (var world in World.AllWorlds)
        {
            var network = world.GetExistingSystem<NetworkStreamReceiveSystem>();
            if (world.GetExistingSystem<ClientSimulationSystemGroup>() != null)
            {
                NetworkEndPoint ep = NetworkEndPoint.LoopbackIpv4;
                ep.Port = 7979;
                network.Connect(ep);
            }
            #if UNITY_EDITOR
            else if (world.GetExistingSystem<ServerSimulationSystemGroup>() != null)
            {
                NetworkEndPoint ep = NetworkEndPoint.AnyIpv4;
                ep.Port = 7979;
                network.Listen(ep);
            }
            #endif
        }
    }
}


public struct GoInGameRequest : IRpcCommand
{
}
ここでは InitGameComponent というComponentを起動時に一回だけ作成し、処理時に破壊することで一度のみの処理を確実にしています。
RequireSingletonForUpdate を用いて、InitGameComponent がある場合のみSystemが動作するようにするといったことが可能です。
そしてクライアントは Connect、サーバーは Listen を行うことで接続を確立しています。
これには、Transportというパッケージを使用しています。(ローカルホストで接続)
また、UpdateInWorldは特定のワールドのみで動作させることが出来ます。ちなみにワールドは以下の4つから選択可能です。
Client
ClientAndServer
Default
Server
最後の GoInGameRequest : IRpcCommand は PRC(Remote Procedure Call)を使ってサーバーに接続準備が完了したことを知らせる為のComponentの一種です。
クライアント側の処理
次にこのリクエストをリクエストするクライアント側の処理とサーバー側の処理を書きます。以下のスクリプトを作成しましょう。
using Unity.Entities;
using Unity.NetCode;
using Unity.Mathematics;
using Unity.Transforms;
using Unity.Collections;
using UnityEngine;

[UpdateInGroup(typeof(ClientSimulationSystemGroup))]
public class GameClientSystem : SystemBase
{
    protected override void OnCreate()
    {
    }

    protected override void OnUpdate()
    {
        var commandBuffer = new EntityCommandBuffer(Allocator.Temp);
        Entities.WithNone<NetworkStreamInGame>().ForEach((Entity ent, ref NetworkIdComponent id) =>
        {
            commandBuffer.AddComponent<NetworkStreamInGame>(ent);
            var req = commandBuffer.CreateEntity();
            commandBuffer.AddComponent<GoInGameRequest>(req);
            commandBuffer.AddComponent(req, new SendRpcCommandRequestComponent { TargetConnection = ent });
        }).Run();
        commandBuffer.Playback(EntityManager);
    }
}
色々書きましたが、まず UpdateInGroup で実行順を制御できます。NetCodeで用いられるグループには以下のようなものがあります。
ClientInitializationSystemGroup
ServerInitializationSystemGroup
ClientAndServerInitializationSystemGroup
ClientSimulationSystemGroup
ServerSimulationSystemGroup
ClientAndServerSimulationSystemGroup
ClientPresentationSystemGroup
ここで、ClientSimulationSystemGroup を指定しているものはクライアント側のみで、ServerSimulationSystemGroup を指定しているものはサーバーのみで動作することが分かります。
まず、クライアント側は、 Entities.WithNone<NetworkStreamInGame> でNetworkStreamInGame が含まれない NetworkIdComponent を持つEntityに対して、NetworkStreamInGame を追加し、先ほど作成した GoInGameRequest を追加し、それに対して SendRpcCommandRequestComponent を使いしています。
ここで大切なことは、SendRpcCommandRequestComponent というComponentを追加することによってコマンドを自動的に送信してくれるということですね、そのためにはTargetConnectionで送信先を指定して上げる必要があります。
サーバー側の処理
次にサーバー側の処理を書きます。次のように追記してください。
[UpdateInGroup(typeof(ServerSimulationSystemGroup))]
public class GameServerSystem : ComponentSystem
{
    protected override void OnCreate()
    {

    }
    protected override void OnUpdate()
    {
        var ghostCollection = GetSingletonEntity<GhostPrefabCollectionComponent>();
        var prefab = Entity.Null;
        var prefabs = EntityManager.GetBuffer<GhostPrefabBuffer>(ghostCollection);
        for (int ghostId = 0; ghostId < prefabs.Length; ++ghostId)
        {
            if (EntityManager.HasComponent<PlayerComponent>(prefabs[ghostId].Value))
                prefab = prefabs[ghostId].Value;
        }

        Entities.WithNone<SendRpcCommandRequestComponent>().ForEach((Entity reqEnt, ref GoInGameRequest req, ref ReceiveRpcCommandRequestComponent reqSrc) =>
        {
            PostUpdateCommands.AddComponent<NetworkStreamInGame>(reqSrc.SourceConnection);
            UnityEngine.Debug.Log(string.Format("Server setting connection {0} to in game", EntityManager.GetComponentData<NetworkIdComponent>(reqSrc.SourceConnection).Value));
            var ghostCollection = GetSingleton<GhostPrefabCollectionComponent>();

            var player = EntityManager.Instantiate(prefab);
            EntityManager.SetComponentData(player, new PlayerComponent { PlayerId = EntityManager.GetComponentData<NetworkIdComponent>(reqSrc.SourceConnection).Value});

            PostUpdateCommands.SetComponent(reqSrc.SourceConnection, new CommandTargetComponent {targetEntity = player});
            PostUpdateCommands.DestroyEntity(reqEnt);
        });
    }
}
サーバー側ではリクエストを処理しています。ここではゴーストコレクションを取得してプレーヤーのゴーストプレハブを検索して作成した PlayerComponent の PlayerId に登録しています。NetworkIdComponent にIDのデータが保管されていて、各接続をエンティティとして保存しています。CommandTargetComponent を追加し、最後にリクエストのEntityを削除して完了となります。
これで実行しても動きますが、動きが少しおかしい気がします、それは入力をクライアントのみで行っているためサーバとの間で一致しなくなってしまうためです。
入力
Command Streamという機能を用いてクライアントからサーバーに入力を送信します。
クライアントは継続的にコマンドストリームをサーバーに送信し、コマンドが送信されない場合、自動的に無効化されます。新しい入力タイプを作成するには、ICommandDataを使ってインターフェースを実装する構造体を作成します。
そのインターフェースを実装するにはTick、およびにアクセスするためのメソッドを提供する必要があり、Serialize、Deserializeがあります。
次のように作成します。これもComponentの一種です。
using Unity.NetCode;
public struct InputCommandData : ICommandData
{
    public uint Tick {get; set;}
    public float angleH;
    public float angleV;
    public float speed;
}
入力として必要そうなデータを送信&受信します。操作方法を書き換えている方はそちらにあったものに変更してください。
ICommandDataというインターフェースを使うことによって、SerializeとDeserialize の処理が自動的に作成されます。SerializeとDeserializeの処理というのは、システムは複数の入力を送信し、最初のパケットには生データが含まれていますが、残りはデルタ圧縮を使用して圧縮されます。変化率が低いと、デルタ圧縮(差分のみ送信)は入力を十分に圧縮することが出来ます。
入力の送信
次に PlayerSystem を次のように書き換えます。
using Unity.Entities;
using Unity.Mathematics;
using Unity.Transforms;
using Unity.NetCode;
using Unity.Collections;
using UnityEngine;


[UpdateInGroup(typeof(GhostInputSystemGroup))]
[AlwaysSynchronizeSystem]
public class InputComponentSystem : SystemBase
{
    private float localAngleV = 0f;
    private float localAngleH = 0f;
    private float defaultspeed = 2.0f;

    protected override void OnCreate()
    {
        RequireSingletonForUpdate<NetworkIdComponent>();
    }

    protected override void OnUpdate()
    {
        var localInput = GetSingleton<CommandTargetComponent>().targetEntity;
        if (localInput == Entity.Null)
        {
            var localPlayerId = GetSingleton<NetworkIdComponent>().Value;
            var commandBuffer = new EntityCommandBuffer(Allocator.Temp);
            var commandTargetEntity = GetSingletonEntity<CommandTargetComponent>();
            Entities.WithNone<InputCommandData>().ForEach((Entity ent, ref PlayerComponent player) =>
            {
                if (player.PlayerId == localPlayerId)
                {
                    commandBuffer.AddBuffer<InputCommandData>(ent);
                    commandBuffer.SetComponent(commandTargetEntity, new CommandTargetComponent {targetEntity = ent});
                }
            }).Run();
            commandBuffer.Playback(EntityManager);
            return;
        }

        var input = default(InputCommandData);
        input.Tick = World.GetExistingSystem<ClientSimulationSystemGroup>().ServerTick;
        if (Input.GetKey("a"))
            localAngleH -= 1.0f;
        if (Input.GetKey("d"))
            localAngleH += 1.0f;
        if (Input.GetKey("w"))
            localAngleV -= 1.0f;
        if (Input.GetKey("s"))
            localAngleV += 1.0f;

        input.angleH = localAngleH;
        input.angleV = localAngleV;
        input.speed = defaultspeed;

        var inputBuffer = EntityManager.GetBuffer<InputCommandData>(localInput);
        inputBuffer.AddCommandData(input);
    }
}

[UpdateInGroup(typeof(GhostPredictionSystemGroup))]
public class PlayerSystem : ComponentSystem
{
    // 向いてる方向
    private float3 front = new float3 (0, 0, 1);
    private float angleH = 0.0f;
    private float angleV = 0.0f;
    private float speed = 2.0f;

    protected override void OnUpdate()
    {
        Entities.ForEach((ref Translation pos, ref Rotation rot, ref PlayerComponent playercomponent) =>
        {
            angleH += Input.GetAxis("Horizontal");
            angleV += Input.GetAxis("Vertical");

            var rotation = Quaternion.AngleAxis(angleH, new float3(0, 1, 0))
                                                * Quaternion.AngleAxis(angleV, new float3(1, 0, 0));
            var dir = new float3(rotation * front);

            pos = new Translation { Value = pos.Value + dir * speed * Time.DeltaTime};
            rot = new Rotation { Value = rotation };
        });
    }
}
これには2つsystemがあり、InputComponentSystem では InputCommandData がアタッチされているエンティティを参照するように接続エンティティのCommandTargetComponent を設定しています。
また、PlayerSystem で値を読み取り、プレーヤーの座標計算を行うといった感じです。
このように、クライアントとサーバの入力にアクセスする必要がある場合は、システムから直接読み取るのではなく、Command Streamからデータを読み取ることが重要です。システムからデータを読み取ると、入力がクライアントとサーバの間で一致しなくなるため、ゲームが予想どおりに動作しなくなります。
バッファから入力にアクセスする必要があるため、GetDataAtTickというDynamicBuffer<ICommandData> の拡張メソッドを使用して、特定のフレームに一致する入力を取得しています。なお、InputComponentSystem ではバッファにコマンドを追加するAddCommandDataを使用しています。
またバッファをEntityに追加しておく必要があるため、GoInGameServerSystem のOnUpdate に PostUpdateCommands.AddBuffer<InputCommandData>(player); を追記します。
    protected override void OnUpdate()
    {
        var ghostCollection = GetSingletonEntity<GhostPrefabCollectionComponent>();
        var prefab = Entity.Null;
        var prefabs = EntityManager.GetBuffer<GhostPrefabBuffer>(ghostCollection);
        for (int ghostId = 0; ghostId < prefabs.Length; ++ghostId)
        {
            if (EntityManager.HasComponent<PlayerComponent>(prefabs[ghostId].Value))
                prefab = prefabs[ghostId].Value;
        }

        Entities.WithNone<SendRpcCommandRequestComponent>().ForEach((Entity reqEnt, ref GoInGameRequest req, ref ReceiveRpcCommandRequestComponent reqSrc) =>
        {
            PostUpdateCommands.AddComponent<NetworkStreamInGame>(reqSrc.SourceConnection);
            UnityEngine.Debug.Log(string.Format("Server setting connection {0} to in game", EntityManager.GetComponentData<NetworkIdComponent>(reqSrc.SourceConnection).Value));
            var ghostCollection = GetSingleton<GhostPrefabCollectionComponent>();

            var player = EntityManager.Instantiate(prefab);
            EntityManager.SetComponentData(player, new PlayerComponent { PlayerId = EntityManager.GetComponentData<NetworkIdComponent>(reqSrc.SourceConnection).Value});

            PostUpdateCommands.AddBuffer<InputCommandData>(player);
            PostUpdateCommands.SetComponent(reqSrc.SourceConnection, new CommandTargetComponent {targetEntity = player});
            PostUpdateCommands.DestroyEntity(reqEnt);
        });
    }
これで完了です。実行してみるとなめらかに動きます。
(Unity 2020.3.16以上でエラーが発生する場合があります。その場合はUnity 2020.3.15以下で実行してください)
魚群の生成
Boidプレハブを生成します。そういえば Bootstrap は全然機能していなかったので、Start() の部分は削除しておきたいと思います。
using Unity.Entities;
using Unity.Mathematics;
using Unity.Transforms;
using UnityEngine;

public class Bootstrap : MonoBehaviour
{
    public GameObject Prefab;
    public static Bootstrap Instance { get; private set; }
    public static Param Param { get { return Instance.param; } }
    [SerializeField] public int boidCount = 100;
    [SerializeField] float3 boidScale = new float3(0.1f, 0.1f, 0.3f);
    [SerializeField] Param param;
    BlobAssetStore blobAssetStore;

    void Awake()
    {
        Instance = this;
        blobAssetStore = new BlobAssetStore();
    }

    void Start()
    {

    }

    void OnDrawGizmos()
    {
        if (!param) return;
        Gizmos.color = Color.green;
        Gizmos.DrawWireCube(Vector3.zero, Vector3.one * param.wallScale);
    }

    void OnDestroy()
    {
        blobAssetStore.Dispose();
    }
}
このようにNetCodeでは普通にEntityを生成するだけでは表示されないので注意しましょう。
では GameSystem の GameServerSystem に以下のように追記します。
[UpdateInGroup(typeof(ServerSimulationSystemGroup))]
public class GameServerSystem : SystemBase
{
    private bool init = false;

    protected override void OnCreate()
    {
    }
    protected override void OnUpdate()
    {
        var commandBuffer = new EntityCommandBuffer(Allocator.Temp);
        var ghostCollection = GetSingletonEntity<GhostPrefabCollectionComponent>();
        var prefab = Entity.Null;
        var prefabs = EntityManager.GetBuffer<GhostPrefabBuffer>(ghostCollection);

        if (!init)
        {
            var random = new Unity.Mathematics.Random(853);
            for (int ghostId = 0; ghostId < prefabs.Length; ++ghostId)
            {
                if (EntityManager.HasComponent<Acceleration>(prefabs[ghostId].Value))
                    prefab = prefabs[ghostId].Value;
            }

            for (int i = 0; i < Bootstrap.Instance.boidCount; ++i)
            {
                var boid = commandBuffer.Instantiate(prefab);
                commandBuffer.SetComponent(boid, new Translation { Value = random.NextFloat3(1f) });
                commandBuffer.SetComponent(boid, new Rotation { Value = quaternion.identity });
                commandBuffer.SetComponent(boid, new Velocity { Value = random.NextFloat3Direction() * Bootstrap.Param.initSpeed });
                commandBuffer.SetComponent(boid, new Acceleration { Value = float3.zero });
                commandBuffer.AddBuffer<NeighborsEntityBuffer>(boid);
            }
            init = true;
        }

        prefab = Entity.Null;
        for (int ghostId = 0; ghostId < prefabs.Length; ++ghostId)
        {
            if (EntityManager.HasComponent<PlayerComponent>(prefabs[ghostId].Value))
                prefab = prefabs[ghostId].Value;
        }

        var networkIdFromEntity = GetComponentDataFromEntity<NetworkIdComponent>(true);
        Entities.WithReadOnly(networkIdFromEntity).ForEach((Entity reqEnt, ref GoInGameRequest req, ref ReceiveRpcCommandRequestComponent reqSrc) =>
        {
            commandBuffer.AddComponent<NetworkStreamInGame>(reqSrc.SourceConnection);
            UnityEngine.Debug.Log(string.Format("Server setting connection {0} to in game", networkIdFromEntity[reqSrc.SourceConnection].Value));

            var player = commandBuffer.Instantiate(prefab);
            commandBuffer.SetComponent(player, new PlayerComponent { PlayerId = networkIdFromEntity[reqSrc.SourceConnection].Value });

            commandBuffer.AddBuffer<InputCommandData>(player);
            commandBuffer.SetComponent(reqSrc.SourceConnection, new CommandTargetComponent { targetEntity = player });
            commandBuffer.DestroyEntity(reqEnt);
        }).Run();
        commandBuffer.Playback(EntityManager);
    }
}
init という変数で最初の一回のみEntityを生成するようにしています。Entityを使って制御してもいいです。やっていることはプレーヤーの時と同じように、ゴーストコレクションからプレハブを探してきて生成するという流れです。ちなみにエラーが出たので、BoidsSimulationSystem に UpdateInGroup でサーバーのみ処理を実行するように設定しました。
…
using Unity.NetCode;
[UpdateInGroup(typeof(ServerSimulationSystemGroup))]
public class BoidsSimulationSystem : JobComponentSystem
{
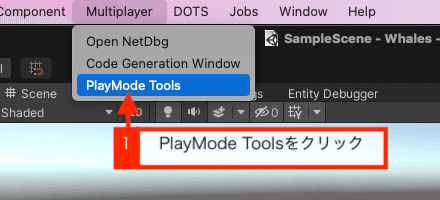
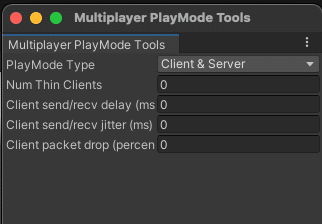
...ここまでで、ECSで作ったものを一通りオンラインにすることが出来ました。ちなみに、MultiPlayer -> PlayMode Tools -> Num Thin Clients でプレイヤーの数を増やして負荷の検証なども行うことができます。(表示はされません)
もちろんビルドしても遊ぶことが出来ます。その際はサーバーが必要なのでエディタやサーバービルドしておく必要があります。
ここでもう少しゲームっぽくするため、色々機能を追加していこうと思います。
カメラの制御
カメラが初期設定のままだったので、プレイヤーを視点に収めることくらいのことはしたいと思います。しかし、UnityのCameraComponentはGameObjectでありまだECSで扱えません、そこでハイブリッドECSという手段を使います。早速作っていきます。
まず、カメラを識別するための CameraComponent を作成します。
using Unity.Entities;

[GenerateAuthoringComponent]
public struct CameraComponent : IComponentData
{
}
そして、FollowCameraという空のスクリプトを追加します。
using UnityEngine;

public class FollowCamera : MonoBehaviour
{
}
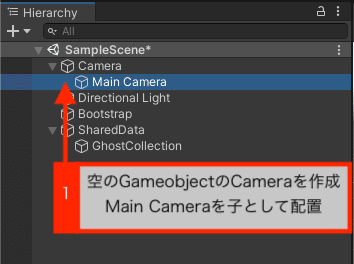
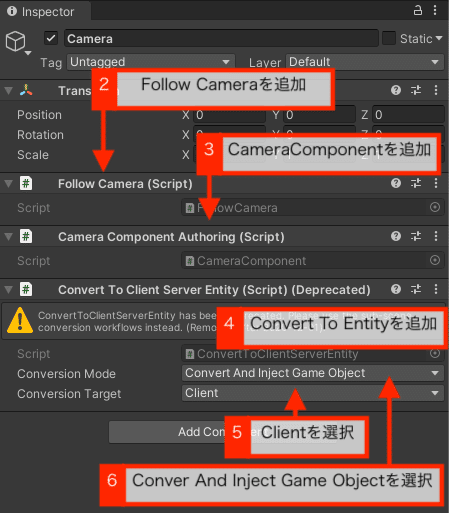
どちらともカメラを識別できればいいので空で大丈夫です。空のGameObject「Camera」を作成し、先ほど作成したコンポーネントをアタッチします。また、Main CameraのことしてMain Cameraを配置します。最後に、ConvertToClientServerEntityを追加して、Conversion ModeをConvert And Inject Game Objectに設定し、Conversion Target を Client に設定します。この設定を行うことでEntityからGameObjectやComponentへ参照が可能になります。
そして、カメラを制御するsystemを作成します。
using Unity.Collections;
using Unity.Entities;
using Unity.Mathematics;
using Unity.Transforms;
using Unity.NetCode;
using UnityEngine;

[UpdateInGroup(typeof(ClientSimulationSystemGroup))]
public class CameraCommponentSystem : SystemBase
{
    private EntityQuery localPlayer;
    protected override void OnCreate()
    {
        localPlayer = GetEntityQuery(typeof(Translation), typeof(InputCommandData));
    }

    protected override void OnUpdate()
    {
        var camera = GameObject.FindObjectOfType<FollowCamera>();
        var targetPos = localPlayer.ToComponentDataArray<Translation>(Allocator.TempJob);
        Entities
            .WithoutBurst()
            .WithDisposeOnCompletion(targetPos)
            .ForEach((ref CameraComponent c, ref Translation position, ref Rotation rotation) =>
        {
            if (targetPos.Length >= 1)
            {
                camera.transform.position = Vector3.Lerp(camera.transform.position, targetPos[0].Value, 0.3f * Time.DeltaTime);
                camera.transform.transform.LookAt(targetPos[0].Value);
            }
        }).Run();
    }
}
ゆっくりプレイヤーについてくるようなカメラワークにしています。これでカメラ制御は完成です。
次回は、当たり判定などを作成して、ゲームとして完成させたいと思います。次回もお楽しみに!
Vol.3-3はこちら👇