SwiftUIでいこう! - Stopwatchを作る。

早速コードを書いていきます。
import SwiftUI
struct ContentView: View {
var body: some View {
VStack {
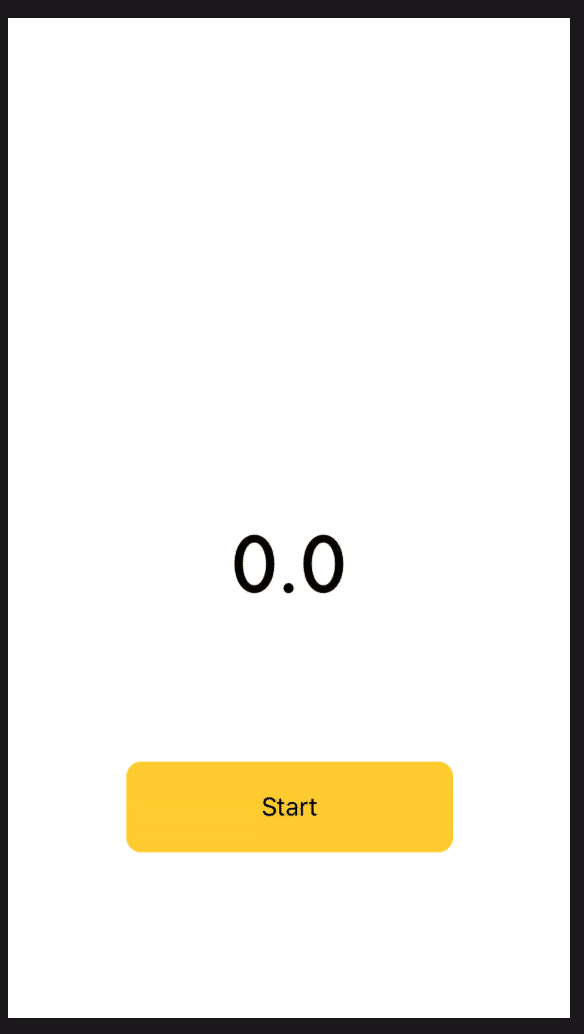
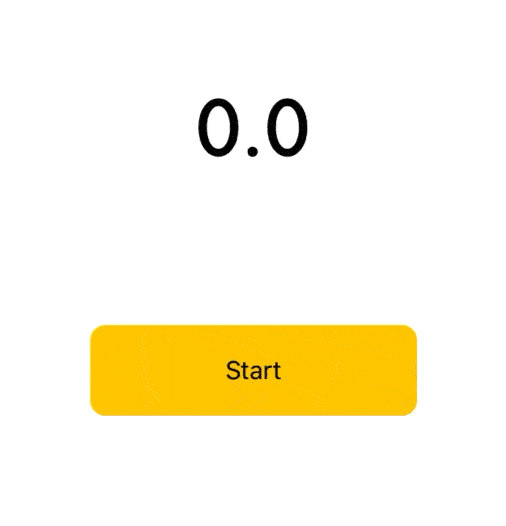
Text("0.0")
.font(.custom("Futura", size: 50))
.padding(.top,200)
.padding(.bottom,100)
.padding(.trailing,100)
.padding(.leading,100)
Button(action: {print("Start Timer")}){
Text("Start")
.foregroundColor(.black)
.padding(.vertical,20)
.padding(.horizontal,90)
.background(Color.yellow)
.cornerRadius(10)
}
}
}
}まずはここまで、
Text("0.0")
と、
Button()
を
VStack {}
縦には並べます。
細かい"padding()"などの設定は"."の後に記述することで指定していきます。
になりました。ここで
 Button(action: {print("Start Timer")}){
               Text("Start")
                   .foregroundColor(.black)
                   .padding(.vertical,20)
                   .padding(.horizontal,90)
                   .background(Color.yellow)
               .cornerRadius(10)
 }
となっていますが、ボタンを押した時の命令がないので追加したいところです。ここで簡単に、別場所に構造体structを作る方法の紹介です。

Text()の上で⌘クリックするとリストが出てくるので"Extract SubView"を選択すると簡単に関数が出来上がります。
この"struct"を修正していきます。
struct ExtractedView: View {
   var body: some View {
       Text("Start")
           .foregroundColor(.black)
           .padding(.vertical,20)
           .padding(.horizontal,90)
           .background(Color.yellow)
           .cornerRadius(10)
   }
}
var label:String
var buttonColor:Color
var textColor:Color
を作って変数を入れ込みます
  Text(label)
           .foregroundColor(textColor)
           .padding(.vertical,20)
           .padding(.horizontal,90)
           .background(buttonColor)
           .cornerRadius(10)
   }
ContentView()のほうも修正します。
 Button(action: {print("Start Timer")}){
               ExtractedView(label: "Start", buttonColor: .yellow, textColor: .black)
           }
さて、ここで、ストップウオッチの心臓部、"Timer()"を作りますが、これは別ファイルで作ります。StopWatchManeger.swiftというファイルを作ります。
import SwiftUI

class StopWatchManeger{
   var secondsElapsed = 0.0
   var timer = Timer()

   func start(){
       timer = Timer.scheduledTimer(withTimeInterval: 0.1, repeats: true){ timer in
           self.secondsElapsed += 0.1
       }
   }
}
ContentViewに戻り、
var stopWatchManeger = StopWatchManeger()
"stopWatchManeger"を使ってタイマー憑依部分を作ります。
String(format:"%.1f",変数)で数値を整形することができます。String(format:)で小数、数字の"0"埋めとかいろいろできます。
Text(String(format:"%1.f",stopWatchManeger.secondsElapsed))
ボタンも"stopWatchManeger"を使って、関数start()を実行するコードを書きます。
Button(action: {self.stopWatchManeger.start()}){}
コード自体はこれ良いのですが、Viewどうしの繋がりを示してやらないと実行されません。プロトコル、Property Wrapperを使っていきます。
StopWatchManeger.swiftですが
"ObservableObject"を適合させます。
class StopWatchManeger:ObservableObject{}
"Property Wrapper"を使います。@Published
@Published var secondsElapsed = 0.0
ContentView.swiftに戻って、"Property Wrapper"をつけます。@ObservedObject
@ObservedObject var stopWatchManeger = StopWatchManeger()
これでデータのやりとりが出来るようになります。
これでスタートボタンを押すと数字が変わっていきます。
次の回でスタート、ストップ、一時停止のモードを作っていきます。
全コードは
この記事が気に入ったらサポートをしてみませんか?