やっぱりJavaScript! - ゲームを作る - 3

次に弾を作っていきます。
クラスを作って
 class Character {
            constructor(x, y, size, angle, speed) {
                this.x = x;
                this.y = y;
                this.size = size;
                this.angle = angle;
                this.speed = speed;
                const element = document.createElement("div");
                container.appendChild(element);
                element.style.position = "absolute";
                element.style.width = `${size}px`;
                element.style.height = `${size}px`;
                this.element = element
            }

            update() {
                this.x += Math.cos(this.angle) * this.speed;
                this.y += Math.sin(this.angle) * this.speed;
                this.element.style.left = `${this.x - this.size / 2}px`;
                this.element.style.top = `${this.y - this.size / 2}px`;
            }
        }
変数宣言しておきます。
    const bulletSize = width / 20;
    const bulletSpeed = width / 20;
クラスCharacterを使って弾(Bullet)を作ります。
    class Bullet extends Character {
            constructor(angle) {
                super(heroX, heroY, bulletSize, angle, bulletSpeed);
                this.element.style.backgroundColor = "#ff0";
                this.element.style.borderRadius = "50%";
            }
        }
ロードする時に弾を出してみます。
const bullet = new Bullet((-90 * Math.PI) / 180);
弾を一つだけ作って while (true) {}でsetTimeoutを使って動かします。
  let bulletList = [];
  let bulletInterval = 0;
変数宣言して
    window.onload = async () => {
            init();

            const bullet = new Bullet((-90 * Math.PI) / 180);

            while (true) {
                await new Promise((r) => setTimeout(r, 16));

                bullet.update();

            }
        };
これで弾が一つ、
const bullet = new Bullet((-90 * Math.PI) / 180);
だけ出るようになります。
連続して出るようにしていきます。 bulletInterval = 10で弾の出る間隔を調整できます。
            while (true) {
                await new Promise((r) => setTimeout(r, 16));

                if (bulletInterval === 0){
                    bulletInterval = 10;
                    bulletList.push(new Bullet((-90 * Math.PI) / 180))
                }

                bulletInterval--;

                for (bullet of bulletList){

                    bullet.update();

                }
            }
これを実行すると弾が連続して出るようになります。

次に敵を作っていきます。
    const ghostSize = width / 8;
    const ghostSpeed = width / 200;
変数を作りクラスをCharacterを拡張して作ります。
    class Ghost extends Character {
            constructor(x, y, angle, speed) {
                super(x, y, ghostSize, angle, speed);
                this.element.style.display = "flex";
                this.element.style.alignItems = "center";
                this.element.style.justifyContent = "center";
                this.element.style.transition = "opacity 300ms ease-out";
                this.element.style.fontSize = `${ghostSize}px`;
                this.element.textContent = "👻";
            }
        }
あとは読み込む時の設定を
  window.onload = async () => {
            init();

            let bulletList = [];
            let bulletInterval = 0;
            let ghostList = [];
            let ghostInterval = 0;

            while (true) {
                await new Promise((r) => setTimeout(r, 16));

                if (bulletInterval === 0) {
                    bulletInterval = 10;
                    bulletList.push(new Bullet((-90 * Math.PI) / 180))
                }
                bulletInterval--;

                if (ghostInterval === 0) {
                    ghostInterval = 5;
                    const gx = Math.random() * width;
                    const gy = Math.random() > 0.5 ? 0 : height;
                    const angle = Math.atan2(heroY - gy, heroX - gx) + (0.5 - Math.random());
                    const speed = ghostSpeed * (1 + Math.random());
                    ghostList.push(new Ghost(gx, gy, angle, speed));
                }
                ghostInterval--;

                for (let bullet of bulletList) {
                    bullet.update();
                }
                for (let ghost of ghostList) {
                    ghost.update();
                }

            }
        };
if (ghostInterval === 0) {
ghostInterval = 5;
const gx = Math.random() * width;
const gy = Math.random() > 0.5 ? 0 : height;
const angle = Math.atan2(heroY - gy, heroX - gx) + (0.5 - Math.random());
const speed = ghostSpeed * (1 + Math.random());
ghostList.push(new Ghost(gx, gy, angle, speed));
}
ghostInterval--;
座標をランダムに作り、作った座標から自機に向けて進むように"atan2"を使ってコードを組みます。
これを
for (let ghost of ghostList) {
ghost.update();
}
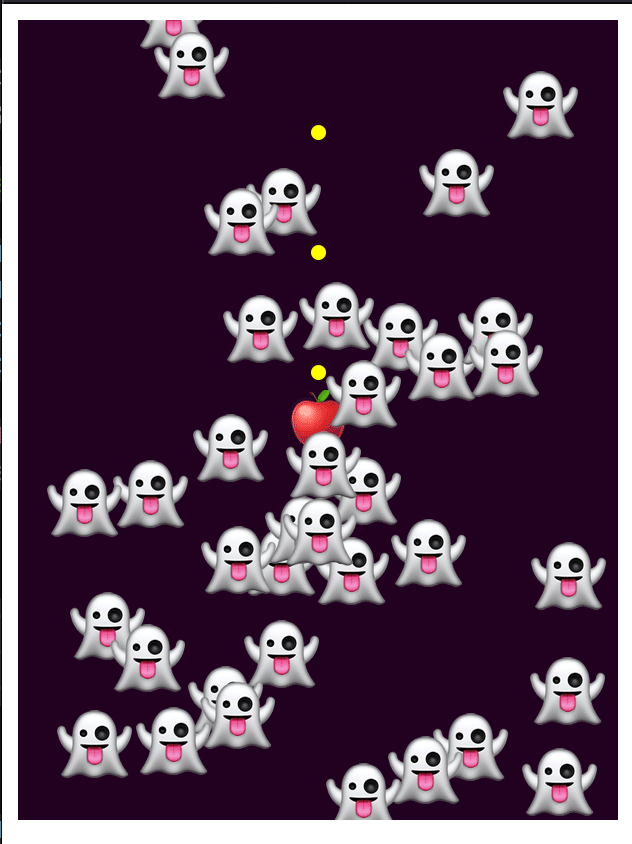
と更新させると"👻"が出てくるようになります。
この記事が気に入ったらサポートをしてみませんか?