
Pythonでマイクラを作る ⑬メニュー画面を作成する

Pythonでマイクラを作る 第13回目です。今回はメニュー画面を作成します。
メニュー画面にはボタンやラベル、入力欄などの GUI部品を配置します。GUI とは Graphical User Interface の略で、画面上に表示された絵や図形(アイコン)をマウスなどのポインティングデバイスで操作する仕組みのことです。
メニュー画面のデザインは、PlumpMath/Panda3DCraft
を参考にさせていただきました。感謝いたします。
ボタンのテクスチャーを作成する
ボタンのテクスチャーを作成します。
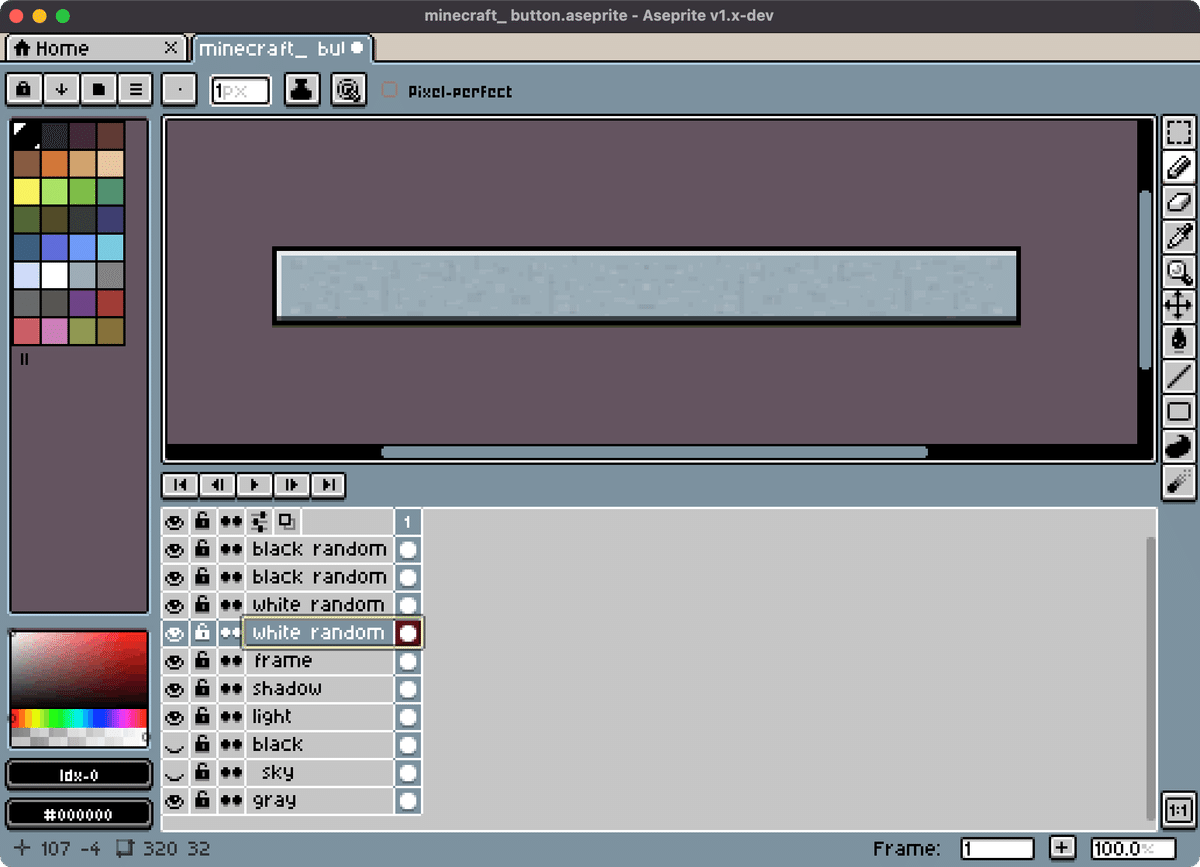
今回は、Aseprite でサイズ 320x32 のドット絵を作成しました。石ブロックの質感を出すために、白と黒のランダムな傷を付けました。テクスチャーは通常(button_up.png)、マウスオーバー(button_over.png)、クリック(button_press.png)、無効(button_disabled.png)の4種類作成しなければなりませんが、クリックと無効を共通にしたので3種類の画像が必要になります。
画像出力時にサイズを 640x64 に変更します。ご自分で作成されない方は以下のファイルをダウンロードしてお使いください。texturesディレクトリの中に buttonディレクトリを作り、その中に4枚の PNG画像を保存します。
ボタンのモデルを作成する
Panda3D の DirectButtonクラスを使うと、通常、マウスオーバー、クリック、無効の4つの状態を切り替えて表示するボタンを作成できます。
4枚のテクスチャーがマップされた(状態とテクスチャーが対応づけられた)ボタンモデルを作成するには、ターミナル(PowerShell)で次のコマンドを実行してください。modelsディレクトリに button_maps.egg が作成されます。
$ cd ~/Documents/pynecrafter # 開発ディレクトリに移動(環境による)
$ cd models
$ egg-texture-cards -o button_maps.egg -p 240,240 ../textures/button/button_up.png ../textures/button/button_press.png ../textures/button/button_over.png ../textures/button/button_disabled.png
ディレクトリ構造を確認
# ディレクトリ構造
Documents/
  ├ pynecrafter/
  │  ├ fonts/
  │  │
  │  ├ images/
  │  │
  │  ├ textures/
  │  │  ├ button/
  │  │  │  ├ button_up.png.png
  │  │  │  ├ button_over.png
  │  │  │  ├ button_press.png
  │  │  │  ├ button_disabled.png
  │  │
  │  ├ models/
  │  │  ├ button_maps.egg
  │  │
  │  ├ src/
  │  │  ├ __init__.py
  │  │  ├ block.py  # ブロック関連
  │  │  ├ player.py  # プレイヤー関連
  │  │  ├ player_model.py  # プレイヤーモデル関連
  │  │  ├ camera.py  # カメラ関連
  │  │  ├ target.py  # ターゲットブロック関連
  │  │  ├ user_interface.py  # インターフェース関連
  │  │  ├ utils.py  # ユーティリティー
  │  │  ├ inventory.py  # インベントリ
  │  │  ├ menu.py  # メニュー関連
  │  │  ├ mc.py  # 統合クラス
現在のディレクトリ構造を確認します。
textures/buttonディレクトリの中に4枚のボタンテクスチャー画像を保存ししました。modelsディレクトリの中にボタンモデル(button_maps.egg)を作成しました。
そして、srcディレクトリの中に、Menuクラスを記述する menu.py を作成ます。
メニュー画面を作成する
"""src/__init__.py"""
from .block import Block
from .player import Player
from .user_interface import UserInterface
from .inventory import Inventory
from .menu import Menu  # 追記
from .mc import MC
__init__.py に Menuクラスをインポートするコードを追記します。
"""src/mc.py"""
from direct.showbase.ShowBase import ShowBase
from panda3d.core import *
from . import *


class MC(ShowBase, UserInterface, Inventory, Menu):  # 追記
    def __init__(self, ground_size=128, mode='normal'):
        self.mode = mode
        # ShowBaseを継承する
        ShowBase.__init__(self)
        self.font = self.loader.loadFont('fonts/PixelMplus12-Regular.ttf')
        UserInterface.__init__(self)
        Inventory.__init__(self)
        Menu.__init__(self)  # 追記

以下略
mc.py に Menuクラスを継承するコードを追記します。
class MC(ShowBase, UserInterface, Inventory, Menu):により、Menuクラスを継承し、Menu.__init__(self)によりMenuクラスのプロパティ初期化を実行します。これでMenuクラスを使えるようになりました。
"""src/utils.py"""
from direct.gui.DirectGui import *
from panda3d.core import *

クラスを追加


class DrawMappedButton(DirectButton):
    def __init__(self, parent=None, model=None, text='', font=None, pos=(0, 0, 0), command=None, extra_args=None):
        super().__init__(
            parent=parent,
            geom=(
                model.find('**/button_up'), model.find('**/button_press'),
                model.find('**/button_over'), model.find('**/button_disabled')
            ),
            text=text,
            text_font=font,
            pos=pos,
            command=command,
            extraArgs=extra_args,
            scale=0.5,
            text_fg=(1, 1, 1, 1),
            text_scale=0.1,
            text_pos=(0, -0.04),
            relief=None,
        )
        self.initialiseoptions(DrawMappedButton)  # 全ての初期化メソッドを呼び出す
utils.py を修正して、DrawMappedButtonクラスを追加します。DrawMappedButtonクラスは DirectButtonクラスを継承して作ります。引数model に4枚の画像をマップしたモデルを指定すると、通常、マウスオーバー、クリック、無効の4つの状態とテクスチャーが対応づけられます。
引数geom にタプル形式でテクスチャーを指定します(geom は geometory の略)。model.find('**/button_up')により、button_upが指定されたテクスチャーを見つけて、「通常」状態とを結びつけます。
initialiseoptionsメソッドは、全ての初期化メソッドを呼び出します。DirectGuiBaseクラスを継承したクラス(DirectButtonなど)をさらに継承するときに指定しなければなりません。
"""src/menu.py"""
from panda3d.core import *
from .utils import *


class Menu:
    def __init__(self):
        self.menu_node = self.aspect2d.attachNewNode('menu_node')
        self.menu_node.stash()
        self.save_node = self.aspect2d.attachNewNode('save_node')
        self.save_node.stash()
        self.load_node = self.aspect2d.attachNewNode('load_node')
        self.load_node.stash()

        menu_cm = CardMaker('menu_card')
        menu_cm.setFrame(-1.5, 1.5, -1, 1)
        self.menu_background_node = self.render2d.attachNewNode(menu_cm.generate())
        self.menu_background_node.setTransparency(1)
        self.menu_background_node.setColor(0, 0, 0, 0.5)
        self.menu_background_node.stash()

        self.button_model = self.loader.loadModel('models/button_maps')
        self.frame_texture = self.loader.loadTexture('textures/button/button_up.png')

        # Menu Screen
        self.resume_button = DrawMappedButton(
            parent=self.menu_node,
            model=self.button_model,
            text='ゲームに戻る',
            font=self.font,
            pos=(0, 0, 0.4),
            command=self.toggle_menu
        )
        self.save_button = DrawMappedButton(
            parent=self.menu_node,
            model=self.button_model,
            text='ゲームをセーブ',
            font=self.font,
            pos=(0, 0, 0.24),
            command=self.toggle_save
        )
        self.load_button = DrawMappedButton(
            parent=self.menu_node,
            model=self.button_model,
            text='ゲームをロード',
            font=self.font,
            pos=(0, 0, 0.08),
            command=self.toggle_load
        )
        self.server_button = DrawMappedButton(
            parent=self.menu_node,
            model=self.button_model,
            text='サーバーを開始',
            font=self.font,
            pos=(0, 0, -0.08),
            command=self.open_server
        )
        self.join_button = DrawMappedButton(
            parent=self.menu_node,
            model=self.button_model,
            text='サーバーに接続',
            font=self.font,
            pos=(0, 0, -0.24),
            command=self.join_server
        )
        self.exit_button = DrawMappedButton(
            parent=self.menu_node,
            model=self.button_model,
            text='ゲームを終了',
            font=self.font,
            pos=(0, 0, -0.4),
            command=exit
        )

        # Save Screen

        # Load Screen

        # ユーザー操作
        self.accept('q', self.toggle_menu)

    def toggle_menu(self):
        if self.menu_node.isStashed():
            self.menu_node.unstash()
            self.menu_background_node.unstash()
        else:
            self.menu_node.stash()
            self.menu_background_node.stash()

    def toggle_save(self):
        pass

    def toggle_load(self):
        pass

    def save_world(self):
        pass

    def load_world(self):
        pass

    def open_server(self):
        pass

    def join_server(self):
        pass
menu.py にMenuクラスを作成します。Menuクラスはメニューを管理します。
Menuクラスの説明をします。
self.menu_node = self.aspect2d.attachNewNode('menu_node')
self.menu_node.stash()
self.save_node = self.aspect2d.attachNewNode('save_node')
self.save_node.stash()
self.load_node = self.aspect2d.attachNewNode('load_node')
self.load_node.stash()
menu_cm = CardMaker('menu_card')
menu_cm.setFrame(-1.5, 1.5, -1, 1)
self.menu_background_node = self.render2d.attachNewNode(menu_cm.generate())
self.menu_background_node.setTransparency(1)
self.menu_background_node.setColor(0, 0, 0, 0.5)
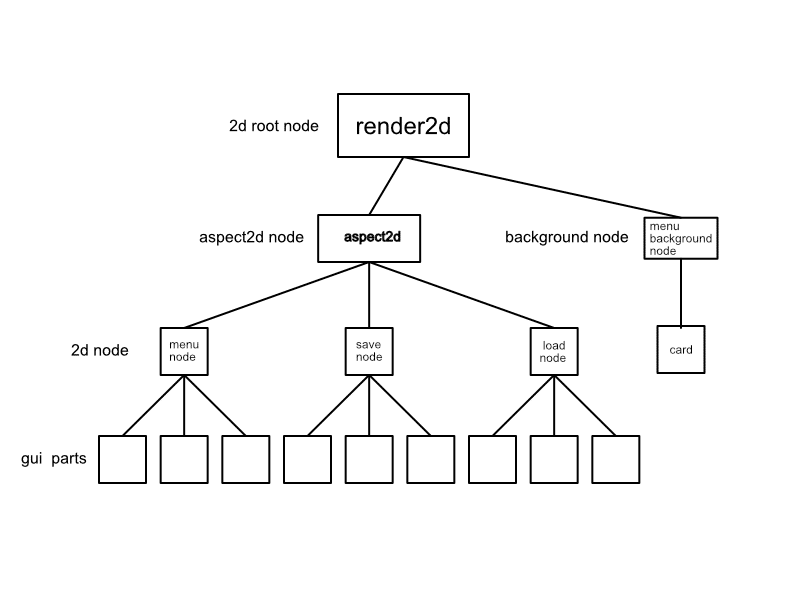
self.menu_background_node.stash()Menuクラスでは、menu_node、save_node、load_node の3つのノードを作成し、その中にボタンなどの GUI 部品を配置していきます。上の2Dシーングラフの図を参照してください。
半透明の背景は、render2d に配置して、3つのノードの背面に配置します。
まずメニュー画面を完成させます。DrawMapedButtonクラスを使って、6つのブロックを等間隔に並べて表示します。
self.accept('q', self.toggle_menu)により、ユーザーが「q」キーを押すと、toggle_menuメソッドが実行されます。toggle_menuメソッドは、menu_nodeノードとmenu_background_nodeノードの表示 / 非表示を切り替えます。そうすることで、メニュー画面を表示したり消したりできるようになります。
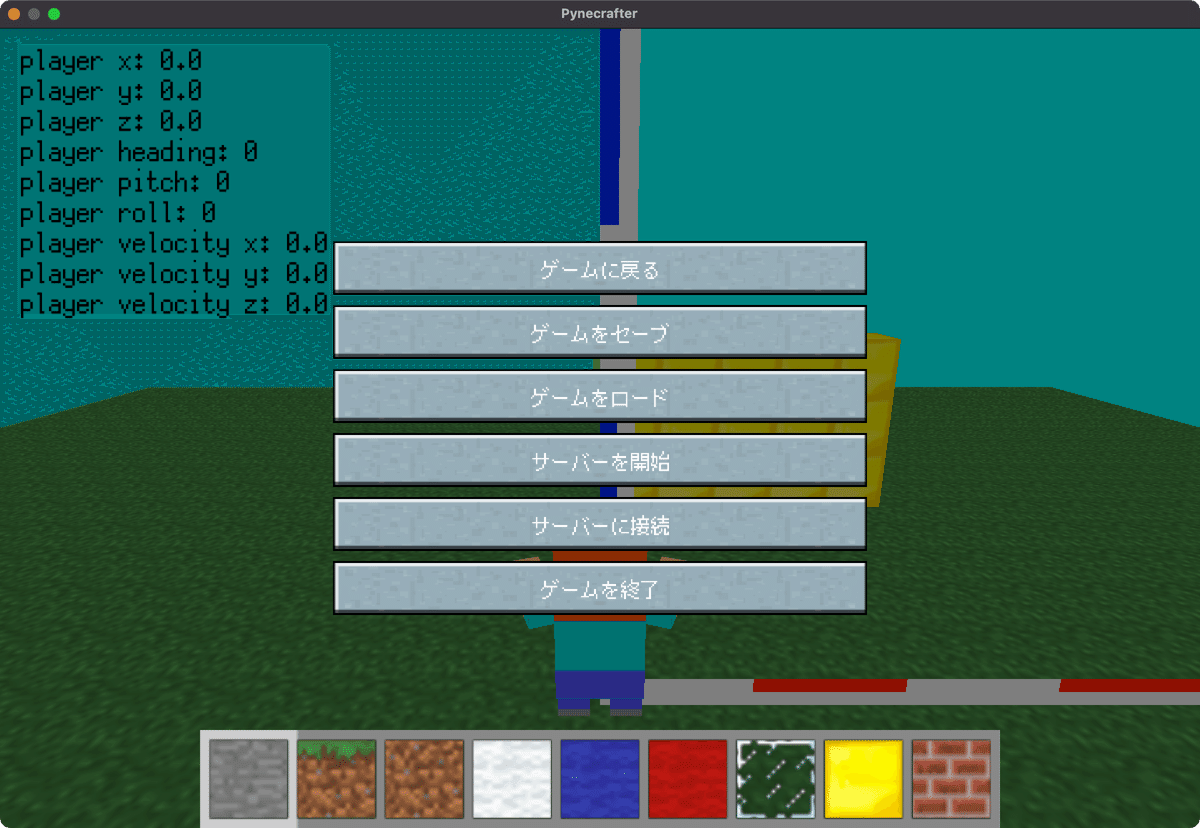
11_01_main.py を実行して、「q」キーを押して、メニュー画面が表示されることを確認します。もう一度「q」キーを押して、メニュー画面が消すことができます。また「ゲームに戻る」ボタンを押して、メニュー画面を消すこともできます。動作を確認してください。
セーブ画面を作成する
"""src/utils.py"""
from direct.gui.DirectGui import *
from panda3d.core import *

クラスを追加


class DrawLabel(DirectLabel):
    def __init__(self, parent=None, text='', font=None, pos=(0, 0, 0), scale=0.05):
        super().__init__(
            parent=parent,
            text=text,
            text_font=font,
            pos=pos,
            scale=scale,
            text_fg=(1, 1, 1, 1),
            frameColor=(0, 0, 0, 0),
        )
        self.initialiseoptions(DrawLabel)  # 全ての初期化メソッドを呼び出す


class DrawEntry(DirectEntry):
    def __init__(self, parent=None, frame_texture=None, initial_text='', font=None, pos=(0, 0, 0), command=None):
        super().__init__(
            parent=parent,
            frameTexture=frame_texture,
            initialText=initial_text,
            text_font=font,
            pos=pos,
            command=command,
            scale=.15,
            numLines=1,
            focus=1,
            text_fg=(1, 1, 1, 1),
            text_scale=0.75,
        )
        self.initialiseoptions(DrawEntry)  # 全ての初期化メソッドを呼び出す


class DrawScrolledList(DirectScrolledList):
    def __init__(self, parent=None, model=None, frame_texture=None, pos=(0, 0, 0), scale=1, num_items_visible=5,
                 item_height=0.1):
        super().__init__(
            parent=parent,
            decButton_pos=(0.35, 0, 0.5),
            decButton_text='^',
            decButton_text_scale=0.04,
            decButton_text_pos=(0, -0.025),
            decButton_text_fg=(1, 1, 1, 1),
            decButton_borderWidth=(0.005, 0.005),
            decButton_scale=(1.5, 1, 2),
            decButton_geom=(model.find('**/button_up'),
                            model.find('**/button_press'),
                            model.find('**/button_over'),
                            model.find('**/button_disabled')),
            decButton_geom_scale=0.1,
            decButton_relief=None,

            incButton_pos=(0.35, 0, 0),
            incButton_text='^',
            incButton_text_scale=0.04,
            incButton_text_pos=(0, -0.025),
            incButton_text_fg=(1, 1, 1, 1),
            incButton_borderWidth=(0.005, 0.005),
            incButton_hpr=(0, 180, 0),
            incButton_scale=(1.5, 1, 2),
            incButton_geom=(model.find('**/button_up'),
                            model.find('**/button_press'),
                            model.find('**/button_over'),
                            model.find('**/button_disabled')),
            incButton_geom_scale=0.1,
            incButton_relief=None,

            frameSize=(-0.4, 1.1, -0.1, 0.59),
            frameTexture=frame_texture,
            frameColor=(1, 1, 1, 0.75),
            pos=pos,
            scale=scale,
            numItemsVisible=num_items_visible,
            forceHeight=item_height,
            itemFrame_frameSize=(-0.2, 0.2, -0.37, 0.11),
            itemFrame_pos=(0.35, 0, 0.4),
            itemFrame_frameColor=(0, 0, 0, 0),
        )
        self.initialiseoptions(DrawScrolledList)  # 全ての初期化メソッドを呼び出す
utils.py に DrawLabelクラスと DrawEntryクラス、DrawScrolledListクラスの3つを追記します。
DrawLabelクラスは画面にラベルを表示します。DrawEntryクラスは入力欄を作り、ユーザーは文字を入力できるようになります。セーブする「ワールド名」を入力するときに使用します。DrawScrolledListクラスはDirectScrolledListを継承して、セーブデータ一覧を表示するために使用します。
"""src/menu.py"""

セーブ画面のコードを記述する

        # Save Screen
        self.save_input_field = DrawEntry(
            parent=self.save_node,
            frame_texture=self.frame_texture,
            initial_text='My World',
            font=self.font,
            pos=(-0.6, 0, 0.1),
            command=self.save_world,
        )
        self.save_text = DrawLabel(
            parent=self.save_node,
            text='セーブする「ワールドの名前」を入力',
            font=self.font,
            pos=(0, 0, 0.35),
            scale=0.075
        )
        self.save_notification_text = DrawLabel(
            parent=self.save_node,
            text='',
            font=self.font,
            pos=(0, 0, -0.45),
            scale=0.06
        )
        self.save_button = DrawMappedButton(
            parent=self.save_node,
            model=self.button_model,
            text='セーブする',
            font=self.font,
            pos=(0, 0, -0.1),
            command=self.save_world
        )
        self.save_back_button = DrawMappedButton(
            parent=self.save_node,
            model=self.button_model,
            text='メニューに戻る',
            font=self.font,
            pos=(0, 0, -0.25),
            command=self.toggle_save
        )
セーブ画面は、ボタン、ラベル、エントリ(入力フィールド)の3種類の部品でできています。DrawMappedButtonクラス、DrawLabelクラス、DrawEntryクラスでそれぞれ作成します。
        self.save_input_field = DrawEntry(
            parent=self.save_node,
            frame_texture=self.frame_texture,
            initial_text='My World',
            font=self.font,
            pos=(-0.6, 0, 0.1),
            command=self.save_world,
        )
DrawEntryクラスの使い方を説明します。
引数initial_text は入力欄に最初から入力されている文字列を指定します。引数frame は入力欄の背景画像を指定します。引数command は Return(Enter)キーをクリックしたときに実行するメソッドを指定します。
"""src/menu.py"""

メソッドを記述

    def toggle_save(self):
        if self.save_node.isStashed():
            self.menu_node.stash()
            self.save_node.unstash()
            self.save_notification_text.setText('')
        else:
            self.menu_node.unstash()
            self.save_node.stash()
toggle_saveメソッドは、メニュー画面とセーブ画面を切り替えるメソッドです。isStashedメソッドで、stashされているか判定して、stash / unstash を切り替えます。
実際にセーブする実装は次回の記事で行います。
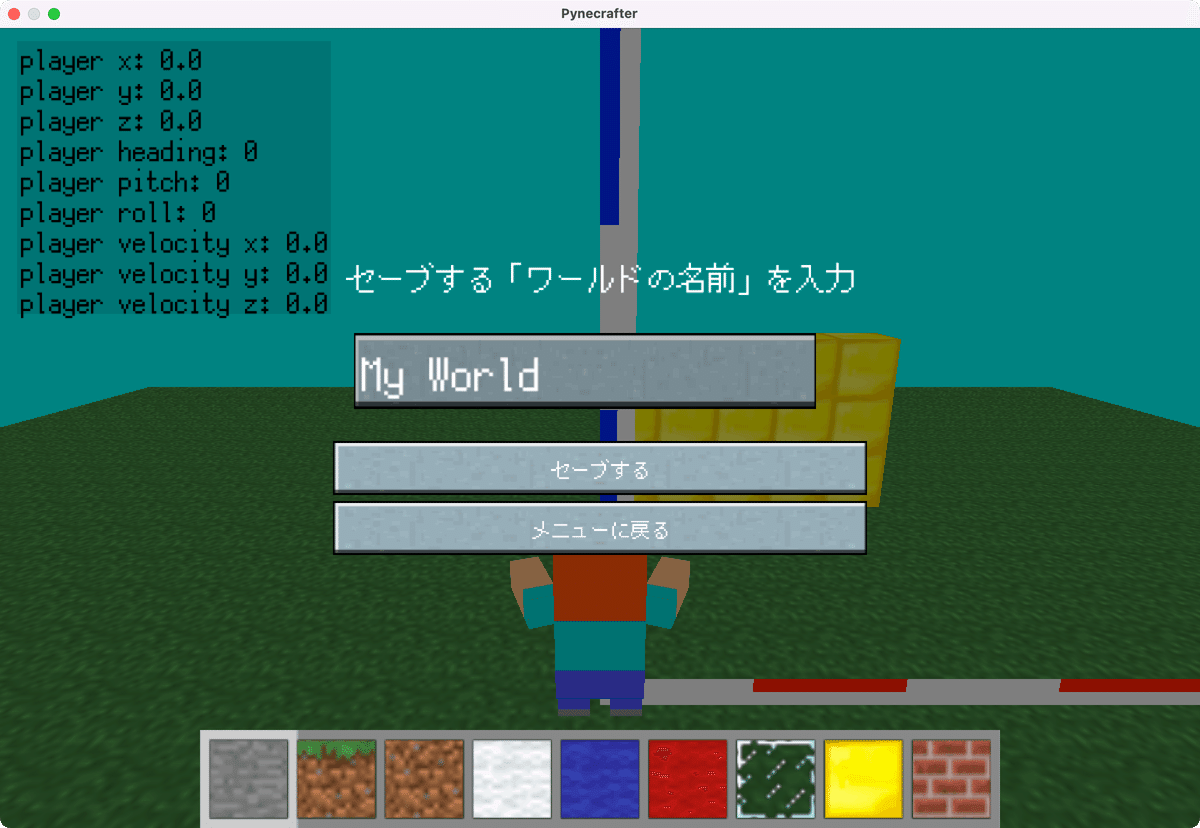
11_01_main.py を実行して動作確認をします。メニュー画面で「ゲームをセーブ」ボタンを押すと、セーブ画面を表示できます。セーブ画面の「メニューに戻る」ボタンでメニュー画面に戻ることができます。
ロード画面を作成する
"""src/menu.py"""

ロード画面のコードを記述する

        # # Load Screen
        self.load_list = DrawScrolledList(
            parent=self.load_node,
            model=self.button_model,
            frame_texture=self.frame_texture,
            pos=(-0.45, 0, -0.25),
            scale=1.25,
            num_items_visible=3,
            item_height=0.15,
        )
        self.load_text = DrawLabel(
            parent=self.load_node,
            text='ロードする「ワールドの名前」を選ぶ',
            font=self.font,
            pos=(0, 0, 0.55),
            scale=0.075
        )
        self.load_notification_text = DrawLabel(
            parent=self.load_node,
            text='',
            font=self.font,
            pos=(0, 0, -0.7),
            scale=0.075
        )
        self.load_back_button = DrawMappedButton(
            parent=self.load_node,
            model=self.button_model,
            text='メニューに戻る',
            font=self.font,
            pos=(0, 0, -0.5),
            command=self.toggle_load
        )


メソッドを記述

    def toggle_load(self):
        if self.load_node.isStashed():
            self.menu_node.stash()
            self.load_node.unstash()
            self.load_notification_text.setText('')
        else:
            self.menu_node.unstash()
            self.load_node.stash()
ロード画面は、ボタン、ラベル、スクロールリストの3種類の部品でできています。DrawMappedButtonクラス、DrawLabelクラス、DrawScrolledListクラスでそれぞれ作成します。
スクロールリストは addItemメソッドでボタンを加えて使います。現時点ではワールドデータがないので空になっています。
toggle_loadメソッドは、メニュー画面とロード画面を切り替えるメソッドです。isStashedメソッドで、stashされているか判定して、stash / unstash を切り替えます。
実際にロードする実装は次回の記事で行います。
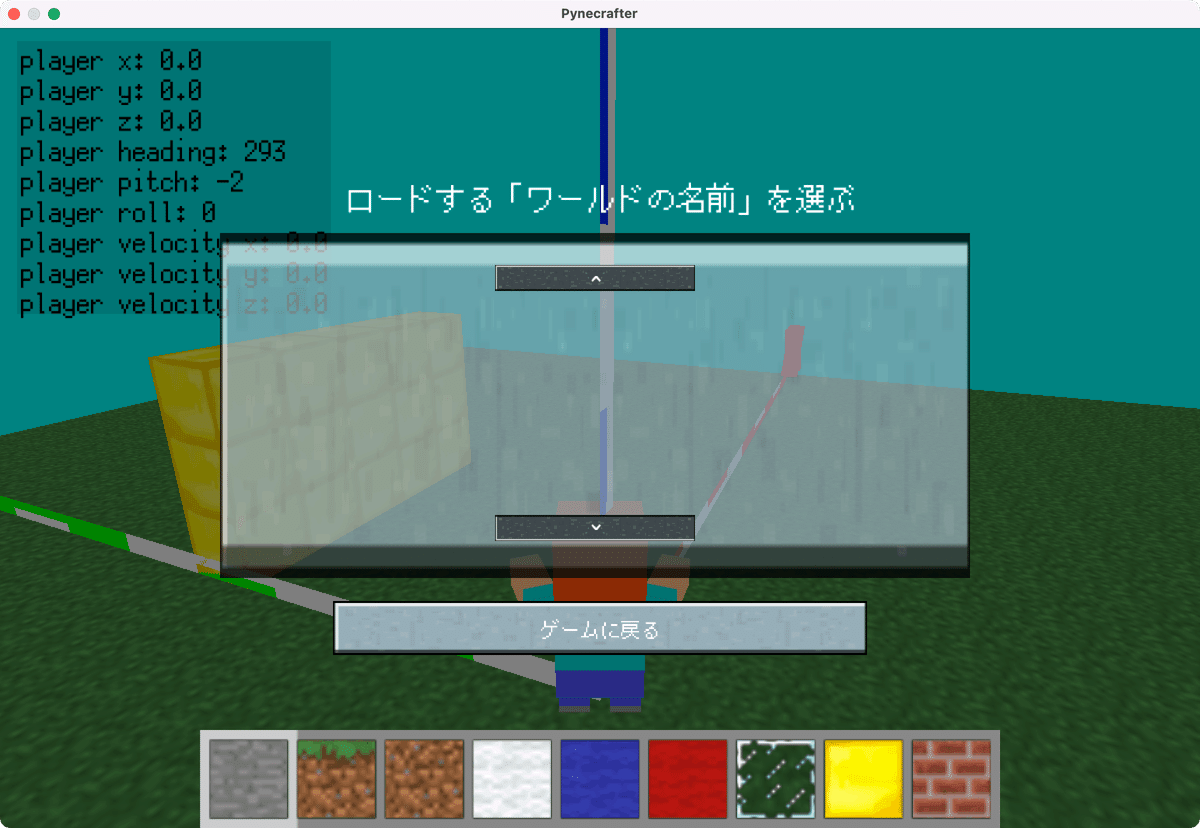
11_01_main.py を実行して動作確認をします。メニュー画面で「ゲームをロード」ボタンを押すと、ロード画面を表示できます。ロード画面の「メニューに戻る」ボタンでメニュー画面に戻ることができます。
細かいバグを修正
"""src/player.py"""

メソッドを修正

def update_direction(self):
    if self.base.mouseWatcherNode.hasMouse() and \
            self.base.inventory_node.isStashed() and \
            self.base.menu_background_node.isStashed():  # 追記
メニュー画面を表示中もプレイヤーが動いてしまうバグを修正します。update_directionメソッドに、メニュー画面が表示しているか判定するコードを追記します。
以上で今回のプログラミングは完了です。
今回は DrawMappedButton、DrawLabel、DrawEntry、DrawScrolledList の4つのクラスを作成し、メニュー画面、セーブ画面、ロード画面の3つの画面を行き来できるようにしました。クラスを作成したおかげで、コードが見やすくなり、GUI部品の再利用が簡単になりました。
次回はゲームをセーブ、ロードを実際に行う方法を学びます。テキストデータで保存することもできるのですが、勉強の意味を兼ねて、sqliteデータベースを使って、ワールドデータのセーブ、ロードを行います。お楽しみに。
前の記事
Pythonでマイクラを作る ⑫インベントリからブロックを選択する
次の記事
Pythonでマイクラを作る ⑭ゲームをセーブする
その他のタイトルはこちら