
PIPのみ ワードクラウド 日本語 Python Jupiter でシルエットの形につくってみる。単語の頻度を可視化する。

目標:日本語のワードクラウドをPython で作成する
(解りやすい資料として記録する)
<手順>
1、参考にさせて頂くサイトのコードをそのまま動かす
2、テキストを日本語の内容に入れ替える
3、必要な素材をそろえ、エラーを解決する
4、画像・テキストを変えてオリジナルのワードクラウドをつくる
#参考にさせて頂いた主なHP
# https://github.com/amueller/word_cloud/blob/master/examples/masked.py
# https://note.nkmk.me/python-janome-tutorial/
# https://quest.signate.jp/quests/10031 「データ前処理道場」
1、参考にしするサイトのコードをそのまま動かす
pip install wordcloud
pip install janome
#!/usr/bin/env python
"""
Masked wordcloud
================
Using a mask you can generate wordclouds in arbitrary shapes.
"""
from os import path
from PIL import Image
import numpy as np
import matplotlib.pyplot as plt
import os
from wordcloud import WordCloud, STOPWORDS
# get data directory (using getcwd() is needed to support running example in generated IPython notebook)
d = path.dirname(__file__) if "__file__" in locals() else os.getcwd()
# Read the whole text.
text = open(path.join(d, 'alice.txt')).read()
# read the mask image
# taken from
# http://www.stencilry.org/stencils/movies/alice%20in%20wonderland/255fk.jpg
alice_mask = np.array(Image.open(path.join(d, "alice_mask.png")))
stopwords = set(STOPWORDS)
stopwords.add("said")
wc = WordCloud(background_color="white", max_words=2000, mask=alice_mask,
stopwords=stopwords, contour_width=3, contour_color='steelblue')
# generate word cloud
wc.generate(text)
# store to file
wc.to_file(path.join(d, "alice.png"))
# show
plt.imshow(wc, interpolation='bilinear')
plt.axis("off")
plt.figure()
plt.imshow(alice_mask, cmap=plt.cm.gray, interpolation='bilinear')
plt.axis("off")
plt.show()---------------------------------------------------------------------------
FileNotFoundError Traceback (most recent call last)
<ipython-input-3-5e42be5721e7> in <module>
18
19 # Read the whole text.
---> 20 text = open(path.join(d, 'alice.txt')).read()
21
22 # read the mask image
FileNotFoundError: [Errno 2] No such file or directory: '/home/user3/5day/エラーと作成過程/alice.txt'
エラー:「alice.txt」というファイルが存在しないよ。 https://github.com/amueller/word_cloud/tree/master/examples からダウンロードして同じ階層のファイルに配置しよう(画像をダウンロードして、同じ階層にアップロードしても良い)
!wget https://github.com/amueller/word_cloud/blob/master/examples/alice.txt
!wget https://raw.githubusercontent.com/amueller/word_cloud/master/examples/alice_mask.png
上記2つの素材をそろえる事で、参考サイトのコードは動く。
2、テキストを日本語の内容に入れ替える
#!/usr/bin/env python
"""
Masked wordcloud
================
Using a mask you can generate wordclouds in arbitrary shapes.
"""

from os import path
from PIL import Image
import numpy as np
import matplotlib.pyplot as plt
import os

from wordcloud import WordCloud, STOPWORDS

# get data directory (using getcwd() is needed to support running example in generated IPython notebook)
d = path.dirname(__file__) if "__file__" in locals() else os.getcwd()

########################################################

# Read the whole text. #text  = open(path.join(d, 'alice.txt')).read()
text = open(path.join(d, 'chumonno_oi_ryoriten.txt')).read()

########################################################

# read the mask image
# taken from
# http://www.stencilry.org/stencils/movies/alice%20in%20wonderland/255fk.jpg
alice_mask = np.array(Image.open(path.join(d, "alice_mask.png")))

stopwords = set(STOPWORDS)
stopwords.add("said")

wc = WordCloud(background_color="white", max_words=2000, mask=alice_mask,
              stopwords=stopwords, contour_width=3, contour_color='steelblue')

# generate word cloud
wc.generate(text)

# store to file
wc.to_file(path.join(d, "alice.png"))

# show
plt.imshow(wc, interpolation='bilinear')
plt.axis("off")
plt.figure()
plt.imshow(alice_mask, cmap=plt.cm.gray, interpolation='bilinear')
plt.axis("off")
plt.show()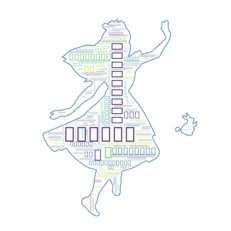
文字が□で表現されたワードクラウドが出来る。
日本語対応しているフォントを指定していないためこのようになる。
日本語対応フォントの位置を指定する
今回は無料で使えるフォントをダウンロードし、同じ階層のフォルダに配置する。(パスが環境によって異なるため、再現しやすいようにするため)
今回使用させて頂いたフリーフォント
https://freefontsdownload.net/free-mukasimukasigfont-font-155411.htm
単語ごとに区切られていないため、単語の頻度を可視化するワードクラウドとして機能していない。 janomeを使用し、日本語を単語ごとに分ける
# pipのみで導入可能であるため、「janome」を使用 文字列から名詞のみを抜き出すために使用
from janome.tokenizer import Tokenizer
#----
# pipのみで導入可能であるため、「janome」を使用 文字列から名詞のみを抜き出すために使用
from janome.tokenizer import Tokenizer

text_wakati = open(path.join(d, 'tes.txt'), encoding='shift_jis').read()
t = Tokenizer()

s = text_wakati

print(type(t.tokenize(s)))

text_wakati=[token.surface for token in t.tokenize(s)
      if token.part_of_speech.startswith('名詞')]

text_wakati =" ".join(map(str, text_wakati))
'shift_jis' codec can't decode byte 0x80 in position 2: illegal multibyte sequence というエラーが出た場合は、テキストファイルを修正します。 新しく、パソコン本体で「メモ帳」を開き、必要なテキストをコピー ペーストしてください。 同じ階層にアップロードしてください。
#!/usr/bin/env python
"""
Masked wordcloud
================
Using a mask you can generate wordclouds in arbitrary shapes.
"""

from os import path
from PIL import Image
import numpy as np
import matplotlib.pyplot as plt
import os

from wordcloud import WordCloud, STOPWORDS

# get data directory (using getcwd() is needed to support running example in generated IPython notebook)
d = path.dirname(__file__) if "__file__" in locals() else os.getcwd()

########################################################

# Read the whole text. #text  = open(path.join(d, 'alice.txt')).read() #text  = open(path.join(d, 'chumonno_oi_ryoriten.txt')).read()


#----
# pipのみで導入可能であるため、「janome」を使用 文字列から名詞のみを抜き出すために使用
from janome.tokenizer import Tokenizer

text_wakati = open(path.join(d, 'chumonno_oi_ryoriten.txt'), encoding='shift_jis').read()
t = Tokenizer()

s = text_wakati

print(type(t.tokenize(s)))

text_wakati=[token.surface for token in t.tokenize(s)
      if token.part_of_speech.startswith('名詞')]

text=" ".join(map(str, text_wakati))

########################################################

# read the mask image
# taken from
# http://www.stencilry.org/stencils/movies/alice%20in%20wonderland/255fk.jpg
alice_mask = np.array(Image.open(path.join(d, "alice_mask.png")))

stopwords = set(STOPWORDS)
stopwords.add("said")
 #wc  = WordCloud(background_color="white", max_words=2000, mask=alice_mask,
#               stopwords=stopwords, contour_width=3, contour_color='steelblue')

########################################################
font_patha_a = 'gomarice_mukasi_mukasi.ttf'
wc = WordCloud(background_color="white", max_words=2000, mask=alice_mask,
              stopwords=stopwords, contour_width=3, contour_color='steelblue',font_path=font_patha_a)
########################################################

# generate word cloud
wc.generate(text)

# store to file
wc.to_file(path.join(d, "alice.png"))

# show
plt.imshow(wc, interpolation='bilinear')
plt.axis("off")
plt.figure()
plt.imshow(alice_mask, cmap=plt.cm.gray, interpolation='bilinear')
plt.axis("off")
plt.show()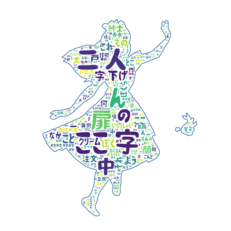
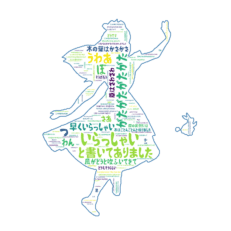
字 下げ ここ 等の本文と関係の無い文字列がはいっている。
なので、本文に関係のない文字列を空白に置き換える
 #置き換えを使うため 、「re」をインポート
import re
# 「字下げる」という文言が、名詞として認識されている。頻出文字として認識されてしまうため、除外する。
text= re.sub("字", ' ', text)
text= re.sub("下げ", ' ', text)
text= re.sub("ここ", ' ', text)#!/usr/bin/env python
"""
Masked wordcloud
================
Using a mask you can generate wordclouds in arbitrary shapes.
"""
from os import path
from PIL import Image
import numpy as np
import matplotlib.pyplot as plt
import os
from wordcloud import WordCloud, STOPWORDS
# get data directory (using getcwd() is needed to support running example in generated IPython notebook)
d = path.dirname(__file__) if "__file__" in locals() else os.getcwd()
########################################################
# Read the whole text. #text = open(path.join(d, 'alice.txt')).read() #text = open(path.join(d, 'chumonno_oi_ryoriten.txt')).read()
#----
# pipのみで導入可能であるため、「janome」を使用 文字列から名詞のみを抜き出すために使用
from janome.tokenizer import Tokenizer
text_wakati = open(path.join(d, 'chumonno_oi_ryoriten.txt'), encoding='shift_jis').read()
t = Tokenizer()
s = text_wakati
print(type(t.tokenize(s)))
text_wakati=[token.surface for token in t.tokenize(s)
if token.part_of_speech.startswith('名詞')]
text=" ".join(map(str, text_wakati))
import re
# 「字下げる」という文言が、名詞として認識されている。頻出文字として認識されてしまうため、除外する。
text= re.sub("字", ' ', text)
text= re.sub("下げ", ' ', text)
text= re.sub("ここ", ' ', text)
########################################################
# read the mask image
# taken from
# http://www.stencilry.org/stencils/movies/alice%20in%20wonderland/255fk.jpg
alice_mask = np.array(Image.open(path.join(d, "alice_mask.png")))
stopwords = set(STOPWORDS)
stopwords.add("said")
#wc = WordCloud(background_color="white", max_words=2000, mask=alice_mask,
# stopwords=stopwords, contour_width=3, contour_color='steelblue')
########################################################
font_patha_a = 'gomarice_mukasi_mukasi.ttf'
wc = WordCloud(background_color="white", max_words=2000, mask=alice_mask,
stopwords=stopwords, contour_width=3, contour_color='steelblue',font_path=font_patha_a)
########################################################
# generate word cloud
wc.generate(text)
# store to file
wc.to_file(path.join(d, "alice.png"))
# show
plt.imshow(wc, interpolation='bilinear')
plt.axis("off")
plt.figure()
plt.imshow(alice_mask, cmap=plt.cm.gray, interpolation='bilinear')
plt.axis("off")
plt.show()
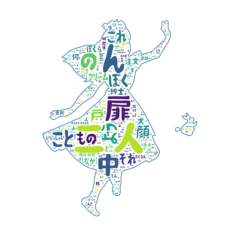
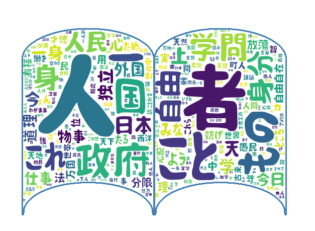
テキストや画像を変更すると、色々なワードクラウドが作成できます。
#!/usr/bin/env python
"""
Masked wordcloud
================
Using a mask you can generate wordclouds in arbitrary shapes.
"""
from janome.tokenizer import Tokenizer
from os import path
from PIL import Image
from wordcloud import WordCloud, STOPWORDS
import matplotlib.pyplot as plt
import numpy as np
import os
import re
# get data directory (using getcwd() is needed to support running example in generated IPython notebook)
d = path.dirname(__file__) if "__file__" in locals() else os.getcwd()
########################################################
# Read the whole text. #text = open(path.join(d, 'alice.txt')).read() #text = open(path.join(d, 'chumonno_oi_ryoriten.txt')).read()
#----
# pipのみで導入可能であるため、「janome」を使用 文字列から名詞のみを抜き出すために使用
#text_wakati = open(path.join(d, 'chumonno_oi_ryoriten.txt'), encoding='shift_jis').read()
text_wakati ='Python(パイソン)はインタープリタ型の高水準汎用プログラミング言語である。グイド・ヴァン・ロッサムにより創り出され、1991年に最初にリリースされたPythonの設計哲学は、有意なホワイトスペース(オフサイドルール)の顕著な使用によってコードの可読性を重視している。その言語構成とオブジェクト指向のアプローチは、プログラマが小規模なプロジェクトから大規模なプロジェクトまで、明確で論理的なコードを書くのを支援することを目的としている。Pythonは動的に型付けされていて、ガベージコレクションされている。構造化(特に手続き型)、オブジェクト指向、関数型プログラミングを含む複数のプログラミングパラダイムをサポートしている。Pythonは、その包括的な標準ライブラリのため、しばしば「バッテリーを含む」言語と表現される[4]。Pythonは1980年代後半にABC言語の後継として考案された。2000年にリリースされたPython 2.0では、リスト内包表記や参照カウントによるガベージコレクションシステムなどの機能が導入された。2008年にリリースされたPython 3.0は、完全な下位互換性を持たない言語の大規模な改訂であり、Python 2のコードの多くはPython 3では変更なしには動作しない。Python 2言語は2020年に正式に廃止され(当初は2015年予定)、"Python 2.7.18はPython 2.7の最後のリリースであり、したがってPython 2の最後のリリースである "[5]とされている。これ以上のセキュリティパッチやその他の改善はリリースされない[6]。Python 2が終了したことで、サポートされるのはPython 3.5.x以降[7]のみとなる。Pythonのインタプリタは多くのOSに対応している。プログラマーのグローバルコミュニティは、無料のオープンソース [8] リファレンス実装であるCPythonを開発および保守している 。非営利団体であるPythonソフトウェア財団は、PythonとCPythonの開発のためのリソースを管理・指導している。(ウィキペディアより引用)'
t = Tokenizer()
s = text_wakati
print(type(t.tokenize(s)))
text_wakati=[token.surface for token in t.tokenize(s)
if token.part_of_speech.startswith('名詞')]
text_wakati =" ".join(map(str, text_wakati))
# 「字下げる」という文言が、名詞として認識されている。頻出文字として認識されてしまうため、除外する。
text_wakati = re.sub("字", ' ', text_wakati)
text_wakati = re.sub("下げ", ' ', text_wakati)
text_wakati = re.sub("ここ", ' ', text_wakati)
########################################################
# read the mask image
# taken from
# http://www.stencilry.org/stencils/movies/alice%20in%20wonderland/255fk.jpg #alice_mask = np.array(Image.open(path.join(d, "alice_mask.png")))
alice_mask = np.array(Image.open(path.join(d, "download2.png")))
stopwords = set(STOPWORDS)
stopwords.add("said")
#wc = WordCloud(background_color="white", max_words=2000, mask=alice_mask,
# stopwords=stopwords, contour_width=3, contour_color='steelblue')
########################################################
font_patha_a = 'gomarice_mukasi_mukasi.ttf'
wc = WordCloud(background_color="white", max_words=2000, mask=alice_mask,
stopwords=stopwords, contour_width=3, contour_color='steelblue',font_path=font_patha_a)
# generate word cloud #wc .generate(text)
wc.generate(text_wakati)
########################################################
# store to file
wc.to_file(path.join(d, "alice.png"))
# show
plt.imshow(wc, interpolation='bilinear')
plt.axis("off")
plt.figure()
plt.imshow(alice_mask, cmap=plt.cm.gray, interpolation='bilinear')
plt.axis("off")
plt.show()

<要点のまとめ>
英語のワードクラウドのコードから、日本語でワードクラウドを作製する時には
・日本語のフォント
・日本語の単語ごとにわける(分かち書き)
という工程が追加で必要となる。
#ワードクラウド 日本語 Python JupyterLab でやってみる。
#参考にさせて頂いた主なHP
# https://github.com/amueller/word_cloud/blob/master/examples/masked.py
# https://note.nkmk.me/python-janome-tutorial/
# https://quest.signate.jp/quests/10031 「データ前処理道場」
短い時間でサッと学習記録を確認!
この記事が気に入ったらサポートをしてみませんか?