
Nuxt × TypeScript でTodoListとユーザ認証を実装してFirebase Hostingにデプロイ [Tutorial - Part 1/5 - 環境構築とHelloWorld]

概要
Nuxt×TypeScriptでTodoListを実装し、Firebase Hostingにデプロイするチュートリアルです。簡単なCRUD(Create, Read, Update, Delete)アプリを作成することで、NuxtとTypeScriptの概要を掴むことが目的です。
CRUDは全ての基本で、ここをきちんと理解すればどんなモノでも作れるようになると言っても過言ではないと思っています。見様見真似で写経するだけで、初心者が簡単なWebサービスのフロントを開発できるようになるような記事を目指して書いていきます。
最近は JS といえば TypeScript な流れを感じており、普段バックエンドをJavaで書いている僕も、型はあるに越したことはないと思っています。型がない中でプログラムを書くなんてめちゃめちゃ怖いです。
各 Part でやることを下に示します。
Part1: 環境構築とHelloWorldの表示
Part2: TodoListを実装する
Part3:Bulmaを使ってデザインを整える
Part4:Firebase Hostingにデプロイする
Part5:Firebase Authを用いてユーザ認証機能を追加する
※このTutorialではデータの永続化 (データベースにデータを保存すること) を扱う予定は今の所ありません。本来のWebサービスであれば、認証はもちろん、DBの用意や、多少複雑なことをやりたければバックエンドのAPIをまた別で開発することになると思います。その辺はまた別の機会に書ければと思います。(今後やる気があれば、Cloud Firestore を扱いたいなという気持ちはあります。) また、GitHubの使い方やVisual Studio Codeの導入など細かい点までは扱いません。もし分からない箇所があったら、適宜ググりながら進めて下さい。
自己紹介
東京で働くソフトウェアエンジニアです。普段はJavaとSpring Bootでバックエンドを書いています。フロントエンドは多少htmlとcssが書ける程度で、本格的にJavaScriptやTypeScriptを書いたことがなかったので、自分の勉強も兼ねてまとめつつ進めます。
対象
・NuxtやTypeScriptが何かは知っているが書いたことはない。
・ある程度LinuxコマンドやGitの使い方が分かる。
・多少はWebサービス開発関連のプログラミングができる。
実装する機能
・簡単なTodo List
使う技術
・Nuxt
・TypeScript
環境
・Mac
・Visual Studio
ソースコード
「Part 1/5 - 環境構築とHelloWorldの表示」の完成物
この Part1 ではまだ下のようなページが表示できるようになるだけです。

手順
1. Nuxtのプロジェクトを作成する
下記を参考にやっていきます。
まず create-nuxt-app というコマンドで雛形を作成します。この時点であまり深入りするつもりはないのですが、下の設定は追加しておいて損はなさそうです。
- Web App (PWA) Support
- Linter / Formatter
- Prettier
- Axios (非同期通信を行うためのツール。今回は使用予定なし)
- Bulma (CSSのツール。BootStrapみたいなやつ)
- Jest (ユニットテスト用のツール)
また、今回は静的ホスティングを行うのでSPAモードで作成します。
npm も yarn もよく知らないので、一旦 npm を使うことにします。
$ npm install pic.twitter.com/WNlRNCWksY
— I Am Devloper (@iamdevloper) November 30, 2018
# 適当なディレクトリを作成する
$ mkdir workspace

# workspaceに移動する
$ cd workspace

# npx をインストールする。(npmがなければ brew install npm する。
# brew もなければググって入れてください。)
$ npm install -g npx

# nuxt-ts-app-tkugimot という名前で雛形の作成。
$ npx create-nuxt-app nuxt-ts-app-tkugimot
npx: installed 379 in 64.034s
> Generating Nuxt.js project in /Users/ToshimitsuKugimoto/workspace/nuxt/nuxt-ts-app-tkugimot
? Project name nuxt-ts-app-tkugimot
? Project description My breathtaking Nuxt.js project
? Use a custom server framework none
? Choose features to install (Press <space> to select, <a> to toggle all, <i> to invert sele
ction)Progressive Web App (PWA) Support, Linter / Formatter, Prettier, Axios
? Use a custom UI framework bulma
? Use a custom test framework jest
? Choose rendering mode Single Page App
? Author name tkugimot
? Choose a package manager npm
npm WARN deprecated joi@11.4.0: This version has been deprecated in accordance with the hapi
 support policy (hapi.im/support). Please upgrade to the latest version to get the best feat
ures, bug fixes, and security patches. If you are unable to upgrade at this time, paid suppo
rt is available for older versions (hapi.im/commercial).

⠹ Installing packages with npm


$ cd nuxt-ts-app-tkugimot

# 一旦起動して表示を確認
# ブラウザで http://localhost:3000 にアクセスするとアプリが起動している
npm run dev
Nuxt.js v2.6.1                            │
   │   Running in development mode (universal)   │
   │   Memory usage: 23.4 MB (RSS: 60.1 MB)      │
   │                                             │
   │   Listening on: http://localhost:3000

$ git add .
$ git commit -m 'Initial Commit'

# 下記が git@github: ではなく git@tkugimot_github: となっているのは僕が複数のGitHubアカウントを所持しているためです。
$ git remote add origin git@tkugimot_github:tkugimot/nuxt-ts-app-tkugimot.git

$ git push origin master

# https://github.com/tkugimot/nuxt-ts-app-tkugimot にコードがPushされていることを確認
※ https://github.com/ の自分のページに適当な名前 (僕の場合は nuxt-ts-app-tkugimot ) で空のリポジトリを作成していないと push できません。
2. TypeScript関連のライブラリやファイルを導入する
下記を参考にやっていきます。
$ npm i -D @nuxt/typescript
$ npm i ts-node

# tsconfig.json ファイルを作成 (とりあえず空のファイルが要るらしい)
$ touch tsconfig.json

# configファイルをrenameする
$ mv nuxt.config.js nuxt.config.ts

# ここでアプリを走らせようとするとコンパイルエラーが起きる
$ npm run init
 ERROR  ⨯ Unable to compile TypeScript:                                          15:59:55
nuxt.config.ts:1:17 - error TS2307: Cannot find module './package'.

1 import pkg from './package'
                  ~~~~~~~~~~~

  nuxt.config.ts:1:17 - error TS2307: Cannot find module './package'.

  1 import pkg from './package'
                    ~~~~~~~~~~~

  at createTSError (node_modules/ts-node/src/index.ts:226:12)
  at getOutput (node_modules/ts-node/src/index.ts:335:40)
  at Object.compile (node_modules/ts-node/src/index.ts:368:11)
  at Module.m._compile (node_modules/ts-node/src/index.ts:414:43)
  at Module._extensions..js (module.js:663:10)
  at Object.require.extensions.(anonymous function) [as .ts] (node_modules/ts-node/src/index.ts:417:12)
  at Module.load (module.js:565:32)
  at tryModuleLoad (module.js:505:12)
  at Function.Module._load (module.js:497:3)
  at Module.require (module.js:596:17)

# 一旦この状態でコミットしておく。
$ git add .
$ git commit -m 'Add TypeScript libraries and files'
3. Visual Studio Code の準備と Vetur のインストール
Homebrew をインストールしていることが前提です。まだの方は下からお願いします。
$ brew update
# HomeBrew で VS Code を入れておくと特に設定なしで code コマンドが使えて便利です。
$ brew cask install visual-studio-code
$ cd ~/workspace/nuxt/nuxt-ts-app-tkugimot

# Visual Studio Code で nuxt-ts-app-tkugimot を開く
$ code .
後は vs code のUIから Vetur という便利なツールを入れておきます。


4. 既存コードをTypeScript用に修正する
# nuxt.config.ts
# 元のコードを消して下記の内容に修正

import NuxtConfiguration from '@nuxt/config'

const config: NuxtConfiguration = {
  // Type or Press `Ctrl + Space` for autocompletion
}

export default config;
ここまでやったら、下記コマンドを使ってアプリを起動します。
適当なブラウザから http://localhost:3000 にアクセスすると、下の画像のようなページが表示されるはずです。

5. HelloWorldを表示する
最後に、HelloWorldを表示するだけのものに修正していきます。まず、create-nuxt-app での雛形作成時に作成したファイルを消します。
⚾️  Toshi-2
😪 💤 $ git status
On branch master
Changes not staged for commit:
  (use "git add/rm <file>..." to update what will be committed)
  (use "git checkout -- <file>..." to discard changes in working directory)

        deleted:    components/Logo.vue
        deleted:    layouts/default.vue
        deleted:    pages/index.vue
        deleted:    test/Logo.spec.js

no changes added to commit (use "git add" and/or "git commit -a")
消してから localhsot:3000 にアクセスすると、「This page could not be found」と表示されるようになりました。

次に、下記の内容で pages/index.vue を作成します。ここで呼び出しているHelloWorldコンポーネントはこの後に作成します。
$ cd ~/workspace/nuxt/nuxt-ts-app-tkugimot/pages/
$ touch index.vue
$ cd ../components
$ touch HelloWorld.vue
# pages/index.vue
<template>
<HelloWorld />
</template>
<script lang="ts">
import { Component, Vue } from 'vue-property-decorator'
import HelloWorld from '~/components/HelloWorld.vue'
@Component({
components: {
HelloWorld
}
})
export default class Home extends Vue {}
</script>
最後に、HelloWorldコンポーネントを作成します。
# components/HelloWorld.vue
<template>
  <div>
    {{ message }}
  </div>
</template>

<script lang="ts">
import { Component, Vue } from 'vue-property-decorator'

@Component
export default class HelloWorld extends Vue {
  message: string = 'Hello world !'
}
</script>
Vetur がちゃんと機能していると、この時点でVSコード上に下記のようなエラー表示がされていると思います。

これは、vue-property-decorator がインストールされていないためです。下記のように package.json を修正します。
--- a/package.json
+++ b/package.json
@@ -19,7 +19,8 @@
     "@nuxtjs/pwa": "^2.6.0",
     "cross-env": "^5.2.0",
     "nuxt": "^2.4.0",
-    "ts-node": "^8.1.0"
+    "ts-node": "^8.1.0",
+    "vue-property-decorator": "^7.3.0"
   },
   "devDependencies": {
     "@nuxt/typescript": "^2.6.3",
現時点での package.json の全体は下記のようになっているかと思います。
# package.json
{
  "name": "nuxt-ts-app-tkugimot",
  "version": "1.0.0",
  "description": "My breathtaking Nuxt.js project",
  "author": "tkugimot",
  "private": true,
  "scripts": {
    "dev": "nuxt",
    "build": "nuxt build",
    "start": "nuxt start",
    "generate": "nuxt generate",
    "lint": "eslint --ext .js,.vue --ignore-path .gitignore .",
    "precommit": "npm run lint",
    "test": "jest"
  },
  "dependencies": {
    "@nuxtjs/axios": "^5.3.6",
    "@nuxtjs/bulma": "^1.2.1",
    "@nuxtjs/pwa": "^2.6.0",
    "cross-env": "^5.2.0",
    "nuxt": "^2.4.0",
    "ts-node": "^8.1.0",
    "vue-property-decorator": "^7.3.0"
  },
  "devDependencies": {
    "@nuxt/typescript": "^2.6.3",
    "@nuxtjs/eslint-config": "^0.0.1",
    "@vue/test-utils": "^1.0.0-beta.27",
    "babel-core": "7.0.0-bridge.0",
    "babel-eslint": "^10.0.1",
    "babel-jest": "^24.1.0",
    "eslint": "^5.15.1",
    "eslint-config-prettier": "^4.1.0",
    "eslint-config-standard": ">=12.0.0",
    "eslint-loader": "^2.1.2",
    "eslint-plugin-import": ">=2.16.0",
    "eslint-plugin-jest": ">=22.3.0",
    "eslint-plugin-node": ">=8.0.1",
    "eslint-plugin-nuxt": ">=0.4.2",
    "eslint-plugin-prettier": "^3.0.1",
    "eslint-plugin-promise": ">=4.0.1",
    "eslint-plugin-standard": ">=4.0.0",
    "eslint-plugin-vue": "^5.2.2",
    "jest": "^24.1.0",
    "nodemon": "^1.18.9",
    "prettier": "^1.16.4",
    "vue-jest": "^3.0.3"
  }
}
上記の内容を反映するために、npm update コマンドを実行し、最後に npm run dev を実行して localhost:3000 を確認します。
$ cd ~/workspace/nuxt/nuxt-ts-app-tkugimot
$ npm update
npm update
+ vue-property-decorator@7.3.0
added 2 packages from 2 contributors in 17.641s
$ npm run dev
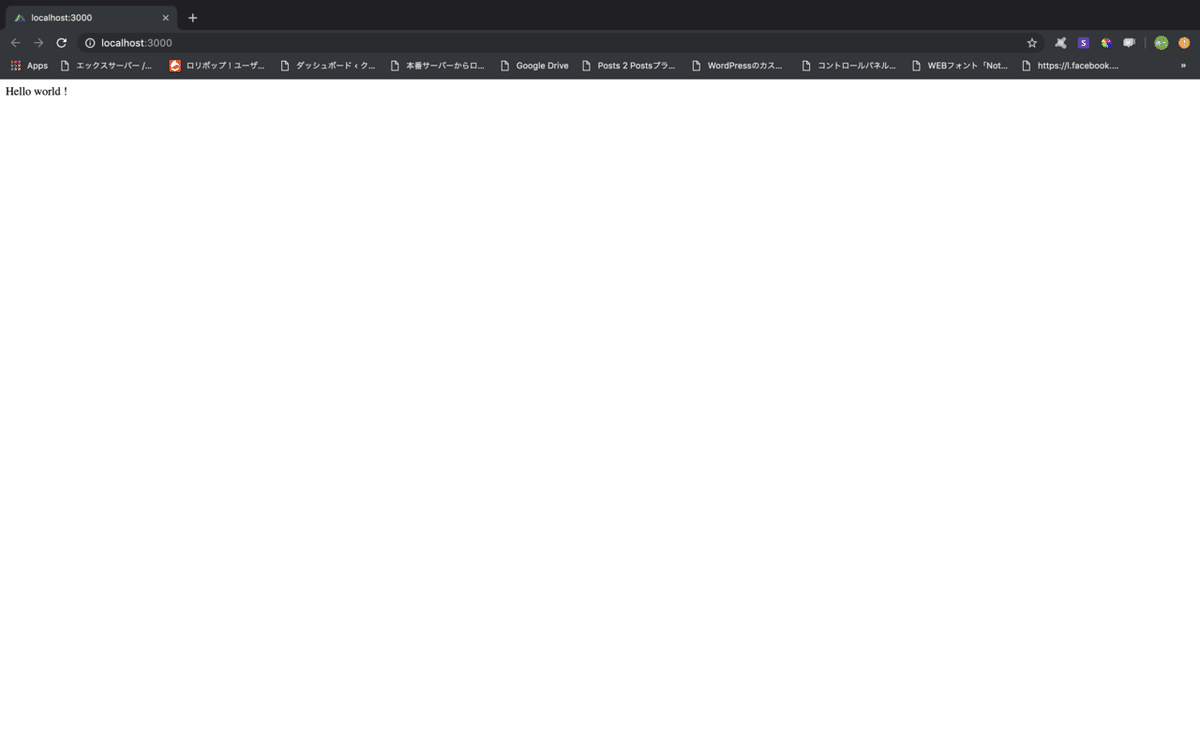
左上の方にちっちゃく Hello World! と表示されています!ようやく完成しました!
GitHubにPushしておきます。
$ git add .
$ git commit -m 'Add HelloWorld'
$ git push origin master
Part1/5終了 ( ´Д`)y━・~~
次のPart2では、満を辞してTodoListの実装に入っていきます! このチュートリアルのメインは次のPart2です!
この記事が気に入ったらサポートをしてみませんか?