
Dependency Injection Zenject (English Version)

Hey, I am Gerald of The Designium. I am introducing the Zenject Plugin for Unity. Zenject allows us to use Dependency Injection, which is also used in other object oriented programming languages. Dependency Injection is not a Design Pattern, but helps us to manage our dependencies between classes.
This post will focus how Dependency Injection works and why it is useful. For advanced usage, please refer to the Zenject Documentation.
Click Here! for Japanese Version
What is Dependency Injection
Traditional ways to code in Unity will mostly look like this:
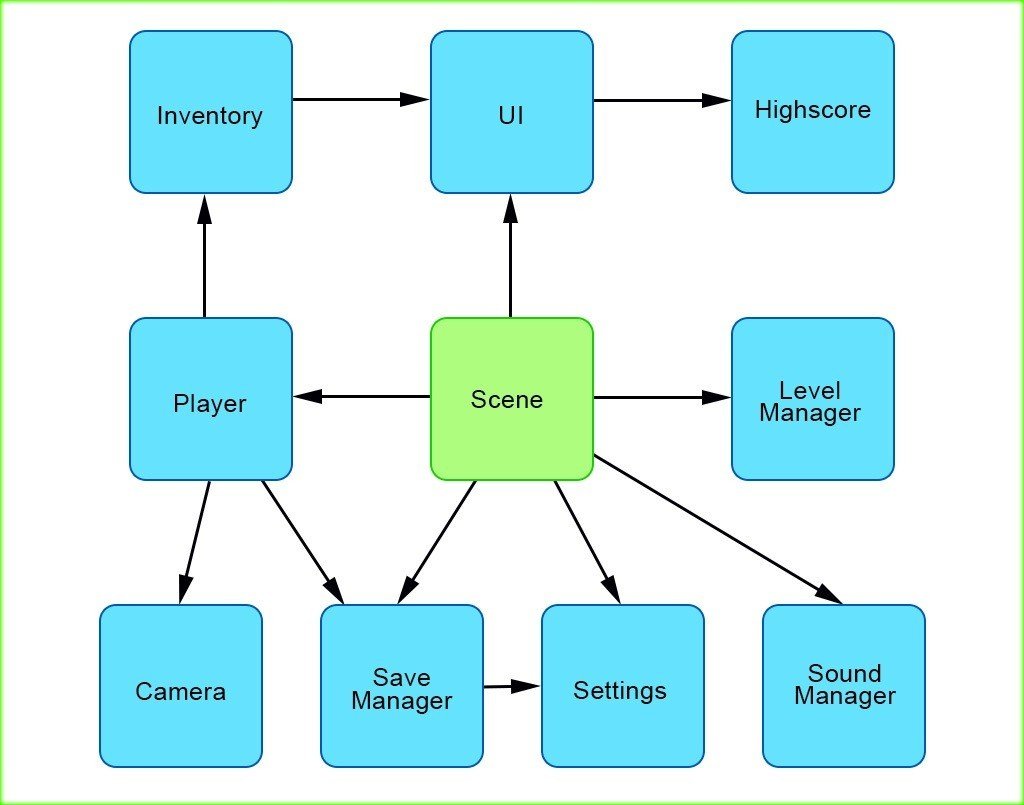
As you can see, those scripts in the scene are criss-crossed and reference each other. Especially in larger projects, this gets even worse and will get difficult to do any changes.
Everything is tightly coupled together and one change impacts many classes.
By using a Dependency Injection Container, we get our references from one single place, instead from many other scripts.
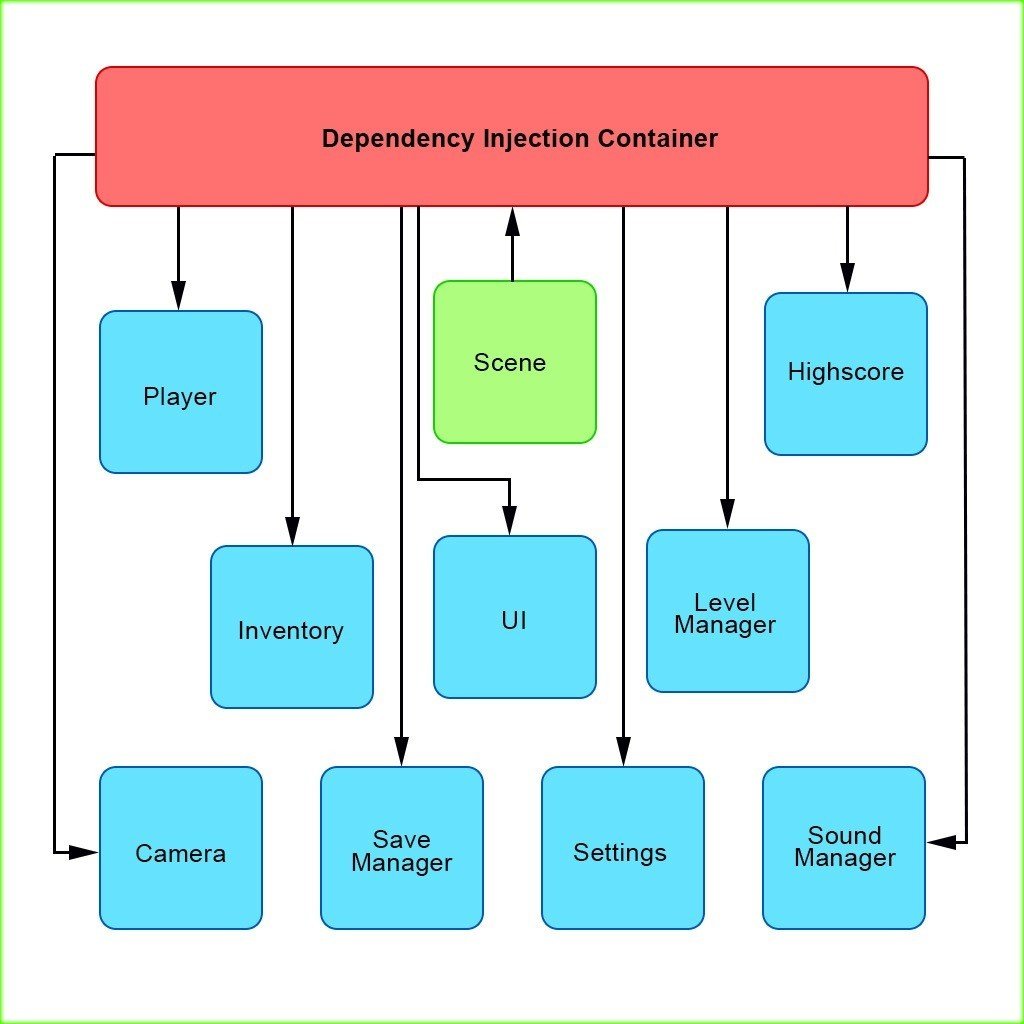
This style makes it easier to change code and improves code quality.
We should be aware that Dependency Injection (aka DI) does not magically decouple code. We don’t need a Dependency Injection framework to decouple code.
To decouple classes and dependencies, we often want to split large classes into smaller classes. Basically respecting the Single Responsibility Principle!
A typical Player script
Imagine a Player script with over 1000 lines and lots of responsibilities. For simplicity, we just look at basic features.
Traditional way:
public class Player : MonoBehaviour {
   [SerializeField]
   private float _moveSpeed = 5;
   [SerializeField]
   private Camera _camera;
   private Animator _animator;
   private Rigidbody _rigidbody;

   void Start() {
       _animator = GetComponent<Animator>();
       _rigidbody = GetComponent<Rigidbody>();
   }

   void Update() {
       UpdateAnimator();
       MovePlayer();
       UpdateCamera();
   }

   private void UpdateAnimator() {
       _animator.SetFloat("moveSpeed", _rigidbody.velocity.magnitude);
   }

   private void MovePlayer() {
       transform.position += transform.forward * Time.deltaTime * _moveSpeed;
   }

   private void UpdateCamera() {
       _camera.transform.position = transform.forward * -2;
   }
}
This class has 3 responsibilities: handling an animator, moving the Player and updating the camera. To decouple it, we can split that into more classes.
A decoupled code without Zenject:
public class Player : MonoBehaviour {
   [SerializeField]
   private float _moveSpeed = 5;
   [SerializeField]
   private Camera _camera;
   private Animator _animator;
   private Rigidbody _rigidbody;

   private PlayerAnimatorHandler _playerAnimatorHandler;
   private PlayerCameraHandler _playerCameraHandler;
   private PlayerMovementHandler _playerMovementHandler;

   void Start() {
       _animator = GetComponent<Animator>();
       _rigidbody = GetComponent<Rigidbody>();
       _playerAnimatorHandler = new PlayerAnimatorHandler(_animator, _rigidbody);
       _playerCameraHandler = new PlayerCameraHandler(_camera, transform);
       _playerMovementHandler = new PlayerMovementHandler(transform);
   }

   void Update() {
       _playerAnimatorHandler.Update();
       _playerCameraHandler.Update();
       _playerMovementHandler.Update(_moveSpeed);
   }
}
public class PlayerAnimatorHandler {
private Animator _animator;
private Rigidbody _rigidbody;
public PlayerAnimatorHandler(Animator animator, Rigidbody rigidbody) {
_animator = animator;
_rigidbody = rigidbody;
}
public void Update() {
_animator.SetFloat("moveSpeed", _rigidbody.velocity.magnitude);
}
}public class PlayerMovementHandler {
private Transform _transform;
public PlayerMovementHandler(Transform transform) {
_transform = transform;
}
public void Update(float moveSpeed) {
_transform.position += _transform.forward * Time.deltaTime * moveSpeed;
}
}public class PlayerCameraHandler {
private Camera _camera;
private Transform _transform;
public PlayerCameraHandler(Camera camera, Transform transform) {
_camera = camera;
_transform = transform;
}
public void Update() {
_camera.transform.position = _transform.forward * -2;
}
}The Player script is much easier and each class has 1 job. But the Player has to instantiate those 3 other classes with correct dependencies (camera, animator, transform, etc.).
This is why Dependency Injection is useful! The Zenject framework creates classes and provides needed dependencies automatically.
Using Zenject now:
public class Player : MonoBehaviour {
   [SerializeField]
   private float _moveSpeed = 5;

   public float GetMoveSpeed() {
       return _moveSpeed;
   }
}
public class PlayerAnimatorHandler : ITickable {
private Animator _animator;
private Rigidbody _rigidbody;
public PlayerAnimatorHandler(Animator animator, Rigidbody rigidbody) {
_animator = animator;
_rigidbody = rigidbody;
}
public void Tick() {
_animator.SetFloat("moveSpeed", _rigidbody.velocity.magnitude);
}
}public class PlayerMovementHandler : ITickable {
private Player _player;
public PlayerMovementHandler(Player player) {
_player = player;
}
public void Tick() {
_player.transform.position += _player.transform.forward * Time.deltaTime * _player.GetMoveSpeed();
}
}public class PlayerCameraHandler : ITickable {
private Camera _camera;
private Player _player;
public PlayerCameraHandler(Camera camera, Player player) {
_camera = camera;
_player = player;
}
public void Tick() {
_camera.transform.position = _player.transform.forward * -2;
}
}Now, the Player script is very simple. Our Animator, movement and camera script are now fully decoupled from the Player.
Before, we used the Update() method to call the other classes. Because PlayerAnimatorHandler is not a MonoBehaviour, we cannot use the Unity Update() method. By implementing the ITickable interface, Zenject calls the Tick() method automatically every frame.
So, we don’t need MonoBehaviours to get Start(), Update(), LateUpdate() etc. calls.
Zenject needs some instruction, how the classes are instantiated. We can do this by the Zenject MonoInstaller:
public class PlayerInstaller : MonoInstaller<PlayerInstaller> {
   [SerializeField]
   private Player _player;
   [SerializeField]
   private Rigidbody _rigidbody;
   [SerializeField]
   private Camera _camera;
   [SerializeField]
   private Animator _animator;

   public override void InstallBindings() {
       Container.BindInstance(_player);
       Container.BindInstance(_rigidbody);
       Container.BindInstance(_camera);
       Container.BindInstance(_animator);

       Container.BindInterfacesAndSelfTo<PlayerAnimatorHandler>().AsSingle();
       Container.BindInterfacesAndSelfTo<PlayerCameraHandler>().AsSingle();
       Container.BindInterfacesAndSelfTo<PlayerMovementHandler>().AsSingle();
   }
}
To put something into the Zenject DI (Dependency Injection) Container, we use several Bind() methods. For already existing references, like cameras, Gameobjects and MonoBehaviours, I used the BindInstance() method.
The BindInterfacesAndSelfTo() method tells Zenject to create a new class of the desired type on Unity’s Start().
For more information about MonoInstaller and Bindings, please take a look here
How to use
Zenject is Open Source and can be downloaded on GitHub or at the Unity asset store. Unfortunately, Unity removed Zenject from the Asset store because it didn’t get updates for a while.
Another developer republished the plugin with a different name called Extenject.
No other installations are required to use Zenject.
Let’s take a look at how to move a simple Cube.
First we need to create a SceneContext. This our DI Container.

On the SceneContext, we add a SceneInstaller script and add the Installer to the “Mono Installers” list.
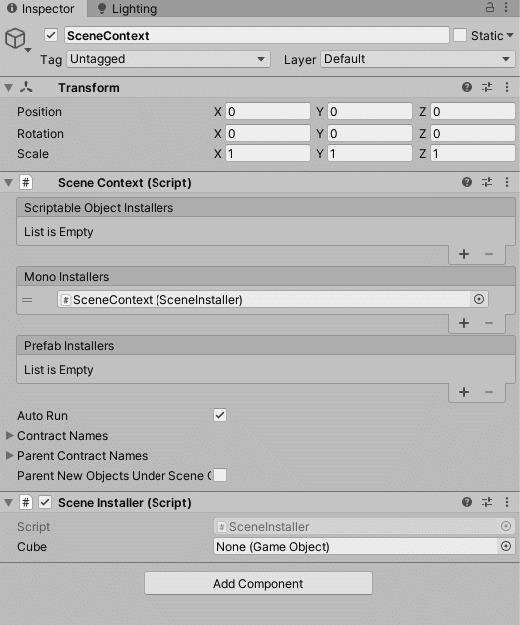
The Installer binds the existing cube from the scene and a CubeMover script into the DI Container.
public class SceneInstaller : MonoInstaller {
   [SerializeField]
   private GameObject _cube;

   public override void InstallBindings() {
       Container.BindInstance(_cube);
       Container.BindInterfacesAndSelfTo<CubeMover>().AsSingle();
   }
}
The CubeMover script moves the cube on Start() and Update(), like a MonoBehaviour would do, by using the IInitializable and ITickable interfaces. The cube GameObject reference is provided by the DI Container.
public class CubeMover : IInitializable, ITickable {
   private Vector3 _startPosition;
   private float _moveSpeed = 5f;
   private GameObject _cube;

   public CubeMover(GameObject cube) {
       _cube = cube;
   }

   // Initialize is called before the first frame update
   public void Initialize() {
       _cube.transform.position = _startPosition;
   }

   // Tick is called once per frame
   public void Tick() {
       _cube.transform.Translate(_cube.transform.forward * _moveSpeed * Time.deltaTime);
   }
}
I used the so-called constructor injection to get the cube references, which is recommended. For other injection method, please look here
Bindings are powerful
Zenject allows us to inject references from the scene and other class references. But we can basically bind any type we want. For example an enum:
public enum Difficulty {
   Easy, Medium, Hard
}
public class Enemy : ITickable {
private Difficulty _difficulty;
public Enemy(Difficulty difficulty) {
_difficulty = difficulty;
}
public void Tick() {
// use _difficulty here
Debug.Log(_difficulty);
}
}We now injected the Difficulty enum in our Enemy class, which is also available to any classes.
If we did that the traditional way, we would have to set the enum on each class (e.g. Enemy, EnemyMovement, EnemyAttack, etc.)
With Zenject, it is easily accessible in every class and stored in one place only.
public class SceneInstaller : MonoInstaller<SceneInstaller> {
   [SerializeField]
   private Difficulty _difficulty;

   public override void InstallBindings() {
       Container.BindInstance(_difficulty);
       Container.BindInterfacesAndSelfTo<Enemy>().AsSingle();
   }
}
Remove Singletons
Singletons are often used to get and call data, without having an explicit reference. Unfortunately, Singletons are considered as Anti-Pattern because they
- make code more complex
- makes classed not reusable
- cannot unit test them
- kind of hidden in the code
By using Zenject, we see immediately, which classes are used in the class by viewing the constructor. Singletons on the hand are somewhere in between the code and make code smell.
Here an example by displaying players health on the HUD-Singleton.
Traditional way:
public class Player : MonoBehaviour {
   [SerializeField]
   private int _startHealth = 100;

   private int _health;

   void Start() {
       _health = _startHealth;
       PlayerUI.Instance.SetHealth(_health);
   }

   public void TakeDamage(int damage) {
       _health -= damage;
       PlayerUI.Instance.SetHealth(_health);
   }
}
public class PlayerUI : MonoBehaviour {
public static PlayerUI Instance { get; private set; }
[SerializeField]
private Text _healthText;
void Awake() {
Instance = this;
}
public void SetHealth(int health) {
_healthText.text = health.ToString();
}
}Let’s take look how to replace Singletons with Zenject:
public class Player : IInitializable {

   private int _health;
   private int _startHealth;
   private PlayerUI _playerUI;

   public Player(int startHealth, PlayerUI playerUI) {
       _startHealth = startHealth;
       _playerUI = playerUI;
   }

   public void Initialize() {
       _health = _startHealth;
       _playerUI.SetHealth(_health);
   }

   public void TakeDamage(int damage) {
       _health -= damage;
       _playerUI.SetHealth(_health);
   }
}
public class PlayerUI {
private Text _healthText;
public PlayerUI(Text healthText) {
_healthText = healthText;
}
public void SetHealth(int health) {
_healthText.text = health.ToString();
}
}public class SceneInstaller : MonoInstaller<SceneInstaller> {
[SerializeField]
private int _startHeath = 100;
[SerializeField]
private Text _healthText;
public override void InstallBindings() {
Container.BindInstance(_healthText);
Container.BindInstance(_startHeath);
Container.BindInterfacesAndSelfTo<Player>().AsSingle();
Container.BindInterfacesAndSelfTo<PlayerUI>().AsSingle();
}
}The Player and PlayerUI are binded into the DI Container, so the Player can inject the PlayerUI reference easily. No need for Singletons anymore!
Side note: the Player script is not an MonoBehaviour anymore and we cannot change the StartHealth in the inspector. So I exposed this variable in the SceneInstaller, which is injected in the Player.
Reuse classes
Zenject allows reusing classes a bit easier. In this example, I want to show how we reuse a Movement script for Player and Enemy.
The difference is just how the input controls the movement. For a Player, the input comes from the keyboard. For an AI, it is controlled by a certain calculated logic. In my case, the Enemy simple goes to a waypoint.
An interface helps us to use the same Movement script for both cases. Then we will create 2 implementations, using the IInputProvider interface.
public interface IInputProvider {
   Vector3 GetMoveDirection();
   bool GetJump();
}
public class PlayerInputProvider : IInputProvider {
public Vector3 GetMoveDirection() {
return new Vector3(Input.GetAxis("Horizontal"), 0, Input.GetAxis("Vertical"));
}
public bool GetJump() {
return Input.GetButtonDown("Jump");
}
}public class EnemyInputProvider : IInputProvider {
private Waypoint _wayPoint;
private Transform _transform;
public EnemyInputProvider(Transform transform, Waypoint waypoint) {
_transform = transform;
_wayPoint = waypoint;
}
public Vector3 GetMoveDirection() {
return _wayPoint.transform.position - _transform.position;
}
public bool GetJump() {
return false;
}
}The Movement script only needs a direction and a jump input. Notice how we inject the IInputProvider.
public class Movement : ITickable {
   private const float JumpPower = 20f;
   private const float MoveSpeed = 0.5f;

   private IInputProvider _inputProvider;
   private CharacterController _characterController;

   public Movement(IInputProvider inputProvider, CharacterController characterController) {
       _inputProvider = inputProvider;
       _characterController = characterController;
   }

   public void Tick() {
       Vector3 moveDirection = _inputProvider.GetMoveDirection() * MoveSpeed;
       if (_inputProvider.GetJump() && _characterController.isGrounded) {
           moveDirection.y += JumpPower;
       }
       moveDirection += Physics.gravity;
       _characterController.Move(moveDirection * Time.deltaTime);
   }
}
The Movement script doesn’t care, which Provider (Player or Enemy) to use. It just does his job. Moving.
In our example, we will use a GameObjectContext. A GameObjectContext is inside a SceneContext and basically a small DI Container, inside the Scene DI Container.
That way, any logic from Player does not interfere with Enemy logic.
Player and Enemy gets an Installer like this
public class PlayerInstaller : MonoInstaller<PlayerInstaller> {
   [SerializeField]
   private Transform _transform;
   [SerializeField]
   private CharacterController _characterController;

   public override void InstallBindings() {
       Container.Bind<IInputProvider>().To<PlayerInputProvider>().AsSingle();
       Container.BindInterfacesAndSelfTo<Movement>().AsSingle();
       Container.BindInstance(_transform);
       Container.BindInstance(_characterController);
   }
}
public class EnemyInstaller : MonoInstaller<EnemyInstaller> {
   [SerializeField]
   private Transform _transform;
   [SerializeField]
   private Waypoint _waypoint;
   [SerializeField]
   private CharacterController _characterController;

   public override void InstallBindings() {
       Container.Bind<IInputProvider>().To<EnemyInputProvider>().AsSingle();
       Container.BindInterfacesAndSelfTo<Movement>().AsSingle();
       Container.BindInstance(_transform);
       Container.BindInstance(_waypoint);
       Container.BindInstance(_characterController);
   }
}
Container.Bind<IInputProvider>().To<PlayerInputProvider>().AsSingle(); tells the DI Container to instantiate a PlayerInputProvider instance, when a class wants to inject a IInputProvider.
The Movement class is created 2 times, once for Player and the Enemy. But they get 2 different input classes at the constructor.
Zenject Advantages
- Helps decoupling code
- Easier to implement the Single Responsibility Principle
- Scripts don’t have direct references to other script
- All scene references are stored at one place (MonoInstaller)
- It makes easier to see, if any reference is lost
- We can rename injected class names
- Normally, the reference is lost in the inspector
- Increase code quality
- No need for Singletons
- Less MonoBehaviours
Can increase performance, because there are less Update() calls from Unity
- Unit Tests are possible
Disadvantages
- Hard to debug
Variables are not exposed in Editor, because of less MonoBehaviours
- Makes prototyping much more complicated
- Exposing variables and settings in the inspector always requires extra code
- Cannot use it with the new ECS
- It takes effort and time at first to switch from traditional programming way to DI
- Does not magically improve your code quality itself
It just helps to code cleaner
- You need to turn deep profiling to see used performance for single scripts
If not enabled, you just see usage of a context
- No real need for another Dependency Injection Container
The Unity scene already is kind of a DI Container by using GetComponent<>(), etc you get all instances you need
- Less updates from the developer in the last few months
When to use Zenject
- At large projects
If you are not using ECS...
- If you have many references in your scene
I had a project with a lot of moving parts (wheels, clamps, locks, actuators, etc) and everything was cross connected into scene
With Zenject, there was one single place for all my references
- Developers who are used to DI or interested into DI
Summary
- Dependency Injection and Zenject helps to decouple code
- Requires practise and effort to use it correctly
- Helps to raise code quality
- Small performance increase
- Not good when prototyping
- Improves reference managing
- Very complex topic, so you need to read the Zenject docs, how to use it
Sources
https://github.com/modesttree/Zenject
https://qiita.com/toRisouP/items/b3d3c43db40857ca4ad4
https://stackoverflow.com/questions/12755539/why-is-singleton-considered-an-anti-pattern
Editorial Note 編集後記
広報のMarikoです!English.verも思い切って日本語版と同じ内容のEditorial Noteをつけちゃいます。(ちょっと英語多めにw)今回もGeraldが英語版と日本語版の記事をpostしてくれました✨外国人のエンジニアが多いチームの方などshareに役立てて頂けるのではないかなと思います!今回の記事はもともと「Zenject is a big help for projects, which take longer than 1 month. 」というGeraldの知見を社内で共有して欲しいということだったため、英語版もすでにデザイニウム内で役に立っています😊Gerald, danke schön!
The Designium.inc
・Interactive website
・Twitter
・Facebook
この記事が気に入ったらサポートをしてみませんか?