
【Flutter】Firebaseの電話番号認証の実装

こんにちは!IOSエンジニアの井上です!
今回はFlutterのFirebaseの電話番号認証を実装しました。
日本語の記事がなかったので、実装方法を載せておきます。
環境
開発環境
・OS: macOS Catalina (10.15.4)
・Flutter: Version 1.12.13+hotfix.8
・Android Studio: Version 3.5.2
事前準備
事前準備
・Flutterの環境構築が完了していること
・Firebaseとアプリの連携は完了していること
・Firebase Consoleで電話番号認証が有効になっていること
実装方法
①ライブラリのインストール
今回使用するライブラリは以下です。
・firebase_auth: ^0.15.5+3
パッケージページリンク
firebase_auth
pubspec.yamlに以下を記述
dependencies:
 flutter:
   sdk: flutter
 # 省略
 firebase_auth: ^0.15.5+3  #追記
flutter packages getでインストール
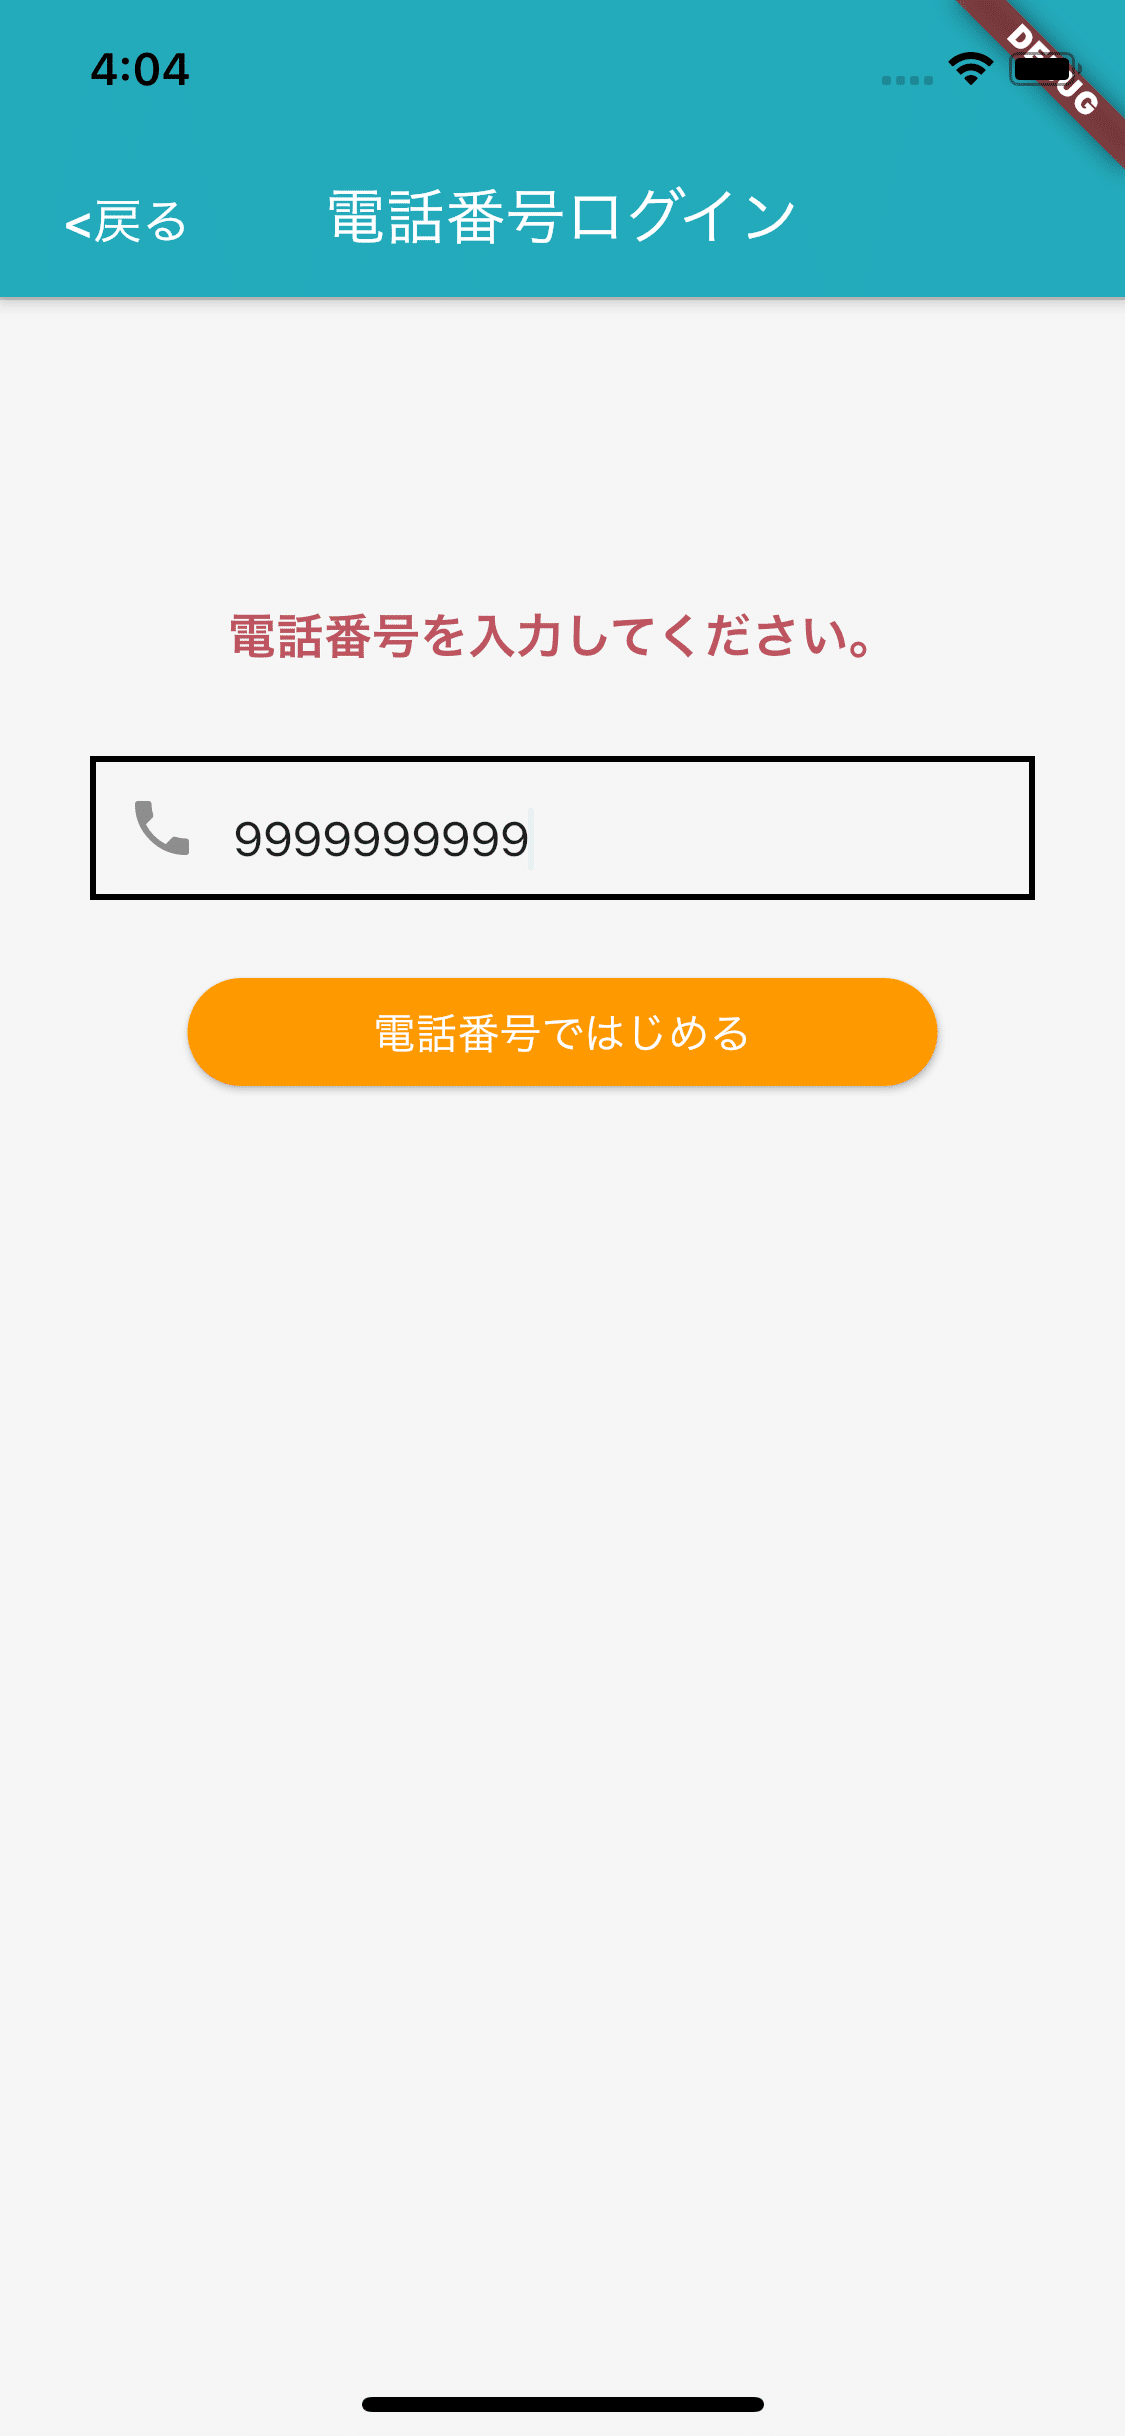
②実装画面
今回は以下のような画面で実装しています。
③実装
import 'package:flutter/material.dart';
import 'package:firebase_auth/firebase_auth.dart';
import 'package:todo_flutter/src/model/screen_arguments.dart';

class PhoneAuthPage extends StatefulWidget {
 PhoneAuthPage({Key key, this.title}) : super(key: key);

 final String title;

 @override
 _PhoneAuthPageState createState() => _PhoneAuthPageState();
}

class _PhoneAuthPageState extends State<PhoneAuthPage> {
 final _phoneNumController = TextEditingController();
 String iphone;
 String smsCode;
 String verificationId;

 void _verifyPhoneNumber(BuildContext context) async {
   // _phoneNumController.text.toString()はテキストフィールドに入力された電話番号
   String phone = "+81" + _phoneNumController.text.toString();
   final fireBaseAuth = FirebaseAuth.instance;

   final PhoneCodeAutoRetrievalTimeout autoRetrieval = (String verId) {
     this.verificationId = verId;
   };

   final PhoneCodeSent smsCodeSent = (String verId, [int forceCordResend]) {
     // fireBaseのrobotチェック後に呼ばれる
     this.verificationId = verId;
     smsCodeDialog(context).then((value) {
       print('sign in');
     });
   };

   final PhoneVerificationCompleted verifiedSuccess = (AuthCredential user) {
     print('verified');
   };

   final PhoneVerificationFailed verifiedFailed = (AuthException exception) {
     print('miss');
     print('${exception.message}');
   };

   await fireBaseAuth.verifyPhoneNumber(
     phoneNumber: phone,
     timeout: Duration(seconds: 5),
     verificationCompleted: verifiedSuccess,
     verificationFailed: verifiedFailed,
     codeSent: smsCodeSent,
     codeAutoRetrievalTimeout: autoRetrieval,
   );
 }

 Future<bool> smsCodeDialog(BuildContext context) {
   return showDialog(
     context: context,
     barrierDismissible: false,
       builder: (BuildContext content) {
       return AlertDialog(
         title: Text('確認コードを入力してください'),
         content: TextField(
           keyboardType: TextInputType.number,
           onChanged: (String value){
             this.smsCode = value;
           },
         ),
         contentPadding: EdgeInsets.all(10),
         actions: <Widget>[
           RaisedButton(
               child: Text(
                 "完了",
                 style: TextStyle(color: Colors.white),
               ),
               color: Colors.orange,
               shape: StadiumBorder(),
               onPressed: (){
                 FirebaseAuth.instance.currentUser().then((user) {
                   if (user == null) {
                     Navigator.pop(context);
                     signIn();
                   }else{
                     Navigator.pop(context);
                     Navigator.pushNamed(
                         context,
                         '/todo',
                         arguments: ScreenArguments(
                           user.uid
                         ),
                     );
                   }
                 });
               }
           ),
         ],
       );
   }
   );
 }

 signIn() {
   AuthCredential _credential = PhoneAuthProvider.getCredential(verificationId: this.verificationId, smsCode: this.smsCode);
   FirebaseAuth.instance.signInWithCredential(_credential).then((user) {
     // 認証後画面遷移させる
     ScreenArguments arg = ScreenArguments(user.user.uid);
     Navigator.pushNamed(
         context,
         '/todo',
         arguments: arg,);
   }).catchError((e){
     print(e.toString());
   });
 }

 @override
 Widget build(BuildContext context) {
   return Scaffold(
     resizeToAvoidBottomPadding: false,
     appBar: AppBar(
       title: Text(
         "電話番号ログイン",
         style: TextStyle(color: Colors.white),
       ),
     ),
     body: Center(
       child: Align(
         alignment: Alignment.center,
         child: Container(
             padding: EdgeInsets.only(
               left: 30,
               right: 30,
               top: 100,
               bottom: 100,
             ),
             child: _phoneNumWidget(context)
         ),
       ),
     ),
   );
 }

 Widget _phoneNumWidget(BuildContext context) {
   return Column(
     mainAxisAlignment: MainAxisAlignment.start,
     children: <Widget>[
       Text(
         "電話番号を入力してください。",
         style: TextStyle(fontWeight: FontWeight.bold,fontSize: 16,color: Colors.red),
       ),
       Padding(
         padding: EdgeInsets.only(top: 20),
       ),
       TextField(
         controller: _phoneNumController,
//          hintText: '090xxxxyyyy',
         keyboardType: TextInputType.phone,
//          icon: Icon(Icons.phone, color: Colors.grey),
         onChanged: (String value){
           this.iphone = value;
         },
       ),
       Padding(
         padding: EdgeInsets.only(top: 20),
       ),
       Container(
         width: 250,
         child: RaisedButton(
             child: Text(
               "電話番号ではじめる",
               style: TextStyle(color: Colors.white),
             ),
             color: Colors.orange,
             shape: StadiumBorder(),
             onPressed: (){
               _verifyPhoneNumber(context);
             }
         ),
       ),
     ],
   );
 }
}
よいFlutterライフを!
この記事が気に入ったらサポートをしてみませんか?