
SwiftUIでカルーセルを実装する

こんにちは。iOSエンジニアの高橋です!
最近本格的にSwiftUIで画面を作成する機会があり、今まで苦労していた画面作成があっという間にできてしまう体験に日々驚いています。ただ、これまでUIKitでできていたことが出来なくなっていることもあり、考え方を変えなければいけない場面があります。今回はおそらくその一つになるカルーセルを作成してみたいと思います。
今回実装するもの
1. 画面の中心にViewが止まる
2. 両サイドに前後のViewが見える
完成コード
import SwiftUI

struct ContentView: View {

   @State private var currentIndex = 0
   @State private var examples = ["1", "2", "3", "4"]
   @GestureState private var dragOffset: CGFloat = 0

   let itemPadding: CGFloat = 20

   var body: some View {
       GeometryReader { bodyView in
           LazyHStack(spacing: itemPadding) {
               ForEach(examples.indices, id: \.self) { index in
                   // カルーセル対象のView
                   Text(examples[index])
                       .foregroundColor(Color.white)
                       .font(.system(size: 50, weight: .bold))
                       .frame(width: bodyView.size.width * 0.8, height: 300)
                       .background(Color.gray)
                       .padding(.leading, index == 0 ? bodyView.size.width * 0.1 : 0)
               }
           }
           .offset(x: self.dragOffset)
           .offset(x: -CGFloat(self.currentIndex) * (bodyView.size.width * 0.8 + itemPadding))
           .gesture(
               DragGesture()
                   .updating(self.$dragOffset, body: { (value, state, _) in
                       // 先頭・末尾ではスクロールする必要がないので、画面サイズの1/5までドラッグで制御する
                       if self.currentIndex == 0, value.translation.width > 0 {
                           state = value.translation.width / 5
                       } else if self.currentIndex == (self.examples.count - 1), value.translation.width < 0 {
                           state = value.translation.width / 5
                       } else {
                           state = value.translation.width
                       }
                   })
                   .onEnded({ value in
                       var newIndex = self.currentIndex
                       // ドラッグ幅からページングを判定
                       if abs(value.translation.width) > bodyView.size.width * 0.3 {
                           newIndex = value.translation.width > 0 ? self.currentIndex - 1 : self.currentIndex + 1
                       }

                       // 最小ページ、最大ページを超えないようチェック
                       if newIndex < 0 {
                           newIndex = 0
                       } else if newIndex > (self.examples.count - 1) {
                           newIndex = self.examples.count - 1
                       }

                       self.currentIndex = newIndex
                   })
           )
       }
       .animation(.interpolatingSpring(mass: 0.6, stiffness: 150, damping: 80, initialVelocity: 0.1))
   }
}
1. カルーセル対象のViewを作成
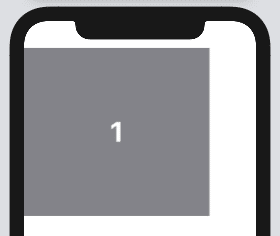
まず、カルーセル対応の各Viewを作成していきます。
と言ってもSwiftUIではとても簡単に作成することができます!
struct ContentView: View {
   var body: some View {
       GeometryReader { bodyView in
           Text("1")
               .foregroundColor(Color.white)
               .font(.system(size: 50, weight: .bold))
               .frame(width: bodyView.size.width * 0.8, height: 300)
               .background(Color.gray)

       }
   }
}GeometryReaderを使用して画面サイズを取得し、今回はwidthを画面サイズの8割(bodyView.size.width * 0.8)で設定しみます。
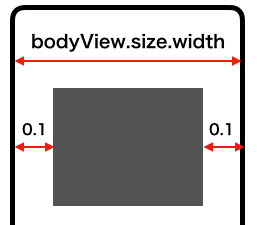
最終的にViewを真ん中に配置したいので、わかりやすい様にこの様に設定しています。
2. カルーセル実装
さて、ここから本題のカルーセル実装になります。
今回の実装ではscrollViewを使用せずに、DragGestureを使用しています。UIKitで実装する場合は、UIScrollViewやUICollectionViewを使用して実装する場合が多いかと思われますが、SwiftUIのscrollViewはUIKitの様に制御する機能がないため(もしscrollViewで行う場合は自分で機能を追加する必要がある)今回はDragGestureを使用しています。
2-1. HStackを作成する
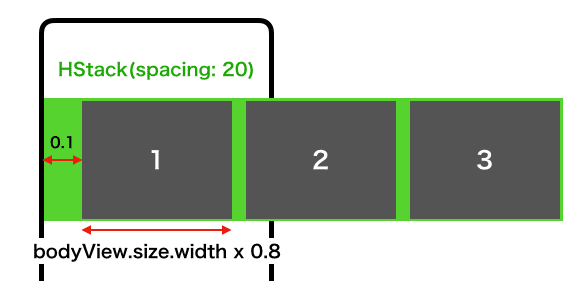
1 で作成したViewをHStackに追加しスクロール用のViewを作成します。
let examples = ["1", "2", "3"]
let itemPadding: CGFloat = 20

var body: some View {
   GeometryReader { bodyView in
       HStack(spacing: itemPadding) {
           ForEach(examples.indices, id: \.self) { index in
               Text(examples[index])
                   .foregroundColor(Color.white)
                   .font(.system(size: 50, weight: .bold))
                   .frame(width: bodyView.size.width * 0.8, height: 300)
                   .background(Color.gray)
                   // 中央に配置させるためにpaddingを設定する
                   .padding(.leading, index == 0 ? bodyView.size.width * 0.1 : 0)
           }
       }
   }
}2-2. ドラッグ情報からOffsetを更新する
このHStackのOffsetを操作することでページングを実装していきます。
具体的には以下の様になります。
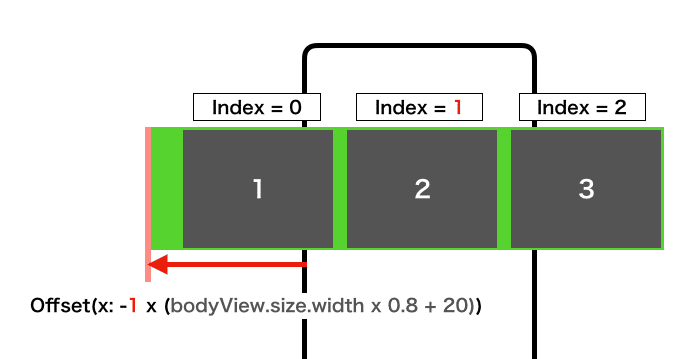

次のView(index = 1)が中央に配置される様にOffsetを設定します。
@State private var currentIndex = 0
@GestureState private var dragOffset: CGFloat = 0
@State private var examples = ["1", "2", "3"]
let itemPadding: CGFloat = 20

var body: some View {
   GeometryReader { bodyView in
       HStack(spacing: itemPadding) {
           ForEach(examples.indices, id: \.self) { index in
               Text(examples[index])
                   .foregroundColor(Color.white)
                   .font(.system(size: 50, weight: .bold))
                   .frame(width: bodyView.size.width * 0.8, height: 300)
                   .background(Color.gray)
                   .padding(.leading, index == 0 ? bodyView.size.width * 0.1 : 0)
           }
       }
       // ドラッグした分だけoffsetを移動する
       .offset(x: self.dragOffset)
       // currentIndexに応じたoffsetへ移動する
       .offset(x: -CGFloat(self.currentIndex) * (bodyView.size.width * 0.8 + itemPadding))
       .gesture(
           DragGesture()
               .updating(self.$dragOffset, body: { (value, state, _) in
                   // 移動幅(width)のみ更新する
                   state = value.translation.width
               })
               .onEnded({ value in
                   var newIndex = self.currentIndex
                   // ドラッグ幅からページングを判定
                   // 今回は画面幅x0.3としているが、操作感に応じてカスタマイズする必要がある
                   if abs(value.translation.width) > bodyView.size.width * 0.3 {
                       newIndex = value.translation.width > 0 ? self.currentIndex - 1 : self.currentIndex + 1
                   }

                   // 最小ページ、最大ページを超えないようチェック
                   if newIndex < 0 {
                       newIndex = 0
                   } else if newIndex > (self.examples.count - 1) {
                       newIndex = self.examples.count - 1
                   }

                   self.currentIndex = newIndex
               })
       )
   }
}
2-3. オプション
2-2まででカルーセル自体は実装できましたが、操作感を良くするためにオプションで設定していきます。
2-3-1. スクロール時のアニメーションを設定
スクロール感を良くするためにアニメーションを設定していきます。
・設定前
・設定後

// 減衰ばねモデル、それぞれの値は操作感に応じて変更する
.animation(.interpolatingSpring(mass: 0.6, stiffness: 150, damping: 80, initialVelocity: 0.1))2-3-2. 先頭・末尾の対応
先頭・末尾の場合は、余計なドラッグをさせない様にしておくと操作感も良くなるかと思いますので設定していきます。
・設定前
・設定後
.gesture(
   DragGesture()
       .updating(self.$dragOffset, body: { (value, state, _) in
           // 先頭・末尾ではスクロールする必要がないので、画面幅の1/5までドラッグで制御する
           if self.currentIndex == 0, value.translation.width > 0 {
               state = value.translation.width / 5
           } else if self.currentIndex == (self.examples.count - 1), value.translation.width < 0 {
               state = value.translation.width / 5
           } else {
               state = value.translation.width
           }
       })
)
2-3-3. HStackからLazyHStackに変更
iOS14以降を対象としたアプリの場合は、LazyHStackを使用するのが良いと思います。カルーセルの表示数にもよると思いますが、画面表示に必要なViewだけ生成することができるため、できるだけ負荷をかけないためにこちらを採用するのが良さそうです。
3. 完成
これまでの対応をまとめると以下の様になります。
import SwiftUI

struct ContentView: View {

   @State private var currentIndex = 0
   @GestureState private var dragOffset: CGFloat = 0
   @State private var examples = ["1", "2", "3", "4"]

   let itemPadding: CGFloat = 20

   var body: some View {
       GeometryReader { bodyView in
           LazyHStack(spacing: itemPadding) {
               ForEach(examples.indices, id: \.self) { index in
                   // カルーセル対象のView
                   Text(examples[index])
                       .foregroundColor(Color.white)
                       .font(.system(size: 50, weight: .bold))
                       .frame(width: bodyView.size.width * 0.8, height: 300)
                       .background(Color.gray)
                       .padding(.leading, index == 0 ? bodyView.size.width * 0.1 : 0)
               }
           }
           .offset(x: self.dragOffset)
           .offset(x: -CGFloat(self.currentIndex) * (bodyView.size.width * 0.8 + itemPadding))
           .gesture(
               DragGesture()
                   .updating(self.$dragOffset, body: { (value, state, _) in
                       // 先頭・末尾ではスクロールする必要がないので、画面サイズの1/5までドラッグで制御する
                       if self.currentIndex == 0, value.translation.width > 0 {
                           state = value.translation.width / 5
                       } else if self.currentIndex == (self.examples.count - 1), value.translation.width < 0 {
                           state = value.translation.width / 5
                       } else {
                           state = value.translation.width
                       }
                   })
                   .onEnded({ value in
                       var newIndex = self.currentIndex
                       // ドラッグ幅からページングを判定
                       if abs(value.translation.width) > bodyView.size.width * 0.3 {
                           newIndex = value.translation.width > 0 ? self.currentIndex - 1 : self.currentIndex + 1
                       }

                       // 最小ページ、最大ページを超えないようチェック
                       if newIndex < 0 {
                           newIndex = 0
                       } else if newIndex > (self.examples.count - 1) {
                           newIndex = self.examples.count - 1
                       }

                       self.currentIndex = newIndex
                   })
           )
       }
       .animation(.interpolatingSpring(mass: 0.6, stiffness: 150, damping: 80, initialVelocity: 0.1))
   }
}
初めに完成コードだけを見ると混乱してしまうかもしれませんが、分解してみると意外と分かった気になってきます!
4. まとめ
現在SwiftUIを学習中ですが、UIKitで実装が大変だった画面が簡単にできることもあれば、今回の様にUIKitでできたことが実現できない場合も多くあると思います。もちろん、今回の対応よりもより良い方法があるかと思いますので、これからも調査を進めていければと思います。それでは、次回は今回作成したカルーセルを無限カルーセルへ進化させる対応を紹介できればと思います。
追記:
無限にカルーセルできるように対応した記事を投稿しました。
最後に
スペースマーケットではともにプロダクトを成長させてくれる仲間を募集中です。
世の中の新しい当たり前を作りたいという思いのある方を心待ちにしています。

この記事が気に入ったらサポートをしてみませんか?