WPFとNAudioで音楽プレイヤーを作る~第3回:MVVMを少しだけ知る~

第3回:MVVMを少しだけ知る
今回のポイント
MVVMって結局なんなの?
双方向バインディング
MVVMとは
ざっくりいうと WPFはModel,View,ViewModelの3つの役割にクラスを分けて開発しましょう ということらしいです。
各クラスの概要は以下の通りです。
Model
各種の処理を担当
View
画面の表示や操作を担当
ViewModel
ViewとModelの仲介を担当
ビジネスロジックとUIを分離することでコードが簡潔に書けたりテストが容易になったりします。
詳しくはググってください。
プロジェクトをMVVMに対応させる
WPFはMVVMで開発しましょうということになっているので今回のプロジェクトもそのようにしてみます。
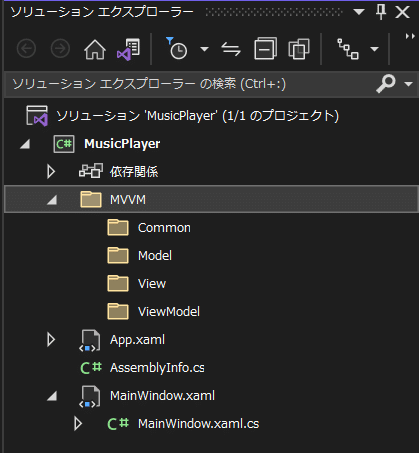
フォルダの作成
プロジェクト内に新しくMVVM`フォルダを作成します。
更にその中に Common , Model , View , ViewModel の4つのフォルダを作成します。
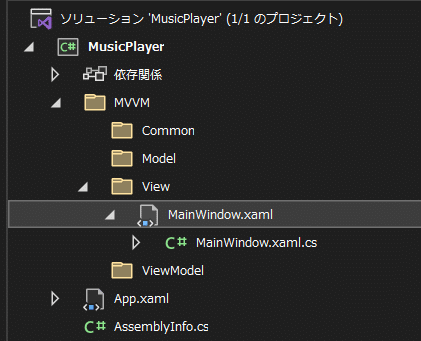
ファイルの移動
MainWindow.xaml を View フォルダに移動させます。
MainWindow.xaml.cs は一心同体です。
設定の変更
このまま実行すると色々とエラーになるので修正します。
App.xaml
StartupUri のみ変更しました。
<Application x:Class="MusicPlayer.App"
             xmlns="http://schemas.microsoft.com/winfx/2006/xaml/presentation"
             xmlns:x="http://schemas.microsoft.com/winfx/2006/xaml"
             xmlns:local="clr-namespace:MusicPlayer"
             StartupUri="MVVM\View\MainWindow.xaml">
    <Application.Resources>

    </Application.Resources>
</Application>
MainWindow.xaml
1行目の x:Class のみ変更しました。
<Window x:Class="MusicPlayer.MVVM.View.MainWindow"
        xmlns="http://schemas.microsoft.com/winfx/2006/xaml/presentation"
        xmlns:x="http://schemas.microsoft.com/winfx/2006/xaml"
        xmlns:d="http://schemas.microsoft.com/expression/blend/2008"
        xmlns:mc="http://schemas.openxmlformats.org/markup-compatibility/2006"
        xmlns:local="clr-namespace:MusicPlayer"
        mc:Ignorable="d"
        Title="MainWindow" Height="450" Width="800">
MainWindow.xaml.cs
namespace を変更しました。
using MusicPlayer.MVVM.ViewModel;
using System.Windows;

namespace MusicPlayer.MVVM.View
{
    /// <summary>
    /// Interaction logic for MainWindow.xaml
    /// </summary>
    public partial class MainWindow : Window

    {
        public MainWindow()
        {
            InitializeComponent();
        }
        // 以下省略
    }
}
ここまでできたら正常に実行できることを確認しましょう。
コードビハインドの処理を移動させる
MVVMで開発する上での重要なルールとして コードビハインドには(基本的に)何も書かない (参照)というのがあります。
色々と準備が必要ですがここさえ乗り切れば開発に専念できるので頑張りましょう。
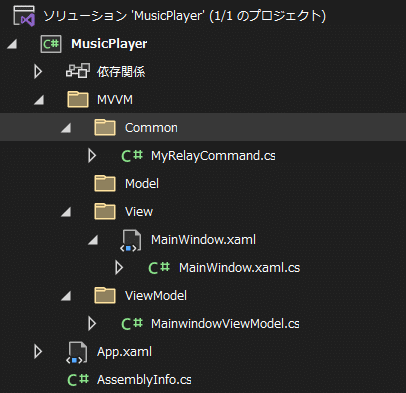
MyRelayCommand.cs を作成する
いきなりなんだ?という感じですが RelayCommand はWPFなどのMVVMパターンにおいて、ユーザーインターフェース(UI)からコマンドを呼び出すためのクラスです。
こちらのサンプルコードをお借りして作成しましょう。
一回作ってしまえば今後修正することはないです。
MVVM/Common フォルダに新しく MyRelayCommand.cs を作成します。
MyRelayCommand.cs
using System;
using System.Windows.Input;
namespace MusicPlayer.MVVM.Common
{
class MyRelayCommand : ICommand
{
private readonly Action _execute;
private readonly Func<bool> _canExecute;
/// <summary>
/// RaiseCanExecuteChanged が呼び出されたときに生成されます。
/// </summary>
public event EventHandler CanExecuteChanged;
/// <summary>
/// 常に実行可能な新しいコマンドを作成します。
/// </summary>
/// <param name="execute">実行ロジック。</param>
public MyRelayCommand(Action execute)
: this(execute, null)
{
}
/// <summary>
/// 新しいコマンドを作成します。
/// </summary>
/// <param name="execute">実行ロジック。</param>
/// <param name="canExecute">実行ステータス ロジック。</param>
public MyRelayCommand(Action execute, Func<bool> canExecute)
{
if (execute == null)
throw new ArgumentNullException("execute");
_execute = execute;
_canExecute = canExecute;
}
/// <summary>
/// 現在の状態でこの <see cref="MyRelayCommand"/> が実行できるかどうかを判定します。
/// </summary>
/// <param name="parameter">
/// コマンドによって使用されるデータ。コマンドが、データの引き渡しを必要としない場合、このオブジェクトを null に設定できます。
/// </param>
/// <returns>このコマンドが実行可能な場合は true、それ以外の場合は false。</returns>
public bool CanExecute(object parameter)
{
return _canExecute == null ? true : _canExecute();
}
/// <summary>
/// 現在のコマンド ターゲットに対して <see cref="MyRelayCommand"/> を実行します。
/// </summary>
/// <param name="parameter">
/// コマンドによって使用されるデータ。コマンドが、データの引き渡しを必要としない場合、このオブジェクトを null に設定できます。
/// </param>
public void Execute(object parameter)
{
_execute();
}
public void RaiseCanExcuteChanged()
{
var handler = CanExecuteChanged;
if (handler != null)
{
handler(this, EventArgs.Empty);
}
}
}
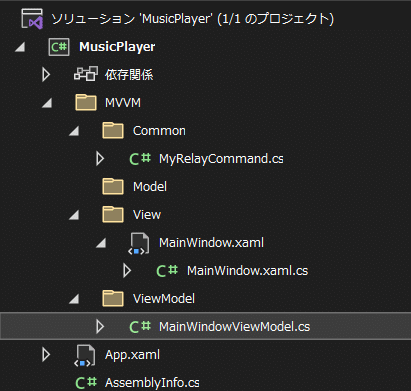
}MainWindowViewModel.cs を作成する。
ViewModel フォルダ内に MainWindowViewModel.cs ファイルを作成します。
記述内容は以下の通りです。後ほど解説します。
MainWindowViewModel.cs
using MusicPlayer.MVVM.Common;
using NAudio.Wave;
using System;
using System.ComponentModel;
using System.Windows.Forms;
using System.Windows.Input;

namespace MusicPlayer.MVVM.ViewModel
{
    class MainwindowViewModel : INotifyPropertyChanged
    {
        // 変数の更新通知用 --1
        public event PropertyChangedEventHandler PropertyChanged;

        private void NotifyPropertyChanged(String info)
        {
            if (PropertyChanged != null) PropertyChanged(this, new PropertyChangedEventArgs(info));
        }

        /// <summary>再生ボタンが押されたときのコマンド --2</summary>
        public ICommand OnPlayButtonClickCommand { get; set; }

        /// <summary>
        /// コンストラクタ
        /// </summary>
        public MainwindowViewModel()
        {
            // 再生ボタン用のコマンド --3
            OnPlayButtonClickCommand = new MyRelayCommand(OnPlayButtonClick);
        }

        // 再生ボタンが押されたときの処理 --4
        private void OnPlayButtonClick()
        {
            var dialog = new OpenFileDialog();
            if (dialog.ShowDialog() == DialogResult.OK)
            {
                WaveOutEvent outputDevice = new WaveOutEvent();
                AudioFileReader afr = new AudioFileReader(dialog.FileName);
                outputDevice.Init(afr);
                outputDevice.Play();
            }
        }
    }
}
MainWindow.xaml を修正する
xmlns:viewmodels="clr-namespace:MusicPlayer.MVVM.ViewModel"の行を追加します。
Button部分も修正します。
MainWindow.xaml
<Window x:Class="MusicPlayer.MVVM.View.MainWindow"
        xmlns="http://schemas.microsoft.com/winfx/2006/xaml/presentation"
        xmlns:x="http://schemas.microsoft.com/winfx/2006/xaml"
        xmlns:d="http://schemas.microsoft.com/expression/blend/2008"
        xmlns:mc="http://schemas.openxmlformats.org/markup-compatibility/2006"
        xmlns:local="clr-namespace:MusicPlayer"
        mc:Ignorable="d"
        Title="MainWindow" Height="450" Width="800"
        xmlns:viewmodels="clr-namespace:MusicPlayer.MVVM.ViewModel"
        >
    <Grid>
        <Button Content="Play" Command="{Binding OnPlayButtonClickCommand}"/>
    </Grid>
</Window>
コードビハインドを修正する
コンストラクタにthis.DataContext = new MainWindowViewModel();を追加しました。
また、OnPlayButtonClickメソッドはMainWindowViewModel.csに移動させたので削除しました。
MainWindow.xaml.cs
using MusicPlayer.MVVM.ViewModel;
using System.Windows;

namespace MusicPlayer.MVVM.View
{
    /// <summary>
    /// Interaction logic for MainWindow.xaml
    /// </summary>
    public partial class MainWindow : Window
    {
        public MainWindow()
        {
            InitializeComponent();
            this.DataContext = new MainWindowViewModel();
        }
    }
}
ここまでの修正が完了したら一度実行してみましょう。
前回と動作内容に変わりが無いことを確認してください。
解説
MainwindowViewModel.cs
①まずMainWindowViewModelはINotifyPropertyChangedインターフェースを実装します。
PropertyChangedEventHandler型の変数PropertyChangedと、NotifyPropertyChangedメソッドを用意することでMainWindow.xamlと 双方向バインディング を実現します。
双方向バインディングとは、Viewのコントロールの値をViewModelのプロパティに反映させるだけでなく、ViewModelのプロパティの変更をViewに反映させることができるバインディングのことです。
class MainWindowViewModel : INotifyPropertyChanged
{
    // 変数の更新通知用 --1
    public event PropertyChangedEventHandler PropertyChanged;

    private void NotifyPropertyChanged(String info)
    {
        if (PropertyChanged != null) PropertyChanged(this, new PropertyChangedEventArgs(info));
    }
    // 以下省略
}②WPFのコマンド機能を実現するためのICommandインターフェースです。
③MyRelayCommandクラスを使用してコマンドをセットしています。
/// <summary>再生ボタンが押されたときのコマンド --2</summary>
public ICommand OnPlayButtonClickCommand { get; set; }

/// <summary>
/// コンストラクタ
/// </summary>
public MainwindowViewModel()
{
    // 再生ボタン用のコマンド --3
    OnPlayButtonClickCommand = new MyRelayCommand(OnPlayButtonClick);
}
④コードビハインドに記述していた処理を移動させてきました。
この処理を元にコマンドが作られます。
// 再生ボタンが押されたときの処理 --4
private void OnPlayButtonClick()
{
    var dialog = new OpenFileDialog();
    if (dialog.ShowDialog() == DialogResult.OK)
    {
        WaveOutEvent outputDevice = new WaveOutEvent();
        AudioFileReader afr = new AudioFileReader(dialog.FileName);
        outputDevice.Init(afr);
        outputDevice.Play();
    }
}
MainWindow.xaml
修正した箇所のみ抜粋します。
xmlns:viewmodels="clr-namespace:MusicPlayer.MVVM.ViewModel"は参照するViewModelクラスの名前空間を指定しています。
ボタン部分で重要になるのはCommand="{Binding OnPlayButtonClickCommand}"の記述です。
先程MainWindowViewModel内で用意したOnPlayButtonClickCommandコマンドをバインディングしています。
xmlns:viewmodels="clr-namespace:MusicPlayer.MVVM.ViewModel"
        >
    <Grid>
        <Button Content="Play" Command="{Binding OnPlayButtonClickCommand}"/>
    </Grid>
次回は画面全体を大まかに作成していきます。
補足
MVVMでは処理をModelに記述するということになっていましたが、今回は作成しませんでした。
理由としてはOnPlayButtonClickがそこまで複雑な処理ではなかったためです。
今後も簡単な処理はViewModel内だけで完結させるかもしれません。
個人で開発する分にはあまりMVVMにガチガチに縛られなくてもいいのかなと思っています。
参考
https://resanaplaza.com/世界で一番短いサンプルで覚えるmvvm入門/
https://e-words.jp/w/MVVM.html
https://shinshin-log.com/mvvm-project/#toc1
https://sourcechord.hatenablog.com/entry/2014/01/13/200039
https://atmarkit.itmedia.co.jp/ait/articles/1011/09/news102_3.html
この記事が気に入ったらサポートをしてみませんか?