
Gitのデータ構造としくみを理解する。

こんにちは。42 Tokyoというエンジニア養成機関の 2023 年度アドベントカレンダー 2日目を担当します、在校生のryozunoと申します。
1日目の昨日は、@Kotabrog さんが「アウトプットのすすめ~ChatGPTに聞けばいいじゃない、と張り合う必要はない~」という記事を書かれていました。まだ読まれていない方はぜひ読んでみてください。
0. はじめに
0.1 この記事の目的
Git初心者が、git init 時に生成される .git ディレクトリの中身(特にobjetcsディレクトリ)について探索した学びをアウトプットします。
情報発信、ブログとか発表とか公開みたいなものっていうのは、数学の未解決問題の証明みたいなものではなくて料理のようなものである。未解決問題の証明だったら一番最初に書いた人に価値がある。そうじゃなくて、料理の紹介みたいなものである。今日どんな料理を作ったとか、オーソリティの人がこういうレシピ紹介しているんだけど、自分はこんな感じでアレンジしてやってみたとか、そういったものでも十分に価値がある。
(和田卓人さんの伝聞経由で知った言葉です)
0.2 前提知識/環境/想定読者
Git/GitHubが使えるように登録や環境設定が完了している。
基本的なコマンドが使える。(cd, ls, echo, |(パイプ), findなど)
git init, add, commit, push, cloneなどのGitコマンドを知っている。
Gitって内部ではどのようにデータを扱ってるの?と気になる方におすすめです。
コラム0. 「理解」について
理解については、以下の記事に書き(直して分割し)ました。
この記事では、comprehendが指す理解を目指しますが、私は初心者なのでunderstandが指す理解のグラデーションの中にいる(Gitに対して中途半端なメンタルモデルを構築している)ことが容易に想定されます。誤った理解をしている記述がありましたら、ポジティブなフィードバックをいただけると幸いです。
1. TL;DR

Gitで管理されるすべてのデータは、Gitオブジェクトと呼ばれるデータ構造で保存されています。これらのGitオブジェクトはすべてハッシュ値によって一意に識別されます。Gitオブジェクトは次の4種類です。
・Blob - ファイルの内容を表すオブジェクト
・Tree - ディレクトリ構造を表すオブジェクト
・Commit - 特定の時点での全ファイルのスナップショットを表すオブジェクト
・Tag - コミットにラベルを付けるためのオブジェクト
Commitオブジェクトにはある時点での全ファイルのスナップショットが含まれており、スナップショットを保存したのが誰なのか、いつ保存したのか、なぜ保存したのかなどのメタデータが含まれます。Treeオブジェクトはディレクトリ構造を表し、Blobオブジェクトはファイルの内容そのものを含んでいます。
このスナップショットベースの設計が、ブランチの分岐やマージを効率的に実現できる理由です。また、コミットは差分ではなくスナップショットです。コミット間の差分情報はCommitオブジェクトに保持されておらず、必要時に計算されます。
上のDerrick Stoleeさんの図がとてもわかりやすいです。
2. 理解する旅の軌跡
the Git Internals chapter of the Pro Git book を模倣しながら、自分で手を動かした軌跡を書いています。読者のみなさんも実際に手を動かすことで、より理解が深まるかもしれません。
2.1 dataは.git ディレクトリのどこに格納されるか
$ git init diary
Initialized empty Git repository in /tmp/test/.git/
$ cd diary
$ ls -a
.       ..      .git
$ tree ./.git
./.git
├── HEAD
├── config
├── description
├── hooks
│   ├── applypatch-msg.sample
│   ├── commit-msg.sample
│   ├── fsmonitor-watchman.sample
│   ├── post-update.sample
│   ├── pre-applypatch.sample
│   ├── pre-commit.sample
│   ├── pre-merge-commit.sample
│   ├── pre-push.sample
│   ├── pre-rebase.sample
│   ├── pre-receive.sample
│   ├── prepare-commit-msg.sample
│   ├── push-to-checkout.sample
│   ├── sendemail-validate.sample
│   └── update.sample
├── info
│   └── exclude
├── objects
│   ├── info
│   └── pack
└── refs
    ├── heads
    └── tags
9 directories, 18 files
git initを実行すると、上記のようなディレクトリやファイルが .git 内に生成されます。日記をgitで管理するケースを想定して、diaryにしました。
$ echo 'Day1: Hello world' | git hash-object -w --stdin
8b992b18e516e5602c6553591b9184cf7a2f0150

$ man git-hash-object
...
DESCRIPTION
    Computes the object ID value for an object with specified type
    with the contents of the named file (which can be outside of the work tree),
    and optionally writes the resulting object into the object database.
    Reports its object ID to its standard output. When <type> is not specified,
    it defaults to "blob".
OPTIONS
    -t <type>
        Specify the type of object to be created (default: "blob").
        Possible values are commit, tree, blob, and tag.
    -w
        Actually write the object into the object database.
    --stdin
        Read the object from standard input instead of from a file.
...
git hash-object コマンドは与えられたコンテンツを取り(今回は標準入力)、ユニークなキー(SHA-1ハッシュ)を返します。SHA-1 ( Secure Hash Algorithm 1 )とは、入力から160ビット(20バイト)のハッシュ値を生成するアルゴリズムです。これは、40桁の16進数で表されます。
再掲になりますが、Gitには以下の四種類のオブジェクトタイプがあります。git hash-object コマンドはデフォルトで、Blobオブジェクトを生成します。
Blob - ファイルの内容を表すオブジェクト
Tree - ディレクトリ構造を表すオブジェクト
Commit - その時点での全ファイルのスナップショットを表すオブジェクト
Tag - コミットにラベルを付けるためのオブジェクト
もう一度、treeコマンドを実行すると、
$ tree ./.git
./.git
├── HEAD
├── config
├── description
├── hooks
│   ├── applypatch-msg.sample
│   ├── ...
│   └── update.sample
├── info
│   └── exclude
├── objects
│   ├── 8b
│   │   └── 992b18e516e5602c6553591b9184cf7a2f0150
│   ├── info
│   └── pack
└── refs
    ├── heads
    └── tags

10 directories, 19 files
objectsディレクトリ内に、"8b"という名前のディレクトリと"992b18e516e5602c6553591b9184cf7a2f0150"という名前の ファイル(regular file) が生成されました。
$ git cat-file -p 8b992b18e516e5602c6553591b9184cf7a2f0150
Day1: Hello world
$ git cat-file -t 8b992b18e516e5602c6553591b9184cf7a2f0150
blob
$ man git-cat-file
...
NAME
    git-cat-file - Provide contents or details of repository objects
DESCRIPTION
    Output the contents or other properties such as size, type or
    delta information of one or more objects.
OPTIONS
        -t
         Instead of the content, show the object type identified by <object>.
    -p
        Pretty-print the contents of <object> based on its type.
...
objectsディレクトリ内に格納されたコンテンツは、git cat-file コマンドで調べることができます。-p オプションをつけると、コンテンツの種類(タイプ)を調べて適切に表示してくれます。-t オプションをつけると、オブジェクトのタイプを表示してくれます。
2.2 Blobオブジェクトの生成
$ echo 'version 1' > day1.txt
$ git hash-object -w day1.txt
83baae61804e65cc73a7201a7252750c76066a30

$ echo 'version 2' > day1.txt
$ git hash-object -w day1.txt
1f7a7a472abf3dd9643fd615f6da379c4acb3e3a

$ git cat-file -p 83baae61804e65cc73a7201a7252750c76066a30
version 1
$ git cat-file -p 1f7a7a472abf3dd9643fd615f6da379c4acb3e3a
version 2

$ git cat-file -t 83baae61804e65cc73a7201a7252750c76066a30
blob
$ git cat-file -t 1f7a7a472abf3dd9643fd615f6da379c4acb3e3a
blob

$ tree ./.git
./.git
├── HEAD
├── config
├── description
├── hooks
│   ├── applypatch-msg.sample
│   ├── ...
│   └── update.sample
├── info
│   └── exclude
├── objects
│   ├── 1f
│   │   └── 7a7a472abf3dd9643fd615f6da379c4acb3e3a
│   ├── 83
│   │   └── baae61804e65cc73a7201a7252750c76066a30
│   ├── 8b
│   │   └── 992b18e516e5602c6553591b9184cf7a2f0150
│   ├── info
│   └── pack
└── refs
    ├── heads
    └── tags

12 directories, 21 files
先ほどは、標準入力からオブジェクトを生成していましたが、今回は、ファイルからオブジェクトを生成しています。SHA-1キー(ハッシュ値)を指定すれば、version1もversion2も同じファイル名(day1.txt)ですが、それぞれの中身を見ることができます。
2.3 index(staging area)の理解
単一のエントリ (test.txt ファイルの最初のバージョン) でインデックスを作成します。その際、git update-index コマンドを使用します。ファイルがまだステージングエリアに存在しない(ステージングエリアがまだ設定されていない)ため、--add オプションが必要です。--cacheinfoオプションを使用すると、指定した情報をインデックスに直接挿入することができます。また、100644は、通常のファイルのモードを表します。実行可能ファイルなら、100755、シンボリックリンクなら120000といった具合です。
$ git update-index --add --cacheinfo 100644 \
83baae61804e65cc73a7201a7252750c76066a30 day1.txt
$ man git-update-index
...
NAME
    git-update-index - Register file contents in the working tree to the index
DESCRIPTION
    Modifies the index. Each file mentioned is updated into the index and
    any unmerged or needs updating state is cleared.

    See also git-add(1) for a more user-friendly way to do some of
    the most common operations on the index.

    The way git update-index handles files it is told about can be modified
    using the various options:

OPTIONS
    --add
        If a specified file isn’t in the index already then it’s added.
        Default behaviour is to ignore new files.
    --cacheinfo <mode>,<object>,<path>, --cacheinfo <mode> <object> <path>
        Directly insert the specified info into the index.
        For backward compatibility, you can also give these three arguments
        as three separate parameters, but new users are encouraged
        to use a single-parameter form.
...

$ tree ./.git
./.git
├── HEAD
├── config
├── description
├── hooks
│   ├── applypatch-msg.sample
│   ├── ...
│   └── update.sample
├── index
├── info
│   └── exclude
├── objects
│   ├── 1f
│   │   └── 7a7a472abf3dd9643fd615f6da379c4acb3e3a
│   ├── 83
│   │   └── baae61804e65cc73a7201a7252750c76066a30
│   ├── 8b
│   │   └── 992b18e516e5602c6553591b9184cf7a2f0150
│   ├── info
│   └── pack
└── refs
    ├── heads
    └── tags

12 directories, 22 files
indexという名前のファイルができました。
2.4 Treeオブジェクトの生成
$ git write-tree
fa187f548995060c45e95b19460f8d3eb26fbe11
$ git cat-file -t fa187f548995060c45e95b19460f8d3eb26fbe11
tree
$ man git-write-tree
...
NAME
    git-write-tree - Create a tree object from the current index

DESCRIPTION
    Creates a tree object using the current index.
        The name of the new tree object is printed to standard output.

    The index must be in a fully merged state.

    Conceptually, git write-tree sync()s the current index contents
    into a set of tree files. In order to have that match what is actually
    in your directory right now, you need to have done a git update-index phase
    before you did the git write-tree.
...
$ git cat-file -p fa187f548995060c45e95b19460f8d3eb26fbe11
100644 blob 83baae61804e65cc73a7201a7252750c76066a30    day1.txt
git write-tree コマンドを使ってステージングエリア(index)をTreeオブジェクトに書き出しました。このTreeオブジェクトは、'version1'と書かれたday1.txt (blobオブジェクト)を含んでいます。

もう一つ、ファイル(day2.txt)を追加して、'version2'と書かれた day1.txt と一緒にTreeオブジェクトを生成してみます。
$ echo 'Day2: Output' > day2.txt

$ git update-index --cacheinfo 100644 \
1f7a7a472abf3dd9643fd615f6da379c4acb3e3a day1.txt
$ git update-index --add day2.txt

$ git write-tree
fd9ec0402b4bc1d241e20627ff89fc9cf75416af
$ git cat-file -p fd9ec0402b4bc1d241e20627ff89fc9cf75416af
100644 blob 1f7a7a472abf3dd9643fd615f6da379c4acb3e3a    day1.txt
100644 blob bf955f7c7d6eef8cd8d3211f723faae90fbc1c44    day2.txt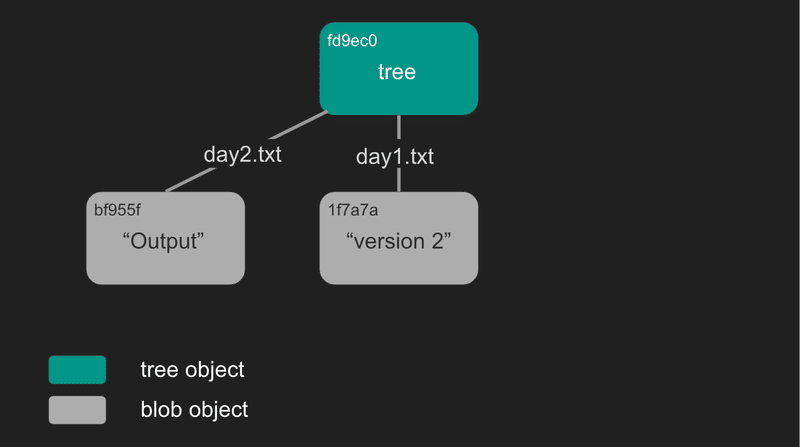
最初に生成したtreeをこのtree(fd9ec0)のサブディレクトに追加してみます。
ステージングエリアにTreeオブジェクトを読み込むには、git read-tree を使います。--prefix オプションを指定すると、既存のTreeオブジェクトをサブツリーとしてステージングエリアに読み込むことができます。
$ git read-tree --prefix=bak fa187f548995060c45e95b19460f8d3eb26fbe11
$ git write-tree
96290bd9eca5fed27e900a456ca9cb543b92ec52

$ git cat-file -p 96290bd9eca5fed27e900a456ca9cb543b92ec52
040000 tree fa187f548995060c45e95b19460f8d3eb26fbe11    bak
100644 blob 1f7a7a472abf3dd9643fd615f6da379c4acb3e3a    day1.txt
100644 blob bf955f7c7d6eef8cd8d3211f723faae90fbc1c44    day2.txt

$ git cat-file -p fa187f548995060c45e95b19460f8d3eb26fbe11
100644 blob 83baae61804e65cc73a7201a7252750c76066a30    day1.txt

$ git cat-file -p 1f7a7a472abf3dd9643fd615f6da379c4acb3e3a
version 2
$ git cat-file -p 83baae61804e65cc73a7201a7252750c76066a30
version 1
2.5 Commitオブジェクトの生成
ここまでで3つのTreeオブジェクトが生成されました。
1つ目:fa187f548995060c45e95b19460f8d3eb26fbe11
2つ目:fd9ec0402b4bc1d241e20627ff89fc9cf75416af
3つ目:96290bd9eca5fed27e900a456ca9cb543b92ec52
commit-treeコマンドを使って、1つ目のTreeオブジェクトからCommitオブジェクトを生成していきます。
(ここで気づいたのですが、SHA-1ハッシュ値は、40桁すべて入力しなくても判別できればいいみたいです。例えば、下記のように6桁でも大丈夫なようです。)
$ echo 'First commit' | git commit-tree fa187f548995060c45e95b19460f8d3eb26fbe11
d62544fedd4742f30867368127986d775138434c

$ git cat-file -p d62544                                       <- 6桁だけ
tree fa187f548995060c45e95b19460f8d3eb26fbe11
author oooooo <oooooo@email.com> 1701404863 +0900
committer oooooo <oooooo@email.com> 1701404863 +0900

First commit

$ man git-commit-tree
...
NAME
    git-commit-tree - Create a new commit object
DESCRIPTION
    This is usually not what an end user wants to run directly.
    See git-commit(1) instead.

    Creates a new commit object based on the provided tree object
    and emits the new commit object id on stdout.

    While a tree represents a particular directory state of a working directory,
    a commit represents that state in "time", and explains how to get there.

    Normally a commit would identify a new "HEAD" state, and while Git doesn’t care
    where you save the note about that state, in practice we tend to just write
    the result to the file that is pointed at by .git/HEAD, so that we can always
    see what the last committed state was.
OPTIONS
       <tree>
           An existing tree object.
       -p <parent>
           Each -p indicates the id of a parent commit object.
...
その時点でのプロジェクトのスナップショットのトップレベルツリー、親コミットがある場合はその親コミット(上記のコミットオブジェクトは親コミットがありません)、作者/コミッター情報(user.nameとuser.emailの設定とタイムスタンプを使用)、空行、そしてコミットメッセージが続けて出力されています。
残り2つのTreeオブジェクトからもCommitオブジェクトを生成します。各コミットはその直前のコミットを参照します。
$ echo 'Second commit' | git commit-tree fd9ec0 -p d62544
ad2dcdb9a411b0f1afbae001fb223e22e98577ac

$ echo 'Third commit'  | git commit-tree 96290b -p ad2dcd
dc950e2c4aa7db8f3c7145a2395e7ad6593426eb
最後のコミットに対して、git log コマンドを使うと今までのコミットを確認できます。
$ git log --stat dc950e
commit dc950e2c4aa7db8f3c7145a2395e7ad6593426eb
Author: oooooo <oooooo@email.com>
Date:   Fri Dec 1 2023 +0900

    Third commit

 bak/day1.txt | 1 +
 1 file changed, 1 insertion(+)

commit ad2dcdb9a411b0f1afbae001fb223e22e98577ac
Author: oooooo <oooooo@email.com>
Date:   Fri Dec 1 2023 +0900

    Second commit

 day1.txt | 2 +-
 day2.txt | 1 +
 2 files changed, 2 insertions(+), 1 deletion(-)

commit d62544fedd4742f30867368127986d775138434c
Author: oooooo <oooooo@email.com>
Date:   Fri Dec 1 2023 +0900

    First commit

 day1.txt | 1 +
 1 file changed, 1 insertion(+)
2.6 全てのオブジェクトは、SHA-1ハッシュ値で.git/objectsに格納される
ここまで、Blobオブジェクト、Treeオブジェクト、Commitオブジェクトの生成について見てきましたが、これらは全て、.git/objectsディレクトリ内に、SHA-1ハッシュ値をキーとして保存されます。
$ find .git/objects -type f
.git/objects/ad/2dcdb9a411b0f1afbae001fb223e22e98577ac # 2nd commit
.git/objects/d6/2544fedd4742f30867368127986d775138434c # 1st commit
.git/objects/fd/9ec0402b4bc1d241e20627ff89fc9cf75416af # tree 2
.git/objects/1f/7a7a472abf3dd9643fd615f6da379c4acb3e3a # day1.txt(ver.2)
.git/objects/96/290bd9eca5fed27e900a456ca9cb543b92ec52 # tree 3
.git/objects/bf/955f7c7d6eef8cd8d3211f723faae90fbc1c44 # day2.txt
.git/objects/dc/950e2c4aa7db8f3c7145a2395e7ad6593426eb # 3rd commit
.git/objects/fa/187f548995060c45e95b19460f8d3eb26fbe11 # tree 1
.git/objects/83/baae61804e65cc73a7201a7252750c76066a30 # day1.txt(ver.1)
.git/objects/8b/992b18e516e5602c6553591b9184cf7a2f0150 # stdin content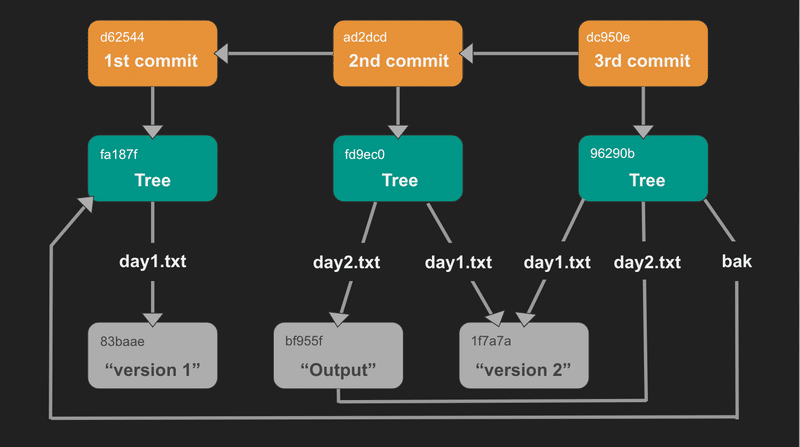
3. もう一歩進んでみる。
2章では、the Git Internals chapter of the Pro Git book を元に、Git オブジェクトについて学び、かなりGitのデータ構造やしくみについて理解が深まりました。
3章では、実際に、git add, git commitなどをした際に、.git/objects内がどのようになっているか、今までの学びを元に確認してみたいと思います。
$ pwd
/Users/home

$ git init work_out --initial-branch main
Initialized empty Git repository in /Users/home/work_out/.git/

$ cd work_out
$ ls -a
.       ..      .git

$ find .git/objects
.git/objects
.git/objects/pack
.git/objects/info
work_outという筋トレを記録するためのディレクトリで、git initし、ブランチをmainにしました。その際、.gitが生成されました。2章と同様にこの時点では、objectsディレクトリには、2つのサブディレクトリ(packとinfo)が存在するだけで、まだGitオブジェクトはありません。
$ echo 'walking 1hour' > day1.txt

$ find .git/objects
.git/objects
.git/objects/pack
.git/objects/info

$ git status
On branch main

No commits yet

Untracked files:
  (use "git add <file>..." to include in what will be committed)
        day1.txt

nothing added to commit but untracked files present (use "git add" to track)
1日目のトレーニングを記録するday1.txtを作成しました。よく見るgit addをする前のworking directoryでのファイル追加/編集です。この時点でも、まだ.git/objects内には、Gitオブジェクトは生成されていません。
$ git add day1.txt

$ find .git/objects
.git/objects
.git/objects/pack
.git/objects/info
.git/objects/8c
.git/objects/8c/b51185086a528460e908a0ca6d34cd599cc2f4

$ git cat-file -t 8cb51185086a528460e908a0ca6d34cd599cc2f4
blob

$ git cat-file -p 8cb51185086a528460e908a0ca6d34cd599cc2f4
walking 1hour
git addすると、.git/objects内にオブジェクトが生成されました。もちろん、オブジェクトタイプは、「blob」で、その中身は「walking 1hour」です。
$ git commit -m "create day1.txt wrote day1 training log"
[main (root-commit) 5a86cba] create day1.txt wrote day1 training log
 1 file changed, 1 insertion(+)
 create mode 100644 day1.txt

$ find .git/objects -type f
.git/objects/5a/86cbaec5d6b26bd57c330c59fdb38f6db6263c # 1st commit
.git/objects/48/30506a0c67b0363998a793fafdfcdac600e842 # tree 1
.git/objects/8c/b51185086a528460e908a0ca6d34cd599cc2f4 # day1.txt

$ git cat-file -t 4830506a0c67b0363998a793fafdfcdac600e842
tree
$ git cat-file -t 5a86cbaec5d6b26bd57c330c59fdb38f6db6263c
commit

$ git cat-file -p 4830506a0c67b0363998a793fafdfcdac600e842
100644 blob 8cb51185086a528460e908a0ca6d34cd599cc2f4    day1.txt

$ git cat-file -p 5a86cbaec5d6b26bd57c330c59fdb38f6db6263c
tree 4830506a0c67b0363998a793fafdfcdac600e842
author oooooo <oooooo@email.com> 1701413202 +0900
committer oooooo <oooooo@email.com> 1701413202 +0900

create day1.txt wrote day1 training log
git commitすると、オブジェクトが2つ追加されました。一つは、Treeオブジェクトで、もう一つは、Commitオブジェクトです。
画像ファイルの場合も気になるので、確認してみます。
$ cp ~/Desktop/sample.png .
$ ls -a
.               .git            sample.png
..              day1.txt

$ git add sample.png
$ find .git/objects -type f
.git/objects/5a/86cbaec5d6b26bd57c330c59fdb38f6db6263c # 1st commit
.git/objects/e3/e0046f4abad86a0885fe8b76068e787c8e3cab # sample.png
.git/objects/48/30506a0c67b0363998a793fafdfcdac600e842 # tree 1
.git/objects/8c/b51185086a528460e908a0ca6d34cd599cc2f4 # day1.txt

$ git cat-file -t e3e0046f4abad86a0885fe8b76068e787c8e3cab
blob
$ git cat-file -p e3e0046f4abad86a0885fe8b76068e787c8e3cab
(-> 文字化けした文字列が出力されました。)
画像ファイルもblobオブジェクトとして扱われることがわかりました。この状態で、再度git commitすると、以下のようになりました。
$ git commit -m "add sample.png"
[main e92a7a1] add sample.png
 1 file changed, 0 insertions(+), 0 deletions(-)
 create mode 100644 sample.png

$ find .git/objects -type f
.git/objects/5a/86cbaec5d6b26bd57c330c59fdb38f6db6263c # 1st commit
.git/objects/e3/e0046f4abad86a0885fe8b76068e787c8e3cab # sample.png
.git/objects/d5/de7b9f2ee00bd713aba00cb24b422e95cfd1d5
.git/objects/e9/2a7a1369abe4fc362e1b513b0b76125ac1cdf8
.git/objects/48/30506a0c67b0363998a793fafdfcdac600e842 # tree 1
.git/objects/8c/b51185086a528460e908a0ca6d34cd599cc2f4 # day1.txt

$ git cat-file -t d5de7b9f2ee00bd713aba00cb24b422e95cfd1d5
tree
$ git cat-file -p d5de7b9f2ee00bd713aba00cb24b422e95cfd1d5
100644 blob 8cb51185086a528460e908a0ca6d34cd599cc2f4    day1.txt
100644 blob e3e0046f4abad86a0885fe8b76068e787c8e3cab    sample.png

$ git cat-file -t e92a7a1369abe4fc362e1b513b0b76125ac1cdf8
commit
$ git cat-file -p e92a7a1369abe4fc362e1b513b0b76125ac1cdf8
tree d5de7b9f2ee00bd713aba00cb24b422e95cfd1d5
parent 5a86cbaec5d6b26bd57c330c59fdb38f6db6263c
author oooooo <oooooo@email.com> 1701413908 +0900
committer oooooo <oooooo@email.com> 1701413908 +0900

add sample.png
1回目のcommitと同じく、TreeオブジェクトとCommitオブジェクトが生成されました。
4. まとめ

まとめると、Gitは4種類のGitオブジェクト(Blob, Tree, Commit, Tag)をデータ構造として持ちます。テキストも画像もBlobオブジェクトとして扱われ、それらのファイルからなるディレクトリ構造がTreeオブジェクトです。そして、ある特定の時点での全ファイルのスナップショットがCommitオブジェクトです。
普段目にしているブランチはCommitオブジェクトを指し、Commitオブジェクトは他のCommitやそのルート・ツリーを指し、TreeオブジェクトはBlobや他のTreeを指し、Blobオブジェクトは何も指しません。Derrick Stolee さんの上記の図がとてもわかりやすいです。緑色の◯がCommitオブジェクト、青色の△がTreeオブジェクト、赤色の□がBlobオブジェクトです。ブランチは、Gitオブジェクトではなく、単に特定のコミットオブジェクトを指すポインタです。
5. アウトプットしてみた感想
約2万字のでかい記事を書いてしまいました。昨日のKotaさんの記事に背中を押されて記事を書きました。
Gitのしくみをちゃんと理解できた感じがしていなかったので、Gitの内部を探ってみる内容の記事を書いてみました。この記事が、読者のみなさんにとって読みやすいかはわかりません。しかし、読者のみなさんに伝えようとする過程で、自分のGitに対する理解は確かに深まりました。2章では、the Git Internals chapter of the Pro Git book の模倣をしていましたが、3章で少しだけ歩みを進めたことで、コマンドの習熟度(コマンドの挙動の理解度)が上がったり、自分の脳内に構築されたGitに対する理解が合っているかの確認ができました。
42 Tokyoには、先生はいません。授業や教科書もありません。ただし、課題を提出する際にピアレビューをします。自分のコードや言葉、図で相手に説明するため、理解度や習熟度が問われます。合理的でとても良い学習の仕組みだと思います。そんな環境で学んでみたい方がいらっしゃったら、以下から調べて、ぜひ応募してみてください。
6. 参考文献
『世界一流エンジニアの思考法』 kindle版
Googleの画像検索から、1の記事に辿り着き、Derrick Stoleeさんの記事を遡って、2の記事にたどり着き、2の記事から3の記事を読み進めました。
7. 明日の告知
明日は、@gu-chiさんが記事を投稿されます!!クリスマスまで引き続き、42 Tokyoの Advent Calendarをお楽しみください。
この記事が気に入ったらサポートをしてみませんか?