
プログラムと電子工作・Webサーバ

M5StickC Plus を Webサーバにします。これによりブラウザから M5StickC Plus に指示を送り、内部変数を設定したり、制御したりできます。
Webサーバを利用すれば、小さな液晶ディスプレイと押しボタン 2個しかない M5StickC Plus のユーザインターフェースを使いやすく拡張することができます。
目標
M5StackC Plus で Webサーバを動作させます。
PC のブラウザから Webサーバに文字列を送信し、M5StickC Plus の液晶ディスプレイに表示します。
部品・機材
使用する部品は次のとおりです。「Hello, World!」と全く同じです。Wi-Fi アクセスポイントが必要です。
電子部品
M5StickC Plus 1台
開発用機材
PC(Windows10 または 11)、開発環境 Arduino-IDE 導入ずみ
USB-A・USB-C ケーブル
Wi-Fi ルータ
開発手順
PC と M5StickC Plus を USBケーブルで接続する。
Arduino-IDE でスケッチ webserver.ino を開く。
同じフォルダに index_html.h を保存する。
検証・コンパイルする。
M5StickC Plus に書き込む。
M5StickC Plus の液晶ディスプレイに表示された IPアドレスに、同じ Wi-Fi ルータに接続した PC のブラウザからアクセスする。
任意の文字列(半角英数字記号)を[送信]する。
スケッチ
webserver.ino
#include <M5StickCPlus.h>
#include <WebServer.h>
#include "index_html.h"

#define LHEIGHT 25      /*1行の高さ(px)M5StickCPlus:25、M5StickC:15*/

//  それぞれのWi-Fi環境を設定する。
const char* ssid = "xxxxxxxx";  /*SSID*/
const char* password = "xxxxxxxx";  /*PASSWORD*/

WebServer server(80);  /*WebServerオブジェクト*/

//------------------------------------------------------------------------------
void setup() {
    //  電源ON時に 1回だけ実行する処理をここに書く。
    M5.begin();               /*M5を初期化する*/
    M5.Lcd.setTextSize(2);    /*文字サイズはちょっと大きめ*/
    M5.Lcd.setRotation(3);    /*上スイッチが左になる向き*/

    Serial.begin(115200);   /*デバッグ用のシリアル通信を初期化する*/

    //  初期化
    M5.Lcd.fillScreen(BLACK);  /*背景を黒にする*/
    M5.Lcd.setCursor(0, LHEIGHT*0);  /*1行目*/
    M5.Lcd.print("webserver");

    //  WiーFiアクセスポイントに接続する。
    WiFi.begin(ssid, password);
    while (WiFi.status() != WL_CONNECTED) {  /*Wi-Fi AP接続待ち*/
        delay(500);
        M5.Lcd.print(".");
    }
    M5.Lcd.fillScreen(BLACK);  /*背景を黒にする*/
    M5.Lcd.setCursor(0, LHEIGHT*0);  /*1行目*/
    M5.Lcd.print("WiFi OK");

    //  URLを表示する。
    M5.Lcd.setCursor(0, LHEIGHT*1);  /*2行目*/
    M5.Lcd.printf("http://%s/\n", WiFi.localIP().toString().c_str());

    Serial.print("WiFi connected\r\nIP address: ");
    Serial.println(WiFi.localIP());

    //  Webサーバページを登録する。
    server.on("/", func_index_html);            /*index.html*/
    server.on("/index.html", func_index_html);  /*index.html*/
    server.onNotFound(func_not_found);          /*not found*/
    server.begin();                             /*web server start*/
}
//------------------------------------------------------------------------------
void loop() {
    //  自動的に繰り返し実行する処理をここに書く。
    server.handleClient();
    delay(1);
}
//------------------------------------------------------------------------------
//  index.html
void func_index_html()
{
    String input = "";

    //  form パラメータを解釈する。
    if (HTTP_POST == server.method()) {
        //  --- POSTメソッド
        //      POSTのときは必ず[送信]ボタンが押されている。
        input = server.arg("input");  /*GETパラメータは<input>のname属性で求める。*/

        //  前後の空白を取り除く。
        input.trim();

        M5.Lcd.setCursor(0, LHEIGHT*2);  /*3行目*/
        M5.Lcd.printf("POST: %-40s", input.c_str());

        Serial.printf("POST: %s\n", input.c_str());
    }
    else if (HTTP_GET == server.method()) {
        //  --- GETメソッド
        //  hiddenフィールドを求める。<input type="hidden" name="flag" value="1">
        String flag = server.arg("flag");

        if (0 == flag.length()) {
            //  --- [送信]ボタンが押されていない。
            //  3行めを消去する。
            M5.Lcd.setCursor(0, LHEIGHT*2);  /*3行目*/
            M5.Lcd.printf("      %-40s", " ");
        }
        else {
            //  --- [送信]ボタンが押された。
            //      GETのときは必ずしも[送信]ボタンが押されているとは限らない。
            input = server.arg("input");  /*GETパラメータは<input>のname属性で求める。*/

            //  前後の空白を取り除く。
            input.trim();

            M5.Lcd.setCursor(0, LHEIGHT*2);  /*3行目*/
            M5.Lcd.printf("GET:  %-40s", input.c_str());

            Serial.printf("GET: %s\n", input.c_str());
        }
    }

    server.send(200, "text/html", index_html);
}
//------------------------------------------------------------------------------
//  URIが見つからなかったとき
void func_not_found()
{
    server.send(404, "text/plain", "File not found.\n\n");
}
index_html.h
const char index_html[] =
    "<html lang=\"ja\">\n"
    "<head>\n"
        "<meta charset=\"utf-8\">\n"
        "<title>Web server on M5StickC</title>\n"
    "</head>\n"
    "<body>\n"
        "<h1>Web server on M5StickC</h1>\n"
        "<p>M5StickC へ送信する文字列(半角英数字)を入力してください。</p>\n"
        "<form method=\"POST\" action=\"/index.html\">\n"
            "<div>INPUT:<input type=\"text\" name=\"input\" size=\"40\" maxlength=\"40\"></div>\n"
            "<div><button type=\"reset\">クリア</button>\n"
                 "<button type=\"submit\">POSTで送信</button></div>\n"
        "</form>\n"
        "<form method=\"GET\" action=\"/index.html\">\n"
            "<div>INPUT:<input type=\"text\" name=\"input\" size=\"40\" maxlength=\"40\">\n"
                        "<input type=\"hidden\" name=\"flag\" value=\"1\"></div>\n"
            "<div><button type=\"reset\">クリア</button>\n"
                 "<button type=\"submit\">GETで送信</button></div>\n"
        "</form>\n"
    "</body>\n"
    "</html>\n";
ブラウザの URL欄に M5StickC Plus の IPアドレスを入力しただけでも、GETメソッドによる HTTPリクエストが送信されます。[GETで送信]ボタンを押したかどうかを判断するために、index.html に <input type="hidden" name="flag" value="1"> を埋め込んでいます。
結果
M5StickC Plus の Webサーバが正常に動作していれば、ホームページが表示されます。(図1)
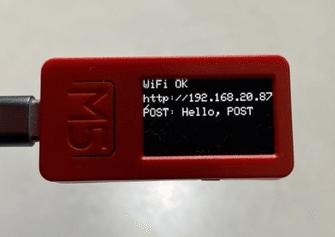
任意の文字列を[POSTで送信]または[GETで送信]すると、M5StickC Plus の液晶ディスプレイに文字列が表示されます。(写真1)

練習問題
[GETで送信]も試してください。
ライセンス
このページのソースコードは、複製・改変・配布が自由です。営利目的にも使用してかまいませんが、何ら責任を負いません。