
Python3 & Heroku & LINE Notify で作る 通知Bot の忘備録 コード編

この記事は自分用の忘備録として。
でも、どこかの誰かの参考になればとも思いつつ。
*お願い*
本記事のコードやその他の点において、非合理的な点や、お見苦しい箇所があるかもしれません。あるでしょう。ご容赦ください。
ご注意事項
スクレイピングは時として諸刃の剣になり得ます。訪問先Webサーバに過負荷を与えないよう調整しましょう。また、スクレイピングを禁止しているサービスもあります。実際に行う際は、くれぐれも自己責任で。
ことの始まり。
うちの大学は「教学システム」なる、履修登録などの手続きを全てWeb上で行い、業務の効率化を図ろうとせんとするシステムがあるのですが、システム内の「お知らせページ」に、希に重要なお知らせがあり、これをLINE Notifyで通知させたら便利&見逃さないのではと思い、作ることにしました。
動作環境
ローカル
・MacBook Pro (13-inch, 2019, Four Thunderbolt 3 ports) Version 10.15.2 (19C57)
・Python 3.7.5
サーバ
・Heroku
Data Base
・Postgres
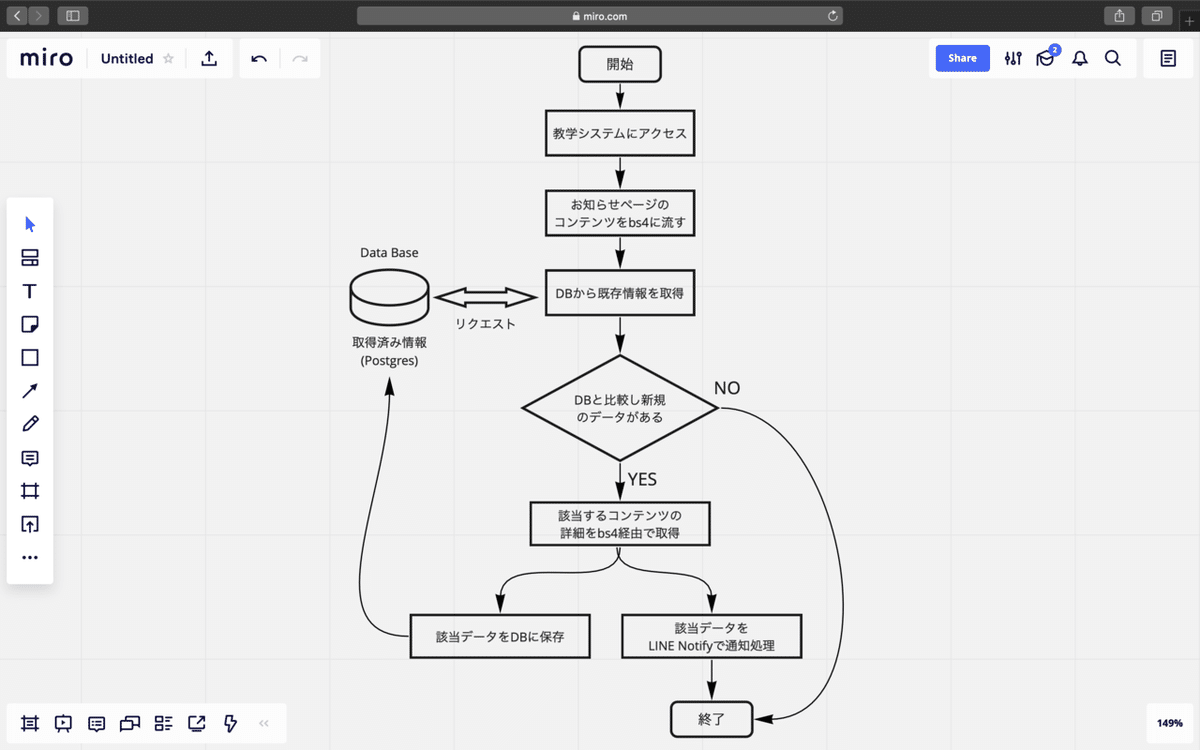
作業フロー
ざっくりと以下の図にまとめました。
コードと雑な解説。
import time
from selenium import webdriver
from selenium.webdriver.support.ui import WebDriverWait
from selenium.webdriver.common.by import By
from selenium.webdriver.chrome.options import Options
from bs4 import BeautifulSoup
import psycopg2
import os
from dotenv import load_dotenv
load_dotenv()
import requests
ここでは、今回使うパッケージ(モジュール)のimportをしています。
必要であればpipからインストールしませう。
def start_chrome():

   options = Options()
   options.add_argument('--headless')
   driver = webdriver.Chrome(options=options)
   # ログインURL
   url = 'https://pt.kyogaku.hogehoge_univercity.ac.jp/uniprove_pt/UnLoginControl'
   driver.get(url)
   return driver

def login_kyougaku(driver):
   #ログイン情報
   login_id = os.getenv('KYOUGAKU_LOGIN_ID')
   login_pw = os.getenv('KYOUGAKU_LOGIN_PW')
   #最大待機時間(秒)
   wait_time = 30
   ### IDを入力
   login_id_xpath = '//*[@id="login"]'
   # xpathの要素が見つかるまで待機します。
   driver.find_element_by_name("username").send_keys(login_id)
   driver.find_element_by_name("password").send_keys(login_pw)
   driver.find_element_by_name('submit').click()
   driver.find_element_by_xpath('//*[@id="retro-student-10001"]/div/div/form/div/div/div/ul/li[2]/span[1]/a').click()
   # リセットボタン
   time.sleep(2)
   driver.find_element_by_xpath('//*[@id="contents_main"]/div[1]/div/div[2]/p/input[1]').click()

   time.sleep(5)
   soup = BeautifulSoup(driver.page_source, "lxml")
   result = []
   result = soup.select(".odd, .even")
   global get_news
   get_news = [x.text.replace('\n','').replace('\u3000',',').replace('\t','').replace('\s','').replace('  ','') for x in result]

def end(driver):
   driver.quit()
ここでは、seleniumのChromedriverを使用して、教学システムの「お知らせページ」にアクセスし、BeautifulSoupを使用して情報を取得しています。
def Postgre_conf():
   global conn
   global cur
   global tname
   DATABASE_URL = os.environ['DATABASE_URL']
   conn = psycopg2.connect(DATABASE_URL, sslmode='require')
   cur = conn.cursor()
   tname = 'news'

def Table_create():
   cur.execute('DROP TABLE IF EXISTS {}'.format(tname))
   cur.execute('CREATE TABLE {}(contents text)'.format(tname))
   print('New table created')

def Table_drop():
   drop_table = '''DROP TABLE {}'''.format(tname)
   cur.execute(drop_table)
   print('Deleted table')

def Show_table():
   cur.execute('SELECT * FROM {}'.format(tname))
   db_news = cur.fetchall()
   print(db_news)
print('Length'+str(len(db_news)))ここでは、DBのPostgres関連の処理を書いています。Show_table()は確認用として定義していますので、無くても結構です。DBのURLなどの機密性の高いデータは、別途「.env」ファイルにて設定し、dotenvで読み込んでいます。
# LINE notify config
# Token code 読み込み
load_dotenv()
token = os.getenv("LINE_TOKEN_WEATHER")
def line_notify(message):
   line_notify_token = token
   line_notify_api = 'https://notify-api.line.me/api/notify'
   payload = {'message': message}
   headers = {'Authorization': 'Bearer ' + line_notify_token}
   requests.post(line_notify_api, data=payload, headers=headers)
ここでは、LINE Notify関連の処理を書いています。ここでも、トークンをdotenvで読み込んでいます。
# ここから ニュースを新しく取得した際の処理 ここから
def News_check(driver):
   # データベースのニュースをdb_newに
   cur.execute('SELECT * FROM {}'.format(tname))
   db_news = cur.fetchall()
   # データベースに保存されているデータと比較するために、収集したデータをデータベースと同じフォーマットにする
   get_news_check = []
   for b in get_news:
       modefied_format = (b,)
       get_news_check.append(modefied_format)
   # 収集したデータに新しいニュースが含まれているか確認する。
   # 含まれている場合は、データベースに追加する
   new_news = []
   i = 0
   if not get_news_check[0] in db_news:
       print('The New news was uploaded')
       while get_news_check[i] not in db_news:
           # 取得した生データをnew_newsに追加する
           new_news.append(get_news[i])
           # コンテンツページにはいる
           # time.sleep(5)
           # driver.find_element_by_xpath('//*[@id="contents_main"]/div[2]/div/div[2]/table/tbody/tr[{}]/td[3]/a'.format(i+1)).click()
           driver.find_element_by_xpath('//*[@id="contents_main"]/div[2]/div/div[2]/table/tbody/tr[{}]/td[3]/b/a'.format(i+1)).click()
           time.sleep(2)
           # コンテンツをbsに流し込む
           soup_contents = BeautifulSoup(driver.page_source, "lxml")
           time.sleep(2)
           news_details = soup_contents.find(class_="check").get_text()

           lines= [line.strip() for line in news_details.splitlines()]
           news_detail = "\n".join(line for line in lines if line)
           print(news_detail)
           # # LINE notify
           line_notify('\n' + news_detail)
           # 戻るクリック
           driver.find_element_by_xpath('//*[@id="contents_footer_bg"]/p/input').click()
           time.sleep(2)
           i += 1
       # ターミナルに表示
       print('I find {} new news'.format(i))
       for t in new_news:
           print(t)
       # new_newsをdbに追加
       for add in new_news:
           sql = 'INSERT INTO {}(contents) values(%s)'.format(tname)
           cur.execute(sql, (add,))
           conn.commit()
       print('updated data base')
   else:
       print('There are no New news!')

   cur.close()
   conn.close()
ここでは、前処理で取得したお知らせデータを元に、DBに保存されているデータと比較を行っています。新規のお知らせデータがある場合には、[詳細ページにアクセスし、内容を取得する。そのデータを、LINE Notifyを使って送信する。DBに追加する為、データをnew_newsという名前の配列に追加する。]という処理を、該当するデータ分行っています。その後、ターミナルに、更新したデータの数とDB追加終了のメッセージを表示させます。もし、新しいお知らせデータがない場合は、それをターミナルに表示させます。
if __name__ == "__main__":
   Postgre_conf()
   # Table_create()
   Show_table()
   driver = start_chrome()
   login_kyougaku(driver)
   News_check(driver)
   end(driver)


   # Table_drop()
   # Show_table()
最後は、恒例のこれです。コメントアウトしているのは、開発段階で、処理を実行させない為です。
全体のコード
import time
from selenium import webdriver
from selenium.webdriver.support.ui import WebDriverWait
from selenium.webdriver.common.by import By
from selenium.webdriver.chrome.options import Options
from bs4 import BeautifulSoup
import psycopg2
import os
from dotenv import load_dotenv
load_dotenv()
import requests


def start_chrome():

   options = Options()
   options.add_argument('--headless')
   driver = webdriver.Chrome(options=options)
   # GoogleログインURL
   url = 'https://pt.kyogaku.hogehoge_univercity.ac.jp/uniprove_pt/UnLoginControl'
   driver.get(url)
   return driver


def login_kyougaku(driver):

   #ログイン情報
   login_id = os.getenv('KYOUGAKU_LOGIN_ID')
   login_pw = os.getenv('KYOUGAKU_LOGIN_PW')

   #最大待機時間(秒)
   wait_time = 30

   ### IDを入力
   login_id_xpath = '//*[@id="login"]'
   # xpathの要素が見つかるまで待機します。
   driver.find_element_by_name("username").send_keys(login_id)
   driver.find_element_by_name("password").send_keys(login_pw)
   driver.find_element_by_name('submit').click()
   driver.find_element_by_xpath('//*[@id="retro-student-10001"]/div/div/form/div/div/div/ul/li[2]/span[1]/a').click()
   # リセットボタン
   time.sleep(2)
   driver.find_element_by_xpath('//*[@id="contents_main"]/div[1]/div/div[2]/p/input[1]').click()

   time.sleep(5)

   soup = BeautifulSoup(driver.page_source, "lxml")
   result = []
   result = soup.select(".odd, .even")

   global get_news
   get_news = [x.text.replace('\n','').replace('\u3000',',').replace('\t','').replace('\s','').replace('  ','') for x in result]


def end(driver):
   driver.quit()


def Postgre_conf():
   global conn
   global cur
   global tname
   DATABASE_URL = os.environ['DATABASE_URL']
   conn = psycopg2.connect(DATABASE_URL, sslmode='require')
   cur = conn.cursor()
   tname = 'news'


def Table_create():
   cur.execute('DROP TABLE IF EXISTS {}'.format(tname))
   cur.execute('CREATE TABLE {}(contents text)'.format(tname))
   print('New table created')


def Table_drop():
   drop_table = '''DROP TABLE {}'''.format(tname)
   cur.execute(drop_table)
   print('Deleted table')


def Show_table():
   cur.execute('SELECT * FROM {}'.format(tname))
   db_news = cur.fetchall()
   print(db_news)
   print('Length'+str(len(db_news)))

# LINE notify config
# Token code 読み込み
load_dotenv()
token = os.getenv("LINE_TOKEN_WEATHER")

def line_notify(message):
   line_notify_token = token
   line_notify_api = 'https://notify-api.line.me/api/notify'
   payload = {'message': message}
   headers = {'Authorization': 'Bearer ' + line_notify_token}
   requests.post(line_notify_api, data=payload, headers=headers)


# ここから ニュースを新しく取得した際の処理 ここから
def News_check(driver):
   # データベースのニュースをdb_newに
   cur.execute('SELECT * FROM {}'.format(tname))
   db_news = cur.fetchall()
   # データベースに保存されているデータと比較するために、収集したデータをデータベースと同じフォーマットにする
   get_news_check = []
   for b in get_news:
       modefied_format = (b,)
       get_news_check.append(modefied_format)

   # 収集したデータに新しいニュースが含まれているか確認する。
   # 含まれている場合は、データベースに追加する
   new_news = []
   i = 0
   if not get_news_check[0] in db_news:
       print('The New news was uploaded')
       while get_news_check[i] not in db_news:
           # 取得した生データをnew_newsに追加する
           new_news.append(get_news[i])
           # コンテンツページにはいる
           # time.sleep(5)
           # driver.find_element_by_xpath('//*[@id="contents_main"]/div[2]/div/div[2]/table/tbody/tr[{}]/td[3]/a'.format(i+1)).click()
           driver.find_element_by_xpath('//*[@id="contents_main"]/div[2]/div/div[2]/table/tbody/tr[{}]/td[3]/b/a'.format(i+1)).click()
           time.sleep(2)
           # コンテンツをbsに流し込む
           soup_contents = BeautifulSoup(driver.page_source, "lxml")
           time.sleep(2)
           news_details = soup_contents.find(class_="check").get_text()

           lines= [line.strip() for line in news_details.splitlines()]
           news_detail = "\n".join(line for line in lines if line)
           print(news_detail)

           # # LINE notify
           line_notify('\n' + news_detail)

           # 戻るクリック
           driver.find_element_by_xpath('//*[@id="contents_footer_bg"]/p/input').click()
           time.sleep(2)

           i += 1
       # ターミナルに表示
       print('I find {} new news'.format(i))
       for t in new_news:
           print(t)
       # new_newsをdbに追加
       for add in new_news:
           sql = 'INSERT INTO {}(contents) values(%s)'.format(tname)
           cur.execute(sql, (add,))
           conn.commit()

       print('updated data base')
   else:
       print('There are no New news!')


   cur.close()
   conn.close()

if __name__ == "__main__":
   Postgre_conf()

   # Table_create()
   Show_table()

   driver = start_chrome()
   login_kyougaku(driver)
   News_check(driver)
   end(driver)


   # Table_drop()
   # Show_table()
まとめ
当初は、1記事だけで完結させようと考えていましたが、想定よりも情報量が多くなり、重要な点を見落としそうなので、分割することにしました。次編では、Herokuにアップロードして運用するまでを、忘備録として書こうと思います。
この記事が気に入ったらサポートをしてみませんか?