Unity Barracuda 入門 / 画像分類

「Unity Barracuda」で画像分類を行う方法をまとめました。
・Unity 2019.3.0f1
・Barracuda 0.6.3
1. プロジェクトの作成
(1) Unityの3Dプロジェクトを作成。
(2) メニュー「Window → Package Manager」で「Package Manager」を開き、「Preview Package」を有効にし、「Barracuda」(0.6.3)をインストール。
2. モデルとラベルの準備
「Assets/Resources」に「TFClassify-Unity-Barracuda」からダウンロードした「モデル」と「ラベル」を追加します。
・mobilenet_v2.nn
・mobilenet_v2_labels.txt
3. 画像分類の実装
画像分類の実装を行います。
(1) Hierarchyウィンドウに、「RawImage」を生成し、そこにスクリプト「WebCam」を追加。
using System.Collections;
using System.Collections.Generic;
using UnityEngine;
using UnityEngine.UI;

// Webカメラ
public class WebCam : MonoBehaviour
{
    // カメラ
    RawImage rawImage; // RawImage
    WebCamTexture webCamTexture; //Webカメラテクスチャ

    // 推論
    public Classifier classifier; // 分類
    public Text uiText; // テキスト
    private bool isWorking = false; // 処理中

    // スタート時に呼ばれる
    void Start ()
    {
        // Webカメラの開始
        this.rawImage = GetComponent<RawImage>();
        this.webCamTexture = new WebCamTexture(
            Classifier.IMAGE_SIZE, Classifier.IMAGE_SIZE, 30);
        this.rawImage.texture = this.webCamTexture;
        this.webCamTexture.Play();
    }

    // フレーム毎に呼ばれる
    private void Update()
    {
        // 画像分類
        TFClassify();
    }

    // 画像分類
    private void TFClassify()
    {
        if (this.isWorking)
        {
            return;
        }

        this.isWorking = true;

        // 画像の前処理
        StartCoroutine(ProcessImage(result =>
        {
            // 推論の実行
            StartCoroutine(this.classifier.Predict(result, probabilities =>
            {
                // 推論結果の表示
                this.uiText.text = "";
                for (int i = 0; i < 3; i++)
                {
                    this.uiText.text += probabilities[i].Key + ": " +
                        string.Format("{0:0.000}%", probabilities[i].Value) + "\n";
                }

                // 未使用のアセットをアンロード
                Resources.UnloadUnusedAssets();
                this.isWorking = false;
            }));
        }));
    }

    // 画像の前処理
    private IEnumerator ProcessImage(System.Action<Color32[]> callback)
    {
        // 画像のクロップ(WebCamTexture → Texture2D)
        yield return StartCoroutine(CropSquare(webCamTexture, texture =>
            {
                // 画像のスケール(Texture2D → Texture2D)
                var scaled = Scaled(texture,
                    Classifier.IMAGE_SIZE,
                    Classifier.IMAGE_SIZE);

                // コールバックを返す
                callback(scaled.GetPixels32());
            }));
    }

    // 画像のクロップ(WebCamTexture → Texture2D)
    public static IEnumerator CropSquare(WebCamTexture texture, System.Action<Texture2D> callback)
    {
        // Texture2Dの準備
        var smallest = texture.width < texture.height ? texture.width : texture.height;
        var rect = new Rect(0, 0, smallest, smallest);
        Texture2D result = new Texture2D((int)rect.width, (int)rect.height);

        // 画像のクロップ
        if (rect.width != 0 && rect.height != 0)
        {
            result.SetPixels(texture.GetPixels(
                Mathf.FloorToInt((texture.width - rect.width) / 2),
                Mathf.FloorToInt((texture.height - rect.height) / 2),
                Mathf.FloorToInt(rect.width),
                Mathf.FloorToInt(rect.height)));
            yield return null;
            result.Apply();
        }

        yield return null;
        callback(result);
    }

    // 画像のスケール(Texture2D → Texture2D)
    public static Texture2D Scaled(Texture2D texture, int width, int height)
    {
        // リサイズ後のRenderTextureの生成
        var rt = RenderTexture.GetTemporary(width, height);
        Graphics.Blit(texture, rt);

        // リサイズ後のTexture2Dの生成
        var preRT = RenderTexture.active;
        RenderTexture.active = rt;
        var ret = new Texture2D(width, height);
        ret.ReadPixels(new Rect(0, 0, width, height), 0, 0);
        ret.Apply();
        RenderTexture.active = preRT;
        RenderTexture.ReleaseTemporary(rt);
        return ret;
    }
}
◎ Webカメラの開始
Start()ではWebカメラの開始を行なっています。
◎ 画像分類の前処理
ProcessImage()では画像の前処理を行なっています。
Webカメラから取得した画像を、CropSquare()で短辺x短辺の正方形にした後、Scaled()で224x224の画像に変換しています。
◎ 推論の実行
「Classifier」のPredict()を呼んで推論の実行を行います。
(2) Hierarchyウィンドウに、空のゲームオブジェクト「Classifier」を生成し、そこにスクリプト「Classifier」を追加。
using System;
using Barracuda;
using System.Linq;
using UnityEngine;
using System.Collections;
using System.Collections.Generic;
using System.Text.RegularExpressions;

// 分類
public class Classifier : MonoBehaviour
{
    // リソース
    public NNModel modelFile; // モデル
    public TextAsset labelsFile; // ラベル

    // パラメータ
    public const int IMAGE_SIZE = 224; // 画像サイズ
    private const int IMAGE_MEAN = 127; // MEAN
    private const float IMAGE_STD = 127.5f; // STD
    private const string INPUT_NAME = "input"; // 入力名
    private const string OUTPUT_NAME = "MobilenetV2/Predictions/Reshape_1"; // 出力名

    // 推論
    private IWorker worker; // ワーカー
    private string[] labels; // ラベル
    private int waitIndex = 0;

    // スタート時に呼ばれる
    void Start()
    {
        // ラベルとモデルの読み込み
        this.labels = Regex.Split(this.labelsFile.text, "\n|\r|\r\n")
            .Where(s => !String.IsNullOrEmpty(s)).ToArray();
        var model = ModelLoader.Load(this.modelFile);

        // ワーカーの生成
        this.worker = WorkerFactory.CreateWorker(WorkerFactory.Type.ComputePrecompiled, model);
    }

    // 推論の実行
    public IEnumerator Predict(Color32[] picture, System.Action<List<KeyValuePair<string, float>>> callback)
    {
        // 結果
        var map = new List<KeyValuePair<string, float>>();

        // 入力テンソルの生成
        using (var tensor = TransformInput(picture, IMAGE_SIZE, IMAGE_SIZE))
        {
            // 入力の生成
            var inputs = new Dictionary<string, Tensor>();
            inputs.Add(INPUT_NAME, tensor);

            // 推論の実行
            var enumerator = this.worker.ExecuteAsync(inputs);

            // 推論の実行の完了待ち
            while (enumerator.MoveNext())
            {
                waitIndex++;
                if (waitIndex >= 20)
                {
                    waitIndex = 0;
                    yield return null;
                }
            };

            // 出力の生成
            var output = worker.PeekOutput(OUTPUT_NAME);
            for (int i = 0; i < labels.Length; i++)
            {
                map.Add(new KeyValuePair<string, float>(labels[i], output[i] * 100));
            }
        }

        // ソートして結果を返す
        callback(map.OrderByDescending(x => x.Value).ToList());
    }

    // 入力テンソルの生成
    public static Tensor TransformInput(Color32[] pic, int width, int height)
    {
        float[] floatValues = new float[width * height * 3];
        for (int i = 0; i < pic.Length; ++i)
        {
            var color = pic[i];
            floatValues[i * 3 + 0] = (color.r - IMAGE_MEAN) / IMAGE_STD;
            floatValues[i * 3 + 1] = (color.g - IMAGE_MEAN) / IMAGE_STD;
            floatValues[i * 3 + 2] = (color.b - IMAGE_MEAN) / IMAGE_STD;
        }
        return new Tensor(1, height, width, 3, floatValues);
    }
}
◎ モデルとラベルの読み込み
Start()でモデルとラベルの読み込みを行います。
◎ 推論の実行
Predict()で推論の実行を行います。
結果は「ラベル」(string)と「精度」(float)のペアのリストに格納されます。
(3) Canvasに「Text」を追加。
Hierarchyウィンドウは次のようになります。

(4) 「Text」をWebCamの「Ui Text」に、「Classifier」をWebCamの「Classifier」にドラッグ&ドロップ。

(5) Assetsのモデルとラベルを「Classifier」の「Model File」と「Labels File」にドラッグ&ドロップ。
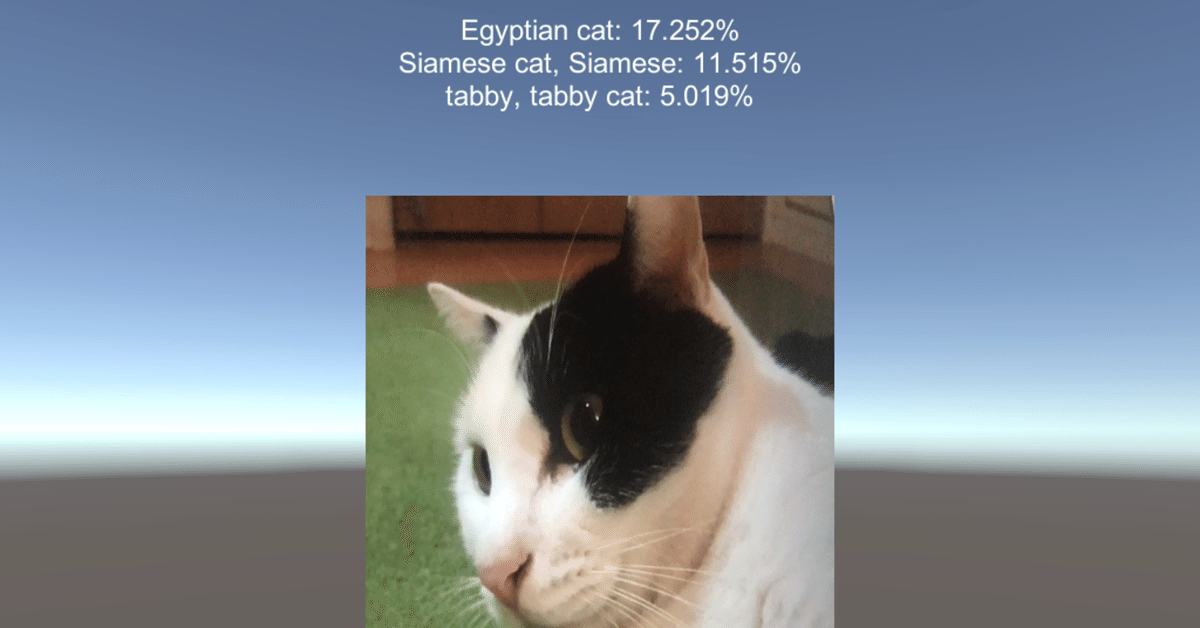
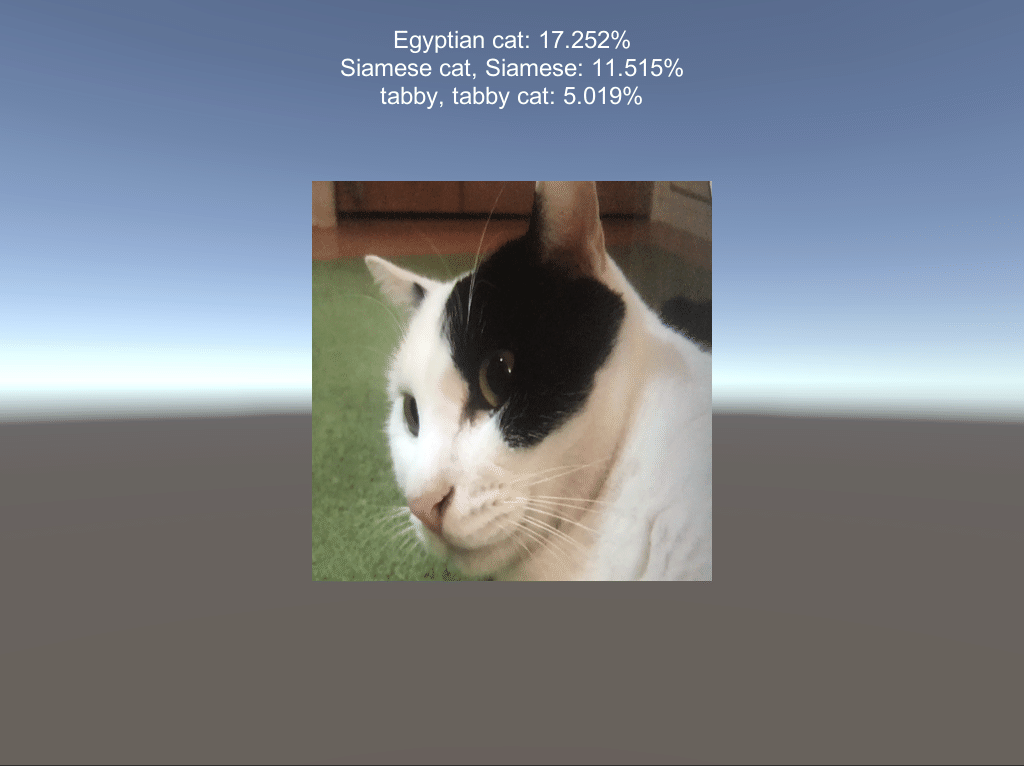
(6) Webカメラのあるパソコン(またはスマートフォン)で、「Unity Editor」のPlayボタンを押して実行。
推論結果がTextに表示されます。
この記事が気に入ったらサポートをしてみませんか?