Google Colab で DALL-E 3 のAPIを試す

「Google Colab」で 「DALL-E 3」のAPIを試したので、まとめました。
前回
1. Images API
「Images API」は、「OpenAI API」で画像生成を行うAPIです。
次の3つの機能を持っていますが、「DALL-E 3」で利用できるのは「テキストからの画像生成」のみです。
・テキストからの画像生成 (DALL-E 3・DALL-E 2)
・既存の画像の編集 (DALL-E 2 のみ)
・既存の画像のバリエーション(DALL-E 2のみ)
2. セットアップ
Colabでのセットアップ手順は、次のとおりです。
(1) パッケージのインストール。
# パッケージのインストール
!pip install openai
(2) 環境変数の準備。
以下のコードの <OpenAI_APIキー> にはOpenAIのサイトで取得できるAPIキーを指定します。(有料)
import os
os.environ["OPENAI_API_KEY"] = "<OpenAI_APIキー>"
(3) クライアントの準備。
「クライアント」は「OpenAI API」にアクセスするインタフェースになります。
from openai import OpenAI

# クライアントの準備
client = OpenAI()
3. テキストからの画像生成
生成画像は、「画像URL」と「画像ファイル」で指定できます。
3-1. 画像URL
(1) テキストからの画像生成。
# テキストからの画像生成の実行
response = client.images.generate(
model="dall-e-3",
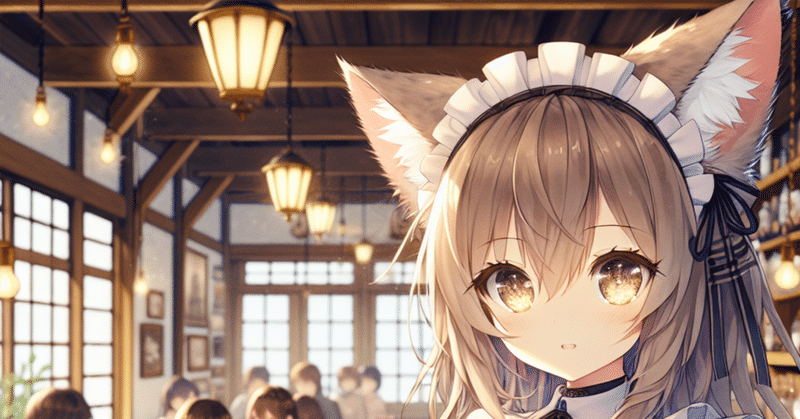
prompt="cute cat eared maid character in a cafe",
size="1024x1024",
quality="standard",
n=1,
)
print(response)レスポンスは次のとおりです。プロンプトが改訂されているのがわかります。
ImagesResponse(
    created=1699321853,
    data=[
        Image(
            b64_json=None,
            revised_prompt="A lovely anime-inspired character with cat-like ears, dressed in a traditional maid outfit. She's situated in a quaint café, which is filled with the aroma of freshly brewed coffee, an assortment of baked goods and soft background music. The character's eyes shimmer with determination, as she deftly manages the café's operations, carrying trays with diligence and grace. Wooden tables and chairs occupy the foreground, with patrons of diverse genders and descents enjoying their meals and conversations, while vintage lights warm up the café's atmosphere.",
            url='https://oaidalleapiprodscus.blob.core.windows.net/private/org-XXXXXXXXXX'
        )
    ]
)
テキストからの画像生成のパラメータは、次のとおりです。
・model : モデルID (dall-e-3)
・prompt : プロンプト
・size : サイズ (DALL-E 3: 1024x1024、1024x1792、1792x1024 )
・quality : 画質 (DALL-E 3: standard or hd)
・n : 画像数 (DALL-E 3: 1のみ)
・response_format : レスポンスフォーマット (url or b64_json)
・style : スタイル (DALL-E 3: vivid or natural)
レスポンスのパラメータは、次のとおりです。
・b64_json : 画像のデータ(Base64)
・url : 画像のURL
・revised_prompt : 改訂プロンプト
人間が指示したプロンプトを基に、AIがより良い改訂プロンプトを考えて、それを使用して画像生成しています。
(2) URLのみ取得。
print(response.data[0].url)https://oaidalleapiprodscus.blob.core.windows.net/private/org-XXXXXXXXXXこのURLを開くと画像が見れます。

3-2. 画像ファイル
(1) テキストからの画像生成。
「response_format」に「b64_json」を指定します。
# テキストからの画像生成の実行
response = client.images.generate(
    model="dall-e-3",
    prompt="cute cat eared maid character in a cafe",
    size="1024x1024",
    quality="standard",
    n=1,
    response_format="b64_json",
)
print(response)
(2) base64を画像ファイルとして保存。
「image.png」として保存されます。
import base64
from PIL import Image
from io import BytesIO

# base64を画像ファイルとして保存
image_data = base64.b64decode(response.data[0].b64_json)
image_stream = BytesIO(image_data)
image = Image.open(image_stream)
image.save("image.png")
次回
この記事が気に入ったらサポートをしてみませんか?